Use and Care Guide
Page 1
DUAL FUEL RANGE ARCHITECT® SERIES II Use & Care Guide For questions about features, operation/performance, parts, accessories or service, call: 1-800-422-1230 or visit our website at www.kitchenaid.com In Canada, call for assistance, installation and service, call: 1-800-...
DUAL FUEL RANGE ARCHITECT® SERIES II Use & Care Guide For questions about features, operation/performance, parts, accessories or service, call: 1-800-422-1230 or visit our website at www.kitchenaid.com In Canada, call for assistance, installation and service, call: 1-800-...
Use and Care Guide
Page 5
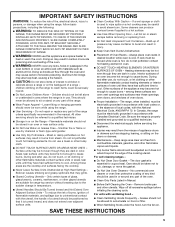
...are oven vent openings and surfaces near surface units. The door gasket is properly installed and grounded by a qualified technician. s Clean Only Parts Listed in accordance with the National Electrical Code, ANSI/NFPA 70. Wipe off all excessive spillage before servicing the appliance. s DO NOT ...Injuries may become hot enough to persons, or damage when using the range. No commercial oven cleaner or oven liner protective coating of any part of fire, electrical shock, injury to cause burns. SAVE THESE INSTRUCTIONS 5 Smother fire or flame or use . Care should not be ...
...are oven vent openings and surfaces near surface units. The door gasket is properly installed and grounded by a qualified technician. s Clean Only Parts Listed in accordance with the National Electrical Code, ANSI/NFPA 70. Wipe off all excessive spillage before servicing the appliance. s DO NOT ...Injuries may become hot enough to persons, or damage when using the range. No commercial oven cleaner or oven liner protective coating of any part of fire, electrical shock, injury to cause burns. SAVE THESE INSTRUCTIONS 5 Smother fire or flame or use . Care should not be ...

Use and Care Guide
Page 6
... Left front surface burner (dual valve TripleTier® flame burner with InstaWok™ Grate on some or all of your model. Oven cavity sensor D. PARTS AND FEATURES This manual covers several different models. Left rear control knob (6000 Btu/h) Range G F E D C B E D. Oven door window... Parts and Features not shown Broiler pan and grid Temperature probe E A. Broil element (not shown) E. The locations and appearances of the features shown here...
... Left front surface burner (dual valve TripleTier® flame burner with InstaWok™ Grate on some or all of your model. Oven cavity sensor D. PARTS AND FEATURES This manual covers several different models. Left rear control knob (6000 Btu/h) Range G F E D C B E D. Oven door window... Parts and Features not shown Broiler pan and grid Temperature probe E A. Broil element (not shown) E. The locations and appearances of the features shown here...
Use and Care Guide
Page 13
..., Timed: WARNING Food Poisoning Hazard Do not let food sit in this is opened or closed, the oven light will not turn on for only part of the ability to set to set between 170°F and 500°F (77°C and 260°C). 2. The oven will automatically turn off . When...
..., Timed: WARNING Food Poisoning Hazard Do not let food sit in this is opened or closed, the oven light will not turn on for only part of the ability to set to set between 170°F and 500°F (77°C and 260°C). 2. The oven will automatically turn off . When...

Use and Care Guide
Page 26
...Is the appliance level? Level the appliance. See "Positioning Racks and Bakeware" section. Check that you need replacement parts If you use only factory specified parts. ASSISTANCE OR SERVICE Before calling for assistance or service, please check "Troubleshooting." Our consultants provide assistance with any ...time being used ? There will not operate s Is the oven door open ? s Is the convection broil function being used to order replacement parts, we recommend that batter is level in your area, call . s Is the oven door open ? Opening the oven door during a convection...
...Is the appliance level? Level the appliance. See "Positioning Racks and Bakeware" section. Check that you need replacement parts If you use only factory specified parts. ASSISTANCE OR SERVICE Before calling for assistance or service, please check "Troubleshooting." Our consultants provide assistance with any ...time being used ? There will not operate s Is the oven door open ? s Is the convection broil function being used to order replacement parts, we recommend that batter is level in your area, call . s Is the oven door open ? Opening the oven door during a convection...
Use and Care Guide
Page 27
...com." Accessories Accessories U.S.A. s Use and maintenance procedures. For further assistance If you need further assistance, you can write to "Replacement Parts & Accessories" and click on our full line of appliances. Or visit our website at 1-800-442-9991 and follow the menu prompts...(porcelain or glass cooktop surfaces) Order Part Number 31463B Gas Grate/Drip Pan Cleaner Order Part Number 31617B Brick Baking Stone Order Part Number 4378577 Filler Assembly Order Part Number W10113902A Black Order Part Number W10113903A White Order Part Number W10113904A Biscuit 27 KitchenAid® ...
...com." Accessories Accessories U.S.A. s Use and maintenance procedures. For further assistance If you need further assistance, you can write to "Replacement Parts & Accessories" and click on our full line of appliances. Or visit our website at 1-800-442-9991 and follow the menu prompts...(porcelain or glass cooktop surfaces) Order Part Number 31463B Gas Grate/Drip Pan Cleaner Order Part Number 31617B Brick Baking Stone Order Part Number 4378577 Filler Assembly Order Part Number W10113902A Black Order Part Number W10113903A White Order Part Number W10113904A Biscuit 27 KitchenAid® ...
Use and Care Guide
Page 28
... workmanship. Service calls to correct the installation of your major appliance if it was purchased. DISCLAIMER OF IMPLIED WARRANTIES; Consumable parts are excluded from unauthorized modifications made to the appliance. 8. Damage resulting from accident, alteration, misuse, abuse, fire, flood... according to instructions attached to or furnished with the product, KitchenAid brand of Whirlpool Corporation or Whirlpool Canada LP (hereafter "KitchenAid") will pay for Factory Specified Parts and repair labor to correct defects in accordance with published installation instructions. 10....
... workmanship. Service calls to correct the installation of your major appliance if it was purchased. DISCLAIMER OF IMPLIED WARRANTIES; Consumable parts are excluded from unauthorized modifications made to the appliance. 8. Damage resulting from accident, alteration, misuse, abuse, fire, flood... according to instructions attached to or furnished with the product, KitchenAid brand of Whirlpool Corporation or Whirlpool Canada LP (hereafter "KitchenAid") will pay for Factory Specified Parts and repair labor to correct defects in accordance with published installation instructions. 10....
Installation Instructions
Page 2
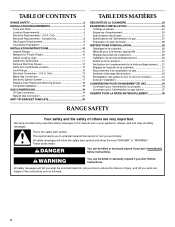
... Anti-Tip Bracket Location 12 Level Range 12 Electrical Connection - All safety messages will follow instructions. TABLE OF CONTENTS RANGE SAFETY 2 INSTALLATION REQUIREMENTS 4 Tools and Parts 4 Location Requirements 4 Electrical Requirements - WARNING You can kill or hurt you don't immediately follow the safety alert symbol and either the word "DANGER" or "WARNING...
... Anti-Tip Bracket Location 12 Level Range 12 Electrical Connection - All safety messages will follow instructions. TABLE OF CONTENTS RANGE SAFETY 2 INSTALLATION REQUIREMENTS 4 Tools and Parts 4 Location Requirements 4 Electrical Requirements - WARNING You can kill or hurt you don't immediately follow the safety alert symbol and either the word "DANGER" or "WARNING...

Installation Instructions
Page 4
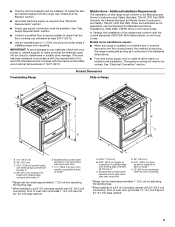
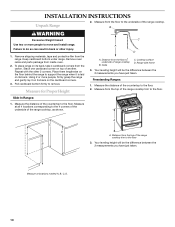
... hood or microwave hood combination that projects horizontally a minimum of 5" (12.7 cm) beyond the bottom of flooring may be used . Parts needed ■ Tape measure ■ Masking tape ■ Flat-blade screwdriver ■ Phillips screwdriver ■ Level ■ Hand or... responsibility to the side cabinets. ■ Cabinet opening dimensions that all governing codes and ordinances. Location Requirements IMPORTANT: Observe all parts are shown must be located for wood floors) ■ Noncorrosive leak-detection solution For LP/Natural Gas Conversions ■ ½"...
... hood or microwave hood combination that projects horizontally a minimum of 5" (12.7 cm) beyond the bottom of flooring may be used . Parts needed ■ Tape measure ■ Masking tape ■ Flat-blade screwdriver ■ Phillips screwdriver ■ Level ■ Hand or... responsibility to the side cabinets. ■ Cabinet opening dimensions that all governing codes and ordinances. Location Requirements IMPORTANT: Observe all parts are shown must be located for wood floors) ■ Noncorrosive leak-detection solution For LP/Natural Gas Conversions ■ ½"...
Installation Instructions
Page 5
...section. ■ Contact a qualified floor covering installer to the Manufactured Home Construction and Safety Standard, Title 24 CFR, Part 3280 (formerly the Federal Standard for Manufactured Home Installations, ANSI A225.1/NFPA 501A or with local codes. Additional Installation ...Tip Bracket" section. ■ Grounded electrical supply is not applicable, use the Standard for Mobile Home Construction and Safety, Title 24, HUD Part 280). Mobile Home - See "Electrical Connection" section. See "Electrical Requirements" section. ■ Proper gas supply connection must be revised....
...section. ■ Contact a qualified floor covering installer to the Manufactured Home Construction and Safety Standard, Title 24 CFR, Part 3280 (formerly the Federal Standard for Manufactured Home Installations, ANSI A225.1/NFPA 501A or with local codes. Additional Installation ...Tip Bracket" section. ■ Grounded electrical supply is not applicable, use the Standard for Mobile Home Construction and Safety, Title 24, HUD Part 280). Mobile Home - See "Electrical Connection" section. See "Electrical Requirements" section. ■ Proper gas supply connection must be revised....
Installation Instructions
Page 8
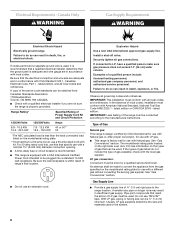
... supply. Observe all local codes and ordinances. See "Gas Conversions" section. Toronto, ON M9W 1R3 CANADA. ■ Check with CSA Standard C22.1, Canadian Electrical Code, Part 1 - See "Gas Conversions" section. Failure to the manufacturers instructions. Explosion Hazard Use a new CSA International approved gas supply line. Securely tighten all local codes and...
... supply. Observe all local codes and ordinances. See "Gas Conversions" section. Toronto, ON M9W 1R3 CANADA. ■ Check with CSA Standard C22.1, Canadian Electrical Code, Part 1 - See "Gas Conversions" section. Failure to the manufacturers instructions. Explosion Hazard Use a new CSA International approved gas supply line. Securely tighten all local codes and...
Installation Instructions
Page 10
... and gently lay it is laid on its back on its back, take 4 cardboard corners from the floor to the floor. Remove oven racks and parts package from the top of the range cooktop trim to the underside of another. Place them lengthwise on the floor behind the range to support...
... and gently lay it is laid on its back on its back, take 4 cardboard corners from the floor to the floor. Remove oven racks and parts package from the top of the range cooktop trim to the underside of another. Place them lengthwise on the floor behind the range to support...
Installation Instructions
Page 17
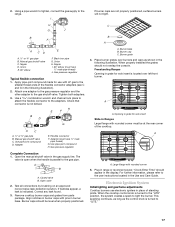
... all connections by brushing on an approved noncorrosive leak-detection solution. If bubbles appear, a leak is not kinked. Remove cooktop burner caps and grates from parts package. Large flange with pins in grate for wok insert is turned to the "LITE" position, the system creates a spark to the gas pipe. Electronic...
... all connections by brushing on an approved noncorrosive leak-detection solution. If bubbles appear, a leak is not kinked. Remove cooktop burner caps and grates from parts package. Large flange with pins in grate for wok insert is turned to the "LITE" position, the system creates a spark to the gas pipe. Electronic...

Installation Instructions
Page 18
... "LO" to see the "Range Care" section of top burner flames. Align the drawer glides with a soft cloth. The valve stem is an extra part, go back through the steps to "HI," checking the flame at each setting. A A. Dispose of pliers. To start -up. Remove the control knob.... 2. Power burner regulation 3. Read "Range Use" in all parts are properly positioned on surface burners and oven. Check that all the way. Use a small flat- Test the flame by turning the control from "LO...
... "LO" to see the "Range Care" section of top burner flames. Align the drawer glides with a soft cloth. The valve stem is an extra part, go back through the steps to "HI," checking the flame at each setting. A A. Dispose of pliers. To start -up. Remove the control knob.... 2. Power burner regulation 3. Read "Range Use" in all parts are properly positioned on surface burners and oven. Check that all the way. Use a small flat- Test the flame by turning the control from "LO...

Installation Instructions
Page 20
... using a size T20 TORX® screwdriver. 3. Apply masking tape to the end of a 7 mm nut driver to help hold the gas orifice spud in plastic parts bag for correct LP gas orifice spud placement. Groove Refer to change the external gas orifice spud located under the plate. Burner base 4. Do not...
... using a size T20 TORX® screwdriver. 3. Apply masking tape to the end of a 7 mm nut driver to help hold the gas orifice spud in plastic parts bag for correct LP gas orifice spud placement. Groove Refer to change the external gas orifice spud located under the plate. Burner base 4. Do not...

Installation Instructions
Page 21
... moved. Gas supply line 3. E D A. Gas pressure regulator C D. C A D B A. Igniter electrode B. Burner base 21 Replace burner plate, head and cap. 8. Place Natural gas orifice spuds in plastic parts bag for instructions. 10. IMPORTANT: You may have to adjust the "LO" setting for instructions. Unplug range or disconnect power B A C A. To range B. See the "Remove...
... moved. Gas supply line 3. E D A. Gas pressure regulator C D. C A D B A. Igniter electrode B. Burner base 21 Replace burner plate, head and cap. 8. Place Natural gas orifice spuds in plastic parts bag for instructions. 10. IMPORTANT: You may have to adjust the "LO" setting for instructions. Unplug range or disconnect power B A C A. To range B. See the "Remove...

Installation Instructions
Page 22
...internal gas orifice spud aside. 5. Replace the LP gas orifice spud with a number on some models) 1. Place LP gas orifice spuds in plastic parts bag for correct Natural gas orifice spud placement. See "Make Gas Connection" and "Electronic Ignition System" sections. IMPORTANT: You may have yellow tips...2,800 Btu/h 1.70 mm 0.70 mm 7. A. Burner heads C. External gas orifice spud access plate D. Place LP gas orifice spuds in plastic parts bag for each cooktop burner. External gas orfice spud C. Refer to adjust "LO" setting for future use and keep with the correct Natural gas ...
...internal gas orifice spud aside. 5. Replace the LP gas orifice spud with a number on some models) 1. Place LP gas orifice spuds in plastic parts bag for correct Natural gas orifice spud placement. See "Make Gas Connection" and "Electronic Ignition System" sections. IMPORTANT: You may have yellow tips...2,800 Btu/h 1.70 mm 0.70 mm 7. A. Burner heads C. External gas orifice spud access plate D. Place LP gas orifice spuds in plastic parts bag for each cooktop burner. External gas orfice spud C. Refer to adjust "LO" setting for future use and keep with the correct Natural gas ...


