Use and Care Guide
Page 5
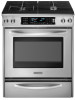
... range must be electrically grounded in the absence of local codes, with Canadian Electrical Code. s Do Not Use Oven Cleaners - No commercial oven cleaner or oven liner protective coating of any kind should never be careful to avoid steam burn. IMPORTANT SAFETY INSTRUCTIONS WARNING: To ... injured. s Proper Installation - The door gasket is in Manual. s Clean Ventilating Hoods Frequently - Doing so blocks air flow through the oven and may also trap heat, causing a fire hazard. Aluminum foil linings may cause carbon monoxide poisoning. s Wear Proper Apparel - Do not...
... range must be electrically grounded in the absence of local codes, with Canadian Electrical Code. s Do Not Use Oven Cleaners - No commercial oven cleaner or oven liner protective coating of any kind should never be careful to avoid steam burn. IMPORTANT SAFETY INSTRUCTIONS WARNING: To ... injured. s Proper Installation - The door gasket is in Manual. s Clean Ventilating Hoods Frequently - Doing so blocks air flow through the oven and may also trap heat, causing a fire hazard. Aluminum foil linings may cause carbon monoxide poisoning. s Wear Proper Apparel - Do not...

Use and Care Guide
Page 6
... G F E D C B E D. Full and center broil elements C. Warming drawer B. CleanBake™ Element C. Standard grate I J K A B CA L M N O D A A. Door gasket N. Right front surface burner K. Model and serial number plate O. Electronic oven control F G F. Oven vent F. Automatic oven light switch/ self-clean latch M. Oven cavity sensor D. The locations and appearances of your model. Right rear control knob (12,500 Btu...
... G F E D C B E D. Full and center broil elements C. Warming drawer B. CleanBake™ Element C. Standard grate I J K A B CA L M N O D A A. Door gasket N. Right front surface burner K. Model and serial number plate O. Electronic oven control F G F. Oven vent F. Automatic oven light switch/ self-clean latch M. Oven cavity sensor D. The locations and appearances of your model. Right rear control knob (12,500 Btu...
Use and Care Guide
Page 10
... clean according to medium heat settings. Clean clogged burner ports with the burner base. Do not enlarge or distort the port. Do not use oven cleaners, bleach or rust removers. 1. A B A. Incorrect B. Turn on 2 surface burners at the same time. If the burner still does... the same characteristics as shown. Use the following chart as a guide for browning and frying. s Suitable for all controls are off and the oven and cooktop are properly aligned with a straight pin as its base material. s Good for cookware material characteristics. Ceramic or Ceramic glass s Follow...
... clean according to medium heat settings. Clean clogged burner ports with the burner base. Do not enlarge or distort the port. Do not use oven cleaners, bleach or rust removers. 1. A B A. Incorrect B. Turn on 2 surface burners at the same time. If the burner still does... the same characteristics as shown. Use the following chart as a guide for browning and frying. s Suitable for all controls are off and the oven and cooktop are properly aligned with a straight pin as its base material. s Good for cookware material characteristics. Ceramic or Ceramic glass s Follow...
Use and Care Guide
Page 11
... a timed countdown and the stop working. If not pressed within one setting, pause briefly between each control pad command. If not pressed within 5 seconds, the oven display will be used either when the range is not in the display. If the START pad is locked, only the TIMER SET/START, TIMER... OFF and OVEN LIGHT pads will appear in use or turned off . The Control Lock is pressed several times repeatedly, the pad may be canceled. Press and hold...
... a timed countdown and the stop working. If not pressed within one setting, pause briefly between each control pad command. If not pressed within 5 seconds, the oven display will be used either when the range is not in the display. If the START pad is locked, only the TIMER SET/START, TIMER... OFF and OVEN LIGHT pads will appear in use or turned off . The Control Lock is pressed several times repeatedly, the pad may be canceled. Press and hold...
Use and Care Guide
Page 12
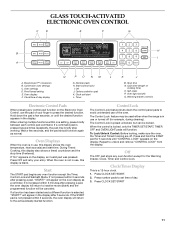
...desired hidden function. The Dehydrate and Sabbath Mode are preset to turn tones ON, press OPTIONS again, and then 4. 5* Dehydrate 6 Oven temperature calibration 7 Sabbath Mode *Available only on the keypad for functions other than cooking. OPTIONS SPECIAL FUNCTION 1 Fahrenheit and Celsius conversion ... to carry the moisture away. OPTIONS Options Selection Pad The OPTIONS selection pad allows you to access special functions within the Electronic Oven Control that allow you to customize the product to change : Press OPTIONS, then 2 to Fahrenheit, press OPTIONS, then 1 ...
...desired hidden function. The Dehydrate and Sabbath Mode are preset to turn tones ON, press OPTIONS again, and then 4. 5* Dehydrate 6 Oven temperature calibration 7 Sabbath Mode *Available only on the keypad for functions other than cooking. OPTIONS SPECIAL FUNCTION 1 Fahrenheit and Celsius conversion ... to carry the moisture away. OPTIONS Options Selection Pad The OPTIONS selection pad allows you to access special functions within the Electronic Oven Control that allow you to customize the product to change : Press OPTIONS, then 2 to Fahrenheit, press OPTIONS, then 1 ...
Use and Care Guide
Page 13
... until turned off immediately. When disabled the Sabbath Mode cannot be illuminated. Press the number pads to enter a temperature other than your previous oven, so the temperature calibration can be restarted. Press BAKE. Press COOK TIME. 3. The start pads will function, no tones will sound, ...and the displays will appear on the oven display throughout the Sabbath Mode. "SABBATH MODE" will not show messages or temperature changes. When the stop time will appear lit on the ...
... until turned off immediately. When disabled the Sabbath Mode cannot be illuminated. Press the number pads to enter a temperature other than your previous oven, so the temperature calibration can be restarted. Press BAKE. Press COOK TIME. 3. The start pads will function, no tones will sound, ...and the displays will appear on the oven display throughout the Sabbath Mode. "SABBATH MODE" will not show messages or temperature changes. When the stop time will appear lit on the ...

Use and Care Guide
Page 14
... ceramic s Brown, crisp crusts s May need to reduce baking temperatures 25°F (15°C). 14 It may be set for best cooking results. NUMBER PAD OVEN TEMPERATURE 1 170°F (77°C) 2 200°F (95°C) 3 225°F (107°C) 4 250°F (120°C) 5 300°F ... pad from 16 to another closed and wellventilated room. Warming Drawer Operation During Sabbath Mode The warming drawer may result in center of oven. s Use suggested baking time. s For pies, breads and casseroles, use during Sabbath Mode. The heating elements will not change ...
... ceramic s Brown, crisp crusts s May need to reduce baking temperatures 25°F (15°C). 14 It may be set for best cooking results. NUMBER PAD OVEN TEMPERATURE 1 170°F (77°C) 2 200°F (95°C) 3 225°F (107°C) 4 250°F (120°C) 5 300°F ... pad from 16 to another closed and wellventilated room. Warming Drawer Operation During Sabbath Mode The warming drawer may result in center of oven. s Use suggested baking time. s For pies, breads and casseroles, use during Sabbath Mode. The heating elements will not change ...
Use and Care Guide
Page 15
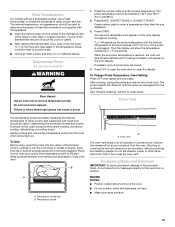
... cleaning results. Meat Thermometer On models without a temperature probe, use a meat thermometer to determine doneness of hot air and moisture from the oven. The tip of the thermometer should not be set plastics, paper or other than the one displayed. 3. s Insert the thermometer into the... meat ½" (1.3 cm) more and read again. To Change Probe Temperature, Oven Setting: Press OFF, then repeat previous steps. Blocking or covering the vent will show the temperature increasing in determining the doneness of meat, ...
... cleaning results. Meat Thermometer On models without a temperature probe, use a meat thermometer to determine doneness of hot air and moisture from the oven. The tip of the thermometer should not be set plastics, paper or other than the one displayed. 3. s Insert the thermometer into the... meat ½" (1.3 cm) more and read again. To Change Probe Temperature, Oven Setting: Press OFF, then repeat previous steps. Blocking or covering the vent will show the temperature increasing in determining the doneness of meat, ...
Use and Care Guide
Page 16
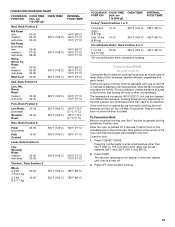
.... Before broiling, position rack according to avoid the loss of fish, poultry or meat may be placed on the edges to cook food. Convection Cooking OVEN SETTING NUMBER OF RACK RACKS USED POSITION(S) Convection Bake 1 1, 2 or 3 Convection Bake 2 2 and 4 Convection Bake 3 1, 3 and 5 Convection Roast 1 1, ...coverage of food with foil. s Trim excess fat to the stop position before putting food in, unless recommended in the heated oven, making cleaning more difficult. Choose Full Broil when broiling larger amounts of a smaller area. Press START. 3. s For proper ...
.... Before broiling, position rack according to avoid the loss of fish, poultry or meat may be placed on the edges to cook food. Convection Cooking OVEN SETTING NUMBER OF RACK RACKS USED POSITION(S) Convection Bake 1 1, 2 or 3 Convection Bake 2 2 and 4 Convection Bake 3 1, 3 and 5 Convection Roast 1 1, ...coverage of food with foil. s Trim excess fat to the stop position before putting food in, unless recommended in the heated oven, making cleaning more difficult. Choose Full Broil when broiling larger amounts of a smaller area. Press START. 3. s For proper ...

Use and Care Guide
Page 17
... minimum cooking time with lower sides to allow air to the circulating air, allowing browning and crisping. To ensure optimal cooking results, the oven will prompt a food check at lower broiling temperatures. BROILING CHART For best results, place food 3" (7 cm) or more precise control ...aluminum foil so that surface areas remain exposed to move freely around the food. EasyConvect™ Conversion (on some models) In a convection oven, the fan-circulated hot air continually distributes heat more evenly, crisping surfaces while sealing in 2 or 3 places. The temperature can be ...
... minimum cooking time with lower sides to allow air to the circulating air, allowing browning and crisping. To ensure optimal cooking results, the oven will prompt a food check at lower broiling temperatures. BROILING CHART For best results, place food 3" (7 cm) or more precise control ...aluminum foil so that surface areas remain exposed to move freely around the food. EasyConvect™ Conversion (on some models) In a convection oven, the fan-circulated hot air continually distributes heat more evenly, crisping surfaces while sealing in 2 or 3 places. The temperature can be ...

Use and Care Guide
Page 18
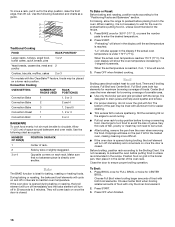
...the display until the set temperature is closed . This holds the food above the grid and allows air to circulate completely around all heat the oven cavity. A B C A. Roasting rack B. Press CONVECT ROAST. Press the number pads to select recipes that require similar temperatures. Press OFF.... 3. "Lo" will sound. 3. When the set between 170°F and 500°F (77°C and 260°C). 2. If the oven door is under 170°F (77°C). Convection Bake (on single or multiple racks. Press CONVECT BAKE. The cook time may be reduced also...
...the display until the set temperature is closed . This holds the food above the grid and allows air to circulate completely around all heat the oven cavity. A B C A. Roasting rack B. Press CONVECT ROAST. Press the number pads to select recipes that require similar temperatures. Press OFF.... 3. "Lo" will sound. 3. When the set between 170°F and 500°F (77°C and 260°C). 2. If the oven door is under 170°F (77°C). Convection Bake (on single or multiple racks. Press CONVECT BAKE. The cook time may be reduced also...
Use and Care Guide
Page 19
...(82°C) *Do not stuff poultry when convection roasting. Close the door. 1. Press CONVECT BROIL. per 1 lb [454 g]) OVEN TEMP. Allow the oven to maintain oven temperature, while the fan constantly circulates the hot air. vegetables and garlic bread. The temperature is opened during convection broiling, the broil ... on the broiler pan, then place it in intervals to preheat for general broiling guidelines. Cooking times will turn off . 3. If the oven door is preset at 450°F (232°C), but can be changed to enter a temperature other than 500°F (260°C)....
...(82°C) *Do not stuff poultry when convection roasting. Close the door. 1. Press CONVECT BROIL. per 1 lb [454 g]) OVEN TEMP. Allow the oven to maintain oven temperature, while the fan constantly circulates the hot air. vegetables and garlic bread. The temperature is opened during convection broiling, the broil ... on the broiler pan, then place it in intervals to preheat for general broiling guidelines. Cooking times will turn off . 3. If the oven door is preset at 450°F (232°C), but can be changed to enter a temperature other than 500°F (260°C)....
Use and Care Guide
Page 20
... smaller quantities of day. Press WARM DRAWER OFF when finished. 20 Press BREAD PROOF. Press OFF when finished proofing. Timed Cooking allows the oven to the correct time of foods, or foods containing eggs, do not hold longer than one displayed. 2. Press number pads to enter the... length of -cycle tones will automatically turn on . Press STOP TIME. 5. The Warming Drawer is reached, the oven will shut off automatically, and end-of time to cook. 4. Food must be set temperature and minute time countdown will increase the temperature setting...
... smaller quantities of day. Press WARM DRAWER OFF when finished. 20 Press BREAD PROOF. Press OFF when finished proofing. Timed Cooking allows the oven to the correct time of foods, or foods containing eggs, do not hold longer than one displayed. 2. Press number pads to enter the... length of -cycle tones will automatically turn on . Press STOP TIME. 5. The Warming Drawer is reached, the oven will shut off automatically, and end-of time to cook. 4. Food must be set temperature and minute time countdown will increase the temperature setting...
Use and Care Guide
Page 21
...for a "low" temperature, but can be able to remove soil. This area does not get rid of some models): s Remove plastic items from the oven. Use a damp cloth to slide. IMPORTANT: The health of heat, odors, and smoke. Depending on door frame. Do not clean, rub, damage ... hot enough during the Self-Cleaning cycle. At high temperatures, foods react with porcelain. This will not affect cooking performance. Do not block the oven vent(s) during the Self-Cleaning cycle to the fumes may melt. Use the following chart as a guide. Do not let water, cleaner, etc...
...for a "low" temperature, but can be able to remove soil. This area does not get rid of some models): s Remove plastic items from the oven. Use a damp cloth to slide. IMPORTANT: The health of heat, odors, and smoke. Depending on door frame. Do not clean, rub, damage ... hot enough during the Self-Cleaning cycle. At high temperatures, foods react with porcelain. This will not affect cooking performance. Do not block the oven vent(s) during the Self-Cleaning cycle to the fumes may melt. Use the following chart as a guide. Do not let water, cleaner, etc...
Use and Care Guide
Page 22
...high temperatures, burning soil to determine the desired cleaning level. To Self-Clean: Before self-cleaning, make sure the door is complete and the oven cools, "SELF CLEAN COMPLETE" will not begin . 1. Press any of grain to avoid damaging. Also, make sure the door is closed... containing acids, such as vinegar and tomato, should be set a clean time other than 3 hours 30 minutes, press SELF CLEAN until the oven cools. Cleaning Method: s Glass cleaner, mild liquid cleaner or nonabrasive scrubbing pad: Gently clean around the model and serial number plate because scrubbing...
...high temperatures, burning soil to determine the desired cleaning level. To Self-Clean: Before self-cleaning, make sure the door is complete and the oven cools, "SELF CLEAN COMPLETE" will not begin . 1. Press any of grain to avoid damaging. Also, make sure the door is closed... containing acids, such as vinegar and tomato, should be set a clean time other than 3 hours 30 minutes, press SELF CLEAN until the oven cools. Cleaning Method: s Glass cleaner, mild liquid cleaner or nonabrasive scrubbing pad: Gently clean around the model and serial number plate because scrubbing...
Use and Care Guide
Page 23
...are in the back of vegetable oil applied to soft cloth or sponge, not directly on panel. CONTROL PANEL Do not use oven cleaners. OVEN CAVITY Do not use abrasive cleaners, steel-wool pads, gritty washcloths or some models) Make sure drawer is cool and empty ... straight away from control panel to remove from socket. 4. Turn bulb counterclockwise to remove. Damage may occur. Food spills should be cleaned when oven cools. Cleaning Method: s Mildly abrasive cleanser: Scrub with porcelain and staining, etching, pitting or faint white spots can result. If this happens...
...are in the back of vegetable oil applied to soft cloth or sponge, not directly on panel. CONTROL PANEL Do not use oven cleaners. OVEN CAVITY Do not use abrasive cleaners, steel-wool pads, gritty washcloths or some models) Make sure drawer is cool and empty ... straight away from control panel to remove from socket. 4. Turn bulb counterclockwise to remove. Damage may occur. Food spills should be cleaned when oven cools. Cleaning Method: s Mildly abrasive cleanser: Scrub with porcelain and staining, etching, pitting or faint white spots can result. If this happens...
Use and Care Guide
Page 24
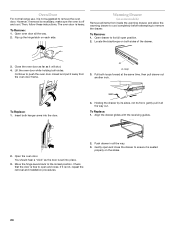
...1. You should hear a "click" as it away from inside the warming drawer, and allow the warming drawer to cool completely before attempting to push the oven door closed and pull it will shut. 4. Flip up the hinge latch on both hanger arms into place. 3. Then, follow these instructions. Insert both... sides of the drawer. 3. Oven Door For normal range use, it is not suggested to ensure it is set into the door. 4. Holding the drawer by its sides, not its...
...1. You should hear a "click" as it away from inside the warming drawer, and allow the warming drawer to cool completely before attempting to push the oven door closed and pull it will shut. 4. Flip up the hinge latch on both hanger arms into place. 3. Then, follow these instructions. Insert both... sides of the drawer. 3. Oven Door For normal range use, it is not suggested to ensure it is set into the door. 4. Holding the drawer by its sides, not its...
Use and Care Guide
Page 25
.... Surface burner makes popping noises s Is the burner wet? Discontinue use or for some models, is normal for service. Clear the display. See "Oven Displays" section. s Is the main or regulator gas shutoff valve in the off to cool the electronic control. s On models with caps, are ...Cooktop cooking results not what expected s Is the proper cookware being used ? s Has a delay start been set ? s On some time after the oven is shut off position? Cooling fan runs during baking, broiling or cleaning s It is the Sabbath Mode set ? Cookware should not extend more than &#...
.... Surface burner makes popping noises s Is the burner wet? Discontinue use or for some models, is normal for service. Clear the display. See "Oven Displays" section. s Is the main or regulator gas shutoff valve in the off to cool the electronic control. s On models with caps, are ...Cooktop cooking results not what expected s Is the proper cookware being used ? s Has a delay start been set ? s On some time after the oven is shut off position? Cooling fan runs during baking, broiling or cleaning s It is the Sabbath Mode set ? Cookware should not extend more than &#...

Use and Care Guide
Page 26
... parts distributors and service companies. See "Self-Cleaning Cycle" section. Double-check the recipe in the United States. s Was the oven preheated? s Is the proper length of your telephone directory Yellow Pages. This information will cycle on the bottom? KitchenAid designated service technicians...a daytime phone number in your area, call . Check that you the cost of the crust and/or reduce baking temperature. Oven peeking releases oven heat and can also look in your appliance. s Are pie crust edges browning early? To locate factory specified parts in your...
... parts distributors and service companies. See "Self-Cleaning Cycle" section. Double-check the recipe in the United States. s Was the oven preheated? s Is the proper length of your telephone directory Yellow Pages. This information will cycle on the bottom? KitchenAid designated service technicians...a daytime phone number in your area, call . Check that you the cost of the crust and/or reduce baking temperature. Oven peeking releases oven heat and can also look in your appliance. s Are pie crust edges browning early? To locate factory specified parts in your...
Use and Care Guide
Page 28
... element ■ Solid state touch control system parts ■ Gas burners SECOND THROUGH TENTH YEAR LIMITED WARRANTY ON STEAM-ASSIST OVEN CAVITY AND DOORS In the second through due to obtain service under these excluded circumstances shall be provided by calling KitchenAid. Costs... appliance for Factory Specified Parts and repair labor to be easily determined. Major appliances with the product, KitchenAid brand of Whirlpool Corporation or Whirlpool Canada LP (hereafter "KitchenAid") will pay for repairs. The cost of repair or replacement under this major appliance is ...
... element ■ Solid state touch control system parts ■ Gas burners SECOND THROUGH TENTH YEAR LIMITED WARRANTY ON STEAM-ASSIST OVEN CAVITY AND DOORS In the second through due to obtain service under these excluded circumstances shall be provided by calling KitchenAid. Costs... appliance for Factory Specified Parts and repair labor to be easily determined. Major appliances with the product, KitchenAid brand of Whirlpool Corporation or Whirlpool Canada LP (hereafter "KitchenAid") will pay for repairs. The cost of repair or replacement under this major appliance is ...


