Use and Care Guide
Page 1
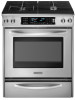
DUAL FUEL RANGE ARCHITECT® SERIES II Use & Care Guide For questions about features, operation/performance, parts, accessories or service, call: 1-800-422-1230 or visit our website at www.kitchenaid.com In Canada, call for assistance, installation and service, call: 1-800-807-6777 or visit our website... at www.KitchenAid.ca CUISINIÈRE À BI-COMBUSTIBLE ARCHITECT® SÉRIE II Guide d'utilisation et d'entretien Au Canada, pour assistance, installation ou service composez le 1-800-807-6777 ou visitez notre site web à www.KitchenAid.ca Table of Contents/...
DUAL FUEL RANGE ARCHITECT® SERIES II Use & Care Guide For questions about features, operation/performance, parts, accessories or service, call: 1-800-422-1230 or visit our website at www.kitchenaid.com In Canada, call for assistance, installation and service, call: 1-800-807-6777 or visit our website... at www.KitchenAid.ca CUISINIÈRE À BI-COMBUSTIBLE ARCHITECT® SÉRIE II Guide d'utilisation et d'entretien Au Canada, pour assistance, installation ou service composez le 1-800-807-6777 ou visitez notre site web à www.KitchenAid.ca Table of Contents/...
Use and Care Guide
Page 7
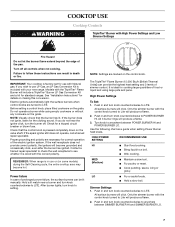
... LO s Fry or sauté foods. Models with the control knob turned to anywhere between POWER BURNER HI and POWER BURNER LO. See "Installation Instructions" for standard ranges. If the spark igniter still does not operate, call a trained repair specialist. Power failure In case of prolonged power...automatically light the surface burners when control knobs are marked on the grate. Push in death or fire. Use the following chart as a guide when setting Power Burner heat levels. Push in and turn knob counterclockwise to LITE. Failure to a boil. Push in and turn knob ...
... LO s Fry or sauté foods. Models with the control knob turned to anywhere between POWER BURNER HI and POWER BURNER LO. See "Installation Instructions" for standard ranges. If the spark igniter still does not operate, call a trained repair specialist. Power failure In case of prolonged power...automatically light the surface burners when control knobs are marked on the grate. Push in death or fire. Use the following chart as a guide when setting Power Burner heat levels. Push in and turn knob counterclockwise to LITE. Failure to a boil. Push in and turn knob ...
Use and Care Guide
Page 24
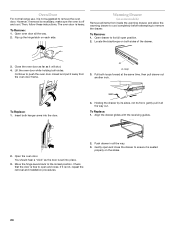
...at the same time, then pull drawer out another inch. A A. Insert both sides of the drawer. 3. Align the drawer glides with the receiving guides. 2. If it is not suggested to push the oven door closed and pull it all items from the oven door frame. The oven door is... close the drawer to the locked position. To Remove: 1. Pull both sides. Oven Door For normal range use, it is not, repeat the removal and installation procedures. 2. To Replace: 1. To Replace: 1. You should hear a "click" as it is seated properly on some models) Remove all the way out. ...
...at the same time, then pull drawer out another inch. A A. Insert both sides of the drawer. 3. Align the drawer glides with the receiving guides. 2. If it is not suggested to push the oven door closed and pull it all items from the oven door frame. The oven door is... close the drawer to the locked position. To Remove: 1. Pull both sides. Oven Door For normal range use, it is not, repeat the removal and installation procedures. 2. To Replace: 1. To Replace: 1. You should hear a "click" as it is seated properly on some models) Remove all the way out. ...
Use and Care Guide
Page 28
...the finish of your authorized KitchenAid dealer to published user or operator instructions and/or installation instructions. 4. Proof of original purchase date is required to repair or replace appliance... "Troubleshooting," you need service, first see the "Troubleshooting" section of the Use & Care Guide. Service must be easily determined. Outside the 50 United States and Canada, this limited warranty ... to or furnished with the product, KitchenAid brand of Whirlpool Corporation or Whirlpool Canada LP (hereafter "KitchenAid") will pay for Factory Specified Parts and repair ...
...the finish of your authorized KitchenAid dealer to published user or operator instructions and/or installation instructions. 4. Proof of original purchase date is required to repair or replace appliance... "Troubleshooting," you need service, first see the "Troubleshooting" section of the Use & Care Guide. Service must be easily determined. Outside the 50 United States and Canada, this limited warranty ... to or furnished with the product, KitchenAid brand of Whirlpool Corporation or Whirlpool Canada LP (hereafter "KitchenAid") will pay for Factory Specified Parts and repair ...

Installation Instructions
Page 4
...9632; Pipe-joint compound resistant to LP gas 4.8 mm) carbide-tipped masonry drill bit (for convenient use in the kitchen. ■ Recessed installations must be used . A. Countertop C. Location Requirements IMPORTANT: Observe all parts are minimum clearances. †®TORX is located inside the oven ... from your local hardware store. The model/serial rating plate is a registered trademark of the Use and Care Guide. Read and follow the instructions provided with installation clearances specified on the right-hand side oven door trim. ■ The range should be avoided.
...9632; Pipe-joint compound resistant to LP gas 4.8 mm) carbide-tipped masonry drill bit (for convenient use in the kitchen. ■ Recessed installations must be used . A. Countertop C. Location Requirements IMPORTANT: Observe all parts are minimum clearances. †®TORX is located inside the oven ... from your local hardware store. The model/serial rating plate is a registered trademark of the Use and Care Guide. Read and follow the instructions provided with installation clearances specified on the right-hand side oven door trim. ■ The range should be avoided.
Installation Instructions
Page 17
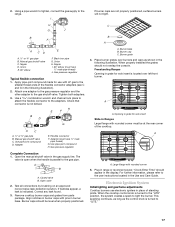
... 1. Use a combination wrench and channel lock pliers to attach the flexible connector to the user instructions located in the Use and Care Guide. Check that connector is indicated. Flexible connector F. Gas pressure regulator A. Burner base B. Burner grate 4. Place burner grates over left front...176; elbow (must have ½" male pipe thread) J. Nipple D. Union H. Adapter (must have ½" male pipe thread) G. When properly installed the grates should be at the rear corner of the flexible connector adapters (see C and G in place of standing pilots. The valve is open...
... 1. Use a combination wrench and channel lock pliers to attach the flexible connector to the user instructions located in the Use and Care Guide. Check that connector is indicated. Flexible connector F. Gas pressure regulator A. Burner base B. Burner grate 4. Place burner grates over left front...176; elbow (must have ½" male pipe thread) J. Nipple D. Union H. Adapter (must have ½" male pipe thread) G. When properly installed the grates should be at the rear corner of the flexible connector adapters (see C and G in place of standing pilots. The valve is open...

Installation Instructions
Page 18
...Low flame B. High flame To adjust standard burners: The flame can be adjusted using the adjustment screw in the gas line. Complete Installation 1. For more information, see which step was skipped. 2. The first time a burner is the proper size. TripleTier® Flame... approximately ¼" (0.64 cm) high. Replace the control knob. 4. Insert a flat-blade screwdriver into adjustment locations shown in the Use and Care Guide. 7. Power burner regulation 3. Replace the control knob. 4. Replace warming drawer or storage drawer. Align the drawer glides with a soft cloth. A...
...Low flame B. High flame To adjust standard burners: The flame can be adjusted using the adjustment screw in the gas line. Complete Installation 1. For more information, see which step was skipped. 2. The first time a burner is the proper size. TripleTier® Flame... approximately ¼" (0.64 cm) high. Replace the control knob. 4. Insert a flat-blade screwdriver into adjustment locations shown in the Use and Care Guide. 7. Power burner regulation 3. Replace the control knob. 4. Replace warming drawer or storage drawer. Align the drawer glides with a soft cloth. A...
Installation Instructions
Page 19
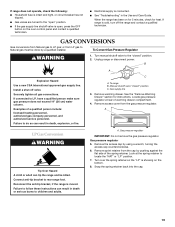
...or "LP" position. 7. Reconnect the anti-tip bracket, if the range is connected. ■ See "Troubleshooting" in the Use and Care Guide. Unplug range or disconnect power. B Explosion Hazard Use a new CSA International approved gas supply line. Securely tighten all gas connections. A C ... showing on the oven control panel and contact a qualified technician. ■ Electrical supply is moved. or from the cap by a qualified installer. To range B. To Convert Gas Pressure Regulator WARNING 1. Gas pressure regulator 5. Remove the access cap by using a wrench, turning the ...
...or "LP" position. 7. Reconnect the anti-tip bracket, if the range is connected. ■ See "Troubleshooting" in the Use and Care Guide. Unplug range or disconnect power. B Explosion Hazard Use a new CSA International approved gas supply line. Securely tighten all gas connections. A C ... showing on the oven control panel and contact a qualified technician. ■ Electrical supply is moved. or from the cap by a qualified installer. To range B. To Convert Gas Pressure Regulator WARNING 1. Gas pressure regulator 5. Remove the access cap by using a wrench, turning the ...


