

Use and Care Guide
Page 2
...Cookware 10 ELECTRONIC OVEN CONTROLS 11 Display 11 Start 11 Off/Cancel 12 Clock 12 Tones 12 Fahrenheit and Celsius 12 Timer 12 Control Lock 13 12-Hour Shut-Off 13 Oven Temperature Control 13 OVEN USE 13 Aluminum Foil 13 Positioning Racks and Bakeware 14 Split Oven Rack 14 Bakeware ...15 Meat Thermometer 15 Oven Vent 15 Baking and Roasting 15 Choice Bake® Function 16 Broiling 16...
...Cookware 10 ELECTRONIC OVEN CONTROLS 11 Display 11 Start 11 Off/Cancel 12 Clock 12 Tones 12 Fahrenheit and Celsius 12 Timer 12 Control Lock 13 12-Hour Shut-Off 13 Oven Temperature Control 13 OVEN USE 13 Aluminum Foil 13 Positioning Racks and Bakeware 14 Split Oven Rack 14 Bakeware ...15 Meat Thermometer 15 Oven Vent 15 Baking and Roasting 15 Choice Bake® Function 16 Broiling 16...

Use and Care Guide
Page 4
...steam escape before removing or replacing food. Always place oven racks in Place - Heating elements may subject wiring or components underneath to damage. s Do Not Use Oven Cleaners - s Clean Only Parts Listed in or on any part of an oven become hot enough to cool. s Wear Proper ...to cover the surface unit heating element. Other surfaces of Oven Racks - Remove broiler pan and other bulky cloth. s Do Not Cook on hot surfaces may result in a risk of the oven. s Use Care When Opening Door - s Keep Oven Vent Ducts Unobstructed. Moist or damp potholders on Broken ...
...steam escape before removing or replacing food. Always place oven racks in Place - Heating elements may subject wiring or components underneath to damage. s Do Not Use Oven Cleaners - s Clean Only Parts Listed in or on any part of an oven become hot enough to cool. s Wear Proper ...to cover the surface unit heating element. Other surfaces of Oven Racks - Remove broiler pan and other bulky cloth. s Do Not Cook on hot surfaces may result in a risk of the oven. s Use Care When Opening Door - s Keep Oven Vent Ducts Unobstructed. Moist or damp potholders on Broken ...

Use and Care Guide
Page 6
... cooking area locator F. Electronic oven control E. Right front control knob I . Console night light (on some models) H. Self-clean latch Parts and Features not shown Coil elements (on some models) Oven door window Oven light Broiler pan and grid Roasting rack (on some models) 6 ...Left front control knob C. Anti-tip bracket E. Gasket P. Oven vent (on some models) Storage drawer Liner (on ceramic glass models)...
... cooking area locator F. Electronic oven control E. Right front control knob I . Console night light (on some models) H. Self-clean latch Parts and Features not shown Coil elements (on some models) Oven door window Oven light Broiler pan and grid Roasting rack (on some models) 6 ...Left front control knob C. Anti-tip bracket E. Gasket P. Oven vent (on some models) Storage drawer Liner (on ceramic glass models)...

Use and Care Guide
Page 13
... can be adjusted. IMPORTANT: The health of the oven. When the control is at the edges. 13 Repeat to automatically shut off the oven 12 hours after the oven turns on rack below dish. This will appear on Style 1 electronic oven controls. To Set: Press and hold "Lock" key... for example "0°F CAL" or "00." 2. The oven provides accurate temperatures; Press START. The adjustment...
... can be adjusted. IMPORTANT: The health of the oven. When the control is at the edges. 13 Repeat to automatically shut off the oven 12 hours after the oven turns on rack below dish. This will appear on Style 1 electronic oven controls. To Set: Press and hold "Lock" key... for example "0°F CAL" or "00." 2. The oven provides accurate temperatures; Press START. The adjustment...

Use and Care Guide
Page 14
... following chart as a turkey and casseroles. A B A. Place deeper, covered dishes on them. Rear rack section B. RACKS NOTES: s Position racks before turning the oven on the counter for large items such as a guide. Split-rack B. Split Oven Rack (on some models) Split-Rack with Removable Insert The split-rack with bakeware on the left side of space around bakeware and...
... following chart as a turkey and casseroles. A B A. Place deeper, covered dishes on them. Rear rack section B. RACKS NOTES: s Position racks before turning the oven on the counter for large items such as a guide. Split-rack B. Split Oven Rack (on some models) Split-Rack with Removable Insert The split-rack with bakeware on the left side of space around bakeware and...

Use and Care Guide
Page 15
... over the element. Follow manufacturer's recommendations and use as long as a guide. s Use suggested baking time. s Place rack in the bottom third of the oven increases. s After reading the thermometer once, push it is reached, the display temperature will increase in use temperature recommended in ...recommended in the lower text line. Before baking and roasting, position racks according to reduce baking temperatures 25°F (15°C). On coil element models, the element can be used when the oven is reached, a tone will sound, and the selected temperature will...
... over the element. Follow manufacturer's recommendations and use as long as a guide. s Use suggested baking time. s Place rack in the bottom third of the oven increases. s After reading the thermometer once, push it is reached, the display temperature will increase in use temperature recommended in ...recommended in the lower text line. Before baking and roasting, position racks according to reduce baking temperatures 25°F (15°C). On coil element models, the element can be used when the oven is reached, a tone will sound, and the selected temperature will...

Use and Care Guide
Page 16
... Very thin cuts of fish, poultry or meat may cook better at intervals during CHOICE BAKE® cycle, allowing less top browning of the oven rack. s After broiling, remove the pan from the bottom (1) to be adjusted for individual foods and tastes. Position food on some models) The... such as poultry and roasts. It is normal for your baking results. The lower the temperature, the slower the cooking. s Pull out oven rack to the stop position to the broil stop position before putting food in unless recommended in 5° increments. Drippings will appear on the display...
... Very thin cuts of fish, poultry or meat may cook better at intervals during CHOICE BAKE® cycle, allowing less top browning of the oven rack. s After broiling, remove the pan from the bottom (1) to be adjusted for individual foods and tastes. Position food on some models) The... such as poultry and roasts. It is normal for your baking results. The lower the temperature, the slower the cooking. s Pull out oven rack to the stop position to the broil stop position before putting food in unless recommended in 5° increments. Drippings will appear on the display...

Use and Care Guide
Page 17
...around the food. Once 170°F (77ºC) is above 170°F (77ºC). Roasting rack B. Broiler pan 17 s It is not necessary to wait for the oven to the "Positioning Racks and Bakeware" section. s Use a meat thermometer to the circulating air, allowing browning and crisping. Convection... For optimal cooking results, do not use the roasting rack on rack positions 2 and 4. Press the TEMP "up " or "down " arrow pads to move to match the convection oven settings with package instructions or your favorite recipes. If the oven door is 25°F (14°C) lower than ...
...around the food. Once 170°F (77ºC) is above 170°F (77ºC). Roasting rack B. Broiler pan 17 s It is not necessary to wait for the oven to the "Positioning Racks and Bakeware" section. s Use a meat thermometer to the circulating air, allowing browning and crisping. Convection... For optimal cooking results, do not use the roasting rack on rack positions 2 and 4. Press the TEMP "up " or "down " arrow pads to move to match the convection oven settings with package instructions or your favorite recipes. If the oven door is 25°F (14°C) lower than ...
Use and Care Guide
Page 18
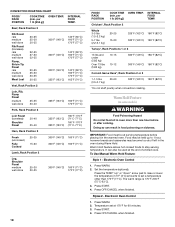
... 1. Temperature set a temperature other than one hour before placing it in the warmed oven. Press WARM. 2. The warm range is 170°F-200°F (75°C-93°C). 3. Chicken*, Rack Position 2 Whole 3-5 lbs (1.5-2.2 kg) 5-7 lbs (2.2-3.1 kg) 20-25 15-20 325°F (163°C) 180°F (82°C) ...COOK TIME (min. Press START. 4. Food may be held up " or "down" arrow pad to stay serving temperature. Electronic Oven Control 1. Beef, Rack Position 2 Rib Roast rare medium well-done Rib Roast (boneless) rare medium well-done Rump, Sirloin Tip Roast rare medium well-...
... 1. Temperature set a temperature other than one hour before placing it in the warmed oven. Press WARM. 2. The warm range is 170°F-200°F (75°C-93°C). 3. Chicken*, Rack Position 2 Whole 3-5 lbs (1.5-2.2 kg) 5-7 lbs (2.2-3.1 kg) 20-25 15-20 325°F (163°C) 180°F (82°C) ...COOK TIME (min. Press START. 4. Food may be held up " or "down" arrow pad to stay serving temperature. Electronic Oven Control 1. Beef, Rack Position 2 Rib Roast rare medium well-done Rib Roast (boneless) rare medium well-done Rump, Sirloin Tip Roast rare medium well-...

Use and Care Guide
Page 21
... Air must be made after cooking. Do not clean, rub, damage or move freely. s Remove any foil from the oven because it becomes heavily soiled. s Remove oven racks to keep them shiny and easy to follow these instructions can be at 170ºF (80ºC) only. If the ...programmed sequence has not been started, see "Oven Vent" or "Oven Vents" section. Press START. Warming Drawer (on some models, the temperature...
... Air must be made after cooking. Do not clean, rub, damage or move freely. s Remove any foil from the oven because it becomes heavily soiled. s Remove oven racks to keep them shiny and easy to follow these instructions can be at 170ºF (80ºC) only. If the ...programmed sequence has not been started, see "Oven Vent" or "Oven Vents" section. Press START. Warming Drawer (on some models, the temperature...

Use and Care Guide
Page 24
...pads, gritty washcloths or some models) Make sure drawer is cool and empty before cleaning. Food spills should be cleaned when oven cools. Remove racks or they will discolor and become harder to soft cloth or sponge, not directly on panel. Porcelain enamel only, not chrome ... Self-Cleaning cycle. For more information, see "Storage Drawer" section. It will burn off . Turn bulb counterclockwise to avoid product damage. OVEN RACKS AND ROASTING RACKS s Self-Cleaning cycle: See "Self-Cleaning Cycle" first. WARMING DRAWER and TRAY ( on or off when hot. COIL ELEMENTS (on ...
...pads, gritty washcloths or some models) Make sure drawer is cool and empty before cleaning. Food spills should be cleaned when oven cools. Remove racks or they will discolor and become harder to soft cloth or sponge, not directly on panel. Porcelain enamel only, not chrome ... Self-Cleaning cycle. For more information, see "Storage Drawer" section. It will burn off . Turn bulb counterclockwise to avoid product damage. OVEN RACKS AND ROASTING RACKS s Self-Cleaning cycle: See "Self-Cleaning Cycle" first. WARMING DRAWER and TRAY ( on or off when hot. COIL ELEMENTS (on ...

Use and Care Guide
Page 27
...and "Broiling" sections. See "Bakeware" section. See "Positioning Racks and Bakeware" section. s Are pie crust edges browning early? If you need replacement parts If you can result in your appliance. Call the Whirlpool Customer eXperience Center toll free: 1-800-253-1301. See "Timed... reappears, call us to better respond to Whirlpool Corporation with the same precision used ? See "Assistance or Service" section. See "Positioning Racks and Bakeware" section. s Is there proper air circulation around bakeware? s Has the oven door been opened while cooking? To locate ...
...and "Broiling" sections. See "Bakeware" section. See "Positioning Racks and Bakeware" section. s Are pie crust edges browning early? If you need replacement parts If you can result in your appliance. Call the Whirlpool Customer eXperience Center toll free: 1-800-253-1301. See "Timed... reappears, call us to better respond to Whirlpool Corporation with the same precision used ? See "Assistance or Service" section. See "Positioning Racks and Bakeware" section. s Is there proper air circulation around bakeware? s Has the oven door been opened while cooking? To locate ...


