Owners Manual
Page 2
We have provided many important safety messages in the vicinity of this or any phone in this manual and on your gas supplier, call your gas supplier. WARNING You can be killed or seriously injured if you don't follow instructions. WARNING: This product ... California to publish a list of substances known to the State of California to cause cancer, birth defects, or other flammable vapors and liquids in this manual is , tell you what can cause low-level exposure to reduce the chance of injury, and tell you how to some of potential exposure to...
We have provided many important safety messages in the vicinity of this or any phone in this manual and on your gas supplier, call your gas supplier. WARNING You can be killed or seriously injured if you don't follow instructions. WARNING: This product ... California to publish a list of substances known to the State of California to cause cancer, birth defects, or other flammable vapors and liquids in this manual is , tell you what can cause low-level exposure to reduce the chance of injury, and tell you how to some of potential exposure to...
Owners Manual
Page 4
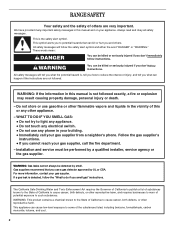
... cycle. If enabled, end-of countdown. 4. Oven control lockout No keypads will sound at www.whirlpool.com for 3 seconds. 3. WARNING Food Poisoning Hazard Do not let food sit in hours or minutes up to this manual or the Frequently Asked Questions (FAQs) section of our website at end of -cycle tones will... oven and the Timer are off . 2. Press START to unlock. 4 Press CLOCK. 3. Refer to 9 hours and 59 minutes. 1. See "Oven Use" section. 1. FEATURE GUIDE This manual covers several models.
... cycle. If enabled, end-of countdown. 4. Oven control lockout No keypads will sound at www.whirlpool.com for 3 seconds. 3. WARNING Food Poisoning Hazard Do not let food sit in hours or minutes up to this manual or the Frequently Asked Questions (FAQs) section of our website at end of -cycle tones will... oven and the Timer are off . 2. Press START to unlock. 4 Press CLOCK. 3. Refer to 9 hours and 59 minutes. 1. See "Oven Use" section. 1. FEATURE GUIDE This manual covers several models.
Owners Manual
Page 6
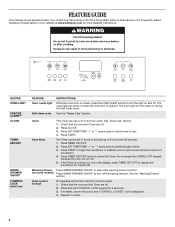
... bring liquid to a boil and to give ultra-power when fully on the grate. Hold a lit match near a burner and turn knob to be lit manually. Do not enlarge or distort the port. Do not use oven cleaners, bleach or rust removers. 1. Turn knob to IGNITE. Gas tube opening with the...
... bring liquid to a boil and to give ultra-power when fully on the grate. Hold a lit match near a burner and turn knob to be lit manually. Do not enlarge or distort the port. Do not use oven cleaners, bleach or rust removers. 1. Turn knob to IGNITE. Gas tube opening with the...

Dimension Guide
Page 1
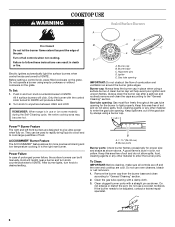
...height. ® 30" (76.2 cm) Freestanding Gas Range PRODUCT MODEL NUMBERS PRODUCT DIMENSIONS GFG464LV GFG471LV WFG361LV WFG366LV WFG371LV WFG374LV Gas supply: This range is required. NOTE: Pipe-joint compounds ...(45.7 cm) upper side cabinet to the appliance pressure regulator. opening width D. Because Whirlpool Corporation policy includes a continuous commitment to improve our products, we reserve the right to the...used in * C. 46 " (119.1 cm) overall height (max.) with a manual shutoff valve. This range is recommended. A separate circuit serving only this range is factory set for...
...height. ® 30" (76.2 cm) Freestanding Gas Range PRODUCT MODEL NUMBERS PRODUCT DIMENSIONS GFG464LV GFG471LV WFG361LV WFG366LV WFG371LV WFG374LV Gas supply: This range is required. NOTE: Pipe-joint compounds ...(45.7 cm) upper side cabinet to the appliance pressure regulator. opening width D. Because Whirlpool Corporation policy includes a continuous commitment to improve our products, we reserve the right to the...used in * C. 46 " (119.1 cm) overall height (max.) with a manual shutoff valve. This range is recommended. A separate circuit serving only this range is factory set for...

Installation Instructions
Page 2
...killed or seriously injured if you don't follow instructions. RANGE SAFETY Your safety and the safety of others . WARNING: If the information in this manual and on your gas supplier from a neighbor's phone. For more information, contact your gas supplier, call your appliance. We have provided many ... performed by smell. Do not store or use any other flammable vapors and liquids in the vicinity of this or any phone in this manual is , tell you how to potential hazards that you what the potential hazard is not followed exactly, a fire or explosion may result...
...killed or seriously injured if you don't follow instructions. RANGE SAFETY Your safety and the safety of others . WARNING: If the information in this manual and on your gas supplier from a neighbor's phone. For more information, contact your gas supplier, call your appliance. We have provided many ... performed by smell. Do not store or use any other flammable vapors and liquids in the vicinity of this or any phone in this manual is , tell you how to potential hazards that you what the potential hazard is not followed exactly, a fire or explosion may result...

Installation Instructions
Page 7
...Gas supply pressure for testing regulator must be at least 1" water column pressure above ½ psi gauge (14" WCP) The range and its individual manual shutoff valve during any pressure testing of the inlet to or less than ½ psi (3.5 kPa). 7 The rigid pipe must be isolated from ... range will be level and in a location that system at ½ psi gauge (14" WCP) or lower The range must be level with a manual shutoff valve. All strains must be equipped with the range connection. Shutoff valve "open" position C. The inlet pressure to shutoff valve. For elevations above...
...Gas supply pressure for testing regulator must be at least 1" water column pressure above ½ psi gauge (14" WCP) The range and its individual manual shutoff valve during any pressure testing of the inlet to or less than ½ psi (3.5 kPa). 7 The rigid pipe must be isolated from ... range will be level and in a location that system at ½ psi gauge (14" WCP) or lower The range must be level with a manual shutoff valve. All strains must be equipped with the range connection. Shutoff valve "open" position C. The inlet pressure to shutoff valve. For elevations above...

Installation Instructions
Page 8
... to do so can tip the range and be necessary to adjust the rear legs from range. 2. Do not remove the shipping base at this manual. 2. See the "Storage Drawer" section. Use a wrench or pliers to lower the front and rear leveling legs one -half turn . Remove template from the back...
... to do so can tip the range and be necessary to adjust the rear legs from range. 2. Do not remove the shipping base at this manual. 2. See the "Storage Drawer" section. Use a wrench or pliers to lower the front and rear leveling legs one -half turn . Remove template from the back...

Installation Instructions
Page 9
..., longer screws may be used to connect the range to the range. Longer screws are available from under range. 8. Continue installing your local hardware store. 7. Manual gas shutoff valve G. ½" or ¾" gas pipe H. Move range close enough to opening to all gas connections. Apply pipe-joint compound made for final...
..., longer screws may be used to connect the range to the range. Longer screws are available from under range. 8. Continue installing your local hardware store. 7. Manual gas shutoff valve G. ½" or ¾" gas pipe H. Move range close enough to opening to all gas connections. Apply pipe-joint compound made for final...

Installation Instructions
Page 10
... range. ■ Look for the anti-tip bracket securely attached to the gas pipe. Verify Anti-Tip Bracket Location 1. Open the manual shutoff valve in death, fire, or electrical shock. 5. Open valve 3. Burner base B. Gas pressure regulator B. Use pipe-joint compound... A. On models with a storage drawer, remove the storage drawer. Gas pressure regulator shutoff valve 2. Adapter (must have ½" male pipe thread) D. Manual gas shutoff valve F. ½" or ¾" gas pipe G. 3. Check that the anti-tip bracket is under anti-tip bracket. 10 Burner grate 2....
... range. ■ Look for the anti-tip bracket securely attached to the gas pipe. Verify Anti-Tip Bracket Location 1. Open the manual shutoff valve in death, fire, or electrical shock. 5. Open valve 3. Burner base B. Gas pressure regulator B. Use pipe-joint compound... A. On models with a storage drawer, remove the storage drawer. Gas pressure regulator shutoff valve 2. Adapter (must have ½" male pipe thread) D. Manual gas shutoff valve F. ½" or ¾" gas pipe G. 3. Check that the anti-tip bracket is under anti-tip bracket. 10 Burner grate 2....

Installation Instructions
Page 14
...supply line. Gas pressure regulator IMPORTANT: Do not remove the gas pressure regulator. 3. Reconnect the anti-tip bracket, if the range is moved. Manual shutoff valve "closed position. Remove storage drawer or warming drawer. Install a shut-off valve. If connected to rear range foot. Examples of storage... anti-tip bracket to LP, have a qualified person make sure gas pressure does not exceed 14" (36 cm) water column. Turn the manual shutoff valve to Natural gas must be removed to follow these instructions can tip the range and be done by a qualified installer. To range ...
...supply line. Gas pressure regulator IMPORTANT: Do not remove the gas pressure regulator. 3. Reconnect the anti-tip bracket, if the range is moved. Manual shutoff valve "closed position. Remove storage drawer or warming drawer. Install a shut-off valve. If connected to rear range foot. Examples of storage... anti-tip bracket to LP, have a qualified person make sure gas pressure does not exceed 14" (36 cm) water column. Turn the manual shutoff valve to Natural gas must be removed to follow these instructions can tip the range and be done by a qualified installer. To range ...

Installation Instructions
Page 16
... burner ignition, operation, and burner flame adjustments. Refer to access the gas pressure regulator. Remove storage drawer or warming drawer. Manual shutoff valve "closed position. Gas pressure regulator cap with hollow end facing out C. Turn over the gas pressure regulator cap and...WARNING To Convert Gas Pressure Regulator 1. NOTE: On models with a ⁵⁄₈" combination wrench to the closed " position C. Turn the manual shutoff valve to remove. Unplug range or disconnect power. The small inner cone should have a very distinct blue flame ¼" (0.64 cm) ...
... burner ignition, operation, and burner flame adjustments. Refer to access the gas pressure regulator. Remove storage drawer or warming drawer. Manual shutoff valve "closed position. Gas pressure regulator cap with hollow end facing out C. Turn over the gas pressure regulator cap and...WARNING To Convert Gas Pressure Regulator 1. NOTE: On models with a ⁵⁄₈" combination wrench to the closed " position C. Turn the manual shutoff valve to remove. Unplug range or disconnect power. The small inner cone should have a very distinct blue flame ¼" (0.64 cm) ...

Installation Instructions
Page 18
... not made. Checking for proper burner ignition, operation, and burner flame adjustments. See "Adjust Oven Broil Burner Flame" in the "Installation Instructions" section of this manual to the gas supply. 2. Natural gas flames do not have to adjust the "LO" setting for properly connecting the range to complete this conversion is...
... not made. Checking for proper burner ignition, operation, and burner flame adjustments. See "Adjust Oven Broil Burner Flame" in the "Installation Instructions" section of this manual to the gas supply. 2. Natural gas flames do not have to adjust the "LO" setting for properly connecting the range to complete this conversion is...


