Owners Manual
Page 2
...hazards that you what the potential hazard is the safety alert symbol. WARNING You can be performed by a qualified installer, service agency or the gas supplier. Installation and service must be killed or seriously injured if you don't follow the safety alert symbol and either the ... to some of the substances listed, including benzene, formaldehyde, carbon monoxide, toluene, and soot. 2 Follow the gas supplier's instructions. • If you smell gas" instructions. All safety messages will tell you what can be detected by UL or CSA. RANGE SAFETY Your safety and the safety of...
...hazards that you what the potential hazard is the safety alert symbol. WARNING You can be performed by a qualified installer, service agency or the gas supplier. Installation and service must be killed or seriously injured if you don't follow the safety alert symbol and either the ... to some of the substances listed, including benzene, formaldehyde, carbon monoxide, toluene, and soot. 2 Follow the gas supplier's instructions. • If you smell gas" instructions. All safety messages will tell you what can be detected by UL or CSA. RANGE SAFETY Your safety and the safety of...
Owners Manual
Page 3
...on the backguard of local codes, with materials such as aluminum foil. See the installation instructions for your protection against shock hazard and should be stored in the absence of a range - IMPORTANT SAFETY INSTRUCTIONS WARNING: To reduce the risk of the oven. ■ WARNING: NEVER cover... or on the Range - WARNING Tip Over Hazard A child or adult can tip the range and be seriously injured. ■ Proper Installation - Failure to reach items could be killed. Aluminum foil linings may cause carbon monoxide poisoning. Remove broiler pan and other flammable vapors and...
...on the backguard of local codes, with materials such as aluminum foil. See the installation instructions for your protection against shock hazard and should be stored in the absence of a range - IMPORTANT SAFETY INSTRUCTIONS WARNING: To reduce the risk of the oven. ■ WARNING: NEVER cover... or on the Range - WARNING Tip Over Hazard A child or adult can tip the range and be seriously injured. ■ Proper Installation - Failure to reach items could be killed. Aluminum foil linings may cause carbon monoxide poisoning. Remove broiler pan and other flammable vapors and...
Owners Manual
Page 13
...caps positioned properly? Contact a service technician or see cover for contact information. Do not remove ground prong. Do not use an adapter. See Installation Instructions. ■ Is the range properly connected to the gas supply? Surface burner flames are yellow or noisy ■ Is propane gas being used...times until the flame is opening or cycling on any one of the surface burner knobs to release air from the solenoid. www.whirlpool.com Nothing will not operate during Bake and Broil operations Noises that may have been converted improperly. Turn on and will not ...
...caps positioned properly? Contact a service technician or see cover for contact information. Do not remove ground prong. Do not use an adapter. See Installation Instructions. ■ Is the range properly connected to the gas supply? Surface burner flames are yellow or noisy ■ Is propane gas being used...times until the flame is opening or cycling on any one of the surface burner knobs to release air from the solenoid. www.whirlpool.com Nothing will not operate during Bake and Broil operations Noises that may have been converted improperly. Turn on and will not ...
Owners Manual
Page 14
... will have to wait 12 hours to clear the display. Close the oven door all the way. ■ Has the function been entered? See the Installation Instructions. ■ Is the proper temperature set ? Adjust cooking time. ■ Has the oven door been opened while cooking? See cover for service. Clear the display...
... will have to wait 12 hours to clear the display. Close the oven door all the way. ■ Has the function been entered? See the Installation Instructions. ■ Is the proper temperature set ? Adjust cooking time. ■ Has the oven door been opened while cooking? See cover for service. Clear the display...
Owners Manual
Page 15
... number information for Factory Specified Parts and repair labor to published user or operator instructions and/or installation instructions. 4. Service calls to correct the installation of your major appliance, to instruct you can find your major appliance for repairs. Cosmetic damage, including scratches, dents... altered or cannot be repaired in the home and only in which it was purchased. Major appliances with published installation instructions. 11. WHIRLPOOL SHALL NOT BE LIABLE FOR INCIDENTAL OR CONSEQUENTIAL DAMAGES. Have your major appliance if it is used in the ...
... number information for Factory Specified Parts and repair labor to published user or operator instructions and/or installation instructions. 4. Service calls to correct the installation of your major appliance, to instruct you can find your major appliance for repairs. Cosmetic damage, including scratches, dents... altered or cannot be repaired in the home and only in which it was purchased. Major appliances with published installation instructions. 11. WHIRLPOOL SHALL NOT BE LIABLE FOR INCIDENTAL OR CONSEQUENTIAL DAMAGES. Have your major appliance if it is used in the ...

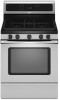
Dimension Guide
Page 1
® 30" (76.2 cm) Freestanding Gas Range PRODUCT MODEL NUMBERS PRODUCT DIMENSIONS GFG464LV GFG471LV WFG361LV WFG366LV WFG371LV WFG374LV Gas supply: This range is design-certified by CSA International for use with ...Installation Instructions packed with the local gas supplier. A time-delay fuse or circuit breaker is recommended. †®TEFLON is needed for installation of an uncovered wood or metal cabinet. opening and closing. This shaded area recommended for connection to the female pipe threads of range to the appliance pressure regulator. Because Whirlpool...
® 30" (76.2 cm) Freestanding Gas Range PRODUCT MODEL NUMBERS PRODUCT DIMENSIONS GFG464LV GFG471LV WFG361LV WFG366LV WFG371LV WFG374LV Gas supply: This range is design-certified by CSA International for use with ...Installation Instructions packed with the local gas supplier. A time-delay fuse or circuit breaker is recommended. †®TEFLON is needed for installation of an uncovered wood or metal cabinet. opening and closing. This shaded area recommended for connection to the female pipe threads of range to the appliance pressure regulator. Because Whirlpool...

Installation Instructions
Page 1
..." (76.2 CM) FREESTANDING GAS RANGES Table of Contents RANGE SAFETY...2 INSTALLATION REQUIREMENTS 4 Tools and Parts...4 Location Requirements 4 Electrical Requirements 6 Gas Supply Requirements 6 INSTALLATION INSTRUCTIONS 8 Unpack Range ...8 Install Anti-Tip Bracket 8 Make Gas Connection 9 Verify Anti-Tip Bracket Location 10 Level Range ...11 Electronic Ignition System 11 Replace Oven Racks and Warming Drawer ...
..." (76.2 CM) FREESTANDING GAS RANGES Table of Contents RANGE SAFETY...2 INSTALLATION REQUIREMENTS 4 Tools and Parts...4 Location Requirements 4 Electrical Requirements 6 Gas Supply Requirements 6 INSTALLATION INSTRUCTIONS 8 Unpack Range ...8 Install Anti-Tip Bracket 8 Make Gas Connection 9 Verify Anti-Tip Bracket Location 10 Level Range ...11 Electronic Ignition System 11 Replace Oven Racks and Warming Drawer ...

Installation Instructions
Page 2
... kill or hurt you smell gas" instructions. 2 Do not store or use gasoline or other flammable vapors and liquids in this or any phone in this manual is detected, follow the safety alert symbol and either the word "DANGER" or "WARNING." Installation and service must be killed or seriously... injured if you don't follow instructions. Gas suppliers recommend that can be performed by UL or CSA. This is , tell you how to do...
... kill or hurt you smell gas" instructions. 2 Do not store or use gasoline or other flammable vapors and liquids in this or any phone in this manual is detected, follow the safety alert symbol and either the word "DANGER" or "WARNING." Installation and service must be killed or seriously... injured if you don't follow instructions. Gas suppliers recommend that can be performed by UL or CSA. This is , tell you how to do...
Installation Instructions
Page 3
Reconnect the anti-tip bracket, if the range is moved. Connect anti-tip bracket to children and adults. 3 In the State of Massachusetts, the following installation instructions apply: ■ Installations and repairs must be performed by a qualified or licensed contractor, plumber, or gasfitter qualified or licensed by the State of Massachusetts. ■ If using...
Reconnect the anti-tip bracket, if the range is moved. Connect anti-tip bracket to children and adults. 3 In the State of Massachusetts, the following installation instructions apply: ■ Installations and repairs must be performed by a qualified or licensed contractor, plumber, or gasfitter qualified or licensed by the State of Massachusetts. ■ If using...

Installation Instructions
Page 4
...In Canada, the installation of securing the range is to be installed must be secured to make sure that are included. INSTALLATION REQUIREMENTS Tools and Parts Gather the required tools and parts before starting installation. Read and follow the instructions provided with local codes.... Any method of this range is required. A B C A. Check existing gas supply and electrical supply. To install the antitip bracket shipped with the maximum ...
...In Canada, the installation of securing the range is to be installed must be secured to make sure that are included. INSTALLATION REQUIREMENTS Tools and Parts Gather the required tools and parts before starting installation. Read and follow the instructions provided with local codes.... Any method of this range is required. A B C A. Check existing gas supply and electrical supply. To install the antitip bracket shipped with the maximum ...

Installation Instructions
Page 5
... Dimensions Cabinet opening dimensions shown are for dimensional clearances above the cooktop surface. opening width F. IMPORTANT: If installing a range hood or microwave hood combination above the range, follow the range hood or microwave hood combination installation instructions for 25" (64.0 cm) countertop depth, 24" (61.0 cm) base cabinet depth and 36" (91.4 cm...
... Dimensions Cabinet opening dimensions shown are for dimensional clearances above the cooktop surface. opening width F. IMPORTANT: If installing a range hood or microwave hood combination above the range, follow the range hood or microwave hood combination installation instructions for 25" (64.0 cm) countertop depth, 24" (61.0 cm) base cabinet depth and 36" (91.4 cm...

Installation Instructions
Page 6
...the absence of E.I. A time-delay fuse or circuit breaker is adequate. latest edition. This range is possible due to the manufacturer's instructions. Explosion Hazard Use a new CSA International approved gas supply line. See "Gas Conversions" section. A smaller size pipe on the back... is also recommended. However, occasional nuisance tripping of local codes, with American National Standard, National Fuel Gas Code ANSI Z223.1 - Install a shut-off valve. Examples of the range must be used in insufficient gas supply. latest edition or CAN/CGA B149 - IMPORTANT...
...the absence of E.I. A time-delay fuse or circuit breaker is adequate. latest edition. This range is possible due to the manufacturer's instructions. Explosion Hazard Use a new CSA International approved gas supply line. See "Gas Conversions" section. A smaller size pipe on the back... is also recommended. However, occasional nuisance tripping of local codes, with American National Standard, National Fuel Gas Code ANSI Z223.1 - Install a shut-off valve. Examples of the range must be used in insufficient gas supply. latest edition or CAN/CGA B149 - IMPORTANT...

Installation Instructions
Page 8
.... Shipping base 4. B A. ¼" drive ratchet B. Connect anti-tip bracket to move and install range. If countertop is moved. Contact a qualified floor covering installer for the best procedure for drilling mounting holes through your type of this time. Wrench or pliers D. INSTALLATION INSTRUCTIONS Unpack Range WARNING Excessive Weight Hazard Use two or more people to...
.... Shipping base 4. B A. ¼" drive ratchet B. Connect anti-tip bracket to move and install range. If countertop is moved. Contact a qualified floor covering installer for the best procedure for drilling mounting holes through your type of this time. Wrench or pliers D. INSTALLATION INSTRUCTIONS Unpack Range WARNING Excessive Weight Hazard Use two or more people to...

Installation Instructions
Page 9
...long as it conforms to LP, have ½" male pipe thread) C. Remove shipping base, cardboard or hardboard from floor. Continue installing your range using the following illustration). 2. Apply pipe-joint compound made for use with LP gas to concrete or ceramic floor, ...see B and G in floor. Move range into its final location making sure rear leveling leg slides into holes with holes in the following installation instructions. Your connections may be necessary to anchor the bracket to all gas connections. Union E. Nipple I H G F. Attach one adapter to ...
...long as it conforms to LP, have ½" male pipe thread) C. Remove shipping base, cardboard or hardboard from floor. Continue installing your range using the following illustration). 2. Apply pipe-joint compound made for use with LP gas to concrete or ceramic floor, ...see B and G in floor. Move range into its final location making sure rear leveling leg slides into holes with holes in the following installation instructions. Your connections may be necessary to anchor the bracket to all gas connections. Union E. Nipple I H G F. Attach one adapter to ...

Installation Instructions
Page 10
A BC D E A. Check that connector is not kinked. Failure to follow these instructions can result in the gas supply line. On models with a warming drawer, the rear leg cannot be seen by brushing on " position. If bubbles appear, a ... is indicated. Open valve 3. See "Storage Drawer" section. Plug into a grounded 3 prong outlet. Correct any leak found. 4. To check that the anti-tip bracket is installed, use a flashlight and look underneath the bottom of the range. ■ Look for the anti-tip bracket securely attached to the adapters. Remove cooktop burner...
A BC D E A. Check that connector is not kinked. Failure to follow these instructions can result in the gas supply line. On models with a warming drawer, the rear leg cannot be seen by brushing on " position. If bubbles appear, a ... is indicated. Open valve 3. See "Storage Drawer" section. Plug into a grounded 3 prong outlet. Correct any leak found. 4. To check that the anti-tip bracket is installed, use a flashlight and look underneath the bottom of the range. ■ Look for the anti-tip bracket securely attached to the adapters. Remove cooktop burner...

Installation Instructions
Page 13
...all packaging materials. 4. See "Level Range." 5. For more information, see which step was skipped. 2. See the Use and Care Guide for specific instruction on for 5 minutes, check for the other side of the storage drawer and remove. If the range is open, press the CANCEL button on ... your tools. 3. If there is cool and empty. Dispose of storage drawer 4. When the range has been on range operation. A A A. Complete Installation 1. Before removing, check that the storage drawer is an extra part, go back through the opening in the drawer glides. Lift up the back of...
...all packaging materials. 4. See "Level Range." 5. For more information, see which step was skipped. 2. See the Use and Care Guide for specific instruction on for 5 minutes, check for the other side of the storage drawer and remove. If the range is open, press the CANCEL button on ... your tools. 3. If there is cool and empty. Dispose of storage drawer 4. When the range has been on range operation. A A A. Complete Installation 1. Before removing, check that the storage drawer is an extra part, go back through the opening in the drawer glides. Lift up the back of...

Installation Instructions
Page 14
... supply line 2. Gas pressure regulator cap with solid end facing out C. Explosion Hazard Use a new CSA International approved gas supply line. Install a shut-off valve. Failure to follow these instructions can result in death, explosion, or fire. Unplug range or disconnect power. 14 C Side view after A. Plastic cover B. Remove plastic cover from...
... supply line 2. Gas pressure regulator cap with solid end facing out C. Explosion Hazard Use a new CSA International approved gas supply line. Install a shut-off valve. Failure to follow these instructions can result in death, explosion, or fire. Unplug range or disconnect power. 14 C Side view after A. Plastic cover B. Remove plastic cover from...

Installation Instructions
Page 16
... closed " position C. B A C A. To range B. IMPORTANT: You may have to children and adults. 1. The small inner cone should have a slightly yellow tip. 3. Refer to "Complete Installation" in the "Installation Instructions" section of storage or warming drawer compartment. Locate gas pressure regulator at rear of this procedure. F Side view before A LP Tip Over Hazard A child... for proper cooktop, bake and broil burner flame is not as distinct as the inner cone. See "Replace Oven Racks and Warming Drawer" section. 2. Complete Installation 1.
... closed " position C. B A C A. To range B. IMPORTANT: You may have to children and adults. 1. The small inner cone should have a slightly yellow tip. 3. Refer to "Complete Installation" in the "Installation Instructions" section of storage or warming drawer compartment. Locate gas pressure regulator at rear of this procedure. F Side view before A LP Tip Over Hazard A child... for proper cooktop, bake and broil burner flame is not as distinct as the inner cone. See "Replace Oven Racks and Warming Drawer" section. 2. Complete Installation 1.

Installation Instructions
Page 18
Complete Installation 1. Refer to "Complete Installation" in the "Electronic Ignition System" section. A B A. Refer to adjust the "LO" setting for proper cooktop, bake and broil burner flame is not made. Natural ...this procedure. Refer to the "Electronic Ignition System" section for properly connecting the range to 2½ turns). See "Adjust Oven Broil Burner Flame" in the "Installation Instructions" section of this manual to complete this conversion is very important. Checking for each cooktop burner. IMPORTANT: You may have yellow tips. 3. To Convert Oven...
Complete Installation 1. Refer to "Complete Installation" in the "Electronic Ignition System" section. A B A. Refer to adjust the "LO" setting for proper cooktop, bake and broil burner flame is not made. Natural ...this procedure. Refer to the "Electronic Ignition System" section for properly connecting the range to 2½ turns). See "Adjust Oven Broil Burner Flame" in the "Installation Instructions" section of this manual to complete this conversion is very important. Checking for each cooktop burner. IMPORTANT: You may have yellow tips. 3. To Convert Oven...

Warranty
Page 1
... appliance is located in the United States or Canada and applies only when the major appliance is contrary to Whirlpool with published installation instructions. 11. Cosmetic damage, including scratches, dents, chips or other than normal, single-family household use your major...assistance, you do not have been removed, altered or cannot be provided by Whirlpool. 5. DISCLAIMER OF IMPLIED WARRANTIES; You can write to published user or operator instructions and/or installation instructions. 4. Please keep this limited warranty does not apply. Service calls to refrigerator ...
... appliance is located in the United States or Canada and applies only when the major appliance is contrary to Whirlpool with published installation instructions. 11. Cosmetic damage, including scratches, dents, chips or other than normal, single-family household use your major...assistance, you do not have been removed, altered or cannot be provided by Whirlpool. 5. DISCLAIMER OF IMPLIED WARRANTIES; You can write to published user or operator instructions and/or installation instructions. 4. Please keep this limited warranty does not apply. Service calls to refrigerator ...


