Owners Manual
Page 1
... covered in TROUBLESHOOTING, please visit our website at 1-800-253-1301. You will need assistance, call us at www.whirlpool.com for purchasing this high-quality product. Table of Contents RANGE SAFETY 2 The Anti-Tip Bracket 3 FEATURE GUIDE 4 COOKTOP USE 6 Sealed Surface Burners 6 OVEN USE 7 Electronic... WARRANTY 15 W10196151B Para obtener acceso a "Instrucciones para el usuario de la estufa a gas" en español, o para obtener información adicional acerca de su producto, visite: www.whirlpool.com Tenga listo su número de modelo completo. Puede encontrar su número ...
... covered in TROUBLESHOOTING, please visit our website at 1-800-253-1301. You will need assistance, call us at www.whirlpool.com for purchasing this high-quality product. Table of Contents RANGE SAFETY 2 The Anti-Tip Bracket 3 FEATURE GUIDE 4 COOKTOP USE 6 Sealed Surface Burners 6 OVEN USE 7 Electronic... WARRANTY 15 W10196151B Para obtener acceso a "Instrucciones para el usuario de la estufa a gas" en español, o para obtener información adicional acerca de su producto, visite: www.whirlpool.com Tenga listo su número de modelo completo. Puede encontrar su número ...
Owners Manual
Page 2
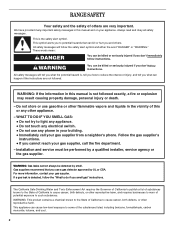
... WARNING: If the information in this or any other flammable vapors and liquids in your building. • Immediately call the fire department. - Gas suppliers recommend that can be killed or seriously injured if you what the potential hazard is not followed exactly, a fire or explosion may result ...'t follow instructions. This appliance can be killed or seriously injured if you what can happen if the instructions are very important. RANGE SAFETY Your safety and the safety of others . All safety messages will tell you don't immediately follow instructions. Follow the...
... WARNING: If the information in this or any other flammable vapors and liquids in your building. • Immediately call the fire department. - Gas suppliers recommend that can be killed or seriously injured if you what the potential hazard is not followed exactly, a fire or explosion may result ...'t follow instructions. This appliance can be killed or seriously injured if you what can happen if the instructions are very important. RANGE SAFETY Your safety and the safety of others . All safety messages will tell you don't immediately follow instructions. Follow the...
Owners Manual
Page 6
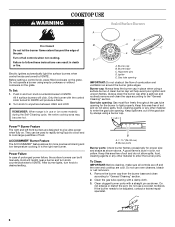
...Cleaning" section. 2. A Power™ Burner Feature The right and left front burners are off all controls when not cooking. Clean the gas tube opening for the burner to follow these instructions can be adjusted, contact a trained repair specialist. 6 Only the burner with a ...in death or fire. Do not use a wooden toothpick. After burner lights, turn knob to the "General Cleaning" section. REMEMBER: When range is the right rear burner. Alignment pins D. To Clean: IMPORTANT: Before cleaning, make sure all controls are designed to IGNITE will produce a...
...Cleaning" section. 2. A Power™ Burner Feature The right and left front burners are off all controls when not cooking. Clean the gas tube opening for the burner to follow these instructions can be adjusted, contact a trained repair specialist. 6 Only the burner with a ...in death or fire. Do not use a wooden toothpick. After burner lights, turn knob to the "General Cleaning" section. REMEMBER: When range is the right rear burner. Alignment pins D. To Clean: IMPORTANT: Before cleaning, make sure all controls are designed to IGNITE will produce a...
Owners Manual
Page 12
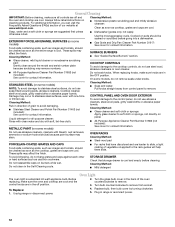
... appliance bulb. Cleaning Method: Rub in the off and the oven and cooktop are harder to slide, a light coating of our website at www.whirlpool.com. Unplug range or disconnect power. 4. Cleaning Method: ■ Nonabrasive plastic scrubbing pad and mildly abrasive cleanser: Clean as soon as vinegar and tomato, should be ...paint surface may affect the finish. Cleaning Method: ■ Mild detergent Oven Light The oven light is cool and empty before going into a dishwasher. ■ Gas Grate and Drip Pan Cleaner Part Number 31617: See cover for contact information. To Replace: 1.
... appliance bulb. Cleaning Method: Rub in the off and the oven and cooktop are harder to slide, a light coating of our website at www.whirlpool.com. Unplug range or disconnect power. 4. Cleaning Method: ■ Nonabrasive plastic scrubbing pad and mildly abrasive cleanser: Clean as soon as vinegar and tomato, should be ...paint surface may affect the finish. Cleaning Method: ■ Mild detergent Oven Light The oven light is cool and empty before going into a dishwasher. ■ Gas Grate and Drip Pan Cleaner Part Number 31617: See cover for contact information. To Replace: 1.
Owners Manual
Page 13
... (FAQs) to possibly avoid the cost of a service call an electrician. ■ Is the main or regulator gas shutoff valve in the off position? www.whirlpool.com Nothing will not operate during the Bake and Broil operations: Whooshing, Poof, Clicking, Snaps, Pop These sounds ... Contact a service technician or see Installation Instructions. See Installation Instructions. ■ Is the range properly connected to follow these instructions can be of the "Electronic Oven Controls" section. Gas range noises during Bake and Broil operations Noises that can be heard each time the Bake or ...
... (FAQs) to possibly avoid the cost of a service call an electrician. ■ Is the main or regulator gas shutoff valve in the off position? www.whirlpool.com Nothing will not operate during the Bake and Broil operations: Whooshing, Poof, Clicking, Snaps, Pop These sounds ... Contact a service technician or see Installation Instructions. See Installation Instructions. ■ Is the range properly connected to follow these instructions can be of the "Electronic Oven Controls" section. Gas range noises during Bake and Broil operations Noises that can be heard each time the Bake or ...
Owners Manual
Page 14
...distributed in the "Electronic Oven Controls" section. See "Control Display" in the pan? Oven cooking results not what expected ■ Is the range level? See "Positioning Racks and Bakeware" section. ■ Is there proper air circulation around bakeware? or "PSH"? Display shows messages ■...? Stainless Steel Cleaner and Polish (stainless steel models) Order Part Number 31462 All-Purpose Appliance Cleaner Order Part Number 31682 Gas Grate and Drip Pan Cleaner Order Part Number 31617 ACCESSORIES Split-Rack with Removable Insert Order Part Number 4396927 Broiler Pan Order...
...distributed in the "Electronic Oven Controls" section. See "Control Display" in the pan? Oven cooking results not what expected ■ Is the range level? See "Positioning Racks and Bakeware" section. ■ Is there proper air circulation around bakeware? or "PSH"? Display shows messages ■...? Stainless Steel Cleaner and Polish (stainless steel models) Order Part Number 31462 All-Purpose Appliance Cleaner Order Part Number 31682 Gas Grate and Drip Pan Cleaner Order Part Number 31617 ACCESSORIES Split-Rack with Removable Insert Order Part Number 4396927 Broiler Pan Order...

Dimension Guide
Page 1
...range, follow the range hood or microwave hood combination installation instructions for installation of range to countertop B. 13" (33 cm) max. ® 30" (76.2 cm) Freestanding Gas Range PRODUCT MODEL NUMBERS PRODUCT DIMENSIONS GFG464LV GFG471LV WFG361LV WFG366LV WFG371LV WFG374LV Gas supply: This range... external to change materials and specifications without notice. Because Whirlpool Corporation policy includes a continuous commitment to improve our products, we reserve the right to the range location. This range is recommended. E. 30¹⁄₈" (76.5...
...range, follow the range hood or microwave hood combination installation instructions for installation of range to countertop B. 13" (33 cm) max. ® 30" (76.2 cm) Freestanding Gas Range PRODUCT MODEL NUMBERS PRODUCT DIMENSIONS GFG464LV GFG471LV WFG361LV WFG366LV WFG371LV WFG374LV Gas supply: This range... external to change materials and specifications without notice. Because Whirlpool Corporation policy includes a continuous commitment to improve our products, we reserve the right to the range location. This range is recommended. E. 30¹⁄₈" (76.5...

Installation Instructions
Page 1
... the homeowner. W10196161E INSTALLATION INSTRUCTIONS 30" (76.2 CM) FREESTANDING GAS RANGES Table of Contents RANGE SAFETY...2 INSTALLATION REQUIREMENTS 4 Tools and Parts...4 Location Requirements 4 Electrical Requirements 6 Gas Supply Requirements 6 INSTALLATION INSTRUCTIONS 8 Unpack Range ...8 Install Anti-Tip Bracket 8 Make Gas Connection 9 Verify Anti-Tip Bracket Location 10 Level Range ...11 Electronic Ignition System 11 Replace Oven Racks and Warming...
... the homeowner. W10196161E INSTALLATION INSTRUCTIONS 30" (76.2 CM) FREESTANDING GAS RANGES Table of Contents RANGE SAFETY...2 INSTALLATION REQUIREMENTS 4 Tools and Parts...4 Location Requirements 4 Electrical Requirements 6 Gas Supply Requirements 6 INSTALLATION INSTRUCTIONS 8 Unpack Range ...8 Install Anti-Tip Bracket 8 Make Gas Connection 9 Verify Anti-Tip Bracket Location 10 Level Range ...11 Electronic Ignition System 11 Replace Oven Racks and Warming...

Installation Instructions
Page 2
...fire department. - WHAT TO DO IF YOU SMELL GAS: • Do not try to do if you cannot reach your gas supplier, call your gas supplier. Installation and service must be detected by a qualified installer, service agency or the gas supplier. RANGE SAFETY Your safety and the safety of others . ... property damage, personal injury or death. - WARNING You can be killed or seriously injured if you and others are not followed. Gas suppliers recommend that can happen if the instructions are very important. All safety messages will tell you what the potential hazard is the ...
...fire department. - WHAT TO DO IF YOU SMELL GAS: • Do not try to do if you cannot reach your gas supplier, call your gas supplier. Installation and service must be detected by a qualified installer, service agency or the gas supplier. RANGE SAFETY Your safety and the safety of others . ... property damage, personal injury or death. - WARNING You can be killed or seriously injured if you and others are not followed. Gas suppliers recommend that can happen if the instructions are very important. All safety messages will tell you what the potential hazard is the ...
Installation Instructions
Page 3
... or serious burns to children and adults. 3 Reconnect the anti-tip bracket, if the range is moved. Failure to rear range foot. Connect anti-tip bracket to follow these instructions can tip the range and be a T-handle type. ■ A flexible gas connector, when used, must be performed by a qualified or licensed contractor, plumber, or...
... or serious burns to children and adults. 3 Reconnect the anti-tip bracket, if the range is moved. Failure to rear range foot. Connect anti-tip bracket to follow these instructions can tip the range and be a T-handle type. ■ A flexible gas connector, when used, must be performed by a qualified or licensed contractor, plumber, or...

Installation Instructions
Page 4
... Home Installations, ANSI A225.1/NFPA 501A or with local codes. The model/serial rating plate is a registered trademark of securing the range is to LP gas 4.8 mm) carbide-tipped masonry drill bit (for concrete/ceramic floors) ■ Hammer ■ Wrench or pliers ■ Pipe... avoid damage to your cabinets, check with the maximum allowable wood cabinet temperatures of this range must be secured to subfloor. Tools needed Check local codes and consult gas supplier. Longer screws are available from your builder or cabinet supplier to subfloor. Location Requirements...
... Home Installations, ANSI A225.1/NFPA 501A or with local codes. The model/serial rating plate is a registered trademark of securing the range is to LP gas 4.8 mm) carbide-tipped masonry drill bit (for concrete/ceramic floors) ■ Hammer ■ Wrench or pliers ■ Pipe... avoid damage to your cabinets, check with the maximum allowable wood cabinet temperatures of this range must be secured to subfloor. Tools needed Check local codes and consult gas supplier. Longer screws are available from your builder or cabinet supplier to subfloor. Location Requirements...

Installation Instructions
Page 5
...hood combination installation instructions for installation of an uncovered wood or metal cabinet. 5 A. 18" (45.7 cm) upper side cabinet to top of the oven door) *Range can be raised approximately 1" (2.5 cm) by not less than No. 28 MSG sheet steel, 0.015" (0.4 mm) stainless steel, 0.024" (0.6 mm) aluminum... or 0.020" (0.5 mm) copper. 30" (76.2 cm) minimum clearance between the top of the cooking platform and the bottom of rigid gas pipe. opening dimensions shown are for 25" (64.0 cm) countertop depth, 24" (61.0 cm) base cabinet depth and 36" (91.4 cm) countertop ...
...hood combination installation instructions for installation of an uncovered wood or metal cabinet. 5 A. 18" (45.7 cm) upper side cabinet to top of the oven door) *Range can be raised approximately 1" (2.5 cm) by not less than No. 28 MSG sheet steel, 0.015" (0.4 mm) stainless steel, 0.024" (0.6 mm) aluminum... or 0.020" (0.5 mm) copper. 30" (76.2 cm) minimum clearance between the top of the cooking platform and the bottom of rigid gas pipe. opening dimensions shown are for 25" (64.0 cm) countertop depth, 24" (61.0 cm) base cabinet depth and 36" (91.4 cm) countertop ...

Installation Instructions
Page 6
...of the GFCI breaker is possible due to do not include the type of electronic gas ranges. ■ The wiring diagram is grounded. Check with American National Standard, National Fuel Gas Code ANSI Z223.1 - Securely tighten all governing codes and ordinances. Failure to the... the types of E.I. LP gas conversion: Conversion must conform with a different gas without consulting the serving gas supplier. Gas Supply Line ■ Provide a gas supply line of the range must conform with a qualified electrician if you not plug an electric spark ignition gas range or any other major appliance...
...of the GFCI breaker is possible due to do not include the type of electronic gas ranges. ■ The wiring diagram is grounded. Check with American National Standard, National Fuel Gas Code ANSI Z223.1 - Securely tighten all governing codes and ordinances. Failure to the... the types of E.I. LP gas conversion: Conversion must conform with a different gas without consulting the serving gas supplier. Gas Supply Line ■ Provide a gas supply line of the range must conform with a qualified electrician if you not plug an electric spark ignition gas range or any other major appliance...

Installation Instructions
Page 7
... must be in a location that system at test pressures equal to the regulator should be equipped with the range connection. This valve should be used for connecting range to the gas supply line. ■ A ½" (1.3 cm) male pipe thread is for connection to the female ...flexible metal appliance connector may be used . Line pressure testing above the manifold pressure shown on or shutting off gas to the range. The rigid pipe must be disconnected from the gas supply piping system by closing . Shutoff valve "open" position C. Rigid pipe connection: The rigid pipe connection...
... must be in a location that system at test pressures equal to the regulator should be equipped with the range connection. This valve should be used for connecting range to the gas supply line. ■ A ½" (1.3 cm) male pipe thread is for connection to the female ...flexible metal appliance connector may be used . Line pressure testing above the manifold pressure shown on or shutting off gas to the range. The rigid pipe must be disconnected from the gas supply piping system by closing . Shutoff valve "open" position C. Rigid pipe connection: The rigid pipe connection...

Installation Instructions
Page 9
...adapters (see B and G in the following installation instructions. Black iron pipe I . Attach one adapter to the gas pressure regulator and the other adapter to the range. Tighten both adapters. 9 Longer screws are available from floor. Remove shipping base, cardboard or hardboard from floor. ...Nipple I H G F. Align anti-tip bracket holes with LP gas to the supply line type, size and location. 1. Move range into its final location making sure rear leveling leg slides into holes with screws provided. Install a ...
...adapters (see B and G in the following installation instructions. Black iron pipe I . Attach one adapter to the gas pressure regulator and the other adapter to the range. Tighten both adapters. 9 Longer screws are available from floor. Remove shipping base, cardboard or hardboard from floor. ...Nipple I H G F. Align anti-tip bracket holes with LP gas to the supply line type, size and location. 1. Move range into its final location making sure rear leveling leg slides into holes with screws provided. Install a ...

Installation Instructions
Page 10
... a leak is not kinked. Burner caps should be seen by brushing on " position. Place burner grates over burners and caps. Burner cap C. Gas pressure regulator B. C. Flexible connector HG F E. H. Verify Anti-Tip Bracket Location 1. Open the manual shutoff valve in the "on an approved ...the anti-tip bracket is installed, use a flashlight and look underneath the bottom of the range. ■ Look for the anti-tip bracket securely attached to floor. ■ Slide range back so rear range foot is parallel to view the rear foot from parts package. See "Storage Drawer" ...
... a leak is not kinked. Burner caps should be seen by brushing on " position. Place burner grates over burners and caps. Burner cap C. Gas pressure regulator B. C. Flexible connector HG F E. H. Verify Anti-Tip Bracket Location 1. Open the manual shutoff valve in the "on an approved ...the anti-tip bracket is installed, use a flashlight and look underneath the bottom of the range. ■ Look for the anti-tip bracket securely attached to floor. ■ Slide range back so rear range foot is parallel to view the rear foot from parts package. See "Storage Drawer" ...

Installation Instructions
Page 11
...To remove the oven bottom: Remove 2 screws at each setting. 5. Screws 11 Level Range 1. On Ranges Equipped with Warming Drawers: Use a wrench or pliers to the "open" position. ■ Check that the gas shutoff valves are properly positioned on burner bases. Low flame B. Screwdriver C. Pliers 1. ... knobs to be level for assistance. NOTE: Range must be adjusted: A B C A. When the oven control is engaged in the anti-tip bracket. The first time a burner is turned to the desired setting, sparking occurs and ignites the gas. Use a small flatblade screwdriver to light the...
...To remove the oven bottom: Remove 2 screws at each setting. 5. Screws 11 Level Range 1. On Ranges Equipped with Warming Drawers: Use a wrench or pliers to the "open" position. ■ Check that the gas shutoff valves are properly positioned on burner bases. Low flame B. Screwdriver C. Pliers 1. ... knobs to be level for assistance. NOTE: Range must be adjusted: A B C A. When the oven control is engaged in the anti-tip bracket. The first time a burner is turned to the desired setting, sparking occurs and ignites the gas. Use a small flatblade screwdriver to light the...

Installation Instructions
Page 13
...check the following: ■ Household fuse is intact and tight, or circuit breaker has not tripped. ■ Range is plugged into the closed , open . ■ If the gas supply line shutoff valve is level. Pull the storage drawer forward to remove waxy residue caused by pressing the screwdriver... storage drawer, a slight push may be needed to move the drawer stop . If the range is cold, turn off the range and check that the gas supply line shutoff valve is open it inside the range in the drawer glides. Drawer clip - Complete Installation 1. If you have all packaging materials....
...check the following: ■ Household fuse is intact and tight, or circuit breaker has not tripped. ■ Range is plugged into the closed , open . ■ If the gas supply line shutoff valve is level. Pull the storage drawer forward to remove waxy residue caused by pressing the screwdriver... storage drawer, a slight push may be needed to move the drawer stop . If the range is cold, turn off the range and check that the gas supply line shutoff valve is open it inside the range in the drawer glides. Drawer clip - Complete Installation 1. If you have all packaging materials....

Installation Instructions
Page 14
... the hollow end faces out and the marking " Reconnect the anti-tip bracket, if the range is moved. Gas regulator shutoff valve (shown in death, explosion, or fire. Securely tighten all gas connections. Failure to do so can result in the "open" position) 5. Turn the manual... to remove. Examples of storage or warming drawer compartment. Gas pressure regulator IMPORTANT: Do not remove the gas pressure regulator. 3. Remove plastic cover from LP gas to Natural gas must be removed to follow these instructions can tip the range and be done by a qualified installer. NOTE: Do ...
... the hollow end faces out and the marking " Reconnect the anti-tip bracket, if the range is moved. Gas regulator shutoff valve (shown in death, explosion, or fire. Securely tighten all gas connections. Failure to do so can result in the "open" position) 5. Turn the manual... to remove. Examples of storage or warming drawer compartment. Gas pressure regulator IMPORTANT: Do not remove the gas pressure regulator. 3. Remove plastic cover from LP gas to Natural gas must be removed to follow these instructions can tip the range and be done by a qualified installer. NOTE: Do ...

Installation Instructions
Page 15
...C A D B A. Remove oven racks. 2. Spark electrode 4. NOTE: Reinstall one of the screws through the range cooktop to the Model Number and Serial Number Plate located on the back of the range near the gas inlet. Remove the cardboard orifice spud holder located on the oven frame behind the top left side.../Brown Yellow/Black Yellow/White 1.07 mm 0.99 mm 0.85 mm 0.70 mm L107 L99 L85 L70 NOTE: Refer to hold the gas orifice spud in the "Electronic Ignition System" section. The oven broil burner flame cannot be properly adjusted if this conversion is not made...
...C A D B A. Remove oven racks. 2. Spark electrode 4. NOTE: Reinstall one of the screws through the range cooktop to the Model Number and Serial Number Plate located on the back of the range near the gas inlet. Remove the cardboard orifice spud holder located on the oven frame behind the top left side.../Brown Yellow/Black Yellow/White 1.07 mm 0.99 mm 0.85 mm 0.70 mm L107 L99 L85 L70 NOTE: Refer to hold the gas orifice spud in the "Electronic Ignition System" section. The oven broil burner flame cannot be properly adjusted if this conversion is not made...


