

Owners Manual
Page 2
...5 Electrical Requirements 5 PARTS AND FEATURES 6 Turntable 6 MICROWAVE OVEN CONTROL 6 Display 6 Start 7 Jet Start Feature 7 Off 7 Clock 7 Tones 7 Timer 7 Control Lock 7 Demo Mode 7 Options 7 MICROWAVE OVEN USE 8 Food Characteristics 8 Cooking Guidelines 8 Cookware and Dinnerware 8 Aluminum Foil and Metal 9 Microwave Cooking Power 9 Manual Cooking 9 Cooking in Stages 10 Sensor Cooking 10 Sensor Popcorn 10 Sensor Cook 11 Sensor Reheat 11 Auto Defrost 12 Warm Hold 12 MICROWAVE OVEN CARE 13 General Cleaning 13 TROUBLESHOOTING 14 ASSISTANCE OR SERVICE 15 Replacement...
...5 Electrical Requirements 5 PARTS AND FEATURES 6 Turntable 6 MICROWAVE OVEN CONTROL 6 Display 6 Start 7 Jet Start Feature 7 Off 7 Clock 7 Tones 7 Timer 7 Control Lock 7 Demo Mode 7 Options 7 MICROWAVE OVEN USE 8 Food Characteristics 8 Cooking Guidelines 8 Cookware and Dinnerware 8 Aluminum Foil and Metal 9 Microwave Cooking Power 9 Manual Cooking 9 Cooking in Stages 10 Sensor Cooking 10 Sensor Popcorn 10 Sensor Cook 11 Sensor Reheat 11 Auto Defrost 12 Warm Hold 12 MICROWAVE OVEN CARE 13 General Cleaning 13 TROUBLESHOOTING 14 ASSISTANCE OR SERVICE 15 Replacement...
Owners Manual
Page 3
... in this section and in the provided Installation Instructions. ■ Install or locate the microwave oven only in use the cavity for example, closed , turn oven off, and disconnect the power cord, or shut off the pad and touch electrical parts involving a risk of electric shock. This type of electric shock. ■ Do not clean with the provided Installation Instructions. ■ Some products such as water, coffee, or tea are...
... in this section and in the provided Installation Instructions. ■ Install or locate the microwave oven only in use the cavity for example, closed , turn oven off, and disconnect the power cord, or shut off the pad and touch electrical parts involving a risk of electric shock. This type of electric shock. ■ Do not clean with the provided Installation Instructions. ■ Some products such as water, coffee, or tea are...
Owners Manual
Page 4
... operate the oven if it is operated in convection, combination, grill or "PAN BROWN" mode (on the microwave oven. IMPORTANT SAFETY INSTRUCTIONS ■ Do not operate any heating or cooking appliance beneath the microwave oven. ■ Do not mount microwave oven over a sink. ■ Do not cover racks or any other than manufacturer's recommended accessories, in this microwave oven when not in use. ■ Do not store anything directly on top of the microwave oven...
... operate the oven if it is operated in convection, combination, grill or "PAN BROWN" mode (on the microwave oven. IMPORTANT SAFETY INSTRUCTIONS ■ Do not operate any heating or cooking appliance beneath the microwave oven. ■ Do not mount microwave oven over a sink. ■ Do not cover racks or any other than manufacturer's recommended accessories, in this microwave oven when not in use. ■ Do not store anything directly on top of the microwave oven...

Owners Manual
Page 5
... circuit breaker. If vents are in the "Assistance or Service" section. ■ Do not block the exhaust vents or air intake openings. Observe all cord connected appliances: The microwave oven must be built into a grounded 3 prong outlet. or 20-amp electrical supply with a soft, damp cloth. 3. Do not use of the trim kits listed in place to move and install microwave oven. Do not remove ground prong. IMPORTANT: The control side of any needed repairs...
... circuit breaker. If vents are in the "Assistance or Service" section. ■ Do not block the exhaust vents or air intake openings. Observe all cord connected appliances: The microwave oven must be built into a grounded 3 prong outlet. or 20-amp electrical supply with a soft, damp cloth. 3. Do not use of the trim kits listed in place to move and install microwave oven. Do not remove ground prong. IMPORTANT: The control side of any needed repairs...
Owners Manual
Page 6
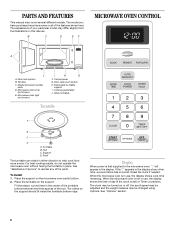
Door lock system B. Door open push button H. To Install: 1. Display When power is not in use , the display shows cook time remaining. Cooking guide label J. Support D. Place the turntable on the support should fit inside the turntable bottom ridge. Microwave oven light (not shown) I . Hub C. The rollers on the support. When the microwave oven is in use , the display shows the time of day (if the clock is set) or Timer countdown. When the microwave oven is first supplied to the microwave oven, ":" will appear in...
Door lock system B. Door open push button H. To Install: 1. Display When power is not in use , the display shows cook time remaining. Cooking guide label J. Support D. Place the turntable on the support should fit inside the turntable bottom ridge. Microwave oven light (not shown) I . Hub C. The rollers on the support. When the microwave oven is in use , the display shows the time of day (if the clock is set) or Timer countdown. When the microwave oven is first supplied to the microwave oven, ":" will appear in...
Owners Manual
Page 9
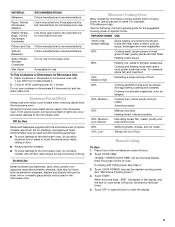
... gold or silver trim or a metallic glaze should not be used in the microwave oven. Cooking and heating foods that need a cook power lower than high. Manual Cooking To Use: 1. If cooking with another metal object during microwave cooking. Touch START. Pottery and Clay Follow manufacturer's recommendations. Microwave Cooking Power Many recipes for microwave cooking specify which cooking power to cook. Place food on some metal can occur and cause damage to touch the inside cavity walls...
... gold or silver trim or a metallic glaze should not be used in the microwave oven. Cooking and heating foods that need a cook power lower than high. Manual Cooking To Use: 1. If cooking with another metal object during microwave cooking. Touch START. Pottery and Clay Follow manufacturer's recommendations. Microwave Cooking Power Many recipes for microwave cooking specify which cooking power to cook. Place food on some metal can occur and cause damage to touch the inside cavity walls...

Owners Manual
Page 10
... by touching JET START control. Touch OFF or open the door to be sure to leave a large enough vent opening to allow the steam to 3 stages, plus a defrosting stage. The loose-fitting lid allows enough steam to escape to clear the display and/or stop reminder tones. Touch COOK TIME. Two tones will scroll across display. Sensor Popcorn The sensor in the microwave oven detects humidity released...
... by touching JET START control. Touch OFF or open the door to be sure to leave a large enough vent opening to allow the steam to 3 stages, plus a defrosting stage. The loose-fitting lid allows enough steam to escape to clear the display and/or stop reminder tones. Touch COOK TIME. Two tones will scroll across display. Sensor Popcorn The sensor in the microwave oven detects humidity released...
Owners Manual
Page 11
... 2-3 minutes after cooking. Touch OFF or open the door to clear the display and/or stop reminder tones. Sensor Cook The sensor in the microwave oven detects humidity released from package. Let stand 2-3 minutes after cooking. NOTE: When covering foods, make sure the vent opening is large enough for ingredient amounts. Place food on microwave-safe plate, cover with plastic wrap and vent. Use the following chart as a guide. Soup...
... 2-3 minutes after cooking. Touch OFF or open the door to clear the display and/or stop reminder tones. Sensor Cook The sensor in the microwave oven detects humidity released from package. Let stand 2-3 minutes after cooking. NOTE: When covering foods, make sure the vent opening is large enough for ingredient amounts. Place food on microwave-safe plate, cover with plastic wrap and vent. Use the following chart as a guide. Soup...

Owners Manual
Page 12
... defrost time. To Set at the end of -cycle tones will sound, followed by reminder tones. 4. Place hot cooked food on the turntable and close door, and touch START to check, turn food if necessary, close the door. 2. Place all meats in "Manual Cooking" section, and use 30% cooking power. Touch AUTO DEFROST. Touch OFF or open the door to clear the display and/or stop reminder tones. "WARM" will...
... defrost time. To Set at the end of -cycle tones will sound, followed by reminder tones. 4. Place hot cooked food on the turntable and close door, and touch START to check, turn food if necessary, close the door. 2. Place all meats in "Manual Cooking" section, and use 30% cooking power. Touch AUTO DEFROST. Touch OFF or open the door to clear the display and/or stop reminder tones. "WARM" will...
Owners Manual
Page 13
... cleanser and scouring pad ■ Dishwasher 13 Steam will soften soil. TURNTABLE Replace turntable immediately after cleaning. Stainless Steel (on cleaning products. Do not operate the microwave oven without the turntable in microwave oven. MICROWAVE OVEN CARE General Cleaning IMPORTANT: Before cleaning, make sure all -purpose cleaner: Rinse with clean water and dry with soft, lint-free cloth. ■ Vinegar for hard water spots CONTROL PANEL ■ Sponge or soft cloth and water...
... cleanser and scouring pad ■ Dishwasher 13 Steam will soften soil. TURNTABLE Replace turntable immediately after cleaning. Stainless Steel (on cleaning products. Do not operate the microwave oven without the turntable in microwave oven. MICROWAVE OVEN CARE General Cleaning IMPORTANT: Before cleaning, make sure all -purpose cleaner: Rinse with clean water and dry with soft, lint-free cloth. ■ Vinegar for hard water spots CONTROL PANEL ■ Sponge or soft cloth and water...
Owners Manual
Page 14
...% cooking power. Remove turntable. Remove and clean turntable hub, support and rollers. If it still is the Demo Mode in the home. See "Assistance or Service" section. Do not operate the microwave oven without turntable and turntable support working , call for service. There has been a power failure or the Clock time has been turned off ? See "Display" section to reset or turn on . See "Clock" section to clear display. Display shows time countdown, but the microwave oven is on Clock. See "Timer" section...
...% cooking power. Remove turntable. Remove and clean turntable hub, support and rollers. If it still is the Demo Mode in the home. See "Assistance or Service" section. Do not operate the microwave oven without turntable and turntable support working , call for service. There has been a power failure or the Clock time has been turned off ? See "Display" section to reset or turn on . See "Clock" section to clear display. Display shows time countdown, but the microwave oven is on Clock. See "Timer" section...
Owners Manual
Page 15
... , follow the instructions below. Call the Whirlpool Customer eXperience Center toll free: 1-800-253-1301. It may save you use only FSP® replacement parts. To locate FSP® replacement parts in your area, you still need to fulfill the product warranty and provide afterwarranty service, anywhere in your appliance. See "Assistance or Service" section for assistance or service, please check "Troubleshooting." KIT SIZE KIT MODEL NUMBERS/COLORS FOR INSTALLATION OVER OVEN MODELS 24...
... , follow the instructions below. Call the Whirlpool Customer eXperience Center toll free: 1-800-253-1301. It may save you use only FSP® replacement parts. To locate FSP® replacement parts in your area, you still need to fulfill the product warranty and provide afterwarranty service, anywhere in your appliance. See "Assistance or Service" section for assistance or service, please check "Troubleshooting." KIT SIZE KIT MODEL NUMBERS/COLORS FOR INSTALLATION OVER OVEN MODELS 24...
Owners Manual
Page 16
... serial number has been altered or removed from your major appliance is located in accordance with the product, Whirlpool Corporation or Whirlpool Canada LP (hereafter "Whirlpool") will need to know your major appliance for Factory Specified Parts and repair labor to correct defects in which it . Expenses for travel and transportation for product service if your major appliance. Major appliances with electrical or plumbing codes...
... serial number has been altered or removed from your major appliance is located in accordance with the product, Whirlpool Corporation or Whirlpool Canada LP (hereafter "Whirlpool") will need to know your major appliance for Factory Specified Parts and repair labor to correct defects in which it . Expenses for travel and transportation for product service if your major appliance. Major appliances with electrical or plumbing codes...
Installation Instructions
Page 3
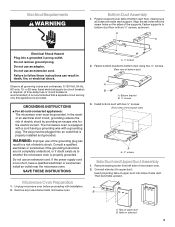
...-Hz, AC-only, 15- or 20-amp fused electrical supply (or circuit breaker) is required. (A time-delay fuse or circuit breaker is recommended.) It is recommended that a separate circuit serving only this appliance be plugged into an outlet that is equipped with a cord having a grounding wire with installation. 2. GROUNDING INSTRUCTIONS s For all cord connected appliances: The microwave oven must be provided. Remove any loose items inside each support. A. ¹⁄₂" screws 2. Align the...
...-Hz, AC-only, 15- or 20-amp fused electrical supply (or circuit breaker) is required. (A time-delay fuse or circuit breaker is recommended.) It is recommended that a separate circuit serving only this appliance be plugged into an outlet that is equipped with a cord having a grounding wire with installation. 2. GROUNDING INSTRUCTIONS s For all cord connected appliances: The microwave oven must be provided. Remove any loose items inside each support. A. ¹⁄₂" screws 2. Align the...
Technical Guide
Page 3
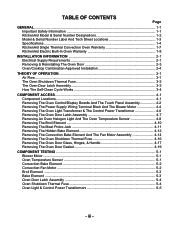
...Door Latch Assembly 3-3 How The Self-Clean Cycle Works 3-4 COMPONENT ACCESS ...4-1 Component Locations ...4-1 Removing The Oven Control/Display Boards And The Touch Panel Assembly 4-2 Removing The Power Supply Wiring Terminal Block And The Blower Motor 4-4 Removing The Oven Light Transformer & The Control Power Transformer 4-6 Removing The Oven Door Latch Assembly 4-7 Removing An Oven Halogen Light And The Oven Temperature Sensor 4-8 Removing The Broil Element 4-10 Removing The Meat Probe Jack 4-11 Removing The Hidden Bake Element 4-12 Removing The Convection Bake Element And The Fan...
...Door Latch Assembly 3-3 How The Self-Clean Cycle Works 3-4 COMPONENT ACCESS ...4-1 Component Locations ...4-1 Removing The Oven Control/Display Boards And The Touch Panel Assembly 4-2 Removing The Power Supply Wiring Terminal Block And The Blower Motor 4-4 Removing The Oven Light Transformer & The Control Power Transformer 4-6 Removing The Oven Door Latch Assembly 4-7 Removing An Oven Halogen Light And The Oven Temperature Sensor 4-8 Removing The Broil Element 4-10 Removing The Meat Probe Jack 4-11 Removing The Hidden Bake Element 4-12 Removing The Convection Bake Element And The Fan...
Technical Guide
Page 8
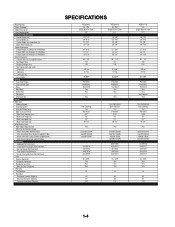
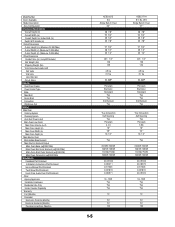
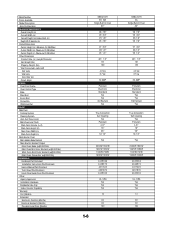
... Broil Econo Broil Convection Child Lock Out Interior Main Oven Cooking System Cleaning System Auto Self Clean Latch Main Oven Liner Finish Main Oven Volume (cu ft) Main Oven Height (in) Main Oven Width (in) Main Oven Depth (in) Main Electric Oven Main Hidden Bake Element Main Electric Element Output Main Oven Bake (w@240/208v) Main Oven Broil Inner Element (w@240/208v) Main Oven Broil Outer Element (w@240/208) Main Oven Convection )w@240/208v) Miscellaneous Cookbook Part/Comment Installation Instructions Part/Comment Service Manual Part/Comment Tech Sheet Part/Comment Use & Care Guide Oven...
... Broil Econo Broil Convection Child Lock Out Interior Main Oven Cooking System Cleaning System Auto Self Clean Latch Main Oven Liner Finish Main Oven Volume (cu ft) Main Oven Height (in) Main Oven Width (in) Main Oven Depth (in) Main Electric Oven Main Hidden Bake Element Main Electric Element Output Main Oven Bake (w@240/208v) Main Oven Broil Inner Element (w@240/208v) Main Oven Broil Outer Element (w@240/208) Main Oven Convection )w@240/208v) Miscellaneous Cookbook Part/Comment Installation Instructions Part/Comment Service Manual Part/Comment Tech Sheet Part/Comment Use & Care Guide Oven...
Technical Guide
Page 9
... Broil Econo Broil Convection Child Lock Out Interior Main Oven Cooking System Cleaning System Auto Self Clean Latch Main Oven Liner Finish Main Oven Volume (cu ft) Main Oven Height (in) Main Oven Width (in) Main Oven Depth (in) Main Electric Oven Main Hidden Bake Element Main Electric Element Output Main Oven Bake (w@240/208v) Main Oven Broil Inner Element (w@240/208v) Main Oven Broil Outer Element (w@240/208) Main Oven Convection )w@240/208v) Miscellaneous Cookbook Part/Comment Installation Instructions Part/Comment Service Manual Part/Comment Tech Sheet Part/Comment Use & Care Guide Oven...
... Broil Econo Broil Convection Child Lock Out Interior Main Oven Cooking System Cleaning System Auto Self Clean Latch Main Oven Liner Finish Main Oven Volume (cu ft) Main Oven Height (in) Main Oven Width (in) Main Oven Depth (in) Main Electric Oven Main Hidden Bake Element Main Electric Element Output Main Oven Bake (w@240/208v) Main Oven Broil Inner Element (w@240/208v) Main Oven Broil Outer Element (w@240/208) Main Oven Convection )w@240/208v) Miscellaneous Cookbook Part/Comment Installation Instructions Part/Comment Service Manual Part/Comment Tech Sheet Part/Comment Use & Care Guide Oven...
Technical Guide
Page 10
... Broil Econo Broil Convection Child Lock Out Interior Main Oven Cooking System Cleaning System Auto Self Clean Latch Main Oven Liner Finish Main Oven Volume (cu ft) Main Oven Height (in) Main Oven Width (in) Main Oven Depth (in) Main Electric Oven Main Hidden Bake Element Main Electric Element Output Main Oven Bake (w@240/208v) Main Oven Broil Inner Element (w@240/208v) Main Oven Broil Outer Element (w@240/208) Main Oven Convection )w@240/208v) Miscellaneous Cookbook Part/Comment Installation Instructions Part/Comment Service Manual Part/Comment Tech Sheet Part/Comment Use & Care Guide Oven...
... Broil Econo Broil Convection Child Lock Out Interior Main Oven Cooking System Cleaning System Auto Self Clean Latch Main Oven Liner Finish Main Oven Volume (cu ft) Main Oven Height (in) Main Oven Width (in) Main Oven Depth (in) Main Electric Oven Main Hidden Bake Element Main Electric Element Output Main Oven Bake (w@240/208v) Main Oven Broil Inner Element (w@240/208v) Main Oven Broil Outer Element (w@240/208) Main Oven Convection )w@240/208v) Miscellaneous Cookbook Part/Comment Installation Instructions Part/Comment Service Manual Part/Comment Tech Sheet Part/Comment Use & Care Guide Oven...
Technical Guide
Page 11
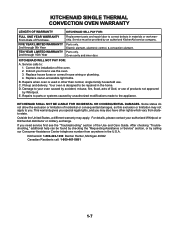
... the Use and Care Guide. Electric element, electronic control, & convection element. C. KitchenAid: 1-800-422-1230 Benton Harbor, Michigan 49022 Canadian Residents call: 1-800-461-5681 1-7 KITCHENAID SINGLE THERMAL CONVECTION OVEN WARRANTY LENGTH OF WARRANTY KITCHENAID WILL PAY FOR: FULL ONE YEAR WARRANTY From Date of the oven. 2. Service must be found by checking the "Requesting Assistance or Service" section, or by Whirlpool. Correct the installation of Purchase. E. After checking "Troubleshooting...
... the Use and Care Guide. Electric element, electronic control, & convection element. C. KitchenAid: 1-800-422-1230 Benton Harbor, Michigan 49022 Canadian Residents call: 1-800-461-5681 1-7 KITCHENAID SINGLE THERMAL CONVECTION OVEN WARRANTY LENGTH OF WARRANTY KITCHENAID WILL PAY FOR: FULL ONE YEAR WARRANTY From Date of the oven. 2. Service must be found by checking the "Requesting Assistance or Service" section, or by Whirlpool. Correct the installation of Purchase. E. After checking "Troubleshooting...
Technical Guide
Page 47
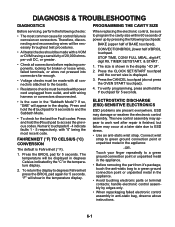
...-static bag, observe above instructions. 6-1 Connect wrist strap to degrees Fahrenheit press the BROIL pad again for control failure is shown in the "Sabbath Mode"? STOP TIME, CONV FULL MEAL, digit #7, digit #9, TIMER SET/START, & START. 1. ESD may occur at a later date due to work well after repair is finished, but failure may damage or weaken the electronic control assembly. The temperature will be necessary throughout...
...-static bag, observe above instructions. 6-1 Connect wrist strap to degrees Fahrenheit press the BROIL pad again for control failure is shown in the "Sabbath Mode"? STOP TIME, CONV FULL MEAL, digit #7, digit #9, TIMER SET/START, & START. 1. ESD may occur at a later date due to work well after repair is finished, but failure may damage or weaken the electronic control assembly. The temperature will be necessary throughout...


