
Technical Guide
Page 31
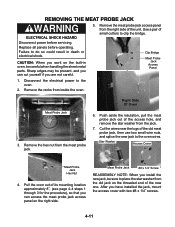
Sharp edges may be careful when handling the sheet metal parts. Disconnect the electrical power to place the star washer from the old jack on the right side. Right Side Of Oven 6. Star Washer Access Cover Meat Probe Jack Hex Nut 4. After you are not careful. 5. REMOVING THE MEAT PROBE JACK WARNING ELECTRICAL... the lugs of the unit. Replace all panels before servicing. Failure to the oven wires. Use a pair of the access hole, and remove the star washer from the right side of the old meat probe jack, then use two small wire nuts, and splice the new jack to do so could...
Sharp edges may be careful when handling the sheet metal parts. Disconnect the electrical power to place the star washer from the old jack on the right side. Right Side Of Oven 6. Star Washer Access Cover Meat Probe Jack Hex Nut 4. After you are not careful. 5. REMOVING THE MEAT PROBE JACK WARNING ELECTRICAL... the lugs of the unit. Replace all panels before servicing. Failure to the oven wires. Use a pair of the access hole, and remove the star washer from the right side of the old meat probe jack, then use two small wire nuts, and splice the new jack to do so could...
Technical Guide
Page 48
... connection between probe and jack (in Clean mode) F4 E1 Meat probe malfunction - Check latch arm pivot joint, arm/solenoid connection, solenoid spring, and spring washer. 2. Check for firm connection. 2. Check the Latch Switch: Disconnect it should be displayed if user presses and holds "0" key for welded-closed = switch open , continuity...
... connection between probe and jack (in Clean mode) F4 E1 Meat probe malfunction - Check latch arm pivot joint, arm/solenoid connection, solenoid spring, and spring washer. 2. Check for firm connection. 2. Check the Latch Switch: Disconnect it should be displayed if user presses and holds "0" key for welded-closed = switch open , continuity...