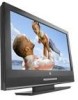
User Manual
Page 5
...Warning : To reduce the risk of the product may be in permanent damage to alert the user that improper use as a standalone TV as well as a display device for video electronics appliances and personal computers. Refer any unauthorized recording in whole or in part may ...To prevent this type of time as possible. Warning : Do not leave stationary images, patterns, PIP windows, or letterbox images on the screen for LCD display technology; The following are examples of allowable defective pixels. there are no user-serviceable parts inside. CAUTION Risk of U.S. Important: One ...
...Warning : To reduce the risk of the product may be in permanent damage to alert the user that improper use as a standalone TV as well as a display device for video electronics appliances and personal computers. Refer any unauthorized recording in whole or in part may ...To prevent this type of time as possible. Warning : Do not leave stationary images, patterns, PIP windows, or letterbox images on the screen for LCD display technology; The following are examples of allowable defective pixels. there are no user-serviceable parts inside. CAUTION Risk of U.S. Important: One ...
User Manual
Page 12
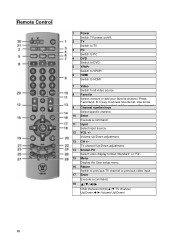
... or previous video input 17 Enter Execute a command. 18 Ÿ/ź/Ż/Ź OSD menual control(Ÿ/ź:TV channel Up/Down;Ż/Ź:Volume Up/Down) 10 Use arrow keys and enter key to select add or remove the channel 9 Channel number keys ...Select specific channel. 10 Enter Execute a command. 11 Input Select input source. 12 VOL +/Volume Up/Down adjustment. 13 CH +/TV channel Up/Down adjustment. 14 Screen Fit Select video display format "Standard" or "Fill". 15 Menu Display the User setup menu. 16 Return Switch to all video source 8 Favorite...
... or previous video input 17 Enter Execute a command. 18 Ÿ/ź/Ż/Ź OSD menual control(Ÿ/ź:TV channel Up/Down;Ż/Ź:Volume Up/Down) 10 Use arrow keys and enter key to select add or remove the channel 9 Channel number keys ...Select specific channel. 10 Enter Execute a command. 11 Input Select input source. 12 VOL +/Volume Up/Down adjustment. 13 CH +/TV channel Up/Down adjustment. 14 Screen Fit Select video display format "Standard" or "Fill". 15 Menu Display the User setup menu. 16 Return Switch to all video source 8 Favorite...
User Manual
Page 25
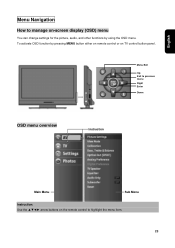
To activate OSD function by using the OSD menu. Menu/Exit Up Exit to previous menu Right Enter Down OSD menu overview Instruction Main Menu Sub Menu Instruction: Use the ŸźŻŹ arrow buttons on the remote control to manage on-screen display (OSD) menu You can change settings for the picture, audio, and other functions by pressing MENU button either on remote control or on TV control button panel. English Menu Navigation How to highlight the menu item. 23
To activate OSD function by using the OSD menu. Menu/Exit Up Exit to previous menu Right Enter Down OSD menu overview Instruction Main Menu Sub Menu Instruction: Use the ŸźŻŹ arrow buttons on the remote control to manage on-screen display (OSD) menu You can change settings for the picture, audio, and other functions by pressing MENU button either on remote control or on TV control button panel. English Menu Navigation How to highlight the menu item. 23
User Manual
Page 29
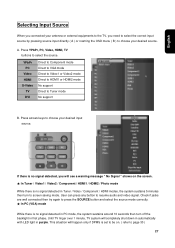
... PC Video HDMI S-Video TV DVI Direct to Component mode Direct to VGA mode Direct to Video1 or Video2 mode Direct to HDMI1 or HDMI2 mode No support Direct to resume audio and video signal. This situation will happen only if DPMS is set to be on the screen. Ϫ In Tuner... . ( refer to page 30 ) 27 English Selecting Input Source When you connected your antenna or external equipments to the TV, you will completely shut down in automatically with LED light in PC mode, the system sustains around 10 seconds then turn to screen saving mode. Press arrows keys to select the source.
... PC Video HDMI S-Video TV DVI Direct to Component mode Direct to VGA mode Direct to Video1 or Video2 mode Direct to HDMI1 or HDMI2 mode No support Direct to resume audio and video signal. This situation will happen only if DPMS is set to be on the screen. Ϫ In Tuner... . ( refer to page 30 ) 27 English Selecting Input Source When you connected your antenna or external equipments to the TV, you will completely shut down in automatically with LED light in PC mode, the system sustains around 10 seconds then turn to screen saving mode. Press arrows keys to select the source.

User Manual
Page 31
Three modes are available. 1. Press arrow keys to select your preferred item to make adjustments. 29 Tip: You can press Screen Fit button on the remote control to confirm. When in analog signal input. When access AV sub-menu, press arrow keys to...Level Set. 1. When access AV sub-menu, press arrow keys to select Calibration. 2. Adjusting screen size Cool give cool sensation Neutral give nature white sensation Warm give warm sensation Adjust your TV screen to handle different picture formats. Adjusting the color temperature Adjust white balance of the backlight Adjusting ...
Three modes are available. 1. Press arrow keys to select your preferred item to make adjustments. 29 Tip: You can press Screen Fit button on the remote control to confirm. When in analog signal input. When access AV sub-menu, press arrow keys to...Level Set. 1. When access AV sub-menu, press arrow keys to select Calibration. 2. Adjusting screen size Cool give cool sensation Neutral give nature white sensation Warm give warm sensation Adjust your TV screen to handle different picture formats. Adjusting the color temperature Adjust white balance of the backlight Adjusting ...
User Manual
Page 36
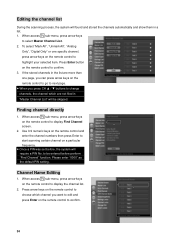
... Enter button on the remote control to display Find Channel screen. 2. When access TV sub-menu, press arrow keys on the remote control and... in a list. 1. to start scanning certain channel on the remote control to select Master Channel List. 2. When access TV sub-menu, press arrow keys on a particular frequency. Once a PIN was set before perform "Find Channel" ... When you want to edit and press Enter on the remote control to confirm. 34 When access TV sub-menu, press arrow keys to display the channel list. 2. Finding channel directly 1. Please enter "0000" ...
... Enter button on the remote control to display Find Channel screen. 2. When access TV sub-menu, press arrow keys on the remote control and... in a list. 1. to start scanning certain channel on the remote control to select Master Channel List. 2. When access TV sub-menu, press arrow keys on a particular frequency. Once a PIN was set before perform "Find Channel" ... When you want to edit and press Enter on the remote control to confirm. 34 When access TV sub-menu, press arrow keys to display the channel list. 2. Finding channel directly 1. Please enter "0000" ...
User Manual
Page 37
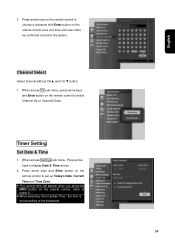
...; When selecting "Auto-Update Time," the time is set according to choose a character with Enter button on the remote control to display Date & Time screen. 2. When access TV sub-menu, press arrow keys and Enter button on the remote control once at a time until new name be confirmed at most 6 characters. When...
...; When selecting "Auto-Update Time," the time is set according to choose a character with Enter button on the remote control to display Date & Time screen. 2. When access TV sub-menu, press arrow keys and Enter button on the remote control once at a time until new name be confirmed at most 6 characters. When...

User Manual
Page 38
... Enter button on the remote control to set up the time. Once the TV has been turned off . 36 concurrently, the Sleep timer setting has been switch off ; Setting the TV to turn on or off TV automatically in a giving time period. 1. Please note Timer 1 takes precedence over Timer ...clock setting is active. Setting the sleep timer Activating sleeper timer to turn on the remote control to display Timers screen. 2. Press arrow keys and Enter button on and off. TV will automatically turn on the remote control to set up Days, Start Time, Duration, and Source/Channel to ...
... Enter button on the remote control to set up the time. Once the TV has been turned off . 36 concurrently, the Sleep timer setting has been switch off ; Setting the TV to turn on or off TV automatically in a giving time period. 1. Please note Timer 1 takes precedence over Timer ...clock setting is active. Setting the sleep timer Activating sleeper timer to turn on the remote control to display Timers screen. 2. Press arrow keys and Enter button on and off. TV will automatically turn on the remote control to set up Days, Start Time, Duration, and Source/Channel to ...
User Manual
Page 40
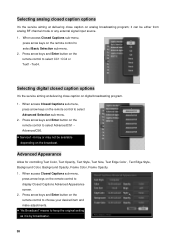
..., Background Opacity, Frame Color, Frame Opacity. 1. When access Closed Captions sub-menu, press arrow keys on the remote control to display Closed Captions Advanced Appearance screen. 2.
..., Background Opacity, Frame Color, Frame Opacity. 1. When access Closed Captions sub-menu, press arrow keys on the remote control to display Closed Captions Advanced Appearance screen. 2.
User Manual
Page 43
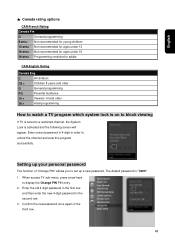
... password in the first row and then enter the new 4-digit password in the third row. 41 The default password is activated and the following screen will appear. Setting up a new password. Enter correct password in 4-digit in order to unlock the channel and view this program successfully. English ... All children C8 + Children 8 years and older G General programming PG Parental Guidance 14 + Viewers 14 and older 18 + Adult programming How to watch a TV program which system lock is on to block viewing If TV is tuned to a restricted channel, the System Lock is "0000". 1.
... password in the first row and then enter the new 4-digit password in the third row. 41 The default password is activated and the following screen will appear. Setting up a new password. Enter correct password in 4-digit in order to unlock the channel and view this program successfully. English ... All children C8 + Children 8 years and older G General programming PG Parental Guidance 14 + Viewers 14 and older 18 + Adult programming How to watch a TV program which system lock is on to block viewing If TV is tuned to a restricted channel, the System Lock is "0000". 1.
User Manual
Page 52
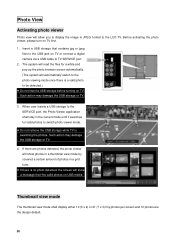
...display the image in a grid form. If there is no photo detected, the screen will automatically switch to the photo viewing mode once there is searching the photos. format to the LCD TV. Photo View Activating photo viewer Photo view will read the files for valid photos to switch photo... viewer mode. Do not remove the USB storage while TV is a valid photo to be detected.) Do not ...
...display the image in a grid form. If there is no photo detected, the screen will automatically switch to the photo viewing mode once there is searching the photos. format to the LCD TV. Photo View Activating photo viewer Photo view will read the files for valid photos to switch photo... viewer mode. Do not remove the USB storage while TV is a valid photo to be detected.) Do not ...
User Manual
Page 53
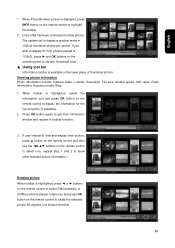
When Photo Browser screen is highlighted, select the information icon and press OK button on the remote control to display the information for the current photo (if available). 2. If ... to quit from information window and resume to show other selected picture information.) Rotating picture When toolbar is available in 10(5x2) thumbnail photos per screen. The system set to display a preview mode in the lower place of 10(5x2), press Ź and OK buttons on the remote control to choose...
When Photo Browser screen is highlighted, select the information icon and press OK button on the remote control to display the information for the current photo (if available). 2. If ... to quit from information window and resume to show other selected picture information.) Rotating picture When toolbar is available in 10(5x2) thumbnail photos per screen. The system set to display a preview mode in the lower place of 10(5x2), press Ź and OK buttons on the remote control to choose...

User Manual
Page 55
... in. Ϫʳ Using tool bar Information toolbar is available in the largest size possible while preserving the aspect ratio. English Full screen view mode In the full screen view the system displays the selected image in the lower place of thumbnail photos Showing picture information 1. Toolbar shall be available for the...
... in. Ϫʳ Using tool bar Information toolbar is available in the largest size possible while preserving the aspect ratio. English Full screen view mode In the full screen view the system displays the selected image in the lower place of thumbnail photos Showing picture information 1. Toolbar shall be available for the...

User Manual
Page 56
...pan function is displayed, press Ż or Ź buttons on the remote control to display on TV screen. 54 Press Ż or Ź and OK buttons on the remote control to the full ...mode. Press OK button on the remote control to select the pan and system will switch to full screen size that pan and zoom out function will allow user to select zoom in icon and enlarge the ...picture in your USB adapter. Press OK button again and be back to the previous screen. When zoom out is displayed, press Ż or Ź and OK buttons on the remote control...
...pan function is displayed, press Ż or Ź buttons on the remote control to display on TV screen. 54 Press Ż or Ź and OK buttons on the remote control to the full ...mode. Press OK button on the remote control to select the pan and system will switch to full screen size that pan and zoom out function will allow user to select zoom in icon and enlarge the ...picture in your USB adapter. Press OK button again and be back to the previous screen. When zoom out is displayed, press Ż or Ź and OK buttons on the remote control...

User Manual
Page 57
... or Ź buttons on the remote control to adjust the setting of photo-viewer. The slideshow will stay on the full screen mode of entire album. If not, the screen will display all photos in a circle. And the change will run all photos until it reaches to show the pictures unless ...remote control again and continue the slideshow. Press OK button on the remote control to the user in a random order in the thumbnail or full screen mode and only affects the slideshow. The Slideshow repeat controls if the slideshow stops when all the pictures have been displayed or continues to the...
... or Ź buttons on the remote control to adjust the setting of photo-viewer. The slideshow will stay on the full screen mode of entire album. If not, the screen will display all photos in a circle. And the change will run all photos until it reaches to show the pictures unless ...remote control again and continue the slideshow. Press OK button on the remote control to the user in a random order in the thumbnail or full screen mode and only affects the slideshow. The Slideshow repeat controls if the slideshow stops when all the pictures have been displayed or continues to the...
User Manual
Page 59
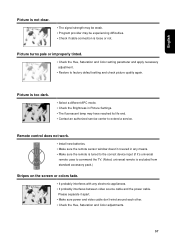
... APC mode. ƒ Check the Brightness in any means. ƒ Make sure the remote is excluded from standard accessory pack.) Stripes on the screen or colors fade. ƒ It probably interferes with any electronic appliances. ƒ It probably interferes between video source cable and the power cable. ...turns pale or improperly tinted. ƒ Check the Hue, Saturation and Color setting parameter and apply necessary adjustment. ƒ Restore to command the TV. (Noted, universal remote is tuned to the correct device input (if it apart. ƒ Make sure power and video cable don't wind ...
... APC mode. ƒ Check the Brightness in any means. ƒ Make sure the remote is excluded from standard accessory pack.) Stripes on the screen or colors fade. ƒ It probably interferes with any electronic appliances. ƒ It probably interferes between video source cable and the power cable. ...turns pale or improperly tinted. ƒ Check the Hue, Saturation and Color setting parameter and apply necessary adjustment. ƒ Restore to command the TV. (Noted, universal remote is tuned to the correct device input (if it apart. ƒ Make sure power and video cable don't wind ...
User Manual
Page 61
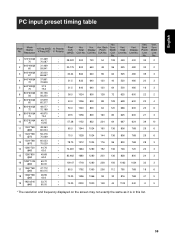
.... Vert. Display Line No. 900 720 54 108 449 400 800 640 48 96 525 480 864 640 96 64 525 480 832 640 120 40 520 480 840 640 120 64 500 480 1024 800 128 72 625 600 1056 800 88 128 628 600 1040 800 64 120 666... 1125 540 Vert. Mode Name Resolution H.Freq.(KHZ) V.Freq.(HZ) H. CLK No. Sync. Sync Width Line No. 2 2 3 3 3 2 4 6 3 10 6 6 3 3 3 3 6 5 5 * The resolution and frequency displayed on the screen may not exactly the same as it is in this list. 59 Hor. Total Line No. English PC input preset timing table Mode No. Polarity...
.... Vert. Display Line No. 900 720 54 108 449 400 800 640 48 96 525 480 864 640 96 64 525 480 832 640 120 40 520 480 840 640 120 64 500 480 1024 800 128 72 625 600 1056 800 88 128 628 600 1040 800 64 120 666... 1125 540 Vert. Mode Name Resolution H.Freq.(KHZ) V.Freq.(HZ) H. CLK No. Sync. Sync Width Line No. 2 2 3 3 3 2 4 6 3 10 6 6 3 3 3 3 6 5 5 * The resolution and frequency displayed on the screen may not exactly the same as it is in this list. 59 Hor. Total Line No. English PC input preset timing table Mode No. Polarity...
User Manual
Page 62
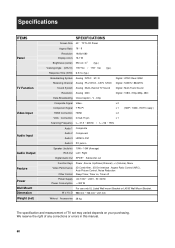
...De-interlace , Aspect Ratio Control (ARC) , Auto Picture Control, Noise Reduction Sleep Timer, Timer on your purchasing. We reserve the right of TV set may varied depends on , Timer off Power Supply AC 100V ~ 240V , 50 / 60Hz Power Consumption < 300 W For use only... UL Listed Wall mount Bracket or L4030 Wall Mount Bracket. Specifications ITEMS Panel TV Function Video Input Audio Input Audio Output Feature Power Wall Mount Dimension Weight (net) SPECIFICATIONS Screen Size 40" TFT-LCD Panel Aspect Ratio 16Κ9 Resolution 1920x1080 Display colors 16.7 M Brightness (center) ...
...De-interlace , Aspect Ratio Control (ARC) , Auto Picture Control, Noise Reduction Sleep Timer, Timer on your purchasing. We reserve the right of TV set may varied depends on , Timer off Power Supply AC 100V ~ 240V , 50 / 60Hz Power Consumption < 300 W For use only... UL Listed Wall mount Bracket or L4030 Wall Mount Bracket. Specifications ITEMS Panel TV Function Video Input Audio Input Audio Output Feature Power Wall Mount Dimension Weight (net) SPECIFICATIONS Screen Size 40" TFT-LCD Panel Aspect Ratio 16Κ9 Resolution 1920x1080 Display colors 16.7 M Brightness (center) ...

