
User Manual
Page 7
...SELECTION The specific power cord for this equipment does cause harmful interference to the country of Unit 10 Amps 12 Amps 12 Amps 10 Amps 12 Amps FCC Compliance Statement This equipment has been tested and complies with the instructions. For High Definition LCD TVs that is ...Conductors in the United States and Canada. If this High Definition LCD TV is certified for power cords used in accordance with the limits for the High Definition LCD TV. CAUTION: The power supply outlet should be located near High Definition LCD TV and should look like Figure A1 below: Figure A1 Figure ...
...SELECTION The specific power cord for this equipment does cause harmful interference to the country of Unit 10 Amps 12 Amps 12 Amps 10 Amps 12 Amps FCC Compliance Statement This equipment has been tested and complies with the instructions. For High Definition LCD TVs that is ...Conductors in the United States and Canada. If this High Definition LCD TV is certified for power cords used in accordance with the limits for the High Definition LCD TV. CAUTION: The power supply outlet should be located near High Definition LCD TV and should look like Figure A1 below: Figure A1 Figure ...

User Manual
Page 8
If a BNC cable is connected. Also, any unauthorized changes or modifications not expressly approved by Westinghouse Digital will void the user's authority to which the receiver is used, use a grounded power supply cord and the provided shielded video interface cable with bonded ferrite cores. FCC Warning To assure continued FCC compliance, the ... use only a shielded BNC (5) cable. English x Connect the equipment into an outlet on a circuit different from that to operate this device. 7 x Consult the Westinghouse Service Center or an experienced radio/TV technician for assistance.
If a BNC cable is connected. Also, any unauthorized changes or modifications not expressly approved by Westinghouse Digital will void the user's authority to which the receiver is used, use a grounded power supply cord and the provided shielded video interface cable with bonded ferrite cores. FCC Warning To assure continued FCC compliance, the ... use only a shielded BNC (5) cable. English x Connect the equipment into an outlet on a circuit different from that to operate this device. 7 x Consult the Westinghouse Service Center or an experienced radio/TV technician for assistance.

User Manual
Page 9
...operating instructions before you touch them. Do not install near water. 2. Take care to the power supply cord or plug; consult an electrician for injuries caused by the manufacturer. 8. Your High Definition LCD TV contains high-voltage parts. For your HDTV and remove the batteries from the apparatus. 7. ... apparatus has been exposed to fir; Refer all servicing to direct sunlight or high temperatures. x If the High Definition LCD TV emits smoke, abnormal noise, or a strange odor, immediately turn it off and contact the Westinghouse Service Center. 8 English 1.
...operating instructions before you touch them. Do not install near water. 2. Take care to the power supply cord or plug; consult an electrician for injuries caused by the manufacturer. 8. Your High Definition LCD TV contains high-voltage parts. For your HDTV and remove the batteries from the apparatus. 7. ... apparatus has been exposed to fir; Refer all servicing to direct sunlight or high temperatures. x If the High Definition LCD TV emits smoke, abnormal noise, or a strange odor, immediately turn it off and contact the Westinghouse Service Center. 8 English 1.
User Manual
Page 16
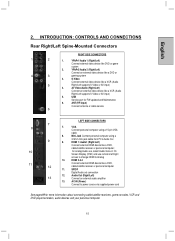
...S-Video Connect external video device like a VCR (Audio Right/Left supports S-Video or AV input) 5. SPIDF Digital Audio out connection 12. AC-IN (Power) Connect to Analog 10. HDMI 2-3-4 11 12 Connect external HDMI device like a DVD or 4 3 gaming system 3. YPbPr2/Audio 2 (Right/Left)...for analog Audio use, select Audio menu in On Screen Display (OSD) and use remote's left/right arrows to change HDMI to power source via supplied power cord See pages19 for FW updated and Maintenance 6. HDMI 1 /Audio1 (Right/Left) Connect external HDMI device like DVD or game ...
...S-Video Connect external video device like a VCR (Audio Right/Left supports S-Video or AV input) 5. SPIDF Digital Audio out connection 12. AC-IN (Power) Connect to Analog 10. HDMI 2-3-4 11 12 Connect external HDMI device like a DVD or 4 3 gaming system 3. YPbPr2/Audio 2 (Right/Left)...for analog Audio use, select Audio menu in On Screen Display (OSD) and use remote's left/right arrows to change HDMI to power source via supplied power cord See pages19 for FW updated and Maintenance 6. HDMI 1 /Audio1 (Right/Left) Connect external HDMI device like DVD or game ...
User Manual
Page 20
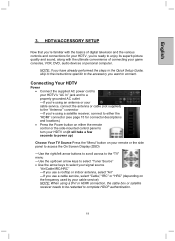
...the side-mounted control panel to turn your HDTV on (it will take a few seconds to power up) Choose Your TV Source Press the "Menu" button on your remote or the side panel to access the On... Screen Display (OSD) -Use the right/left arrow buttons to scroll across to the "TV" menu -Use the up/down arrow keys to select "Tuner Source" x Use the arrow keys to select ... satellite receiver needs to be restarted to complete HDCP authentication. 19 Connecting Your HDTV Power x Connect the supplied AC power cord to your HDTV's "AC In" jack and to a properly grounded AC outlet -If you 're...
...the side-mounted control panel to turn your HDTV on (it will take a few seconds to power up) Choose Your TV Source Press the "Menu" button on your remote or the side panel to access the On... Screen Display (OSD) -Use the right/left arrow buttons to scroll across to the "TV" menu -Use the up/down arrow keys to select "Tuner Source" x Use the arrow keys to select ... satellite receiver needs to be restarted to complete HDCP authentication. 19 Connecting Your HDTV Power x Connect the supplied AC power cord to your HDTV's "AC In" jack and to a properly grounded AC outlet -If you 're...

User Manual
Page 22
... to set this timing mode (many computers show 1360x768 as an alternative resolution) Connection Types x VGA Connection -Connect a 15-pin analog VGA cable (not supplied) from your computer's "VGA OUT" port to the HDTV's "VGA IN" port -Connect a stereo mini cable from your computer's "AUDIO OUT" port... to the HDTV's "AUDIO IN" port Power x Turn on your HDTV (wait a few seconds for it to power up) x Turn on your computer -The HDTV will automatically adjust to the computer's resolution 21 English 3.
... to set this timing mode (many computers show 1360x768 as an alternative resolution) Connection Types x VGA Connection -Connect a 15-pin analog VGA cable (not supplied) from your computer's "VGA OUT" port to the HDTV's "VGA IN" port -Connect a stereo mini cable from your computer's "AUDIO OUT" port... to the HDTV's "AUDIO IN" port Power x Turn on your HDTV (wait a few seconds for it to power up) x Turn on your computer -The HDTV will automatically adjust to the computer's resolution 21 English 3.

User Manual
Page 41
... to the video output port on the High Definition LCD TV. x Adjust brightness and contrast. x Make sure that the outlet is set. APPENDIX: Troubleshooting No Power x Make sure power cord is tightly secured to the High Definition LCD TV, secure it off x Check if Sleep Timer is supplying the proper voltage. x Go to E. x Make sure batteries are...
... to the video output port on the High Definition LCD TV. x Adjust brightness and contrast. x Make sure that the outlet is set. APPENDIX: Troubleshooting No Power x Make sure power cord is tightly secured to the High Definition LCD TV, secure it off x Check if Sleep Timer is supplying the proper voltage. x Go to E. x Make sure batteries are...


