User Manual
Page 3
... Cord Protection 6 Ventilation 6 Safety: Lamp Disposal 6 WARNINGS AND PRECAUTIONS 7 ANTENNA INSTALLATION SAFETY 8 Lighting 8 Power lines 8 CLEANING THE LCD TV 9 Dolby-Digital Notice 9 PACKAGE CONTENTS 10 CONTROL PANEL 11 TERMINALS 12 REMOTE CONTROL 13 REMOTE CONTROL OPERATION 15 INSTALLING THE REMOTE CONTROL BATTERIES ..... 15 REMOTE CONTROL TRANSMISSION RANGE .......... 15 LCD TV BASE 16 INSTALLING THE LCD TV BASE 16 REMOVING THE LCD TV BASE 17 ANTENNA CONNECTION 18 OUTDOOR ANTENNA CONNECTION 18 CABLE TV (CTV/DTV) CONNECTION 18 i
... Cord Protection 6 Ventilation 6 Safety: Lamp Disposal 6 WARNINGS AND PRECAUTIONS 7 ANTENNA INSTALLATION SAFETY 8 Lighting 8 Power lines 8 CLEANING THE LCD TV 9 Dolby-Digital Notice 9 PACKAGE CONTENTS 10 CONTROL PANEL 11 TERMINALS 12 REMOTE CONTROL 13 REMOTE CONTROL OPERATION 15 INSTALLING THE REMOTE CONTROL BATTERIES ..... 15 REMOTE CONTROL TRANSMISSION RANGE .......... 15 LCD TV BASE 16 INSTALLING THE LCD TV BASE 16 REMOVING THE LCD TV BASE 17 ANTENNA CONNECTION 18 OUTDOOR ANTENNA CONNECTION 18 CABLE TV (CTV/DTV) CONNECTION 18 i

User Manual
Page 7
...and has been selected according to be placed on the floor, only SJT type cord sets may be easily accessible. For LCD TVs that are listed below for the LCD TV. The female receptacle of power cords used . Always use the appropriate AC cord that are to be placed directly on a ... The specific power cord for your specific country. UL • Canada - Observe the following guidelines if it is certified for this LCD TV is no cord set enclosed. For LCD TVs that is necessary to prevent electric shock. The cord set must be used. Cord Type SJT SVT Size of destination.
...and has been selected according to be placed on the floor, only SJT type cord sets may be easily accessible. For LCD TVs that are listed below for the LCD TV. The female receptacle of power cords used . Always use the appropriate AC cord that are to be placed directly on a ... The specific power cord for your specific country. UL • Canada - Observe the following guidelines if it is certified for this LCD TV is no cord set enclosed. For LCD TVs that is necessary to prevent electric shock. The cord set must be used. Cord Type SJT SVT Size of destination.

User Manual
Page 8
...instructions. Bitstream Vera is connected. • if the interference persists even after performing the above measures, consult the Westinghouse Service Center or an experienced radio/TV technician for a Class B digital device, pursuant to which can radiate radio frequency energy, and may cause harmful ... following measures: • Reorient or relocate the receiving antenna. • Increase the distance between the LCD TV and the receiver. • Connect the LCD TV to an outlet on a circuit separate from to part 15 of the FCC Rules. Permission to radio communications...
...instructions. Bitstream Vera is connected. • if the interference persists even after performing the above measures, consult the Westinghouse Service Center or an experienced radio/TV technician for a Class B digital device, pursuant to which can radiate radio frequency energy, and may cause harmful ... following measures: • Reorient or relocate the receiving antenna. • Increase the distance between the LCD TV and the receiver. • Connect the LCD TV to an outlet on a circuit separate from to part 15 of the FCC Rules. Permission to radio communications...

User Manual
Page 9
... when unused for your outlet, consult an electrician for replacement of the obsolete outlet. • Protect the power cord from being walked on the LCD TV. A grounding type plug has two blades and a third grounding prong. If the provided plug does not fit into the apparatus, the apparatus has been exposed...
... when unused for your outlet, consult an electrician for replacement of the obsolete outlet. • Protect the power cord from being walked on the LCD TV. A grounding type plug has two blades and a third grounding prong. If the provided plug does not fit into the apparatus, the apparatus has been exposed...
User Manual
Page 10
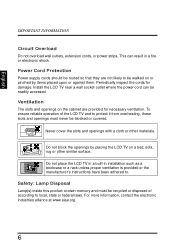
... more information, contact the electronic industries alliance at www.eiae.org. 6 Periodically inspect the cords for necessary ventilation. Do not place the LCD TV in a built-in a fire or electronic shock. Power Cord Protection Power supply cords should be routed so that they are provided for damage... by items placed upon or against them. Ventilation The slots and openings on a bed, sofa, rug or other materials. Install the LCD TV near a wall socket outlet where the power cord can result in installation such as a bookcase or a rack unless proper ventilation is provided ...
... more information, contact the electronic industries alliance at www.eiae.org. 6 Periodically inspect the cords for necessary ventilation. Do not place the LCD TV in a built-in a fire or electronic shock. Power Cord Protection Power supply cords should be routed so that they are provided for damage... by items placed upon or against them. Ventilation The slots and openings on a bed, sofa, rug or other materials. Install the LCD TV near a wall socket outlet where the power cord can result in installation such as a bookcase or a rack unless proper ventilation is provided ...
User Manual
Page 11
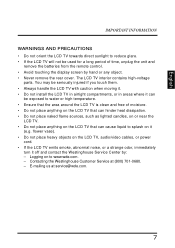
... moisture. • Do not place anything on the LCD TV that can hinder heat dissipation. • Do not place naked flame sources, such as lighted candles, on or near the LCD TV. • Do not place anything on it off and contact the Westinghouse Service Center by hand or any object. • Never...
... moisture. • Do not place anything on the LCD TV that can hinder heat dissipation. • Do not place naked flame sources, such as lighted candles, on or near the LCD TV. • Do not place anything on it off and contact the Westinghouse Service Center by hand or any object. • Never...

User Manual
Page 12
... electrode. IMPORTANT INFORMATION English ANTENNA INSTALLATION SAFETY Outdoor Antenna Grounding If an outside antenna or cable system is connected to the LCD TV, be sure the antenna or cable system is left unattended and unused for long periods of overhead power lines or other electric ... Section 810-21) Grounding clamps Power service grounding electrode system (NEC Art 250 part H) Lighting Z Z Z For added protection for the LCD TV during a heavy storm-lightning may strike while you are holding the cable cord, causing serious injury. When installing an outside antenna system should be ...
... electrode. IMPORTANT INFORMATION English ANTENNA INSTALLATION SAFETY Outdoor Antenna Grounding If an outside antenna or cable system is connected to the LCD TV, be sure the antenna or cable system is left unattended and unused for long periods of overhead power lines or other electric ... Section 810-21) Grounding clamps Power service grounding electrode system (NEC Art 250 part H) Lighting Z Z Z For added protection for the LCD TV during a heavy storm-lightning may strike while you are holding the cable cord, causing serious injury. When installing an outside antenna system should be ...
User Manual
Page 13
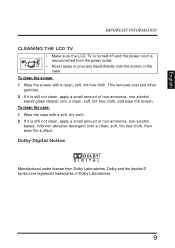
... of Dolby Laboratories. 9 To clean the case: 1 Wipe the case with a clean, soft, lint-free cloth. English IMPORTANT INFORMATION CLEANING THE LCD TV • Make sure the LCD TV is turned off and the power cord is still not clean, apply a small amount of non-ammonia, non-alcohol based glass cleaner onto...
... of Dolby Laboratories. 9 To clean the case: 1 Wipe the case with a clean, soft, lint-free cloth. English IMPORTANT INFORMATION CLEANING THE LCD TV • Make sure the LCD TV is turned off and the power cord is still not clean, apply a small amount of non-ammonia, non-alcohol based glass cleaner onto...
User Manual
Page 15
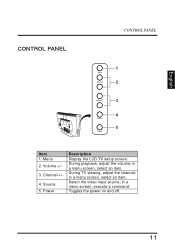
English CONTROL PANEL USB AV 2 L R HDMI R PC / VGA Y L PC AUDIOSPDIF OUT PbCOMPPOrNENT L R AV 1 L R CONTROL PANEL 1 Menu Volume 2 Channel 3 4 Source 5 Power Item 1. Menu 2. Source 5. During TV viewing, adjust the channel; Volume +/- 3. Power Description Display the LCD TV setup screen. Channel +/- 4. in a menu screen, select an item. in a menu screen, execute a command. in a menu screen, select an item. Toggles the power on and off. 11 During playback, adjust the volume; Select the video input source;
English CONTROL PANEL USB AV 2 L R HDMI R PC / VGA Y L PC AUDIOSPDIF OUT PbCOMPPOrNENT L R AV 1 L R CONTROL PANEL 1 Menu Volume 2 Channel 3 4 Source 5 Power Item 1. Menu 2. Source 5. During TV viewing, adjust the channel; Volume +/- 3. Power Description Display the LCD TV setup screen. Channel +/- 4. in a menu screen, select an item. in a menu screen, execute a command. in a menu screen, select an item. Toggles the power on and off. 11 During playback, adjust the volume; Select the video input source;
User Manual
Page 16
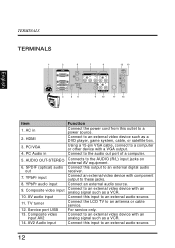
... the LCD TV to an external audio source. 11. Service port USB For service only. 13. Composite video input AV2 Connect to an external video device with a VGA ...
... the LCD TV to an external audio source. 11. Service port USB For service only. 13. Composite video input AV2 Connect to an external video device with a VGA ...

User Manual
Page 17
... entry. 3 5. Input 4 Select the video input source. 7. Enter Execute a command. 15 17 11. Favorite See page 23 for the LCD TV to a previously bookmarked 19 12. TV 15. Enable VGA as the input source. Enable video as the input source. Sleep zZz 22. Toggle the closed caption display on and... 20. Arrow keys Navigate through the on and off. PC 18. Power Toggle the TV power on -screen 9 11 10 / // menu. 13 12 14 10. Ch / Change the current TV channel. 5 7 8. Menu Display the LCD TV setup screen. 16 18 Switch to turn off . 13 HDMI 16. Channel keys Key...
... entry. 3 5. Input 4 Select the video input source. 7. Enter Execute a command. 15 17 11. Favorite See page 23 for the LCD TV to a previously bookmarked 19 12. TV 15. Enable VGA as the input source. Enable video as the input source. Sleep zZz 22. Toggle the closed caption display on and... 20. Arrow keys Navigate through the on and off. PC 18. Power Toggle the TV power on -screen 9 11 10 / // menu. 13 12 14 10. Ch / Change the current TV channel. 5 7 8. Menu Display the LCD TV setup screen. 16 18 Switch to turn off . 13 HDMI 16. Channel keys Key...

User Manual
Page 18
...supported. Display the input source or channel information as well as the input source. Select the video input source. Change the current TV channel. Enable HDMI 1 as the system date and time. Enable HDMI2 as the input source Enable S-Video as input. Return...through the on and off. G 26 27 RMT-11 15. Ch / 19. HDMI 2 27. Execute a channel entry. Vol +/- 18. Execute a command. Enable TV or HDTV as the input source. REMOTE CONTROL English Item 1. Menu 14 15 11. Aspect ratio 20. Adjust the LCD screen backlight. Sleep zZz B 7 8 7....
...supported. Display the input source or channel information as well as the input source. Select the video input source. Change the current TV channel. Enable HDMI 1 as the system date and time. Enable HDMI2 as the input source Enable S-Video as input. Return...through the on and off. G 26 27 RMT-11 15. Ch / 19. HDMI 2 27. Execute a channel entry. Vol +/- 18. Execute a command. Enable TV or HDTV as the input source. REMOTE CONTROL English Item 1. Menu 14 15 11. Aspect ratio 20. Adjust the LCD screen backlight. Sleep zZz B 7 8 7....

User Manual
Page 19
... a risk of used batteries in cracking or leakage, which may result in accordance with local laws and regulations. • Keep batteries away from the LCD TV. 15 REMOTE CONTROL TRANSMISSION RANGE Transmission range depends upon the reception angle. English REMOTE CONTROL OPERATION REMOTE CONTROL OPERATION INSTALLING THE REMOTE CONTROL BATTERIES CAUTIONS...
... a risk of used batteries in cracking or leakage, which may result in accordance with local laws and regulations. • Keep batteries away from the LCD TV. 15 REMOTE CONTROL TRANSMISSION RANGE Transmission range depends upon the reception angle. English REMOTE CONTROL OPERATION REMOTE CONTROL OPERATION INSTALLING THE REMOTE CONTROL BATTERIES CAUTIONS...
User Manual
Page 20
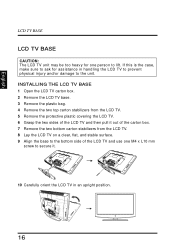
... screw to secure it out of the carton box. 7 Remove the two bottom carton stabilizers from the LCD TV. 5 Remove the protective plastic covering the LCD TV. 6 Grasp the two sides of the LCD TV and use one person to lift. USB USB AV 2 AV 2 L R HDMI R PC / VGA L Y PC AUDIOSPDIF OUT ...AV 1 L R 16 USB USB AV 2 AV 2 10 Carefully orient the LCD TV in handling the LCD TV to prevent physical injury and/or damage to the unit. INSTALLING THE LCD TV BASE 1 Open the LCD TV carton box. 2 Remove the LCD TV base. 3 Remove the plastic bag. 4 Remove the two top carton stabilizers from...
... screw to secure it out of the carton box. 7 Remove the two bottom carton stabilizers from the LCD TV. 5 Remove the protective plastic covering the LCD TV. 6 Grasp the two sides of the LCD TV and use one person to lift. USB USB AV 2 AV 2 L R HDMI R PC / VGA L Y PC AUDIOSPDIF OUT ...AV 1 L R 16 USB USB AV 2 AV 2 10 Carefully orient the LCD TV in handling the LCD TV to prevent physical injury and/or damage to the unit. INSTALLING THE LCD TV BASE 1 Open the LCD TV carton box. 2 Remove the LCD TV base. 3 Remove the plastic bag. 4 Remove the two top carton stabilizers from...

User Manual
Page 21
...port terminals. 4 Lay the LCD TV on a clear, flat, and stable surface. English USB USB LCD TV BASE REMOVING THE LCD TV BASE If you must first remove the LCD TV base. 1 Turn off the LCD TV and all connected devices. 2 Disconnect the power cord from the LCD TV. 3 Disconnect all signal cables ...from LCD TV. USB AV 2 L R HDMI R PC / VGA L...
...port terminals. 4 Lay the LCD TV on a clear, flat, and stable surface. English USB USB LCD TV BASE REMOVING THE LCD TV BASE If you must first remove the LCD TV base. 1 Turn off the LCD TV and all connected devices. 2 Disconnect the power cord from the LCD TV. 3 Disconnect all signal cables ...from LCD TV. USB AV 2 L R HDMI R PC / VGA L...
User Manual
Page 22
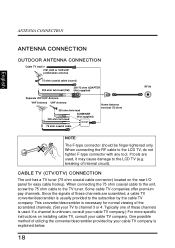
...75 ohm coaxial cable to the unit, screw the 75 ohm cable to the LCD TV, do not tighten F-type connector with any tool. This converter/descrambler is unknown, consult your cable TV company.) For more specific instructions on the rear I/O panel for normal viewing of ...If tools are scrambled, a cable TV converter/descrambler is explained below. 18 CABLE TV (CTV/DTV) CONNECTION The unit has a TV tuner (75 ohm coaxial cable connector) located on installing cable TV, consult your cable TV company is usually provided to the LCD TV (e.g. ANTENNA CONNECTION English ANTENNA CONNECTION ...
...75 ohm coaxial cable to the unit, screw the 75 ohm cable to the LCD TV, do not tighten F-type connector with any tool. This converter/descrambler is unknown, consult your cable TV company.) For more specific instructions on the rear I/O panel for normal viewing of ...If tools are scrambled, a cable TV converter/descrambler is explained below. 18 CABLE TV (CTV/DTV) CONNECTION The unit has a TV tuner (75 ohm coaxial cable connector) located on installing cable TV, consult your cable TV company is usually provided to the LCD TV (e.g. ANTENNA CONNECTION English ANTENNA CONNECTION ...

User Manual
Page 23
.... Picture can view the scrambled channels via the converter/descrambler by using the converter's channel keys. Picture can view all unscrambled channels by using the TV's channel keys. • B position on the RF switch (not supplied) - RF switch (not supplied) A OUT IN B Two-set through the analog ...terminals. 19 You can be displayed only when a 480i, 480P, 720P or 1080i signal is received. When you wish to connect to the LCD TV. • Make sure that the picture may cause damage to the HDMI terminal with a DVI-HDMI conversion cable, there is a possibility that the...
.... Picture can view the scrambled channels via the converter/descrambler by using the converter's channel keys. Picture can view all unscrambled channels by using the TV's channel keys. • B position on the RF switch (not supplied) - RF switch (not supplied) A OUT IN B Two-set through the analog ...terminals. 19 You can be displayed only when a 480i, 480P, 720P or 1080i signal is received. When you wish to connect to the LCD TV. • Make sure that the picture may cause damage to the HDMI terminal with a DVI-HDMI conversion cable, there is a possibility that the...

User Manual
Page 24
... cable Video Audio PC SPDIF cable AUDIO OUT Audio amplifier Video Audio Audio (L) (R) Home Video game system Camcorder VCR Audio output terminal DVD Player Digital TV turner 20
... cable Video Audio PC SPDIF cable AUDIO OUT Audio amplifier Video Audio Audio (L) (R) Home Video game system Camcorder VCR Audio output terminal DVD Player Digital TV turner 20

User Manual
Page 25
...PbCOMPPOrNENT L R AV 1 L R INITIAL SETUP Press on the control panel or on the remote control to turn on how to set up the LCD TV's operational settings. Select the desired language and select Yes to a proper AC outlet. Menu Volume Channel Source Power 21 The SetupWizard will guide you on... the LCD TV. POWER CONNECTION POWER CONNECTION CONNECTING AC POWER IMPORTANT: The LCD TV works on a 120 VAC, 60 Hz power input voltage ONLY. Turn off all connected devices before plugging in the...
...PbCOMPPOrNENT L R AV 1 L R INITIAL SETUP Press on the control panel or on the remote control to turn on how to set up the LCD TV's operational settings. Select the desired language and select Yes to a proper AC outlet. Menu Volume Channel Source Power 21 The SetupWizard will guide you on... the LCD TV. POWER CONNECTION POWER CONNECTION CONNECTING AC POWER IMPORTANT: The LCD TV works on a 120 VAC, 60 Hz power input voltage ONLY. Turn off all connected devices before plugging in the...
User Manual
Page 26
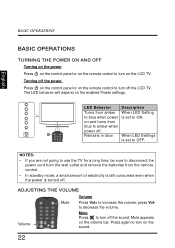
... still consumed even when the power is set to turn off the sound. ADJUSTING THE VOLUME Volume Mute Press Vol+ to turn on the LCD TV. Mute appears on the enabled Power settings. The LED behavior will depend on the volume bar. Power Remains in blue. Turning off . NOTES: • If... you are not going to use the TV for a long time, be sure to disconnect the power cord from the wall outlet and remove the batteries from blue to turn off the LCD...
... still consumed even when the power is set to turn off the sound. ADJUSTING THE VOLUME Volume Mute Press Vol+ to turn on the LCD TV. Mute appears on the enabled Power settings. The LED behavior will depend on the volume bar. Power Remains in blue. Turning off . NOTES: • If... you are not going to use the TV for a long time, be sure to disconnect the power cord from the wall outlet and remove the batteries from blue to turn off the LCD...


