User Manual
Page 2
... SAFETY BRACKET OPTIONS 37 WALL MOUNT AND SAFETY BRACKET OPTIONS 38 32 INCH HIGH DEFINITION LCD TV SPECIFICATIONS 39 42 INCH HIGH DEFINITION LCD TV SPECIFICATIONS 39 TROUBLESHOOTING...41 CLEANING THE HIGH DEFINITION LCD TV 43 i PRODUCT SAFETY SAFETY GUIDELINES ...2 PRODUCT SAFETY INSTRUCTIONS...3 ANTENNA... 31 PARENTAL CONTROLS (CANADIAN FRENCH 32 PARENTAL CONTROLS (PASSWORD EDIT 33 INPUT MENUS...34 FAVORITE BUTTONS...35 5. INSTALLATION PACKAGE CONTENTS ...8 FRONT VIEW OF THE HIGH DEFINITION LCD TV 9 SIDE VIEW OF THE HIGH DEFINITION LCD TV 10 REMOTE CONTROL ...13 INSTALLATION ...14 4....
... SAFETY BRACKET OPTIONS 37 WALL MOUNT AND SAFETY BRACKET OPTIONS 38 32 INCH HIGH DEFINITION LCD TV SPECIFICATIONS 39 42 INCH HIGH DEFINITION LCD TV SPECIFICATIONS 39 TROUBLESHOOTING...41 CLEANING THE HIGH DEFINITION LCD TV 43 i PRODUCT SAFETY SAFETY GUIDELINES ...2 PRODUCT SAFETY INSTRUCTIONS...3 ANTENNA... 31 PARENTAL CONTROLS (CANADIAN FRENCH 32 PARENTAL CONTROLS (PASSWORD EDIT 33 INPUT MENUS...34 FAVORITE BUTTONS...35 5. INSTALLATION PACKAGE CONTENTS ...8 FRONT VIEW OF THE HIGH DEFINITION LCD TV 9 SIDE VIEW OF THE HIGH DEFINITION LCD TV 10 REMOTE CONTROL ...13 INSTALLATION ...14 4....
User Manual
Page 6
.... 5. Skin oils are provided for your outlet, consult an electrician for replacement of time, unplug the High Definition LCD TV and remove the batteries from the remote control • Only use this user's manual for a long period of the obsolete outlet. 10. Read these ...instructions. 3. Your High Definition LCD TV contains high-voltage parts. Do not install near water. 6. Only use caution when moving it. • If the High Definition LCD TV emits smoke, abnormal noise, or a strange odor, immediately turn it off and contact the Westinghouse Service Center. 3 Keep these...
.... 5. Skin oils are provided for your outlet, consult an electrician for replacement of time, unplug the High Definition LCD TV and remove the batteries from the remote control • Only use this user's manual for a long period of the obsolete outlet. 10. Read these ...instructions. 3. Your High Definition LCD TV contains high-voltage parts. Do not install near water. 6. Only use caution when moving it. • If the High Definition LCD TV emits smoke, abnormal noise, or a strange odor, immediately turn it off and contact the Westinghouse Service Center. 3 Keep these...
User Manual
Page 10
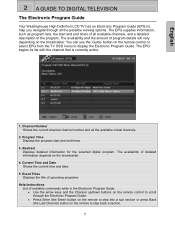
... TELEVISION The Electronic Program Guide Your Westinghouse High Definition LCD TV has an Electronic Program Guide (EPG) to help you navigate through the Electronic Program Guide. • Press Enter (the Enter) button on the remote to step into a sub section or press Back (the Last Channel) button on the remote control or select EPG from...
... TELEVISION The Electronic Program Guide Your Westinghouse High Definition LCD TV has an Electronic Program Guide (EPG) to help you navigate through the Electronic Program Guide. • Press Enter (the Enter) button on the remote to step into a sub section or press Back (the Last Channel) button on the remote control or select EPG from...
User Manual
Page 11
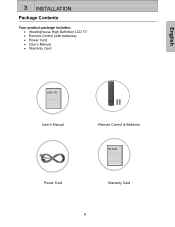
TV User's Manual Remote Control & Batteries W. Card Power Cord Warranty Card 8 English 3 INSTALLATION Package Contents Your product package includes: • Westinghouse High Definition LCD TV • Remote Control (with batteries) • Power Cord • User's Manual • Warranty Card LCD -
TV User's Manual Remote Control & Batteries W. Card Power Cord Warranty Card 8 English 3 INSTALLATION Package Contents Your product package includes: • Westinghouse High Definition LCD TV • Remote Control (with batteries) • Power Cord • User's Manual • Warranty Card LCD -
User Manual
Page 12
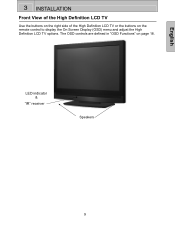
LED indicator & "IR" receiver Speakers 9 English 3 INSTALLATION Front View of the High Definition LCD TV Use the buttons on the right side of the High Definition LCD TV or the buttons on page 18. The OSD controls are defined in "OSD Functions" on the remote control to display the On Screen Display (OSD) menu and adjust the High Definition LCD TV options.
LED indicator & "IR" receiver Speakers 9 English 3 INSTALLATION Front View of the High Definition LCD TV Use the buttons on the right side of the High Definition LCD TV or the buttons on page 18. The OSD controls are defined in "OSD Functions" on the remote control to display the On Screen Display (OSD) menu and adjust the High Definition LCD TV options.
User Manual
Page 16
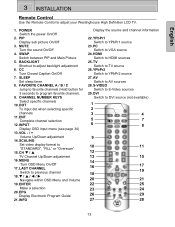
... channel). 9. HDMI Switch to AV sources 28. AV Switch to HDMI sources 25. DVI Switch to adjust your Westinghouse High Definition LCD TV. 1. SWAP Switch between PIP and Main Picture 5. English 3 INSTALLATION Remote Control Use the Remote Control to DVI source (not available) 1 2 3 4 5 7 6 8 9 10 11 12 13 15 14 16...Display OSD input menu (see page 34) 13. MENU Turn OSD Menu On/Off 17. PIP Display sub picture On/Off 3. TV Switch to TV source 26. MUTE Turn the sound On/Off 4. CH T / S TV Channel Up/Down adjustment 16. ENTER Make a selection 20.
... channel). 9. HDMI Switch to AV sources 28. AV Switch to HDMI sources 25. DVI Switch to adjust your Westinghouse High Definition LCD TV. 1. SWAP Switch between PIP and Main Picture 5. English 3 INSTALLATION Remote Control Use the Remote Control to DVI source (not available) 1 2 3 4 5 7 6 8 9 10 11 12 13 15 14 16...Display OSD input menu (see page 34) 13. MENU Turn OSD Menu On/Off 17. PIP Display sub picture On/Off 3. TV Switch to TV source 26. MUTE Turn the sound On/Off 4. CH T / S TV Channel Up/Down adjustment 16. ENTER Make a selection 20.
User Manual
Page 17
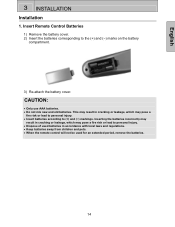
... risk or lead to personal injury. • Insert batteries according to the (+) and (−) marks on the battery compartment. 3) Re-attach the battery cover. Insert Remote Control Batteries 1) Remove the battery cover. 2) Insert the batteries corresponding to (+) and (−) markings. CAUTION: • Only use AAA batteries. • Do not mix ...in cracking or leakage, which may result in accordance with local laws and regulations. • Keep batteries away from children and pets. • When the remote control will not be used for an extended period, remove the batteries. 14
... risk or lead to personal injury. • Insert batteries according to the (+) and (−) marks on the battery compartment. 3) Re-attach the battery cover. Insert Remote Control Batteries 1) Remove the battery cover. 2) Insert the batteries corresponding to (+) and (−) markings. CAUTION: • Only use AAA batteries. • Do not mix ...in cracking or leakage, which may result in accordance with local laws and regulations. • Keep batteries away from children and pets. • When the remote control will not be used for an extended period, remove the batteries. 14
User Manual
Page 19
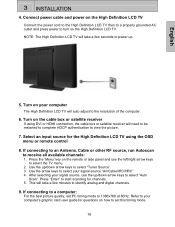
...channels. 5. Refer to your signal source "Air/Cable/IRC/HRC". 4. Turn on the High Definition LCD TV. Press "Enter" to turn on the cable box or satellite receiver If using the OSD menu or remote control 8. Connect power cable and power on how to view the picture. 7. If connecting to ... will take a few seconds to the resolution of the computer. 6. NOTE: The High Definition LCD TV will auto adjust to power up /down arrow keys to select "Auto Scan". English 3 INSTALLATION 4. Turn on the remote or side panel and use the up . 5. Press the 'Menu' key on your signal source...
...channels. 5. Refer to your signal source "Air/Cable/IRC/HRC". 4. Turn on the High Definition LCD TV. Press "Enter" to turn on the cable box or satellite receiver If using the OSD menu or remote control 8. Connect power cable and power on how to view the picture. 7. If connecting to ... will take a few seconds to the resolution of the computer. 6. NOTE: The High Definition LCD TV will auto adjust to power up /down arrow keys to select "Auto Scan". English 3 INSTALLATION 4. Turn on the remote or side panel and use the up . 5. Press the 'Menu' key on your signal source...
User Manual
Page 21
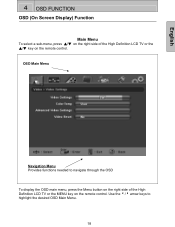
OSD Main Menu Navigation Menu Provides functions needed to highlight the desired OSD Main Menu. 18 Use the 3/4 arrow keys to navigate through the OSD To display the OSD main menu, press the Menu button on the right side of the High Definition LCD TV or the ▲/▼ key on the remote control. English 4 OSD FUNCTION OSD (On Screen Display) Function Main Menu To select a sub-menu, press ▲/▼ on the right side of the High Definition LCD TV or the MENU key on the remote control.
OSD Main Menu Navigation Menu Provides functions needed to highlight the desired OSD Main Menu. 18 Use the 3/4 arrow keys to navigate through the OSD To display the OSD main menu, press the Menu button on the right side of the High Definition LCD TV or the ▲/▼ key on the remote control. English 4 OSD FUNCTION OSD (On Screen Display) Function Main Menu To select a sub-menu, press ▲/▼ on the right side of the High Definition LCD TV or the MENU key on the remote control.
User Manual
Page 29
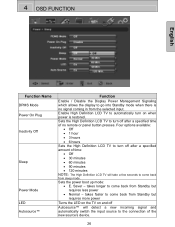
... a specified amount of time: • Off • 30 minutes • 60 minutes • 90 minutes • 120 minutes NOTE: The High Definition LCD TV will detect a new incoming signal and automatically switch the input source to the connection of no signal coming in from sleep mode. takes faster to...turn off Autosource™ will take a few seconds to come back from Standby but requires more power Turns the LED on the TV on when power is no remote or panel button presses. Saver - 4 OSD FUNCTION English Function Name DPMS Mode Power On Plug Inactivity Off Sleep Power Mode ...
... a specified amount of time: • Off • 30 minutes • 60 minutes • 90 minutes • 120 minutes NOTE: The High Definition LCD TV will detect a new incoming signal and automatically switch the input source to the connection of no signal coming in from sleep mode. takes faster to...turn off Autosource™ will take a few seconds to come back from Standby but requires more power Turns the LED on the TV on when power is no remote or panel button presses. Saver - 4 OSD FUNCTION English Function Name DPMS Mode Power On Plug Inactivity Off Sleep Power Mode ...
User Manual
Page 37
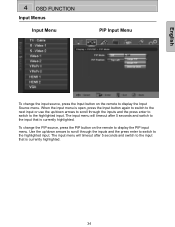
... scroll through the inputs and the press enter to switch to the highlighted input. To change the input source, press the Input button on the remote to display the PIP input menu. The input menu will timeout after 5 seconds and switch to the input that is currently highlighted. The input menu... is currently highlighted. 34 English 4 OSD FUNCTION Input Menus Input Menu PIP Input Menu To change the PIP source, press the PIP button on the remote to display the Input Source menu.
... scroll through the inputs and the press enter to switch to the highlighted input. To change the input source, press the Input button on the remote to display the PIP input menu. The input menu will timeout after 5 seconds and switch to the input that is currently highlighted. The input menu... is currently highlighted. 34 English 4 OSD FUNCTION Input Menus Input Menu PIP Input Menu To change the PIP source, press the PIP button on the remote to display the Input Source menu.
User Manual
Page 38
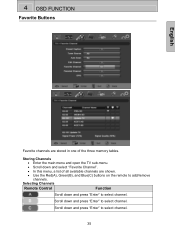
...and press "Enter" to select channel. 35 Selecting Channels Remote Control Function Scroll down and select "Favorite Channel". • In this menu, a list of the three memory tables. Storing Channels • Enter the main menu and open the TV sub-menu. • Scroll down and press "Enter..." to select channel. 4 OSD FUNCTION Favorite Buttons English Favorite channels are stored in one of all available channels are shown. • Use the Red(A), Green(B), and Blue(C) buttons on the remote to add/remove ...
...and press "Enter" to select channel. 35 Selecting Channels Remote Control Function Scroll down and select "Favorite Channel". • In this menu, a list of the three memory tables. Storing Channels • Enter the main menu and open the TV sub-menu. • Scroll down and press "Enter..." to select channel. 4 OSD FUNCTION Favorite Buttons English Favorite channels are stored in one of all available channels are shown. • Use the Red(A), Green(B), and Blue(C) buttons on the remote to add/remove ...
User Manual
Page 44
...is suddenly turned off • Check if Sleep Timer is set . Remote Control Does Not Work • Press only one button at a time. • Make sure batteries are connected to corresponds to the source on the High Definition LCD TV. • Verify that the antenna is properly connected. If so,...is set . No Picture • Check the video connection. • Make sure the video cable connected to the High Definition LCD TV is not attached permanently to the High Definition LCD TV, secure it off . No Picture when I connect VGA cable or "No Input Signal" • Check VGA cable connection. ...
...is suddenly turned off • Check if Sleep Timer is set . Remote Control Does Not Work • Press only one button at a time. • Make sure batteries are connected to corresponds to the source on the High Definition LCD TV. • Verify that the antenna is properly connected. If so,...is set . No Picture • Check the video connection. • Make sure the video cable connected to the High Definition LCD TV is not attached permanently to the High Definition LCD TV, secure it off . No Picture when I connect VGA cable or "No Input Signal" • Check VGA cable connection. ...
User Manual
Page 45
...check the video cable to another computer. The High Definition LCD TV audio may be set correctly. Loose or broken pins in TV mode. • Check your antenna connection. No Sound • Check the audio connection. • Press MUTE on the remote control, so that S-Video and Composite AV1 share the ... to reset the password. Blocky images appear in the cable connector could cause an improper connection. • Connect the High Definition LCD TV to make sure it is connected securely. If necessary, rotate the antenna and wait up to 10 seconds for signal. • Check the...
...check the video cable to another computer. The High Definition LCD TV audio may be set correctly. Loose or broken pins in TV mode. • Check your antenna connection. No Sound • Check the audio connection. • Press MUTE on the remote control, so that S-Video and Composite AV1 share the ... to reset the password. Blocky images appear in the cable connector could cause an improper connection. • Connect the High Definition LCD TV to make sure it is connected securely. If necessary, rotate the antenna and wait up to 10 seconds for signal. • Check the...


