User Manual
Page 2
...Contents 6 Front View of the HD Video Monitor 7 Rear View of the HD Video Monitor 7 Side View of the HD Video Monitor 8 Remote Control 10 Installation 11 OSD Functions PICTURE PARAMETERS: Brightness / Contrast / Saturation / Hue / Color Temp / Sharpness / Aspect Ratio / Backlight... PARAMETERS: Auto Adjust / Clock / Phase / Position 16 AUDIO SETTINGS: Volume / Bass / Treble / Balance / Mute / Speaker / Reset 17 PICTURE-IN-PICTURE: Display Mode / Main Source / PIP Source / Swap / PIP Position / PIP Size / Audio From..... 18 GENERAL SETTINGS: Menu Position / Menu Timeout / Language / Sleep...
...Contents 6 Front View of the HD Video Monitor 7 Rear View of the HD Video Monitor 7 Side View of the HD Video Monitor 8 Remote Control 10 Installation 11 OSD Functions PICTURE PARAMETERS: Brightness / Contrast / Saturation / Hue / Color Temp / Sharpness / Aspect Ratio / Backlight... PARAMETERS: Auto Adjust / Clock / Phase / Position 16 AUDIO SETTINGS: Volume / Bass / Treble / Balance / Mute / Speaker / Reset 17 PICTURE-IN-PICTURE: Display Mode / Main Source / PIP Source / Swap / PIP Position / PIP Size / Audio From..... 18 GENERAL SETTINGS: Menu Position / Menu Timeout / Language / Sleep...
User Manual
Page 4
...Orient the HD Monitor away from direct sunlight to reduce glare. • Always handle the HD display with liquids, such as a bookcase or rack unless proper ventilation is clean and free of time,...adhered to. Your warranty does not cover repairs or attempted repairs by anyone not authorized by Westinghouse Digital. • If the HD Monitor will not be seriously injured if you operate the ...are not likely to dripping or splashing and objects filled with care when moving it from the remote control. don't place the HD Monitor in fire or electronic shock. To ensure reliable operation of...
...Orient the HD Monitor away from direct sunlight to reduce glare. • Always handle the HD display with liquids, such as a bookcase or rack unless proper ventilation is clean and free of time,...adhered to. Your warranty does not cover repairs or attempted repairs by anyone not authorized by Westinghouse Digital. • If the HD Monitor will not be seriously injured if you operate the ...are not likely to dripping or splashing and objects filled with care when moving it from the remote control. don't place the HD Monitor in fire or electronic shock. To ensure reliable operation of...
User Manual
Page 8
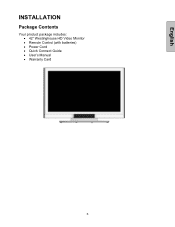
English INSTALLATION Package Contents Your product package includes: • 42" Westinghouse HD Video Monitor • Remote Control (with batteries) • Power Cord • Quick Connect Guide • User's Manual • Warranty Card 6
English INSTALLATION Package Contents Your product package includes: • 42" Westinghouse HD Video Monitor • Remote Control (with batteries) • Power Cord • Quick Connect Guide • User's Manual • Warranty Card 6
User Manual
Page 9
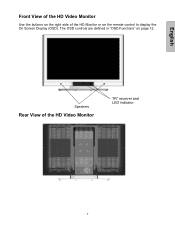
English Front View of the HD Video Monitor Use the buttons on the right side of the HD Video Monitor "IR" receiver and LED indicator 7 The OSD controls are defined in "OSD Functions" on the remote control to display the On Screen Display (OSD). Speakers Rear View of the HD Monitor or on page 12.
English Front View of the HD Video Monitor Use the buttons on the right side of the HD Video Monitor "IR" receiver and LED indicator 7 The OSD controls are defined in "OSD Functions" on the remote control to display the On Screen Display (OSD). Speakers Rear View of the HD Monitor or on page 12.
User Manual
Page 12
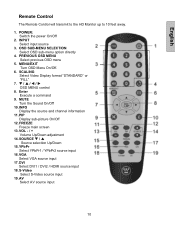
English Remote Control The Remote Control will transmit to the HD Monitor up to 10 feet away. 1. SCALING Select Video Display format "STANDARD" or "FILL" 7. INFO Display the source and channel information 11. SOURCE T / S Source selection Up/Down 15. S-Video Select S-Video source input 19. PREVIOUS OSD MENU Select... OSD Menu On/Off. 6. T / S / W / X OSD MENU control 8. MUTE Turn the Sound On/Off 10. POWER: Switch the power On/Off 2. PIP Display sub-picture On/Off 12. FREEZE Freeze main screen 13. YPbPr Select YPbPr1 / YPbPr2 source input 16. AV Select AV source input 10
English Remote Control The Remote Control will transmit to the HD Monitor up to 10 feet away. 1. SCALING Select Video Display format "STANDARD" or "FILL" 7. INFO Display the source and channel information 11. SOURCE T / S Source selection Up/Down 15. S-Video Select S-Video source input 19. PREVIOUS OSD MENU Select... OSD Menu On/Off. 6. T / S / W / X OSD MENU control 8. MUTE Turn the Sound On/Off 10. POWER: Switch the power On/Off 2. PIP Display sub-picture On/Off 12. FREEZE Freeze main screen 13. YPbPr Select YPbPr1 / YPbPr2 source input 16. AV Select AV source input 10
User Manual
Page 13
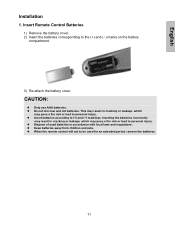
...result in accordance with local laws and regulations. z Dispose of used for an extended period, remove the batteries. 11 z When the remote control will not to be used batteries in cracking or leakage, which may pose a fire risk or lead to personal injury. z... Do not mix new and old batteries. English Installation 1. CAUTION: z Only use AAA batteries. Insert Remote Control Batteries 1) Remove the battery cover. 2) Insert the batteries corresponding to (+) and (−) markings. Inserting the batteries incorrectly may result in ...
...result in accordance with local laws and regulations. z Dispose of used for an extended period, remove the batteries. 11 z When the remote control will not to be used batteries in cracking or leakage, which may pose a fire risk or lead to personal injury. z... Do not mix new and old batteries. English Installation 1. CAUTION: z Only use AAA batteries. Insert Remote Control Batteries 1) Remove the battery cover. 2) Insert the batteries corresponding to (+) and (−) markings. Inserting the batteries incorrectly may result in ...
User Manual
Page 15
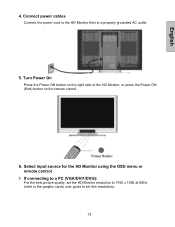
If connecting to a PC (VGA/DVI1/DVI2): For the best picture quality, set this resolution). 13 Select input source for the HD Monitor using the OSD menu or remote control 7. Turn Power On Press the Power ON button on the right side of the HD Monitor, or press the Power ON (Red) button on the remote control. 6. English 4. Connect power cables Connect the power cord to the HD Monitor then to set the HD Monitor resolution to 1920 x 1080 at 60Hz (refer to the graphic card's user guide to a properly grounded AC outlet. 5.
If connecting to a PC (VGA/DVI1/DVI2): For the best picture quality, set this resolution). 13 Select input source for the HD Monitor using the OSD menu or remote control 7. Turn Power On Press the Power ON button on the right side of the HD Monitor, or press the Power ON (Red) button on the remote control. 6. English 4. Connect power cables Connect the power cord to the HD Monitor then to set the HD Monitor resolution to 1920 x 1080 at 60Hz (refer to the graphic card's user guide to a properly grounded AC outlet. 5.
User Manual
Page 16
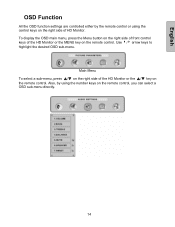
...; on the right side of the HD Monitor or the MENU key on the remote control. Also, by the remote control or using the number keys on the remote control, you can select a OSD sub-menu directly. 14 To display the OSD main menu, press the Menu button on the right side of front... control keys of the HD Monitor or the ▲/▼ key on the remote control. English OSD Function All the OSD function settings are controlled either by using...
...; on the right side of the HD Monitor or the MENU key on the remote control. Also, by the remote control or using the number keys on the remote control, you can select a OSD sub-menu directly. 14 To display the OSD main menu, press the Menu button on the right side of front... control keys of the HD Monitor or the ▲/▼ key on the remote control. English OSD Function All the OSD function settings are controlled either by using...
User Manual
Page 23
...in a "Universal" Remote • Purchase a separate "learning" remote control or log on to "internal". The HD Monitor audio may be set to minimum. • Press the Volume + (Up) key on the back of the video cable is set to : www.westinghousedigital.com • Contact Westinghouse Customer Service at (...866) 287-5555 or write us at a time. Power is ON but No Screen Image • Make sure the video cable connected to the HD Monitor is tightly secured to the video output port on the remote control. • Make...
...in a "Universal" Remote • Purchase a separate "learning" remote control or log on to "internal". The HD Monitor audio may be set to minimum. • Press the Volume + (Up) key on the back of the video cable is set to : www.westinghousedigital.com • Contact Westinghouse Customer Service at (...866) 287-5555 or write us at a time. Power is ON but No Screen Image • Make sure the video cable connected to the HD Monitor is tightly secured to the video output port on the remote control. • Make...


