User Manual
Page 2
... Menu ...22 PIP function Menu ...23 Auto Adjustment ...23 Input Source not found in "universal" remote 26 How do I find more help? ...26 1 Turn Power On...10 6. Attach Base Stand to LCD TV ...7 3. Connect Antenna, Cable, Video, S-Video, YPbPr, DVI, and/or VGA Cables 8 4. Table of Range ...24 APPENDIX ...25 Specifications ...25 Troubleshooting ...26 No power ...26 Power is ON but no screen image...26 Wrong or abnormal colors ...26 Snow appears on screen...26 No sound...26 Remote control does not work ...26 Remote control code...
... Menu ...22 PIP function Menu ...23 Auto Adjustment ...23 Input Source not found in "universal" remote 26 How do I find more help? ...26 1 Turn Power On...10 6. Attach Base Stand to LCD TV ...7 3. Connect Antenna, Cable, Video, S-Video, YPbPr, DVI, and/or VGA Cables 8 4. Table of Range ...24 APPENDIX ...25 Specifications ...25 Troubleshooting ...26 No power ...26 Power is ON but no screen image...26 Wrong or abnormal colors ...26 Snow appears on screen...26 No sound...26 Remote control does not work ...26 Remote control code...
User Manual
Page 3
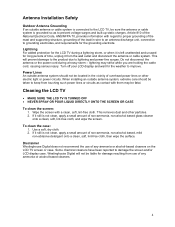
... power sources when installing television. Power supply cords should never be routed away from the product. The cord should be severely bent, pinched, or twisted. Avoid exposing the LCD display to protect it exits from foot traffic and contact with water. IMPORTANT PRODUCT SAFETY INSTRUCTIONS Read carefully and follow warnings can result in a convenient location for future reference. Avoid exposing the LCD display to remove...
... power sources when installing television. Power supply cords should never be routed away from the product. The cord should be severely bent, pinched, or twisted. Avoid exposing the LCD display to protect it exits from foot traffic and contact with water. IMPORTANT PRODUCT SAFETY INSTRUCTIONS Read carefully and follow warnings can result in a convenient location for future reference. Avoid exposing the LCD display to remove...
User Manual
Page 4
... no user serviceable parts inside. Do not place it in a built-in installation, such as a bookcase or an enclosed rack, unless proper ventilation is present, immediately unplug the power cord. Refer all servicing and repairs to qualified service personnel. You may be used for extended periods of time, unplug the power cord and remove the batteries from the remote control. 3 Contact a qualified service technician If your LCD TV will...
... no user serviceable parts inside. Do not place it in a built-in installation, such as a bookcase or an enclosed rack, unless proper ventilation is present, immediately unplug the power cord. Refer all servicing and repairs to qualified service personnel. You may be used for extended periods of time, unplug the power cord and remove the batteries from the remote control. 3 Contact a qualified service technician If your LCD TV will...
User Manual
Page 5
... clean the screen: 1. Turn off your LCD display and wait for the grounding electrode. Do not disconnect the antenna or the power cord during a lightning storm, or when it is grounded so as contact with a clean, soft, lint-free cloth. Use a soft, dry cloth. 2. Westinghouse Digital will prevent damage to the product due to proper grounding of the mast and supporting structure...
... clean the screen: 1. Turn off your LCD display and wait for the grounding electrode. Do not disconnect the antenna or the power cord during a lightning storm, or when it is grounded so as contact with a clean, soft, lint-free cloth. Use a soft, dry cloth. 2. Westinghouse Digital will prevent damage to the product due to proper grounding of the mast and supporting structure...
User Manual
Page 6
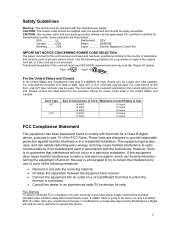
... Conductors in a residential installation. However, there is connected. • Consult the dealer or an experienced radio/TV technician for a Class B digital device, pursuant to part 15 of the cord set is going to radio communications if not installed and used , use the appropriate AC cord that is certified for power cords used . For units that interference will void the user's authority to operate this equipment does...
... Conductors in a residential installation. However, there is connected. • Consult the dealer or an experienced radio/TV technician for a Class B digital device, pursuant to part 15 of the cord set is going to radio communications if not installed and used , use the appropriate AC cord that is certified for power cords used . For units that interference will void the user's authority to operate this equipment does...
User Manual
Page 7
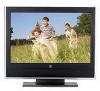
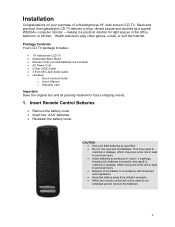
Package Contents Your LCD TV package includes: • 19" widescreen LCD TV • Detachable Base Stand • Remote Control (2 AAA batteries are included) • AC Power Cord • D-Sub (VGA) Cable • 3.5mm Mini-Jack Audio Cable • Literature o Quick Connect Guide o User's Manual o Warranty Card Important Save the original box and all packing material for an extended period, remove the batteries. 6 CAUTION • Only use AAA batteries as a superb WSXGA+ computer monitor -making it...
Package Contents Your LCD TV package includes: • 19" widescreen LCD TV • Detachable Base Stand • Remote Control (2 AAA batteries are included) • AC Power Cord • D-Sub (VGA) Cable • 3.5mm Mini-Jack Audio Cable • Literature o Quick Connect Guide o User's Manual o Warranty Card Important Save the original box and all packing material for an extended period, remove the batteries. 6 CAUTION • Only use AAA batteries as a superb WSXGA+ computer monitor -making it...
User Manual
Page 9
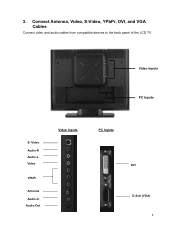
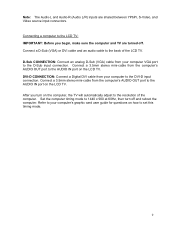
Connect Antenna, Video, S-Video, YPbPr, DVI, and VGA Cables Connect video and audio cables from compatible devices to the back panel of the LCD TV. Video Inputs PC Inputs S- Video Audio-R Audio-L Video YPbPr Antenna Audio-In Audio-Out Video Inputs PC Inputs DVI D-Sub (VGA) 8 3.
Connect Antenna, Video, S-Video, YPbPr, DVI, and VGA Cables Connect video and audio cables from compatible devices to the back panel of the LCD TV. Video Inputs PC Inputs S- Video Audio-R Audio-L Video YPbPr Antenna Audio-In Audio-Out Video Inputs PC Inputs DVI D-Sub (VGA) 8 3.
User Manual
Page 10
...-D input connection. Refer to your computer to the AUDIO IN port on the LCD TV. Connect a 3.5mm stereo mini-cable from your computer's graphic card user guide for questions on the computer, the TV will automatically adjust to the D-Sub input connection. Connect a 3.5mm stereo mini-cable from your computer VGA port to the resolution of the LCD TV. Connect a D-Sub (VGA) or DVI cable and an audio cable to set this timing mode. 9 Set the computer timing mode to...
...-D input connection. Refer to your computer to the AUDIO IN port on the LCD TV. Connect a 3.5mm stereo mini-cable from your computer's graphic card user guide for questions on the computer, the TV will automatically adjust to the D-Sub input connection. Connect a 3.5mm stereo mini-cable from your computer VGA port to the resolution of the LCD TV. Connect a D-Sub (VGA) or DVI cable and an audio cable to set this timing mode. 9 Set the computer timing mode to...
User Manual
Page 11
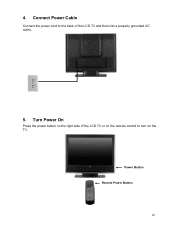
Turn Power On Press the power button on the TV. Power Button Remote Power Button 10 4. Connect Power Cable Connect the power cord to the back of the LCD TV or on the remote control to turn on the right side of the LCD TV and then into a properly grounded AC outlet. 5.
Turn Power On Press the power button on the TV. Power Button Remote Power Button 10 4. Connect Power Cable Connect the power cord to the back of the LCD TV or on the remote control to turn on the right side of the LCD TV and then into a properly grounded AC outlet. 5.
User Manual
Page 12
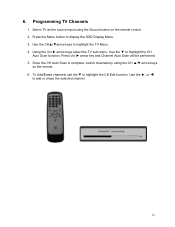
... Vol ► arrow keys select the TV sub-menu. Once the CH Auto Scan is complete, switch channels by using the Source button on the remote. 6. Press Vol ► arrow key and Channel Auto Scan will be performed. 5. Use the ▼ to add or erase the selected channel. 11 Press the Menu button to display the OSD Display Menu. 3. Select TV as the source input using the CH ▲/▼ arrow keys on the remote control. 2. Programming TV Channels 1.
... Vol ► arrow keys select the TV sub-menu. Once the CH Auto Scan is complete, switch channels by using the Source button on the remote. 6. Press Vol ► arrow key and Channel Auto Scan will be performed. 5. Use the ▼ to add or erase the selected channel. 11 Press the Menu button to display the OSD Display Menu. 3. Select TV as the source input using the CH ▲/▼ arrow keys on the remote control. 2. Programming TV Channels 1.
User Manual
Page 15
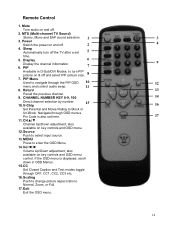
... by number 15 10. Scaling Push to change picture aspect ratio to enter the OSD Menu. 14. Power Switch the power on and off and select PIP picture size. 8 7. PIP 7 Available in OSD Menus. 15. If the OSD menu is also set 5 time. 5. Pin Code is displayed, scroll down in D-Sub/DVI Modes; MENU Press to Normal, Zoom, or Full. 17. Vol◄/► Volume Up/Down adjustment; MTS (Multi-channel TV Sound...
... by number 15 10. Scaling Push to change picture aspect ratio to enter the OSD Menu. 14. Power Switch the power on and off and select PIP picture size. 8 7. PIP 7 Available in OSD Menus. 15. If the OSD menu is also set 5 time. 5. Pin Code is displayed, scroll down in D-Sub/DVI Modes; MENU Press to Normal, Zoom, or Full. 17. Vol◄/► Volume Up/Down adjustment; MTS (Multi-channel TV Sound...
User Manual
Page 16
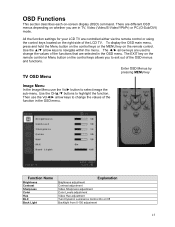
... -screen display (OSD) command. The ◄/► arrow keys are used to change the values of the function in the OSD menu. The EXIT key on the remote control or Menu button on the control keys allows you are selected in TV, Video (Video/S-Video/YPbPr) or PC (D-Sub/DVI) mode. Function Name Brightness Contrast Sharpness Color Hue DLC Back Light Explanation Brightness adjustment Contrast adjustment Video Sharpness adjustment Color Levels adjustment Video Hue adjustment Turn...
... -screen display (OSD) command. The ◄/► arrow keys are used to change the values of the function in the OSD menu. The EXIT key on the remote control or Menu button on the control keys allows you are selected in TV, Video (Video/S-Video/YPbPr) or PC (D-Sub/DVI) mode. Function Name Brightness Contrast Sharpness Color Hue DLC Back Light Explanation Brightness adjustment Contrast adjustment Video Sharpness adjustment Color Levels adjustment Video Hue adjustment Turn...

User Manual
Page 19
... automatically OSD horizontal/vertical position adjustment Restore factory default settings Set the Sleep timer for 30, 45, 60, 90, or 120 minutes Set the display to Full, Normal, or Zoom (Can only change the Pin Code, enter new Password and confirm new Password is 0000). To change with an active signal) V-Chip and Parental Control Menu To access the PARENTAL CONTROL menu press the V-Chip button located on the remote control. Enter the Pin Code (default is set. 18
... automatically OSD horizontal/vertical position adjustment Restore factory default settings Set the Sleep timer for 30, 45, 60, 90, or 120 minutes Set the display to Full, Normal, or Zoom (Can only change the Pin Code, enter new Password and confirm new Password is 0000). To change with an active signal) V-Chip and Parental Control Menu To access the PARENTAL CONTROL menu press the V-Chip button located on the remote control. Enter the Pin Code (default is set. 18
User Manual
Page 20
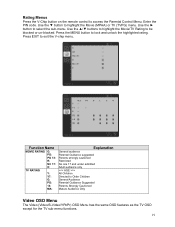
... to select the sub-menu. Enter the PIN code. Use the ► button to exit the V-chip menu. Rating Menus Press the V-Chip button on the remote control to lock and unlock the highlighted rating. Press the MENU button to access the Parental Control Menu. Use the ▲/▼ buttons to highlight the Movie/TV Rating to highlight the Movie (MPAA) or TV (TVPG) menu. Use the ▼ button to be blocked or...
... to select the sub-menu. Enter the PIN code. Use the ► button to exit the V-chip menu. Rating Menus Press the V-Chip button on the remote control to lock and unlock the highlighted rating. Press the MENU button to access the Parental Control Menu. Use the ▲/▼ buttons to highlight the Movie/TV Rating to highlight the Movie (MPAA) or TV (TVPG) menu. Use the ▼ button to be blocked or...
User Manual
Page 21
... Brightness adjustment. Contrast adjustment. Default value is 100. Adjust OSD on vertical position. Use the CH▲/▼ buttons to highlight function. Adjust the Clock timing. Adjust the Video Hue level. Adjust OSD on horizontal position. Adjust automatically the picture and synch the LCD TV monitor 20 Default value is 50. Default value is 2. Then use the Vol► button to select image sub-menu. Default value is 55. Adjust picture sharpness from 1 - 5. Default value...
... Brightness adjustment. Contrast adjustment. Default value is 100. Adjust OSD on vertical position. Use the CH▲/▼ buttons to highlight function. Adjust the Clock timing. Adjust the Video Hue level. Adjust OSD on horizontal position. Adjust automatically the picture and synch the LCD TV monitor 20 Default value is 50. Default value is 2. Then use the Vol► button to select image sub-menu. Default value is 55. Adjust picture sharpness from 1 - 5. Default value...

User Manual
Page 23
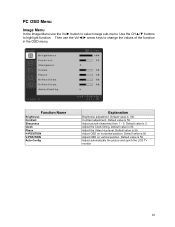
... OSD Time-out OSD Position Reset Auto Setting PIP Menu Explanation English, Chinese, French, Spanish Set OSD transparency level Set the time to highlight the function. Use the CH▲/▼ buttons to turn off the OSD automatically OSD horizontal/vertical position adjustment Restore factory default settings Automatically configure TV with PC Access PIP Menu INFO Menu Display system information. Miscellaneous Menu In the Miscellaneous Menu, use the Vol◄/► arrow keys to change the...
... OSD Time-out OSD Position Reset Auto Setting PIP Menu Explanation English, Chinese, French, Spanish Set OSD transparency level Set the time to highlight the function. Use the CH▲/▼ buttons to turn off the OSD automatically OSD horizontal/vertical position adjustment Restore factory default settings Automatically configure TV with PC Access PIP Menu INFO Menu Display system information. Miscellaneous Menu In the Miscellaneous Menu, use the Vol◄/► arrow keys to change the...
User Manual
Page 24
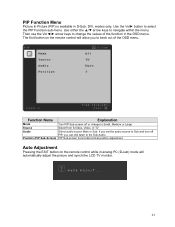
... S-Video, Video, or TV Audio Select audio source Main or Sub. Use the Vol► button to navigate within the menu. Function Name Explanation Mode Turn PIP Sub-screen off PIP, you can still listen to back out of the function in D-Sub, DVI, modes only. Position (PIP Sub-Screen) PIP Sub-screen horizontal/vertical position adjustment Auto Adjustment Pressing the EXIT button on the remote control will automatically adjust the picture and synch the LCD TV monitor. 23 PIP Function Menu Picture...
... S-Video, Video, or TV Audio Select audio source Main or Sub. Use the Vol► button to navigate within the menu. Function Name Explanation Mode Turn PIP Sub-screen off PIP, you can still listen to back out of the function in D-Sub, DVI, modes only. Position (PIP Sub-Screen) PIP Sub-screen horizontal/vertical position adjustment Auto Adjustment Pressing the EXIT button on the remote control will automatically adjust the picture and synch the LCD TV monitor. 23 PIP Function Menu Picture...
User Manual
Page 25
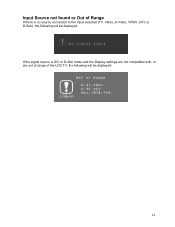
Input Source not found or Out of Range If there is no source connected to the Input selected (TV, Video, S-Video, YPbPr, DVI, or D-Sub), the following will be displayed: If the signal source is DVI or D-Sub mode and the Display settings are not compatible with, or are out of range of the LCD TV, the following will be displayed: 24
Input Source not found or Out of Range If there is no source connected to the Input selected (TV, Video, S-Video, YPbPr, DVI, or D-Sub), the following will be displayed: If the signal source is DVI or D-Sub mode and the Display settings are not compatible with, or are out of range of the LCD TV, the following will be displayed: 24
User Manual
Page 26
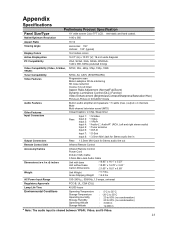
... output x 2 channels Mute Multi-channel television sound (MTS) Closed Caption, V-Chip, Sleep timer Rear: Input 1: Input 2: Input 3: Input 4: Input 5: Input 6: Input 7: Input 8: 1 S-Video 1 Video 1 YPbPr 1 Audio-L*, Audio-R* (RCA, Left and right stereo audio) 1 Tuner antenna 1 DVI-D 1 D-Sub 1 3.5mm Mini-Jack for Stereo audio line in Output Connectors Rear: 1 3.5mm Mini-Jack for Stereo audio line out Remote Control Unit Infrared Remote Control Accessory/Cables Infrared Remote Control Power Cord D-Sub (VGA) Cable 3.5mm Mini-Jack Audio Cable Dimensions (w x h x d) inches Unit with base...
... output x 2 channels Mute Multi-channel television sound (MTS) Closed Caption, V-Chip, Sleep timer Rear: Input 1: Input 2: Input 3: Input 4: Input 5: Input 6: Input 7: Input 8: 1 S-Video 1 Video 1 YPbPr 1 Audio-L*, Audio-R* (RCA, Left and right stereo audio) 1 Tuner antenna 1 DVI-D 1 D-Sub 1 3.5mm Mini-Jack for Stereo audio line in Output Connectors Rear: 1 3.5mm Mini-Jack for Stereo audio line out Remote Control Unit Infrared Remote Control Accessory/Cables Infrared Remote Control Power Cord D-Sub (VGA) Cable 3.5mm Mini-Jack Audio Cable Dimensions (w x h x d) inches Unit with base...
User Manual
Page 27
... Source settings. Westinghouse and You can be set to properly match 75 ohm impedance. • Check TV / CATV selection. Remote control code not found in YPbPr component video input. Wrong or abnormal colors • If any colors (red, green, or blue) are missing, check the video cable to make sure it 's Westinghouse are trademarks of the LCD TV. • Make sure AC power cord is securely connected to the AC socket. • Plug...
... Source settings. Westinghouse and You can be set to properly match 75 ohm impedance. • Check TV / CATV selection. Remote control code not found in YPbPr component video input. Wrong or abnormal colors • If any colors (red, green, or blue) are missing, check the video cable to make sure it 's Westinghouse are trademarks of the LCD TV. • Make sure AC power cord is securely connected to the AC socket. • Plug...


