User Manual
Page 2
...Attach Base Stand to LCD TV ...7 3. Table of Range ...24 APPENDIX ...25 Specifications ...25 Troubleshooting ...26 No power ...26 Power is ON but no screen image...26 Wrong or abnormal colors ...26 Snow appears on screen...26 No sound...26 Remote control does not work ...26 Remote control code not found ......12 Front View of the Product...12 Remote Control ...14 OSD FUNCTIONS ...15 TV OSD Menu ...15 Image Menu ...15 Audio Menu ...16 Color Menu...16 TV Menu...17 Miscellaneous Menu...17 V-Chip and Parental Control Menu ...18 Rating Menus...19 Video OSD Menu...19 PC OSD Menu ...20 Image Menu ......
...Attach Base Stand to LCD TV ...7 3. Table of Range ...24 APPENDIX ...25 Specifications ...25 Troubleshooting ...26 No power ...26 Power is ON but no screen image...26 Wrong or abnormal colors ...26 Snow appears on screen...26 No sound...26 Remote control does not work ...26 Remote control code not found ......12 Front View of the Product...12 Remote Control ...14 OSD FUNCTIONS ...15 TV OSD Menu ...15 Image Menu ...15 Audio Menu ...16 Color Menu...16 TV Menu...17 Miscellaneous Menu...17 V-Chip and Parental Control Menu ...18 Rating Menus...19 Video OSD Menu...19 PC OSD Menu ...20 Image Menu ......
User Manual
Page 4
...LCD TV on a bed, sofa, rug or other similar surface. Your LCD TV contains high-voltage parts. Do not place it in a built-in installation, such as a bookcase or an enclosed rack, unless proper ventilation is present, immediately unplug the power cord. To assure proper ventilation, do not block the openings by Westinghouse... remove the batteries from the remote control. 3 If smoke, abnormal noise, or strange odor is provided. Other Notices and Precautions Caution: Never remove the rear cover. Contact a qualified service technician If your LCD TV will not be seriously injured ...
...LCD TV on a bed, sofa, rug or other similar surface. Your LCD TV contains high-voltage parts. Do not place it in a built-in installation, such as a bookcase or an enclosed rack, unless proper ventilation is present, immediately unplug the power cord. To assure proper ventilation, do not block the openings by Westinghouse... remove the batteries from the remote control. 3 If smoke, abnormal noise, or strange odor is provided. Other Notices and Precautions Caution: Never remove the rear cover. Contact a qualified service technician If your LCD TV will not be seriously injured ...
User Manual
Page 7
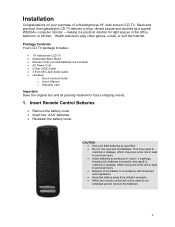
... and (−) markings. Watch television, play video games, e-mail, or surf the Internet. Package Contents Your LCD TV package includes: • 19" widescreen LCD TV • Detachable Base Stand • Remote Control (2 AAA batteries are included) • AC Power Cord • D-Sub (VGA) Cable • ...remote control will not be used for an extended period, remove the batteries. 6 This may result in cracking or leakage, which may pose a fire risk or lead to personal injury. • Insert batteries according to personal injury. • Dispose of a Westinghouse 19" wide screen LCD TV...
... and (−) markings. Watch television, play video games, e-mail, or surf the Internet. Package Contents Your LCD TV package includes: • 19" widescreen LCD TV • Detachable Base Stand • Remote Control (2 AAA batteries are included) • AC Power Cord • D-Sub (VGA) Cable • ...remote control will not be used for an extended period, remove the batteries. 6 This may result in cracking or leakage, which may pose a fire risk or lead to personal injury. • Insert batteries according to personal injury. • Dispose of a Westinghouse 19" wide screen LCD TV...
User Manual
Page 11
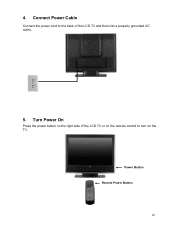
Turn Power On Press the power button on the right side of the LCD TV or on the TV. Power Button Remote Power Button 10 4. Connect Power Cable Connect the power cord to turn on the remote control to the back of the LCD TV and then into a properly grounded AC outlet. 5.
Turn Power On Press the power button on the right side of the LCD TV or on the TV. Power Button Remote Power Button 10 4. Connect Power Cable Connect the power cord to turn on the remote control to the back of the LCD TV and then into a properly grounded AC outlet. 5.
User Manual
Page 12
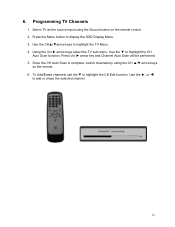
... CH Auto Scan function. Press Vol ► arrow key and Channel Auto Scan will be performed. 5. Select TV as the source input using the CH ▲/▼ arrow keys on the remote control. 2. Use the CH▲/▼arrow keys to highlight the CH Edit function. To Add/Erase channels ...use the ▼ to highlight the TV Menu. 4. 6. Using the Vol ► arrow keys select the TV sub-menu. Press the Menu button to display...
... CH Auto Scan function. Press Vol ► arrow key and Channel Auto Scan will be performed. 5. Select TV as the source input using the CH ▲/▼ arrow keys on the remote control. 2. Use the CH▲/▼arrow keys to highlight the CH Edit function. To Add/Erase channels ...use the ▼ to highlight the TV Menu. 4. 6. Using the Vol ► arrow keys select the TV sub-menu. Press the Menu button to display...
User Manual
Page 13
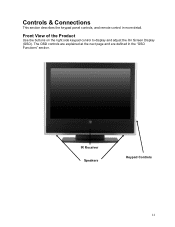
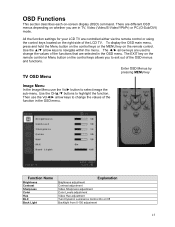
Controls & Connections This section describes the keypad panel controls, and remote control in the "OSD Functions" section. IR Receiver Speakers Keypad Controls 12 The OSD controls are explained at the next page and are defined in more detail. Front View of the Product Use the buttons on the right side keypad control to display and adjust the On Screen Display (OSD).
Controls & Connections This section describes the keypad panel controls, and remote control in the "OSD Functions" section. IR Receiver Speakers Keypad Controls 12 The OSD controls are explained at the next page and are defined in more detail. Front View of the Product Use the buttons on the right side keypad control to display and adjust the On Screen Display (OSD).
User Manual
Page 15
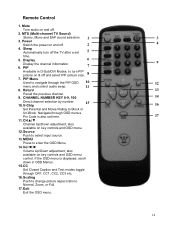
Mute Turn audio on and off . 2 4. Power Switch the power on & off the TV after a set here. 11. PIP 7 Available in OSD Menus. 15. PIP Menu Used to Block or Un-Block. Navigate through OFF, CC1, CC2, CC3 etc. ...◄/► Volume Up/Down adjustment; Return Recall the previous channel. 9. Scaling Push to change picture aspect ratio to select input source. 13. Remote Control 1. MTS (Multi-channel TV Sound) Stereo, Mono and SAP sound selection 1 3. MENU Press to turn off and select PIP picture size. 8 7. CC Set Closed Caption and Text...
Mute Turn audio on and off . 2 4. Power Switch the power on & off the TV after a set here. 11. PIP 7 Available in OSD Menus. 15. PIP Menu Used to Block or Un-Block. Navigate through OFF, CC1, CC2, CC3 etc. ...◄/► Volume Up/Down adjustment; Return Recall the previous channel. 9. Scaling Push to change picture aspect ratio to select input source. 13. Remote Control 1. MTS (Multi-channel TV Sound) Stereo, Mono and SAP sound selection 1 3. MENU Press to turn off and select PIP picture size. 8 7. CC Set Closed Caption and Text...
User Manual
Page 16
... Video Hue adjustment Turn Dynamic Luminance Control On or Off Backlight from 0-100 adjustment 15 All the function settings for your LCD TV are controlled either via the remote control or using the control keys located on the right side of the functions that are different OSD menus depending on the...Sub/DVI) mode. The ◄/► arrow keys are in the OSD menu. The EXIT key on the remote control or Menu button on whether you to change the values of the LCD TV. Use the CH▲/▼ buttons to navigate within the menu. Then use the Vol► button to...
... Video Hue adjustment Turn Dynamic Luminance Control On or Off Backlight from 0-100 adjustment 15 All the function settings for your LCD TV are controlled either via the remote control or using the control keys located on the right side of the functions that are different OSD menus depending on the...Sub/DVI) mode. The ◄/► arrow keys are in the OSD menu. The EXIT key on the remote control or Menu button on whether you to change the values of the LCD TV. Use the CH▲/▼ buttons to navigate within the menu. Then use the Vol► button to...

User Manual
Page 19
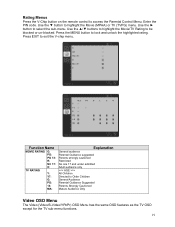
To change with an active signal) V-Chip and Parental Control Menu To access the PARENTAL CONTROL menu press the V-Chip button located on the remote control. Function Name Language OSD Transparency OSD Time-out OSD Position Reset Sleep Aspect Ratio Explanation English, Chinese, French, Spanish Set OSD transparency level Set ...
To change with an active signal) V-Chip and Parental Control Menu To access the PARENTAL CONTROL menu press the V-Chip button located on the remote control. Function Name Language OSD Transparency OSD Time-out OSD Position Reset Sleep Aspect Ratio Explanation English, Chinese, French, Spanish Set OSD transparency level Set ...
User Manual
Page 20
...Strongly Cautioned Mature Audience Only Video OSD Menu The Video (Video/S-Video/YPbPr) OSD Menu has the same OSD features as the TV OSD except for the TV sub-menu functions. 19 Press the MENU button to select the sub-menu. Use the ► button to lock and unlock the highlighted rating. Rating... Menus Press the V-Chip button on the remote control to exit the V-chip menu. Enter the PIN code. Press EXIT to access the ...
...Strongly Cautioned Mature Audience Only Video OSD Menu The Video (Video/S-Video/YPbPr) OSD Menu has the same OSD features as the TV OSD except for the TV sub-menu functions. 19 Press the MENU button to select the sub-menu. Use the ► button to lock and unlock the highlighted rating. Rating... Menus Press the V-Chip button on the remote control to exit the V-chip menu. Enter the PIN code. Press EXIT to access the ...
User Manual
Page 24
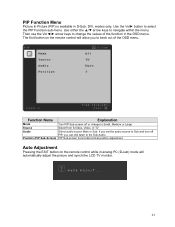
...Name Explanation Mode Turn PIP Sub-screen off PIP, you can still listen to Small, Medium or Large Source Select from S-Video, Video, or TV Audio Select audio source Main or Sub. If you to select the PIP Function sub-menu. Use either the ▲/▼ arrow keys to ...-Screen) PIP Sub-screen horizontal/vertical position adjustment Auto Adjustment Pressing the EXIT button on the remote control will automatically adjust the picture and synch the LCD TV monitor. 23 The Exit button on the remote control while in analog PC (D-sub) mode will allow you set the audio source to Sub...
...Name Explanation Mode Turn PIP Sub-screen off PIP, you can still listen to Small, Medium or Large Source Select from S-Video, Video, or TV Audio Select audio source Main or Sub. If you to select the PIP Function sub-menu. Use either the ▲/▼ arrow keys to ...-Screen) PIP Sub-screen horizontal/vertical position adjustment Auto Adjustment Pressing the EXIT button on the remote control will automatically adjust the picture and synch the LCD TV monitor. 23 The Exit button on the remote control while in analog PC (D-sub) mode will allow you set the audio source to Sub...
User Manual
Page 26
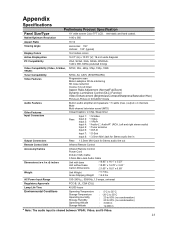
...Specifications Panel Size/Type Native/Optimum Resolution Aspect Ratio Viewing Angle Display Colors Active Display Area PC Compatibility Preliminary Product Specification 19" wide screen Color TFT LCD. Anti-static and hard coated. 1440 x 900 16:10 Horizontal: 150° Vertical: 130° (typical)... 3.5mm Mini-Jack for Stereo audio line in Output Connectors Rear: 1 3.5mm Mini-Jack for Stereo audio line out Remote Control Unit Infrared Remote Control Accessory/Cables Infrared Remote Control Power Cord D-Sub (VGA) Cable 3.5mm Mini-Jack Audio Cable Dimensions (w x h x d) inches Unit with...
...Specifications Panel Size/Type Native/Optimum Resolution Aspect Ratio Viewing Angle Display Colors Active Display Area PC Compatibility Preliminary Product Specification 19" wide screen Color TFT LCD. Anti-static and hard coated. 1440 x 900 16:10 Horizontal: 150° Vertical: 130° (typical)... 3.5mm Mini-Jack for Stereo audio line in Output Connectors Rear: 1 3.5mm Mini-Jack for Stereo audio line out Remote Control Unit Infrared Remote Control Accessory/Cables Infrared Remote Control Power Cord D-Sub (VGA) Cable 3.5mm Mini-Jack Audio Cable Dimensions (w x h x d) inches Unit with...
User Manual
Page 27
...or abnormal colors • If any colors (red, green, or blue) are missing, check the video cable to make sure it 's Westinghouse are trademarks of the LCD TV. • Make sure AC power cord is securely connected to the AC socket. • Plug another electrical device (like a... screen image • Adjust brightness and contrast. • Check Source settings. Snow appears on your remote control. • Make sure that headphones are not connected. Remote control code not found in the cable connector could cause an improper connection. • The red connector for...
...or abnormal colors • If any colors (red, green, or blue) are missing, check the video cable to make sure it 's Westinghouse are trademarks of the LCD TV. • Make sure AC power cord is securely connected to the AC socket. • Plug another electrical device (like a... screen image • Adjust brightness and contrast. • Check Source settings. Snow appears on your remote control. • Make sure that headphones are not connected. Remote control code not found in the cable connector could cause an improper connection. • The red connector for...


