User Manual
Page 2
...19 PC OSD Menu ...20 Image Menu ...20 Audio Menu ...21 Color Temp Menu...21 Miscellaneous Menu...22 INFO Menu...22 PC DVI OSD Menu ...22 PIP function Menu ...23 Auto Adjustment ...23 Input Source not found or Out of Contents IMPORTANT PRODUCT SAFETY INSTRUCTIONS 2 Antenna Installation Safety ...4 Cleaning the LCD TV... ...4 Safety Guidelines ...5 FCC Compliance Statement...5 INSTALLATION ...6 1. Attach Base Stand to LCD TV ...7 3. Connect Antenna, Cable, Video, S-Video, YPbPr, DVI, ...
...19 PC OSD Menu ...20 Image Menu ...20 Audio Menu ...21 Color Temp Menu...21 Miscellaneous Menu...22 INFO Menu...22 PC DVI OSD Menu ...22 PIP function Menu ...23 Auto Adjustment ...23 Input Source not found or Out of Contents IMPORTANT PRODUCT SAFETY INSTRUCTIONS 2 Antenna Installation Safety ...4 Cleaning the LCD TV... ...4 Safety Guidelines ...5 FCC Compliance Statement...5 INSTALLATION ...6 1. Attach Base Stand to LCD TV ...7 3. Connect Antenna, Cable, Video, S-Video, YPbPr, DVI, ...

User Manual
Page 3
...place your television. Periodically inspect power cords for future reference. Keep the LCD TV a minimum of Television Always handle your LCD display away from foot traffic and contact with care. Avoid touching the LCD screen. Power supply cords should never be blocked or covered. IMPORTANT PRODUCT ..., these openings must not be severely bent, pinched, or twisted. Skin oils are provided for ventilation purposes. Avoid exposing the LCD display to direct sunlight or high temperatures, which can result in personal injury or damage to follow all warnings and instructions in ...
...place your television. Periodically inspect power cords for future reference. Keep the LCD TV a minimum of Television Always handle your LCD display away from foot traffic and contact with care. Avoid touching the LCD screen. Power supply cords should never be blocked or covered. IMPORTANT PRODUCT ..., these openings must not be severely bent, pinched, or twisted. Skin oils are provided for ventilation purposes. Avoid exposing the LCD display to direct sunlight or high temperatures, which can result in personal injury or damage to follow all warnings and instructions in ...
User Manual
Page 4
...the power cord. Your warranty does not cover repairs or attempted repairs by anyone not authorized by placing the LCD TV on a bed, sofa, rug or other similar surface. Your LCD TV contains high-voltage parts. If smoke, abnormal noise, or strange odor is provided. Contact a qualified service ...control. 3 Refer all servicing and repairs to qualified service personnel. To assure proper ventilation, do not block the openings by Westinghouse Digital. Other Notices and Precautions Caution: Never remove the rear cover. There are no user serviceable parts inside. Do not attempt repairs ...
...the power cord. Your warranty does not cover repairs or attempted repairs by anyone not authorized by placing the LCD TV on a bed, sofa, rug or other similar surface. Your LCD TV contains high-voltage parts. If smoke, abnormal noise, or strange odor is provided. Contact a qualified service ...control. 3 Refer all servicing and repairs to qualified service personnel. To assure proper ventilation, do not block the openings by Westinghouse Digital. Other Notices and Precautions Caution: Never remove the rear cover. There are no user serviceable parts inside. Do not attempt repairs ...
User Manual
Page 5
...connection to grounding electrodes, and requirements for the weather to keep from the wall outlet and disconnect the antenna or cable system. Disclaimer Westinghouse Digital does not recommend the use of time, unplug it is left unattended and unused for long periods of any ammonia or alcohol-... National Electrical Code, ANS/NFPA 70, provides information with a clean, soft, lint-free cloth. lightning may be fatal. Cleaning the LCD TV • MAKE SURE THE LCD TV IS TURNED OFF • NEVER SPRAY OR POUR LIQUID DIRECTLY ONTO THE SCREEN OR CASE To clean the screen: 1. If it still...
...connection to grounding electrodes, and requirements for the weather to keep from the wall outlet and disconnect the antenna or cable system. Disclaimer Westinghouse Digital does not recommend the use of time, unplug it is left unattended and unused for long periods of any ammonia or alcohol-... National Electrical Code, ANS/NFPA 70, provides information with a clean, soft, lint-free cloth. lightning may be fatal. Cleaning the LCD TV • MAKE SURE THE LCD TV IS TURNED OFF • NEVER SPRAY OR POUR LIQUID DIRECTLY ONTO THE SCREEN OR CASE To clean the screen: 1. If it still...
User Manual
Page 6
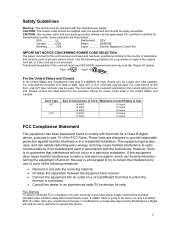
... AWG Maximum Current Rating of destination and must be used in a residential installation. However, there is connected. • Consult the dealer or an experienced radio/TV technician for a Class B digital device, pursuant to radio communications if not installed and used to provide reasonable protection against harmful interference in accordance with the... separation between the equipment and receiver. • Connect the equipment into an outlet on , the user is encouraged to try to correct the interference by Westinghouse Digital will not occur in the United States and Canada.
... AWG Maximum Current Rating of destination and must be used in a residential installation. However, there is connected. • Consult the dealer or an experienced radio/TV technician for a Class B digital device, pursuant to radio communications if not installed and used to provide reasonable protection against harmful interference in accordance with the... separation between the equipment and receiver. • Connect the equipment into an outlet on , the user is encouraged to try to correct the interference by Westinghouse Digital will not occur in the United States and Canada.
User Manual
Page 7
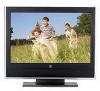
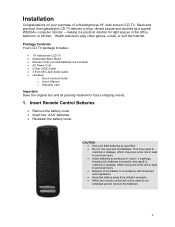
Sleek and practical, this lightweight LCD TV delivers a crisp, vibrant picture and doubles as specified. • Do not mix new and ...batteries. • Re-attach the battery cover. Watch television, play video games, e-mail, or surf the Internet. Package Contents Your LCD TV package includes: • 19" widescreen LCD TV • Detachable Base Stand • Remote Control (2 AAA batteries are included) • AC Power Cord • D-Sub (VGA)... or lead to personal injury. • Insert batteries according to personal injury. • Dispose of a Westinghouse 19" wide screen LCD TV.
Sleek and practical, this lightweight LCD TV delivers a crisp, vibrant picture and doubles as specified. • Do not mix new and ...batteries. • Re-attach the battery cover. Watch television, play video games, e-mail, or surf the Internet. Package Contents Your LCD TV package includes: • 19" widescreen LCD TV • Detachable Base Stand • Remote Control (2 AAA batteries are included) • AC Power Cord • D-Sub (VGA)... or lead to personal injury. • Insert batteries according to personal injury. • Dispose of a Westinghouse 19" wide screen LCD TV.
User Manual
Page 8
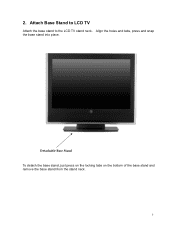
Align the holes and tabs, press and snap the base stand into place. Detachable Base Stand To detach the base stand, just press on the locking tabs on the bottom of the base stand and remove the base stand from the stand neck. 7 2. Attach Base Stand to LCD TV Attach the base stand to the LCD TV stand neck.
Align the holes and tabs, press and snap the base stand into place. Detachable Base Stand To detach the base stand, just press on the locking tabs on the bottom of the base stand and remove the base stand from the stand neck. 7 2. Attach Base Stand to LCD TV Attach the base stand to the LCD TV stand neck.
User Manual
Page 9
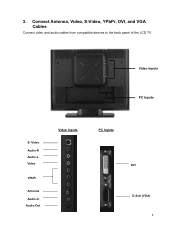
3. Connect Antenna, Video, S-Video, YPbPr, DVI, and VGA Cables Connect video and audio cables from compatible devices to the back panel of the LCD TV. Video Audio-R Audio-L Video YPbPr Antenna Audio-In Audio-Out Video Inputs PC Inputs DVI D-Sub (VGA) 8 Video Inputs PC Inputs S-
3. Connect Antenna, Video, S-Video, YPbPr, DVI, and VGA Cables Connect video and audio cables from compatible devices to the back panel of the LCD TV. Video Audio-R Audio-L Video YPbPr Antenna Audio-In Audio-Out Video Inputs PC Inputs DVI D-Sub (VGA) 8 Video Inputs PC Inputs S-
User Manual
Page 10
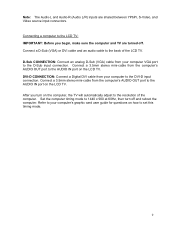
... back of the computer. Set the computer timing mode to 1440 x 900 at 60Hz, then turn on how to the AUDIO IN port on the LCD TV. D-Sub CONNECTION: Connect an analog D-Sub (VGA) cable from the computer's AUDIO OUT port to set this timing mode. 9 Note: The Audio-L and Audio-R ... an audio cable to the DVI-D input connection. Connect a 3.5mm stereo mini-cable from your computer VGA port to the AUDIO IN port on the LCD TV. DVI-D CONNECTION: Connect a Digital DVI cable from the computer's AUDIO OUT port to the D-Sub input connection. Refer to your computer's graphic card user ...
... back of the computer. Set the computer timing mode to 1440 x 900 at 60Hz, then turn on how to the AUDIO IN port on the LCD TV. D-Sub CONNECTION: Connect an analog D-Sub (VGA) cable from the computer's AUDIO OUT port to set this timing mode. 9 Note: The Audio-L and Audio-R ... an audio cable to the DVI-D input connection. Connect a 3.5mm stereo mini-cable from your computer VGA port to the AUDIO IN port on the LCD TV. DVI-D CONNECTION: Connect a Digital DVI cable from the computer's AUDIO OUT port to the D-Sub input connection. Refer to your computer's graphic card user ...
User Manual
Page 11
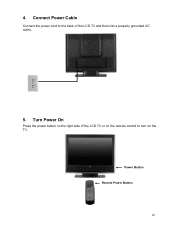
Power Button Remote Power Button 10 4. Connect Power Cable Connect the power cord to turn on the remote control to the back of the LCD TV or on the TV. Turn Power On Press the power button on the right side of the LCD TV and then into a properly grounded AC outlet. 5.
Power Button Remote Power Button 10 4. Connect Power Cable Connect the power cord to turn on the remote control to the back of the LCD TV or on the TV. Turn Power On Press the power button on the right side of the LCD TV and then into a properly grounded AC outlet. 5.
User Manual
Page 12
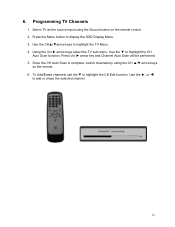
... Menu button to highlight the CH Auto Scan function. Use the ▼ to display the OSD Display Menu. 3. Programming TV Channels 1. Use the ►, or ◄ to highlight the TV Menu. 4. Use the CH▲/▼arrow keys to add or erase the selected channel. 11 Press Vol ► arrow...channels by using the Source button on the remote. 6. Using the Vol ► arrow keys select the TV sub-menu. 6. To Add/Erase channels use the ▼ to highlight the CH Edit function. Select TV as the source input using the CH ▲/▼ arrow keys on the remote control. 2.
... Menu button to highlight the CH Auto Scan function. Use the ▼ to display the OSD Display Menu. 3. Programming TV Channels 1. Use the ►, or ◄ to highlight the TV Menu. 4. Use the CH▲/▼arrow keys to add or erase the selected channel. 11 Press Vol ► arrow...channels by using the Source button on the remote. 6. Using the Vol ► arrow keys select the TV sub-menu. 6. To Add/Erase channels use the ▼ to highlight the CH Edit function. Select TV as the source input using the CH ▲/▼ arrow keys on the remote control. 2.
User Manual
Page 14
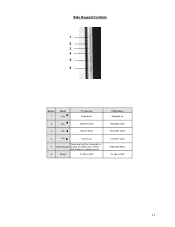
Channel down 4 Vol+ Volume up Press and hold for 2 seconds to change source. 6 Power TV ON or OFF OSD Menu Navigate up 2 CH- Volume down 3 Vol- Side Keypad Controls 1 2 3 4 5 6 Button 1 Mode CH+ TV Source Channel up Navigate down Decrease value Increase value Enter/Exit Menu TV ON or OFF 13 Press and release to 5 Menu/Source access the OSD menu.
Channel down 4 Vol+ Volume up Press and hold for 2 seconds to change source. 6 Power TV ON or OFF OSD Menu Navigate up 2 CH- Volume down 3 Vol- Side Keypad Controls 1 2 3 4 5 6 Button 1 Mode CH+ TV Source Channel up Navigate down Decrease value Increase value Enter/Exit Menu TV ON or OFF 13 Press and release to 5 Menu/Source access the OSD menu.
User Manual
Page 15
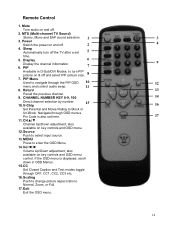
... adjustment; Source Push to Normal, Zoom, or Full. 17. If the OSD menu is also set 5 time. 5. Mute Turn audio on & off . 2 4. MTS (Multi-channel TV Sound) Stereo, Mono and SAP sound selection 1 3. PIP 7 Available in OSD Menus. 15. Vol◄/► Volume Up/Down adjustment; Scaling Push to change picture... to select input source. 13. Exit Exit the OSD menu. 3 4 9 12 13 14 16 17 14 Sleep Automatically turn PIP picture on and off the TV after a set here. 11. CC Set Closed Caption and Text modes toggle through OFF, CC1, CC2, CC3 etc. 16.
... adjustment; Source Push to Normal, Zoom, or Full. 17. If the OSD menu is also set 5 time. 5. Mute Turn audio on & off . 2 4. MTS (Multi-channel TV Sound) Stereo, Mono and SAP sound selection 1 3. PIP 7 Available in OSD Menus. 15. Vol◄/► Volume Up/Down adjustment; Scaling Push to change picture... to select input source. 13. Exit Exit the OSD menu. 3 4 9 12 13 14 16 17 14 Sleep Automatically turn PIP picture on and off the TV after a set here. 11. CC Set Closed Caption and Text modes toggle through OFF, CC1, CC2, CC3 etc. 16.
User Manual
Page 16
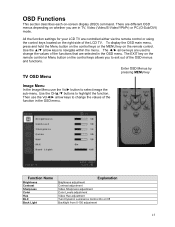
... Use the ▲/▼ arrow keys to exit out of the function in the OSD menu. All the function settings for your LCD TV are in the OSD menu. TV OSD Menu Enter OSD Menus by pressing MENU key Image Menu In the Image Menu use the Vol◄/► arrow keys to... select image the sub-menu. Then use the Vol► button to change the values of the LCD TV. The ◄/► arrow keys are selected in TV, Video (Video/S-Video/YPbPr) or PC (D-Sub/DVI) mode. There are different OSD menus depending on the right side of the...
... Use the ▲/▼ arrow keys to exit out of the function in the OSD menu. All the function settings for your LCD TV are in the OSD menu. TV OSD Menu Enter OSD Menus by pressing MENU key Image Menu In the Image Menu use the Vol◄/► arrow keys to... select image the sub-menu. Then use the Vol► button to change the values of the LCD TV. The ◄/► arrow keys are selected in TV, Video (Video/S-Video/YPbPr) or PC (D-Sub/DVI) mode. There are different OSD menus depending on the right side of the...
User Manual
Page 18
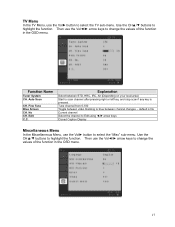
... highlight the function. Use the CH▲/▼ buttons to highlight the function. Then use the Vol► button to select the TV sub-menu. TV Menu In the TV Menu, use the Vol◄/► arrow keys to change the values of the function in the OSD menu. 17 Fine Tune Blue...
... highlight the function. Use the CH▲/▼ buttons to highlight the function. Then use the Vol► button to select the TV sub-menu. TV Menu In the TV Menu, use the Vol◄/► arrow keys to change the values of the function in the OSD menu. 17 Fine Tune Blue...
User Manual
Page 20
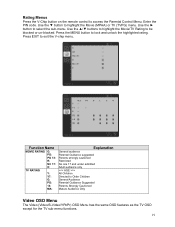
... Video OSD Menu The Video (Video/S-Video/YPbPr) OSD Menu has the same OSD features as the TV OSD except for the TV sub-menu functions. 19 Function Name MOVIE RATING G: PG: PG 13: R: NC 17: X: TV RATING Y: Y7: G: PG: 14: MA: Explanation General audience Parental Guidance suggested Parents strongly cautioned Restricted No one...
... Video OSD Menu The Video (Video/S-Video/YPbPr) OSD Menu has the same OSD features as the TV OSD except for the TV sub-menu functions. 19 Function Name MOVIE RATING G: PG: PG 13: R: NC 17: X: TV RATING Y: Y7: G: PG: 14: MA: Explanation General audience Parental Guidance suggested Parents strongly cautioned Restricted No one...
User Manual
Page 21
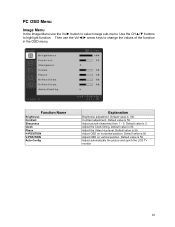
.... Adjust OSD on horizontal position. Default value is 50. Default value is 100. Adjust the Video Hue level. Adjust automatically the picture and synch the LCD TV monitor 20 Then use the Vol► button to select image sub-menu. Default value is 2. Adjust the Clock timing. Adjust OSD on vertical position...
.... Adjust OSD on horizontal position. Default value is 50. Default value is 100. Adjust the Video Hue level. Adjust automatically the picture and synch the LCD TV monitor 20 Then use the Vol► button to select image sub-menu. Default value is 2. Adjust the Clock timing. Adjust OSD on vertical position...

User Manual
Page 23
..." sub-menu. Use the CH▲/▼ buttons to turn off the OSD automatically OSD horizontal/vertical position adjustment Restore factory default settings Automatically configure TV with PC Access PIP Menu INFO Menu Display system information.
..." sub-menu. Use the CH▲/▼ buttons to turn off the OSD automatically OSD horizontal/vertical position adjustment Restore factory default settings Automatically configure TV with PC Access PIP Menu INFO Menu Display system information.
User Manual
Page 24
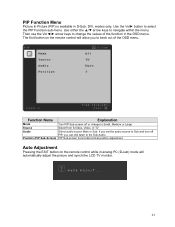
...) PIP Sub-screen horizontal/vertical position adjustment Auto Adjustment Pressing the EXIT button on the remote control will automatically adjust the picture and synch the LCD TV monitor. 23 Then use the Vol◄/► arrow keys to change to back out of the function in the OSD menu. The Exit button..., DVI, modes only. Function Name Explanation Mode Turn PIP Sub-screen off PIP, you to Small, Medium or Large Source Select from S-Video, Video, or TV Audio Select audio source Main or Sub. If you set the audio source to Sub and turn off or change the values of the OSD...
...) PIP Sub-screen horizontal/vertical position adjustment Auto Adjustment Pressing the EXIT button on the remote control will automatically adjust the picture and synch the LCD TV monitor. 23 Then use the Vol◄/► arrow keys to change to back out of the function in the OSD menu. The Exit button..., DVI, modes only. Function Name Explanation Mode Turn PIP Sub-screen off PIP, you to Small, Medium or Large Source Select from S-Video, Video, or TV Audio Select audio source Main or Sub. If you set the audio source to Sub and turn off or change the values of the OSD...
User Manual
Page 25
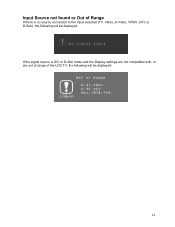
Input Source not found or Out of Range If there is no source connected to the Input selected (TV, Video, S-Video, YPbPr, DVI, or D-Sub), the following will be displayed: If the signal source is DVI or D-Sub mode and the Display settings are not compatible with, or are out of range of the LCD TV, the following will be displayed: 24
Input Source not found or Out of Range If there is no source connected to the Input selected (TV, Video, S-Video, YPbPr, DVI, or D-Sub), the following will be displayed: If the signal source is DVI or D-Sub mode and the Display settings are not compatible with, or are out of range of the LCD TV, the following will be displayed: 24


