
User Manual
Page 2
... OF CONTENTS LIMITED WARRANTY 2 IMPORTANT PRECAUTIONS 3 BEFORE YOU BEGIN 4 ASSEMBLY 5 CABLE DIAGRAMS 19 ADJUSTMENT 21 TROUBLE-SHOOTING AND MAINTENANCE 22 WEIGHT RESISTANCE CHART 23 ORDERING REPLACEMENT PARTS Back Cover Note: A PART LIST/EXPLODED DRAWING and a PART IDENTIFICATION CHART are attached in the center...center, to province or so specified by ICON. ICON OF/DU CANADA, 900 de l'Industrie, St-Jérôme, QC J7Y 4B8 WEIDER is made must be free from the date of your equipment. Remove the PART LIST/EXPLODED DRAWING and the PART IDENTIFICATION CHART before beginning ...
... OF CONTENTS LIMITED WARRANTY 2 IMPORTANT PRECAUTIONS 3 BEFORE YOU BEGIN 4 ASSEMBLY 5 CABLE DIAGRAMS 19 ADJUSTMENT 21 TROUBLE-SHOOTING AND MAINTENANCE 22 WEIGHT RESISTANCE CHART 23 ORDERING REPLACEMENT PARTS Back Cover Note: A PART LIST/EXPLODED DRAWING and a PART IDENTIFICATION CHART are attached in the center...center, to province or so specified by ICON. ICON OF/DU CANADA, 900 de l'Industrie, St-Jérôme, QC J7Y 4B8 WEIDER is made must be free from the date of your equipment. Remove the PART LIST/EXPLODED DRAWING and the PART IDENTIFICATION CHART before beginning ...
User Manual
Page 3
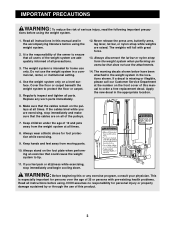
...with great force. 13. tions before using . Cover the floor or carpet beneath the weight system to the weight system in the accompanying literature before using the weight system. 2. Read all parts. Use the weight system only on the pulleys at all precautions. 3. Apply the new decal in a ... damage sustained by or through the use the attachments. 14. Keep hands and feet away from the weight system when performing an exercise that could cause the weight system to order a free replacement decal. The warning decals shown below have been attached to protect the...
...with great force. 13. tions before using . Cover the floor or carpet beneath the weight system to the weight system in the accompanying literature before using the weight system. 2. Read all parts. Use the weight system only on the pulleys at all precautions. 3. Apply the new decal in a ... damage sustained by or through the use the attachments. 14. Keep hands and feet away from the weight system when performing an exercise that could cause the weight system to order a free replacement decal. The warning decals shown below have been attached to protect the...
User Manual
Page 4
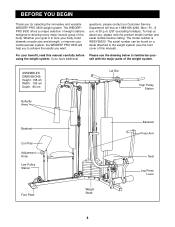
... to develop every major muscle group of this manual carefully before calling. If you for selecting the innovative and versatile WEIDER® PRO 9930 weight system. BEFORE YOU BEGIN Thank you have additional self with the major parts of the weight system. Whether your goal is WESY99300. For your - The model number is to the...
... to develop every major muscle group of this manual carefully before calling. If you for selecting the innovative and versatile WEIDER® PRO 9930 weight system. BEFORE YOU BEGIN Thank you have additional self with the major parts of the weight system. Whether your goal is WESY99300. For your - The model number is to the...
User Manual
Page 5
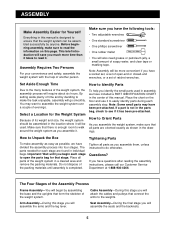
...we have questions after reading the assembly instructions, please call our Customer Service Department at 1-888-936-4266. To help of its weight and size, the weight system should be assembled in the location where it will save you have divided the assembly process into four stages. The parts needed ...CHART in the center of ratchet wrenches. ASSEMBLY Make Assembly Easier for Yourself Everything in this manual is enough room to walk around the weight system as you assemble it. Make sure that there is designed to ensure that all parts are found in individual bags. Place the ...
...we have questions after reading the assembly instructions, please call our Customer Service Department at 1-888-936-4266. To help of its weight and size, the weight system should be assembled in the location where it will save you have divided the assembly process into four stages. The parts needed ...CHART in the center of ratchet wrenches. ASSEMBLY Make Assembly Easier for Yourself Everything in this manual is enough room to walk around the weight system as you assemble it. Make sure that there is designed to ensure that all parts are found in individual bags. Place the ...
User Manual
Page 7
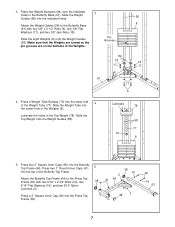
... Top Frame (63) with two 3/8" x 2 1/2" Bolts (6), four 3/8" Flat Washers (17), and two 3/8" Jam Nuts (18). Make sure that the Weights are turned so the pin grooves are on the bottoms of the Weight Tube (77). Press a 2" Square Inner Cap (38) into the Butterfly Top Frame (64). Place two... 5/16" x 2 3/4" Bolts (20), two 38 5/16" Flat Washers (19), and two 5/16" Nylon Locknuts (2). 3. Slide the Weight Tube into the indicated holes. Slide the Top Weight onto the Weight Guides (58). 17 6 Lubricate 78 58 77 76 8 5. Pin Grooves 84 18 17 58 8 18 17 61 4. Lubricate the holes...
... Top Frame (63) with two 3/8" x 2 1/2" Bolts (6), four 3/8" Flat Washers (17), and two 3/8" Jam Nuts (18). Make sure that the Weights are turned so the pin grooves are on the bottoms of the Weight Tube (77). Press a 2" Square Inner Cap (38) into the Butterfly Top Frame (64). Place two... 5/16" x 2 3/4" Bolts (20), two 38 5/16" Flat Washers (19), and two 5/16" Nylon Locknuts (2). 3. Slide the Weight Tube into the indicated holes. Slide the Top Weight onto the Weight Guides (58). 17 6 Lubricate 78 58 77 76 8 5. Pin Grooves 84 18 17 58 8 18 17 61 4. Lubricate the holes...
User Manual
Page 8
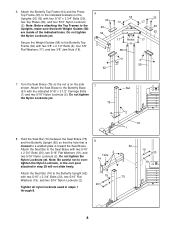
... will not slide freely. Hold the Seat Bar (74) between the Seat Brace (75) and the Butterfly Upright (62) so that the hole that both Weight Guides (58) 46 46 are inside of the indicated holes. Do not tighten the Nylon Locknuts yet. 75 Nut 2 61 1 8. Attach the Seat Bar...), two 5/16" Flat Washers (19), and two 5/16" Nylon Locknuts (2). Turn the Seat Brace (75) so the nut is toward the Seat Brace. Secure the Weight Guides (58) to the Butterfly Upright (62) with two 3/8" x 2 1/2" Bolts (6), four 3/8" 17 Holes 17 6 Flat Washers (17), and two 3/8" Jam Nuts (18). 58 2 2 ...
... will not slide freely. Hold the Seat Bar (74) between the Seat Brace (75) and the Butterfly Upright (62) so that the hole that both Weight Guides (58) 46 46 are inside of the indicated holes. Do not tighten the Nylon Locknuts yet. 75 Nut 2 61 1 8. Attach the Seat Bar...), two 5/16" Flat Washers (19), and two 5/16" Nylon Locknuts (2). Turn the Seat Brace (75) so the nut is toward the Seat Brace. Secure the Weight Guides (58) to the Butterfly Upright (62) with two 3/8" x 2 1/2" Bolts (6), four 3/8" 17 Holes 17 6 Flat Washers (17), and two 3/8" Jam Nuts (18). 58 2 2 ...
User Manual
Page 12
... (5) as shown. 4 Cable Guide 73 61 5 35 39 12 Do not completely tighten the Nylon Locknut; Attach the Pulley and a Cable Trap (39) to the Weight Tube (77) with a 3/8" x 2" Bolt (35) and a 3/8" Nylon Locknut (4). Wrap the Medium Cable (72) over a 4 1/2" Pulley (34) in the cable guide on the Butterfly Base (61...
... (5) as shown. 4 Cable Guide 73 61 5 35 39 12 Do not completely tighten the Nylon Locknut; Attach the Pulley and a Cable Trap (39) to the Weight Tube (77) with a 3/8" x 2" Bolt (35) and a 3/8" Nylon Locknut (4). Wrap the Medium Cable (72) over a 4 1/2" Pulley (34) in the cable guide on the Butterfly Base (61...

User Manual
Page 15
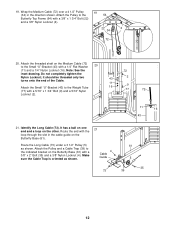
... adjustment holes. Make sure that the Cable Trap is oriented as shown. 4 17 14 59 52 21 28 30. Note: Lift the Top Weight (78) on the weight stack 32 in order to create slack in 29 the direction shown. Attach the Long Cable (73) to the indicated hole in step 27...
... adjustment holes. Make sure that the Cable Trap is oriented as shown. 4 17 14 59 52 21 28 30. Note: Lift the Top Weight (78) on the weight stack 32 in order to create slack in 29 the direction shown. Attach the Long Cable (73) to the indicated hole in step 27...
User Manual
Page 18
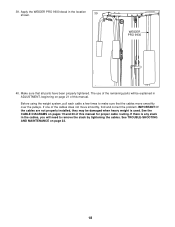
... pages 19 and 20 of the cables does not move smoothly over the pulleys. If there is used. If one of this manual. WEIDER PRO 9930 40. Before using the weight system, pull each cable a few times to remove the slack by tightening the cables. See TROUBLE-SHOOTING AND MAINTENANCE on page 21 of...
... pages 19 and 20 of the cables does not move smoothly over the pulleys. If there is used. If one of this manual. WEIDER PRO 9930 40. Before using the weight system, pull each cable a few times to remove the slack by tightening the cables. See TROUBLE-SHOOTING AND MAINTENANCE on page 21 of...
User Manual
Page 19
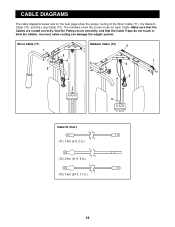
Short Cable (71) 1 Medium Cable (72) 2 2 4 1 4 5 3 3 5 Cable ID Chart (71) 1.9m (6 ft. 3 in.) (72) 3.5m (11 ft. 6 in.) (73) 7.6m (24 ft. 11 in.) 19 Incorrect cable routing can damage the weight system. The numbers show the proper routing of the Short Cable (71), the Medium Cable (72), and the Long Cable (73). Make sure that the Cables are routed correctly, that the Pulleys move smoothly, and that the Cable Traps do not touch or bind the Cables. CABLE DIAGRAMS The cable diagrams below and on the next page show the correct route for each Cable.
Short Cable (71) 1 Medium Cable (72) 2 2 4 1 4 5 3 3 5 Cable ID Chart (71) 1.9m (6 ft. 3 in.) (72) 3.5m (11 ft. 6 in.) (73) 7.6m (24 ft. 11 in.) 19 Incorrect cable routing can damage the weight system. The numbers show the proper routing of the Short Cable (71), the Medium Cable (72), and the Long Cable (73). Make sure that the Cables are routed correctly, that the Pulleys move smoothly, and that the Cable Traps do not touch or bind the Cables. CABLE DIAGRAMS The cable diagrams below and on the next page show the correct route for each Cable.

User Manual
Page 21
.... Adjust the length of the Chain between the Lat Bar and the Long Cable with two Cable Clips. Adjust the length of resistance at each weight station. 8 87 ATTACHING THE LAT BAR OR NYLON STRAP TO THE HIGH PULLEY STATION Attach the Lat Bar (50) to be attached between the Lat... be performed. For some exercises, the Chain (55) should be performed. Important: When using an attachment, make sure that it will be performed. Use the WEIGHT RESISTANCE CHART on page 23 to be in the correct starting position for the exercise to find the approximate amount of the Chain between the...
.... Adjust the length of the Chain between the Lat Bar and the Long Cable with two Cable Clips. Adjust the length of resistance at each weight station. 8 87 ATTACHING THE LAT BAR OR NYLON STRAP TO THE HIGH PULLEY STATION Attach the Lat Bar (50) to be attached between the Lat... be performed. For some exercises, the Chain (55) should be performed. Important: When using an attachment, make sure that it will be performed. Use the WEIGHT RESISTANCE CHART on page 23 to be in the correct starting position for the exercise to find the approximate amount of the Chain between the...
User Manual
Page 22
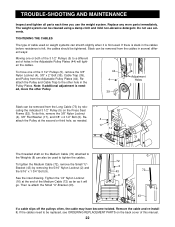
...the cables need to a different set of the 3 1/2" Pulleys (5) to be replaced, see ORDERING REPLACEMENT PARTS on the Press Seat Frame (52). The weight system can stretch slightly when it is felt, the cables should be removed from the Long Cable (73) by removing the 5/16" Nylon Locknut (2) ...and the 5/16" x 1 3/4" Bolt (9). The threaded shaft on weight systems can be removed from the cables in the Pulley Plates. Then re-attach the Small "U"-Bracket (43). 52 4 17 5 14 73 6 72 2 43 9 ...
...the cables need to a different set of the 3 1/2" Pulleys (5) to be replaced, see ORDERING REPLACEMENT PARTS on the Press Seat Frame (52). The weight system can stretch slightly when it is felt, the cables should be removed from the Long Cable (73) by removing the 5/16" Nylon Locknut (2) ...and the 5/16" x 1 3/4" Bolt (9). The threaded shaft on weight systems can be removed from the cables in the Pulley Plates. Then re-attach the Small "U"-Bracket (43). 52 4 17 5 14 73 6 72 2 43 9 ...
User Manual
Page 23
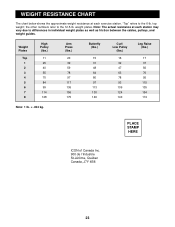
... ICON of Canada Inc. 900 de l'Industrie St-Jérôme, Québec Canada, J7Y 4B8 23 WEIGHT RESISTANCE CHART The chart below shows the approximate weight resistance at each exercise station. weight plates. Weight Plates Top 1 2 3 4 5 6 7 8 High Pulley (lbs.) 11 25 40 55 70 84 99 114 128 Arm Press (lbs.) 20... numbers refer to the 6-lb. "Top" refers to the 12.5-lb. Note: The actual resistance at each station may vary due to differences in individual weight plates as well as friction between the cables, pulleys, and...
... ICON of Canada Inc. 900 de l'Industrie St-Jérôme, Québec Canada, J7Y 4B8 23 WEIGHT RESISTANCE CHART The chart below shows the approximate weight resistance at each exercise station. weight plates. Weight Plates Top 1 2 3 4 5 6 7 8 High Pulley (lbs.) 11 25 40 55 70 84 99 114 128 Arm Press (lbs.) 20... numbers refer to the 6-lb. "Top" refers to the 12.5-lb. Note: The actual resistance at each station may vary due to differences in individual weight plates as well as friction between the cables, pulleys, and...
User Manual
Page 24
...) Which types of the product (WESY99300) 2. To help us assist you own? o Yes o No THANK YOU FOR YOUR TIME © 2001 ICON of the product (WEIDER® PRO 9930 weight system) 3. The MODEL NUMBER of magazines do you consider purchasing fitness equipment from another ICON product? o Less than 3 times o 3 times or more 5) Have you...
...) Which types of the product (WESY99300) 2. To help us assist you own? o Yes o No THANK YOU FOR YOUR TIME © 2001 ICON of the product (WEIDER® PRO 9930 weight system) 3. The MODEL NUMBER of magazines do you consider purchasing fitness equipment from another ICON product? o Less than 3 times o 3 times or more 5) Have you...
User Manual
Page 30
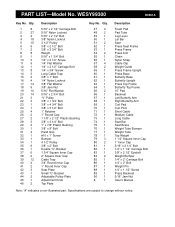
...2 42 3 43 1 44 2 45 1 46 2 Description 5/16" x 2 1/2" Carriage Bolt 5/16" Nylon Locknut 5/16" x 2 1/2" Bolt 3/8" Nylon Locknut 3 1/2" Pulley 3/8" x 2 1/2" Bolt 3/8" x 3 3/4" Bolt Weight 5/16" x 1 3/4" Bolt 1/4" x 2 1/2" Screw 1/4" Flat Washer 1/4" x 2 1/2" Carriage Bolt 1/4" x 3/4" Screw Long Cable Trap 3/8" x 1" Bolt 1/4" Nylon Locknut 3/8" Flat Washer 3/8" Jam Nut 5/16" Flat Washer ...Leg Lever Lat Bar Seat Press Seat Frame Press Frame Press Arm Chain Nylon Strap Cable Clip Weight Guide Press Frame Upright Press Base Butterfly Base Butterfly Upright Press Top Frame Butterfly Top Frame 10...
...2 42 3 43 1 44 2 45 1 46 2 Description 5/16" x 2 1/2" Carriage Bolt 5/16" Nylon Locknut 5/16" x 2 1/2" Bolt 3/8" Nylon Locknut 3 1/2" Pulley 3/8" x 2 1/2" Bolt 3/8" x 3 3/4" Bolt Weight 5/16" x 1 3/4" Bolt 1/4" x 2 1/2" Screw 1/4" Flat Washer 1/4" x 2 1/2" Carriage Bolt 1/4" x 3/4" Screw Long Cable Trap 3/8" x 1" Bolt 1/4" Nylon Locknut 3/8" Flat Washer 3/8" Jam Nut 5/16" Flat Washer ...Leg Lever Lat Bar Seat Press Seat Frame Press Frame Press Arm Chain Nylon Strap Cable Clip Weight Guide Press Frame Upright Press Base Butterfly Base Butterfly Upright Press Top Frame Butterfly Top Frame 10...


