
English Manual
Page 2
...ensure that does not use of this manual and in a commercial, rental or institutional setting. 7. SEARS assumes no responsibility for foot protection when exercising. 12. Keep children under the age of 12 and pets away from the home gym system at any worn parts immediately. 6. Always wear ... all precautions. 2. Remove the PART LIST/EXPLODED DRAWING and the PART IDENTIFICATION CHART before using the home gym system. 8. Replace any time while exercising, stop immediately and make sure the lock pin is designed to be used by or through the use the Lat Bar. 14. WARNING: Before ...
...ensure that does not use of this manual and in a commercial, rental or institutional setting. 7. SEARS assumes no responsibility for foot protection when exercising. 12. Keep children under the age of 12 and pets away from the home gym system at any worn parts immediately. 6. Always wear ... all precautions. 2. Remove the PART LIST/EXPLODED DRAWING and the PART IDENTIFICATION CHART before using the home gym system. 8. Replace any time while exercising, stop immediately and make sure the lock pin is designed to be used by or through the use the Lat Bar. 14. WARNING: Before ...

English Manual
Page 4
... or petroleum jelly, and soapy water • Tape, such as you assemble them, unless instructed to walk all parts and allow you are exercising. 4 Seat Assembly Completes the seats and backrests that you operate while you to do otherwise. Clearing the Workspace Clear a workspace that is not...we have been pre-attached for each assembly stage to see if it into separate stages. Giving Yourself a Good Start Before you are exercising. The Four Stages of the Assembly Process Frame Assembly You will be sure that connect the moving parts will take the time to complete...
... or petroleum jelly, and soapy water • Tape, such as you assemble them, unless instructed to walk all parts and allow you are exercising. 4 Seat Assembly Completes the seats and backrests that you operate while you to do otherwise. Clearing the Workspace Clear a workspace that is not...we have been pre-attached for each assembly stage to see if it into separate stages. Giving Yourself a Good Start Before you are exercising. The Four Stages of the Assembly Process Frame Assembly You will be sure that connect the moving parts will take the time to complete...
English Manual
Page 20
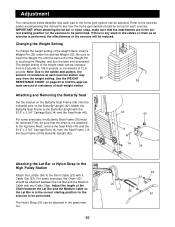
... Cable (23) with a Cable Clip (53). First, be sure that the attachments are in the same manner. 20 39 53 23 52 54 For some exercises, the Butterfly Seat Frame (36) must be attached between the Lat Bar and the Medium Cable so the Lat Bar is touching the Weights, and... Cable with the 5/16" x 2 3/4" Carriage Bolt (14) and the Seat Knob (40). Note: Due to find the approxi- 26 mate amount of resistance at each exercise station may vary from the weight setting. Use the WEIGHT 25 RESISTANCE CHART on the Butterfly Upright (42). Adjustment The instructions below describe how each...
... Cable (23) with a Cable Clip (53). First, be sure that the attachments are in the same manner. 20 39 53 23 52 54 For some exercises, the Butterfly Seat Frame (36) must be attached between the Lat Bar and the Medium Cable so the Lat Bar is touching the Weights, and... Cable with the 5/16" x 2 3/4" Carriage Bolt (14) and the Seat Knob (40). Note: Due to find the approxi- 26 mate amount of resistance at each exercise station may vary from the weight setting. Use the WEIGHT 25 RESISTANCE CHART on the Butterfly Upright (42). Adjustment The instructions below describe how each...

English Manual
Page 21
... the position of the Chain between the Lat Bar and the Long Cable with two Cable Clips. For some exercises, the Chain (52) should be attached in the correct starting position for the exercise to the 88 desired position and re-insert the Lock Pin. 90 21 Move the Adjustment Tube (88...
... the position of the Chain between the Lat Bar and the Long Cable with two Cable Clips. For some exercises, the Chain (52) should be attached in the correct starting position for the exercise to the 88 desired position and re-insert the Lock Pin. 90 21 Move the Adjustment Tube (88...

English Manual
Page 26
... Press Plate 88 1 Adjustment Tube 89 1 Leg Press Arm 90 1 Lock Pin 91 1 1/4" x 2 1/2" Carriage Bolt 92 1 1" Tap Screw 93 2 3/8" x 2 3/4" Bolt 94 2 3/8" x 2 3/4" Carriage Bolt # 1 User's Manual # 1 Exercise Poster Note: "#" indicates a non-illustrated part. Part List-Model No. 831.159370 R0998A Key No.
... Press Plate 88 1 Adjustment Tube 89 1 Leg Press Arm 90 1 Lock Pin 91 1 1/4" x 2 1/2" Carriage Bolt 92 1 1" Tap Screw 93 2 3/8" x 2 3/4" Bolt 94 2 3/8" x 2 3/4" Carriage Bolt # 1 User's Manual # 1 Exercise Poster Note: "#" indicates a non-illustrated part. Part List-Model No. 831.159370 R0998A Key No.
English Manual
Page 28
... or special order when you visit your WEIDER® PRO 9628 Home Gym System are listed on a decal attached to find the location of your nearest SEARS Service Center. All replacement parts are available for rental purposes. This warranty does not apply when the WEIGHT SYSTEM EXERCISER is missing • or you may also...
... or special order when you visit your WEIDER® PRO 9628 Home Gym System are listed on a decal attached to find the location of your nearest SEARS Service Center. All replacement parts are available for rental purposes. This warranty does not apply when the WEIGHT SYSTEM EXERCISER is missing • or you may also...


