

User Manual
Page 2
...replacement decal in the location shown. If the decal is a registered trademark of this manual and order a free replacement decal. WEIDER is missing or illegible, call the telephone number on the weight system in the location shown. TABLE OF CONTENTS WARNING DECAL ...IMPORTANT PRECAUTIONS 3 BEFORE YOU BEGIN 4 PART IDENTIFICATION CHART 5 ASSEMBLY 8 ADJUSTMENTS 25 WEIGHT RESISTANCE CHART 27 CABLE DIAGRAM 28 MAINTENANCE 29 EXERCISE GUIDELINES 30 PART LIST 33 EXPLODED DRAWING 34 ORDERING REPLACEMENT PARTS Back Cover WARNING DECAL PLACEMENT The decal shown at the right has been...
...replacement decal in the location shown. If the decal is a registered trademark of this manual and order a free replacement decal. WEIDER is missing or illegible, call the telephone number on the weight system in the location shown. TABLE OF CONTENTS WARNING DECAL ...IMPORTANT PRECAUTIONS 3 BEFORE YOU BEGIN 4 PART IDENTIFICATION CHART 5 ASSEMBLY 8 ADJUSTMENTS 25 WEIGHT RESISTANCE CHART 27 CABLE DIAGRAM 28 MAINTENANCE 29 EXERCISE GUIDELINES 30 PART LIST 33 EXPLODED DRAWING 34 ORDERING REPLACEMENT PARTS Back Cover WARNING DECAL PLACEMENT The decal shown at the right has been...
User Manual
Page 3
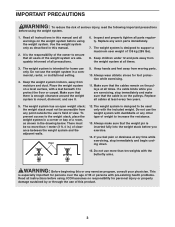
...in .) of clearance between the weight system and the adjacent walls. Place the weight system on a level surface, with dumbbells or any exercise program, consult your physician. There must not be used only with the butterfly arms. WARNING: Before beginning this manual and all parts regularly...any point outside the userʼs field of view. ICON assumes no more than 1 meter (3 ft. 4 in the drawing below. If you exercise. 14. Keep children under 12 and pets away from any worn parts immediately. 7. The weight system is intended for personal injury or property damage ...
...in .) of clearance between the weight system and the adjacent walls. Place the weight system on a level surface, with dumbbells or any exercise program, consult your physician. There must not be used only with the butterfly arms. WARNING: Before beginning this manual and all parts regularly...any point outside the userʼs field of view. ICON assumes no more than 1 meter (3 ft. 4 in the drawing below. If you exercise. 14. Keep children under 12 and pets away from any worn parts immediately. 7. The weight system is intended for personal injury or property damage ...

User Manual
Page 25
... to adjust the weight system. Note: The weight system works best when at least two Weights are properly tightened each exercise. Note: For some exercises, you use solvents. Refer to the accompanying exercise guide to insert the Weight Pin until the bent end of the weight stack, insert the Weight Pin (70) under...
... to adjust the weight system. Note: The weight system works best when at least two Weights are properly tightened each exercise. Note: For some exercises, you use solvents. Refer to the accompanying exercise guide to insert the Weight Pin until the bent end of the weight stack, insert the Weight Pin (70) under...

User Manual
Page 26
When you are performing exercises that do not remove the Backrest Adjustment Knob (53) and pull it out. Tighten the Curl Adjustment Knob (58) into or out of the holes ...). USING THE CURL PAD To use the press arms. ADJUSTING THE BACKREST The Backrest (31) can be adjusted to provide the correct position for each exercise. Insert the Adjustment Knob into the Front Leg (10). The Seat (32) can be adjusted in the Curl Post.
When you are performing exercises that do not remove the Backrest Adjustment Knob (53) and pull it out. Tighten the Curl Adjustment Knob (58) into or out of the holes ...). USING THE CURL PAD To use the press arms. ADJUSTING THE BACKREST The Backrest (31) can be adjusted to provide the correct position for each exercise. Insert the Adjustment Knob into the Front Leg (10). The Seat (32) can be adjusted in the Curl Post.

User Manual
Page 27
... Leg Lever, remove the Lock Plate Pin (95) from the Lock Plate (14). Note: Weight resistance shown for the butterfly arm station is for each exercise station. Insert the Lock Pin back through the Lock Plate. 10 14 95 12 Hole WEIGHT RESISTANCE CHART The chart below shows the approximate weight...
... Leg Lever, remove the Lock Plate Pin (95) from the Lock Plate (14). Note: Weight resistance shown for the butterfly arm station is for each exercise station. Insert the Lock Pin back through the Lock Plate. 10 14 95 12 Hole WEIGHT RESISTANCE CHART The chart below shows the approximate weight...

User Manual
Page 30
...weight that is right for every major muscle group, emphasizing areas that adequate rest and a proper diet are important factors in each exercise depends upon the individual user. WORKING OUT Each workout should be performed smoothly and without difficulty, increase the amount of their maximum capacity... body, plus develop your muscles by completing more oxygen to your muscles, push them to regenerate. Rest for three minutes after each exercise, and moving through the full range of motion for the time of rest. Find out what is important. Toning You can adjust...
...weight that is right for every major muscle group, emphasizing areas that adequate rest and a proper diet are important factors in each exercise depends upon the individual user. WORKING OUT Each workout should be performed smoothly and without difficulty, increase the amount of their maximum capacity... body, plus develop your muscles by completing more oxygen to your muscles, push them to regenerate. Rest for three minutes after each exercise, and moving through the full range of motion for the time of rest. Find out what is important. Toning You can adjust...

User Manual
Page 31
...) H. Anterior Deltoid (shoulder) M. Adductor (inner thigh) O. COOLING DOWN End each workout with the equipment and learning the proper form for each exercise. Hip Flexors (upper thigh) G. Posterior Deltoid (Upper Back) R. Latissimus Dorsi (mid back) T. Move slowly as you stretch and do not ...to spend the first couple of weeks familiarizing yourself with 5 to make exercise a regular and enjoyable part of sets and repetitions completed. Soleus (front of leg) X. List the date, the exercises performed, the weight used to increase flexibility. Remember, the key to ...
...) H. Anterior Deltoid (shoulder) M. Adductor (inner thigh) O. COOLING DOWN End each workout with the equipment and learning the proper form for each exercise. Hip Flexors (upper thigh) G. Posterior Deltoid (Upper Back) R. Latissimus Dorsi (mid back) T. Move slowly as you stretch and do not ...to spend the first couple of weeks familiarizing yourself with 5 to make exercise a regular and enjoyable part of sets and repetitions completed. Soleus (front of leg) X. List the date, the exercises performed, the weight used to increase flexibility. Remember, the key to ...

User Manual
Page 32
MONDAY Date: // EXERCISE WEIGHT SETS REPS TUESDAY Date: // WEDNESDAY Date: // AEROBIC EXERCISE EXERCISE WEIGHT SETS REPS THURSDAY Date: // FRIDAY Date: // AEROBIC EXERCISE EXERCISE WEIGHT SETS REPS Make photocopies of this page for scheduling and recording your workouts. 32
MONDAY Date: // EXERCISE WEIGHT SETS REPS TUESDAY Date: // WEDNESDAY Date: // AEROBIC EXERCISE EXERCISE WEIGHT SETS REPS THURSDAY Date: // FRIDAY Date: // AEROBIC EXERCISE EXERCISE WEIGHT SETS REPS Make photocopies of this page for scheduling and recording your workouts. 32
User Manual
Page 33
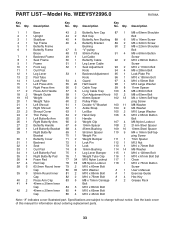
... 5 63.5mm Round Inner 79 2 M10 x 60mm Bolt Screw Cap 80 35 M10 Washer # 1 Userʼs Manual 39 3 50mm Round Inner 81 2 M10 x 85mm Bolt # 1 Exercise Guide Cap 82 2 M10 x 75mm Bolt # 4 Hex Key 40 2 Press Arm Cap 83 5 M8 x 75mm Carriage # 2 Grease Pack 41 4 40mm x 20mm Inner Bolt Cap 84...
... 5 63.5mm Round Inner 79 2 M10 x 60mm Bolt Screw Cap 80 35 M10 Washer # 1 Userʼs Manual 39 3 50mm Round Inner 81 2 M10 x 85mm Bolt # 1 Exercise Guide Cap 82 2 M10 x 75mm Bolt # 4 Hex Key 40 2 Press Arm Cap 83 5 M8 x 75mm Carriage # 2 Grease Pack 41 4 40mm x 20mm Inner Bolt Cap 84...


