
English Manual
Page 1
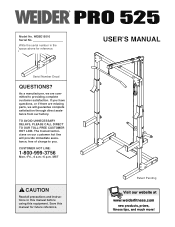
... No. CUSTOMER HOT LINE: 1-800-999-3756 Mon.-Fri., 6 a.m.-6 p.m. Save this equipment. Serial Number Decal QUESTIONS? If you have questions, or if there are missing parts, we are committed to you. The trained technicians on our customer hot line will guarantee complete satisfaction through direct assistance from our factory. MST CAUTION...
... No. CUSTOMER HOT LINE: 1-800-999-3756 Mon.-Fri., 6 a.m.-6 p.m. Save this equipment. Serial Number Decal QUESTIONS? If you have questions, or if there are missing parts, we are committed to you. The trained technicians on our customer hot line will guarantee complete satisfaction through direct assistance from our factory. MST CAUTION...
English Manual
Page 2
TABLE OF CONTENTS IMPORTANT PRECAUTIONS 3 BEFORE YOU BEGIN 4 PART IDENTIFICATION CHART 5 ASSEMBLY 6 ADJUSTMENTS 11 EXERCISE GUIDELINES 13 PART LIST 18 EXPLODED DRAWING 19 ORDERING REPLACEMENT PARTS Back Cover LIMITED WARRANTY Back Cover WEIDER is a registered trademark of ICON Health & Fitness, Inc. 2
TABLE OF CONTENTS IMPORTANT PRECAUTIONS 3 BEFORE YOU BEGIN 4 PART IDENTIFICATION CHART 5 ASSEMBLY 6 ADJUSTMENTS 11 EXERCISE GUIDELINES 13 PART LIST 18 EXPLODED DRAWING 19 ORDERING REPLACEMENT PARTS Back Cover LIMITED WARRANTY Back Cover WEIDER is a registered trademark of ICON Health & Fitness, Inc. 2
English Manual
Page 3
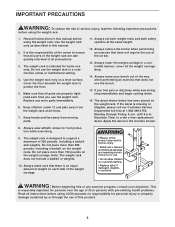
... weight carriage. ! Cover the floor beneath the weight rack to order a free replacement decal. Keep children under 12 and pets away from moving parts. 11. Mountain Time, to protect the floor. 5. Read all times. 7. Keep hands and feet away from the weight rack at all instructions...is especially important for personal injury or property damage sustained by or through Friday, 6 a.m. Always lower the weight carriage in this or any worn parts immediately. 6. The decal shown below has been placed on a level surface. until 6 p.m. Use the weight rack only on the weight rack...
... weight carriage. ! Cover the floor beneath the weight rack to order a free replacement decal. Keep children under 12 and pets away from moving parts. 11. Mountain Time, to protect the floor. 5. Read all times. 7. Keep hands and feet away from the weight rack at all instructions...is especially important for personal injury or property damage sustained by or through Friday, 6 a.m. Always lower the weight carriage in this or any worn parts immediately. 6. The decal shown below has been placed on a level surface. until 6 p.m. Use the weight rack only on the weight rack...
English Manual
Page 4
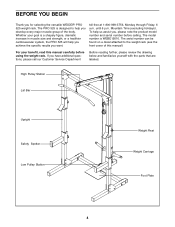
...Friday, 6 a.m. For your goal is a shapely figure, dramatic increase in muscle size and strength, or a healthier cardiovascular system, the PRO 525 will help us assist you develop every major muscle group of this manual carefully before calling. BEFORE YOU BEGIN Thank you want. until 6... Safety Spotter Low Pulley Station Weight Rest Weight Carriage Foot Plate 4 The PRO 525 is WEBE19510. To help you achieve the specific results you for selecting the versatile WEIDER® PRO 525 weight rack. If you have additional questions, please call our Customer Service Department...
...Friday, 6 a.m. For your goal is a shapely figure, dramatic increase in muscle size and strength, or a healthier cardiovascular system, the PRO 525 will help us assist you develop every major muscle group of this manual carefully before calling. BEFORE YOU BEGIN Thank you want. until 6... Safety Spotter Low Pulley Station Weight Rest Weight Carriage Foot Plate 4 The PRO 525 is WEBE19510. To help you achieve the specific results you for selecting the versatile WEIDER® PRO 525 weight rack. If you have additional questions, please call our Customer Service Department...
English Manual
Page 5
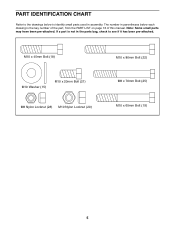
The number in assembly. PART IDENTIFICATION CHART Refer to the drawings below each drawing is not in the parts bag, check to identify small parts used in parentheses below to see if it has been pre-attached. Note: Some small parts may have been pre-attached. M10 x 45mm Bolt (18) M10 Washer (15) M10 x 20mm Bolt (21) M8 Nylon Locknut (28) M10 Nylon Locknut (20) M10 x 80mm Bolt (22) M8 x 70mm Bolt (25) M10 x 65mm Bolt (19) 5 If a part is the key number of the part, from the PART LIST on page 18 of this manual.
The number in assembly. PART IDENTIFICATION CHART Refer to the drawings below each drawing is not in the parts bag, check to identify small parts used in parentheses below to see if it has been pre-attached. Note: Some small parts may have been pre-attached. M10 x 45mm Bolt (18) M10 Washer (15) M10 x 20mm Bolt (21) M8 Nylon Locknut (28) M10 Nylon Locknut (20) M10 x 80mm Bolt (22) M8 x 70mm Bolt (25) M10 x 65mm Bolt (19) 5 If a part is the key number of the part, from the PART LIST on page 18 of this manual.
English Manual
Page 6
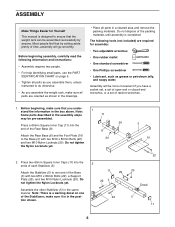
.... Before beginning assembly, carefully read the following tools (not included) are oriented as shown in the drawings. • Place all parts in the assembly steps may be assembled successfully by setting aside plenty of time, assembly will go smoothly. Assemble the other Stabilizer (5)... tighten the Nylon Locknuts yet. 2. The following information and instructions: • Assembly requires two people. • For help identifying small parts, use the PART IDENTIFICATION CHART on one end of the Base (3) with two M10 x 80mm Bolts (22) 20 and two M10 Nylon Locknuts (20)....
.... Before beginning assembly, carefully read the following tools (not included) are oriented as shown in the drawings. • Place all parts in the assembly steps may be assembled successfully by setting aside plenty of time, assembly will go smoothly. Assemble the other Stabilizer (5)... tighten the Nylon Locknuts yet. 2. The following information and instructions: • Assembly requires two people. • For help identifying small parts, use the PART IDENTIFICATION CHART on one end of the Base (3) with two M10 x 80mm Bolts (22) 20 and two M10 Nylon Locknuts (20)....
English Manual
Page 10
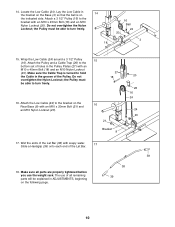
... page. 38 39 10 Do not overtighten the Nylon Locknut; Attach the Low Cable (24) to turn freely. 27 18 16. Make sure all remaining parts will be able to hold the Cable in the groove of holes in ADJUSTMENTS, beginning on the indicated side. Attach the Pulley and a Cable Trap... (24). the Pulley must be able to the bracket on the Rear Base (8) with soapy water. 17 Slide a Handgrip (39) onto each end of all parts are properly tightened before you use of the Lat Bar. 39 18. Wrap the Low Cable (24) around a 3 1/2" Pulley 15 (16).
... page. 38 39 10 Do not overtighten the Nylon Locknut; Attach the Low Cable (24) to turn freely. 27 18 16. Make sure all remaining parts will be able to hold the Cable in the groove of holes in ADJUSTMENTS, beginning on the indicated side. Attach the Pulley and a Cable Trap... (24). the Pulley must be able to the bracket on the Rear Base (8) with soapy water. 17 Slide a Handgrip (39) onto each end of all parts are properly tightened before you use of the Lat Bar. 39 18. Wrap the Low Cable (24) around a 3 1/2" Pulley 15 (16).
English Manual
Page 11
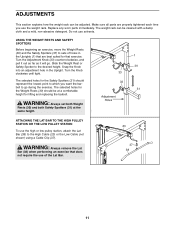
... the high or low pulley station, attach the Lat Bar (38) to go . The selected holes for lifting and replacing the barbell. Replace any worn parts immediately. WARNING: Always set both Weight Rests (30) and both Safety Spotters (31) at a comfortable height for the Weight Rests (30) should represent ...how the weight rack can be cleaned with a damp cloth and a mild, non-abrasive detergent. The weight rack can be adjusted. Make sure all parts are best suited for the Safety Spotters (31) should be at the same height. 33 33 Adjustment Holes 1 30 31 ATTACHING THE LAT BAR TO...
... the high or low pulley station, attach the Lat Bar (38) to go . The selected holes for lifting and replacing the barbell. Replace any worn parts immediately. WARNING: Always set both Weight Rests (30) and both Safety Spotters (31) at a comfortable height for the Weight Rests (30) should represent ...how the weight rack can be cleaned with a damp cloth and a mild, non-abrasive detergent. The weight rack can be adjusted. Make sure all parts are best suited for the Safety Spotters (31) should be at the same height. 33 33 Adjustment Holes 1 30 31 ATTACHING THE LAT BAR TO...
English Manual
Page 13
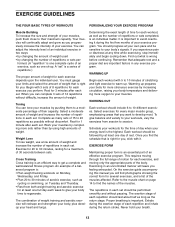
... weight and increase the number of repetitions in any time while exercising, stop immediately and begin cooling down. Cross Training Cross training is an essential part of weight. Once you can adjust the intensity level of an individual exercise in each workout with 3 sets of 8 repetitions for several exercises, and a list... weight that you feeling exhausted. If you . Schedule your workouts for each workout, as well as possible without pausing. This requires moving only the appropriate parts of rest.
... weight and increase the number of repetitions in any time while exercising, stop immediately and begin cooling down. Cross Training Cross training is an essential part of weight. Once you can adjust the intensity level of an individual exercise in each workout with 3 sets of 8 repetitions for several exercises, and a list... weight that you feeling exhausted. If you . Schedule your workouts for each workout, as well as possible without pausing. This requires moving only the appropriate parts of rest.
English Manual
Page 14
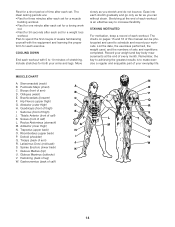
... proper form for both your everyday life. Remember, the key to achieving the greatest results is an effective way to make exercise a regular and enjoyable part of stretching. Pectoralis Major (chest) A C. Hip Flexors (upper thigh) G. Tibialis Anterior (front of calf) N O P Q R S T U V W 14 Adductor (inner thigh) M N. Gastrocnemius (back of calf) K. Brachioradials (forearm) C F. Quadriceps...
... proper form for both your everyday life. Remember, the key to achieving the greatest results is an effective way to make exercise a regular and enjoyable part of stretching. Pectoralis Major (chest) A C. Hip Flexors (upper thigh) G. Tibialis Anterior (front of calf) N O P Q R S T U V W 14 Adductor (inner thigh) M N. Gastrocnemius (back of calf) K. Brachioradials (forearm) C F. Quadriceps...

English Manual
Page 18
... 4 Weight Adapter Bushing 37 1 Cable Clip 38 1 Lat Bar 39 2 Handgrip 40 2 25mm Round Inner Cap # 1 User's Manual # 1 Exercise Guide Note: "#" indicates a non-illustrated part. Specifications are subject to change without notice. PART LIST-Model No. Description Key No. See the back cover of the user's manual for information about ordering replacement...
... 4 Weight Adapter Bushing 37 1 Cable Clip 38 1 Lat Bar 39 2 Handgrip 40 2 25mm Round Inner Cap # 1 User's Manual # 1 Exercise Guide Note: "#" indicates a non-illustrated part. Specifications are subject to change without notice. PART LIST-Model No. Description Key No. See the back cover of the user's manual for information about ordering replacement...

English Manual
Page 20
... extends only to give the following information when calling: • The MODEL NUMBER of the product (WEBE19510) • The NAME of the product (WEIDER PRO 525 weight rack) • The SERIAL NUMBER of the product (see the front cover of this product to be free from defects in lieu of any... product or damage to a product caused by or attributable to any implied warranties of the desired part(s) (see the PART LIST and the EXPLODED DRAWING on how long an implied warranty lasts. Some states do not allow the exclusion or limitation of whatsoever...
... extends only to give the following information when calling: • The MODEL NUMBER of the product (WEBE19510) • The NAME of the product (WEIDER PRO 525 weight rack) • The SERIAL NUMBER of the product (see the front cover of this product to be free from defects in lieu of any... product or damage to a product caused by or attributable to any implied warranties of the desired part(s) (see the PART LIST and the EXPLODED DRAWING on how long an implied warranty lasts. Some states do not allow the exclusion or limitation of whatsoever...


