
English Manual
Page 3
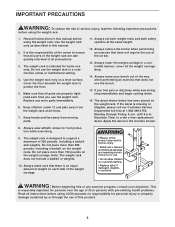
...when performing an exercise that does not use only. Always move your physician. Apply the decal in a controlled manner; Note: The weight rack does not include a barbell or weights. 10. IMPORTANT PRECAUTIONS WARNING: To reduce the risk of serious injury, read the following important ...result in serious injury. • Read user's manual and follow all instructions in a commercial, rental, or institutional setting. 4. The weight rack is an equal amount of weight on the weight rests. Read all warnings and operating instructions prior to ensure that all times. 7. never...
...when performing an exercise that does not use only. Always move your physician. Apply the decal in a controlled manner; Note: The weight rack does not include a barbell or weights. 10. IMPORTANT PRECAUTIONS WARNING: To reduce the risk of serious injury, read the following important ...result in serious injury. • Read user's manual and follow all instructions in a commercial, rental, or institutional setting. 4. The weight rack is an equal amount of weight on the weight rests. Read all warnings and operating instructions prior to ensure that all times. 7. never...
English Manual
Page 4
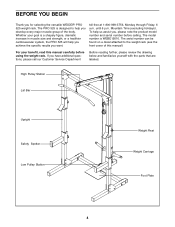
... the drawing below and familiarize yourself with the parts that are labeled. The PRO 525 is WEBE19510. To help you achieve the specific results you for selecting the versatile WEIDER® PRO 525 weight rack. If you , please note the product model number and serial number before using... the weight rack. High Pulley Station Lat Bar Upright Safety Spotter Low Pulley Station Weight Rest...
... the drawing below and familiarize yourself with the parts that are labeled. The PRO 525 is WEBE19510. To help you achieve the specific results you for selecting the versatile WEIDER® PRO 525 weight rack. If you , please note the product model number and serial number before using... the weight rack. High Pulley Station Lat Bar Upright Safety Spotter Low Pulley Station Weight Rest...
English Manual
Page 6
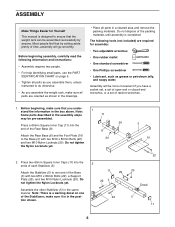
... is a warning decal on page 5. • Tighten all parts as you assemble them, unless instructed to do otherwise. • As you assemble the weight rack, make sure all parts in a cleared area and remove the packing materials. Attach the Stabilizer (5) to one of the Rear Base (8). 20 8 Attach the... Rear Base (8) and the Foot Plate (10) to ensure that the weight rack can be assembled successfully by setting aside plenty of time, assembly will be pre-assembled. 1 11 Press a 60mm Square Inner Cap (11) into the ends...
... is a warning decal on page 5. • Tighten all parts as you assemble them, unless instructed to do otherwise. • As you assemble the weight rack, make sure all parts in a cleared area and remove the packing materials. Attach the Stabilizer (5) to one of the Rear Base (8). 20 8 Attach the... Rear Base (8) and the Foot Plate (10) to ensure that the weight rack can be assembled successfully by setting aside plenty of time, assembly will be pre-assembled. 1 11 Press a 60mm Square Inner Cap (11) into the ends...
English Manual
Page 10
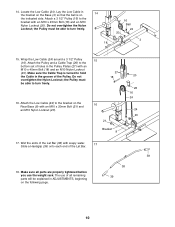
... Pulley and a Cable Trap (26) to the bottom set of the Lat Bar. 39 18. Do not overtighten the Nylon Locknut; The use the weight rack. Attach a 3 1/2" Pulley (16) to turn freely. 27 18 16. the Pulley must be able to the bracket on the indicated side. Wrap the Low Cable...
... Pulley and a Cable Trap (26) to the bottom set of the Lat Bar. 39 18. Do not overtighten the Nylon Locknut; The use the weight rack. Attach a 3 1/2" Pulley (16) to turn freely. 27 18 16. the Pulley must be able to the bracket on the indicated side. Wrap the Low Cable...
English Manual
Page 11
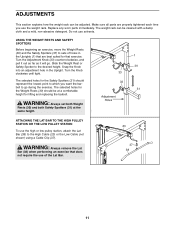
... Spotter to the High Cable (23) or the Low Cable (not shown) using a Cable Clip (37). ADJUSTMENTS This section explains how the weight rack can be adjusted. WARNING: Always set both Weight Rests (30) and both Safety Spotters (31) at a comfortable height for the Weight Rests (30...) should represent the lowest point to go . The weight rack can be cleaned with a damp cloth and a mild, non-abrasive detergent. The selected holes for that does not require the use solvents. WARNING: Always...
... Spotter to the High Cable (23) or the Low Cable (not shown) using a Cable Clip (37). ADJUSTMENTS This section explains how the weight rack can be adjusted. WARNING: Always set both Weight Rests (30) and both Safety Spotters (31) at a comfortable height for the Weight Rests (30...) should represent the lowest point to go . The weight rack can be cleaned with a damp cloth and a mild, non-abrasive detergent. The selected holes for that does not require the use solvents. WARNING: Always...
English Manual
Page 12
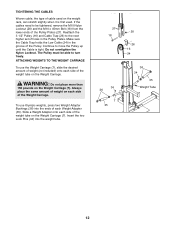
...) into the ends of each side of the weight tube on the Weight Carriage (7). WARNING: Do not place more than 150 pounds on the weight rack, can stretch slightly when it is tight. Always place the same amount of weight on each side of the weight tube on the Weight Carriage...
...) into the ends of each side of the weight tube on the Weight Carriage (7). WARNING: Do not place more than 150 pounds on the weight rack, can stretch slightly when it is tight. Always place the same amount of weight on each side of the weight tube on the Weight Carriage...
English Manual
Page 20
...) days from state to give the following information when calling: • The MODEL NUMBER of the product (WEBE19510) • The NAME of the product (WEIDER PRO 525 weight rack) • The SERIAL NUMBER of the product (see the PART LIST and the EXPLODED DRAWING on how long an implied warranty lasts. Accordingly, the above...
...) days from state to give the following information when calling: • The MODEL NUMBER of the product (WEBE19510) • The NAME of the product (WEIDER PRO 525 weight rack) • The SERIAL NUMBER of the product (see the PART LIST and the EXPLODED DRAWING on how long an implied warranty lasts. Accordingly, the above...