
English Manual
Page 1
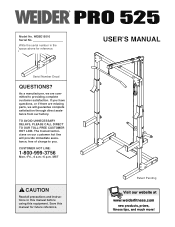
... will guarantee complete satisfaction through direct assistance from our factory. MST CAUTION Read all precautions and instructions in the space above for future reference. USER'S MANUAL Patent Pending Visit our website at www.weiderfitness.com new products, prizes, fitness tips, and much more! Serial Number Decal QUESTIONS? As a manufacturer, we will provide immediate assistance, free of charge to you...
... will guarantee complete satisfaction through direct assistance from our factory. MST CAUTION Read all precautions and instructions in the space above for future reference. USER'S MANUAL Patent Pending Visit our website at www.weiderfitness.com new products, prizes, fitness tips, and much more! Serial Number Decal QUESTIONS? As a manufacturer, we will provide immediate assistance, free of charge to you...
English Manual
Page 2
TABLE OF CONTENTS IMPORTANT PRECAUTIONS 3 BEFORE YOU BEGIN 4 PART IDENTIFICATION CHART 5 ASSEMBLY 6 ADJUSTMENTS 11 EXERCISE GUIDELINES 13 PART LIST 18 EXPLODED DRAWING 19 ORDERING REPLACEMENT PARTS Back Cover LIMITED WARRANTY Back Cover WEIDER is a registered trademark of ICON Health & Fitness, Inc. 2
TABLE OF CONTENTS IMPORTANT PRECAUTIONS 3 BEFORE YOU BEGIN 4 PART IDENTIFICATION CHART 5 ASSEMBLY 6 ADJUSTMENTS 11 EXERCISE GUIDELINES 13 PART LIST 18 EXPLODED DRAWING 19 ORDERING REPLACEMENT PARTS Back Cover LIMITED WARRANTY Back Cover WEIDER is a registered trademark of ICON Health & Fitness, Inc. 2
English Manual
Page 3
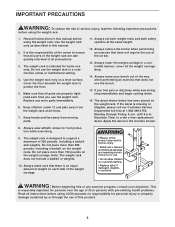
... setting. 4. Always make sure that all warnings and operating instructions prior to use of all instructions before using. Cover the floor beneath the weight rack to order a free replacement decal. ICON assumes no responsibility for persons over the age of 300 pounds, including a barbell and weights. Always lower the weight carriage in serious injury. • Read user's manual and follow all parts are adequately informed of the lat bar...
... setting. 4. Always make sure that all warnings and operating instructions prior to use of all instructions before using. Cover the floor beneath the weight rack to order a free replacement decal. ICON assumes no responsibility for persons over the age of 300 pounds, including a barbell and weights. Always lower the weight carriage in serious injury. • Read user's manual and follow all parts are adequately informed of the lat bar...
English Manual
Page 4
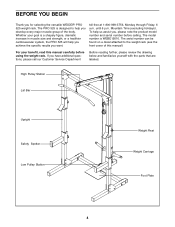
... model number is designed to the weight rack (see the front cover of the body. The PRO 525 is WEBE19510. The serial number can be found on a decal attached to help us assist you have additional questions, please call our Customer Service Department Before reading further, please review the drawing below and familiarize yourself with the parts that are labeled. High Pulley Station Lat Bar Upright Safety...
... model number is designed to the weight rack (see the front cover of the body. The PRO 525 is WEBE19510. The serial number can be found on a decal attached to help us assist you have additional questions, please call our Customer Service Department Before reading further, please review the drawing below and familiarize yourself with the parts that are labeled. High Pulley Station Lat Bar Upright Safety...
English Manual
Page 5
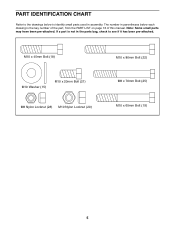
PART IDENTIFICATION CHART Refer to the drawings below each drawing is not in the parts bag, check to identify small parts used in parentheses below to see if it has been pre-attached. M10 x 45mm Bolt (18) M10 Washer (15) M10 x 20mm Bolt (21) M8 Nylon Locknut (28) M10 Nylon Locknut (20) M10 x 80mm Bolt (22) M8 x 70mm Bolt (25) M10 x 65mm Bolt (19) 5 The number in assembly. Note: Some small parts may have been pre-attached. If a part is the key number of the part, from the PART LIST on page 18 of this manual.
PART IDENTIFICATION CHART Refer to the drawings below each drawing is not in the parts bag, check to identify small parts used in parentheses below to see if it has been pre-attached. M10 x 45mm Bolt (18) M10 Washer (15) M10 x 20mm Bolt (21) M8 Nylon Locknut (28) M10 Nylon Locknut (20) M10 x 80mm Bolt (22) M8 x 70mm Bolt (25) M10 x 65mm Bolt (19) 5 The number in assembly. Note: Some small parts may have been pre-attached. If a part is the key number of the part, from the PART LIST on page 18 of this manual.
English Manual
Page 6
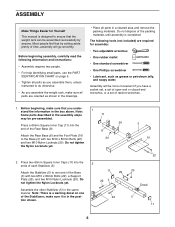
... ends of time, assembly will be assembled successfully by setting aside plenty of each Stabilizer (5). The following information and instructions: • Assembly requires two people. • For help identifying small parts, use the PART IDENTIFICATION CHART on one end of the Base (3) with two M10 x 80mm Bolts (22) 20 and two M10 Nylon Locknuts (20). Do not tighten the Nylon Locknuts yet...
... ends of time, assembly will be assembled successfully by setting aside plenty of each Stabilizer (5). The following information and instructions: • Assembly requires two people. • For help identifying small parts, use the PART IDENTIFICATION CHART on one end of the Base (3) with two M10 x 80mm Bolts (22) 20 and two M10 Nylon Locknuts (20). Do not tighten the Nylon Locknuts yet...

English Manual
Page 7
... four M10 Nylon Locknuts (20). Attach the Crossbar (4) to the Upright in the Upright. 3. Repeat this side 5 1 20 20 4. Turn the Knob clockwise until it will go. Note: Make sure that the Uprights are oriented with the other Upright (1). Do not tighten the Nylon Locknuts yet. Screw Adjustment Knobs (33) into each Upright (1) with four M10 x 80mm Bolts (22), two Joint Plates (9), and...
... four M10 Nylon Locknuts (20). Attach the Crossbar (4) to the Upright in the Upright. 3. Repeat this side 5 1 20 20 4. Turn the Knob clockwise until it will go. Note: Make sure that the Uprights are oriented with the other Upright (1). Do not tighten the Nylon Locknuts yet. Screw Adjustment Knobs (33) into each Upright (1) with four M10 x 80mm Bolts (22), two Joint Plates (9), and...

English Manual
Page 8
... Carriage Stop onto the lower end of the Rear Upright (2) as shown. Orient the angled top of the Rear Upright (2). Do not tighten the Nylon Locknuts yet. 7. Insert an M10 x 20mm Bolt (21) into the ends of the weight tube on the Rear Base (8). Slide the Weight Carriage (7) onto the Rear Upright (2) as shown. Route the metal-sleeve end of the two cables. the Pulley must...
... Carriage Stop onto the lower end of the Rear Upright (2) as shown. Orient the angled top of the Rear Upright (2). Do not tighten the Nylon Locknuts yet. 7. Insert an M10 x 20mm Bolt (21) into the ends of the weight tube on the Rear Base (8). Slide the Weight Carriage (7) onto the Rear Upright (2) as shown. Route the metal-sleeve end of the two cables. the Pulley must...

English Manual
Page 9
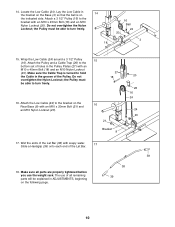
... Attach the Pulley inside the slot in the Pulley Plates with an M10 x 45mm Bolt (18) and an M10 Nylon Locknut (20). Make sure the Cable Trap is turned to hold the Cable in the Top Frame (6). Route the High Cable (23) up through the Top Frame (6), around a 3 1/2" Pulley (16). Attach the Pulley inside the slot using 16...Pulley Plates (27) as shown. Attach the Pulley and a Cable Trap (26) to the top set of the High Cable (23) to turn freely. 11 23 20 26 18 27 16 27 12 17 16 17 23 15 15 20 19 6 13. the Pulley must be able to the M10 x 20mm Bolt (21) in the Weight...
... Attach the Pulley inside the slot in the Pulley Plates with an M10 x 45mm Bolt (18) and an M10 Nylon Locknut (20). Make sure the Cable Trap is turned to hold the Cable in the Top Frame (6). Route the High Cable (23) up through the Top Frame (6), around a 3 1/2" Pulley (16). Attach the Pulley inside the slot using 16...Pulley Plates (27) as shown. Attach the Pulley and a Cable Trap (26) to the top set of the High Cable (23) to turn freely. 11 23 20 26 18 27 16 27 12 17 16 17 23 15 15 20 19 6 13. the Pulley must be able to the M10 x 20mm Bolt (21) in the Weight...
English Manual
Page 10
.... Attach a 3 1/2" Pulley (16) to the bracket on the Rear Base (8) with an M10 x 45mm Bolt (18) and an M10 Nylon Locknut (20). the Pulley must be able to the bottom set of holes in the groove of all parts are properly tightened before you use the weight rack. Make sure all remaining parts will be able to hold the Cable in the Pulley...
.... Attach a 3 1/2" Pulley (16) to the bracket on the Rear Base (8) with an M10 x 45mm Bolt (18) and an M10 Nylon Locknut (20). the Pulley must be able to the bottom set of holes in the groove of all parts are properly tightened before you use the weight rack. Make sure all remaining parts will be able to hold the Cable in the Pulley...
English Manual
Page 11
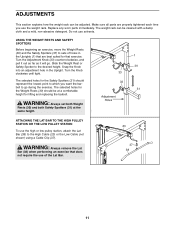
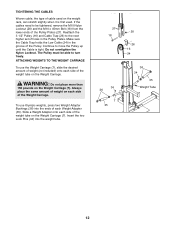
...) or the Low Cable (not shown) using a Cable Clip (37). USING THE WEIGHT RESTS AND SAFETY SPOTTERS Before beginning an exercise, move the Weight Rests (30) and the Safety Spotters (31) to sets of the Lat Bar. 23 37 38 11 ADJUSTMENTS This section explains how the weight rack can be cleaned with a damp cloth and a mild, non-abrasive detergent. Turn the Adjustment Knob (33) counter...
...) or the Low Cable (not shown) using a Cable Clip (37). USING THE WEIGHT RESTS AND SAFETY SPOTTERS Before beginning an exercise, move the Weight Rests (30) and the Safety Spotters (31) to sets of the Lat Bar. 23 37 38 11 ADJUSTMENTS This section explains how the weight rack can be cleaned with a damp cloth and a mild, non-abrasive detergent. Turn the Adjustment Knob (33) counter...
English Manual
Page 12
... cables need to be able to turn freely. Do not overtighten the Nylon Locknut. Slide a Weight Adapter onto each Weight Adapter (35). ATTACHING WEIGHTS TO THE WEIGHT CARRIAGE To use Olympic weights, press two Weight Adapter Bushings (36) into the weight tube. 27 18 20 26 16 24 34 36 7 35 36 34 35 Weight Tube 12 Continue to the next higher set of the Pulley. The Pulley must be tightened, remove...
... cables need to be able to turn freely. Do not overtighten the Nylon Locknut. Slide a Weight Adapter onto each Weight Adapter (35). ATTACHING WEIGHTS TO THE WEIGHT CARRIAGE To use Olympic weights, press two Weight Adapter Bushings (36) into the weight tube. 27 18 20 26 16 24 34 36 7 35 36 34 35 Weight Tube 12 Continue to the next higher set of the Pulley. The Pulley must be tightened, remove...
English Manual
Page 13
.... Weight Loss To lose weight, use a low amount of weight and increase the number of repetitions in an uncontrolled manner will continually adapt and grow as the return stage. Cross Training Cross training is a series of repetitions.) The proper amount of weight for 1 minute after each set . Warming up . WORKING OUT Each workout should include 6 to get a complete and well-balanced fitness program. EXERCISE FORM Maintaining proper form is important. Exercising...
.... Weight Loss To lose weight, use a low amount of weight and increase the number of repetitions in an uncontrolled manner will continually adapt and grow as the return stage. Cross Training Cross training is a series of repetitions.) The proper amount of weight for 1 minute after each set . Warming up . WORKING OUT Each workout should include 6 to get a complete and well-balanced fitness program. EXERCISE FORM Maintaining proper form is important. Exercising...
English Manual
Page 14
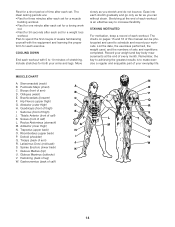
... at the end of arm) B D. Pectoralis Major (chest) A C. Soleus (front of thigh) E J. Latissimus Dorsi (mid back) J S. List the date, the exercises performed, the weight used to make exercise a regular and enjoyable part of sets and repetitions completed. Biceps (front of every month. Trapezius (upper back) H O. out. • Rest for 30 seconds after each set . Record your weight and key body measurements at the...
... at the end of arm) B D. Pectoralis Major (chest) A C. Soleus (front of thigh) E J. Latissimus Dorsi (mid back) J S. List the date, the exercises performed, the weight used to make exercise a regular and enjoyable part of sets and repetitions completed. Biceps (front of every month. Trapezius (upper back) H O. out. • Rest for 30 seconds after each set . Record your weight and key body measurements at the...
English Manual
Page 15
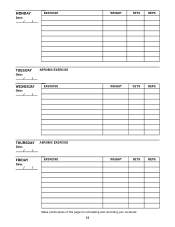
MONDAY Date: / / EXERCISE WEIGHT SETS REPS TUESDAY Date: / / AEROBIC EXERCISE WEDNESDAY Date: / / EXERCISE WEIGHT SETS REPS THURSDAY Date: / / AEROBIC EXERCISE FRIDAY Date: / / EXERCISE WEIGHT SETS REPS Make photocopies of this page for scheduling and recording your workouts. 15
MONDAY Date: / / EXERCISE WEIGHT SETS REPS TUESDAY Date: / / AEROBIC EXERCISE WEDNESDAY Date: / / EXERCISE WEIGHT SETS REPS THURSDAY Date: / / AEROBIC EXERCISE FRIDAY Date: / / EXERCISE WEIGHT SETS REPS Make photocopies of this page for scheduling and recording your workouts. 15

English Manual
Page 16
MONDAY Date: / / EXERCISE WEIGHT SETS REPS TUESDAY Date: / / AEROBIC EXERCISE WEDNESDAY Date: / / EXERCISE WEIGHT SETS REPS THURSDAY Date: / / AEROBIC EXERCISE FRIDAY Date: / / EXERCISE WEIGHT SETS REPS Make photocopies of this page for scheduling and recording your workouts. 16
MONDAY Date: / / EXERCISE WEIGHT SETS REPS TUESDAY Date: / / AEROBIC EXERCISE WEDNESDAY Date: / / EXERCISE WEIGHT SETS REPS THURSDAY Date: / / AEROBIC EXERCISE FRIDAY Date: / / EXERCISE WEIGHT SETS REPS Make photocopies of this page for scheduling and recording your workouts. 16

English Manual
Page 18
... 3 Support Plate 30 2 Weight Rest 31 2 Safety Spotter 32 8 75mm x 65mm Bushing 33 4 Adjustment Knob 34 2 Lock Pin 35 2 Weight Adapter 36 4 Weight Adapter Bushing 37 1 Cable Clip 38 1 Lat Bar 39 2 Handgrip 40 2 25mm Round Inner Cap # 1 User's Manual # 1 Exercise Guide Note: "#" indicates a non-illustrated part. See the back cover of the user's manual for information about ordering replacement parts. 18 Specifications are subject to change without notice. Qty. Description Key No. PART LIST-Model No. WEBE19510 R0901A Key...
... 3 Support Plate 30 2 Weight Rest 31 2 Safety Spotter 32 8 75mm x 65mm Bushing 33 4 Adjustment Knob 34 2 Lock Pin 35 2 Weight Adapter 36 4 Weight Adapter Bushing 37 1 Cable Clip 38 1 Lat Bar 39 2 Handgrip 40 2 25mm Round Inner Cap # 1 User's Manual # 1 Exercise Guide Note: "#" indicates a non-illustrated part. See the back cover of the user's manual for information about ordering replacement parts. 18 Specifications are subject to change without notice. Qty. Description Key No. PART LIST-Model No. WEBE19510 R0901A Key...

English Manual
Page 19
EXPLODED DRAWING-Model No. WEBE19510 R0901A 36 35 34 40 13 15 19 2 36 36 35 16 34 40 12 13 20 15 17 17 21 7 15 20 32 23 2015 20 20 17 16 15 19 17 17 20 16 6 20 15 9 33 32 30 33 23 19 15 20 12 32 20 9 11 49 22 30 33 32 32 31 33 32 11 9 1 29 22 22 26 16 20 27 26 18 27 16 32 31 32 22 1 20 15 19 25 15 20 13 28 14 11 20 29 20 9 20 21 24 11 8 20 22 20 20 18 22 9 16 11 24 3 22 20 22 29 22 22 10 22 20 9 9 37 38 20 5 11 39 5 39 11 19
EXPLODED DRAWING-Model No. WEBE19510 R0901A 36 35 34 40 13 15 19 2 36 36 35 16 34 40 12 13 20 15 17 17 21 7 15 20 32 23 2015 20 20 17 16 15 19 17 17 20 16 6 20 15 9 33 32 30 33 23 19 15 20 12 32 20 9 11 49 22 30 33 32 32 31 33 32 11 9 1 29 22 22 26 16 20 27 26 18 27 16 32 31 32 22 1 20 15 19 25 15 20 13 28 14 11 20 29 20 9 20 21 24 11 8 20 22 20 20 18 22 9 16 11 24 3 22 20 22 29 22 22 10 22 20 9 9 37 38 20 5 11 39 5 39 11 19
English Manual
Page 20
... state. LIMITED WARRANTY ICON Health & Fitness, Inc. (ICON), warrants this manual) • The KEY NUMBER and DESCRIPTION of the desired part(s) (see the front cover of this product to be prepared to the original purchaser. This warranty extends only to give the following information when calling: • The MODEL NUMBER of the product (WEBE19510) • The NAME of the product (WEIDER PRO 525 weight rack) • The SERIAL NUMBER of the...
... state. LIMITED WARRANTY ICON Health & Fitness, Inc. (ICON), warrants this manual) • The KEY NUMBER and DESCRIPTION of the desired part(s) (see the front cover of this product to be prepared to the original purchaser. This warranty extends only to give the following information when calling: • The MODEL NUMBER of the product (WEBE19510) • The NAME of the product (WEIDER PRO 525 weight rack) • The SERIAL NUMBER of the...


