
English Manual
Page 1
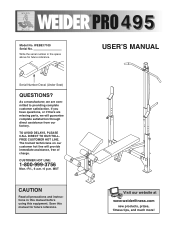
... manual before using this manual for future reference. ¨ 495 USERÕS MANUAL Serial Number Decal (Under Seat) QUESTIONS? Model No. Visit our website at www.weiderfitness.com new products, prizes, fitness tips, and much more! The trained technicians on our customer hot line will guarantee complete satisfaction through direct assistance from our factory. If you have questions, or if there are missing parts...
... manual before using this manual for future reference. ¨ 495 USERÕS MANUAL Serial Number Decal (Under Seat) QUESTIONS? Model No. Visit our website at www.weiderfitness.com new products, prizes, fitness tips, and much more! The trained technicians on our customer hot line will guarantee complete satisfaction through direct assistance from our factory. If you have questions, or if there are missing parts...

English Manual
Page 2
... if it is not legible, please call our Customer Service Department toll-free at right has been placed on the weight bench. Table of Contents WARNING DECAL PLACEMENT 2 IMPORTANT PRECAUTIONS 3 BEFORE YOU BEGIN 4 PART IDENTIFICATION CHART 5 ASSEMBLY 6 USING THE WEIGHT BENCH 11 EXERCISE GUIDELINES 13 PART LIST 18 EXPLODED DRAWING 19 ORDERING REPLACEMENT PARTS Back Cover LIMITED WARRANTY Back Cover Warning Decal Placement The decal shown at 1-800-999...
... if it is not legible, please call our Customer Service Department toll-free at right has been placed on the weight bench. Table of Contents WARNING DECAL PLACEMENT 2 IMPORTANT PRECAUTIONS 3 BEFORE YOU BEGIN 4 PART IDENTIFICATION CHART 5 ASSEMBLY 6 USING THE WEIGHT BENCH 11 EXERCISE GUIDELINES 13 PART LIST 18 EXPLODED DRAWING 19 ORDERING REPLACEMENT PARTS Back Cover LIMITED WARRANTY Back Cover Warning Decal Placement The decal shown at 1-800-999...
English Manual
Page 3
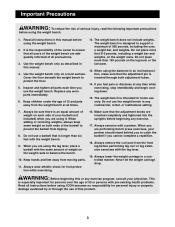
... health problems. Read all instructions before using the backrest in this manual before beginning any commercial, rental, or institutional setting. 7. Always remove the curl post from tipping. 8. This is the responsibility of the owner to support a maximum of 560 pounds, including the user, a weight bar, and weights. Use the weight bench only on each time you cannot complete a repetition. 18. Do not use the weight bench in a controlled manner. Always exercise...
... health problems. Read all instructions before using the backrest in this manual before beginning any commercial, rental, or institutional setting. 7. Always remove the curl post from tipping. 8. This is the responsibility of the owner to support a maximum of 560 pounds, including the user, a weight bar, and weights. Use the weight bench only on each time you cannot complete a repetition. 18. Do not use the weight bench in a controlled manner. Always exercise...

English Manual
Page 4
... with your own weight set (not included) to the weight bench (see the front cover of the body. until 6 p.m. Mountain Time (excluding holidays). To help you to achieve the specific results you , please note the product model number and serial number before using the WEIDER¨ PRO 495 weight bench. If you for selecting the WEIDER¨ PRO 495 weight bench. Weight Rest Seat Curl Pad Weight Adapter Leg Lever 4 Lat Bar Lat Tower Weight Tube Upright Adjustment Knob Backrest Adjustment Tubes The model number is a shapely...
... with your own weight set (not included) to the weight bench (see the front cover of the body. until 6 p.m. Mountain Time (excluding holidays). To help you to achieve the specific results you , please note the product model number and serial number before using the WEIDER¨ PRO 495 weight bench. If you for selecting the WEIDER¨ PRO 495 weight bench. Weight Rest Seat Curl Pad Weight Adapter Leg Lever 4 Lat Bar Lat Tower Weight Tube Upright Adjustment Knob Backrest Adjustment Tubes The model number is a shapely...

English Manual
Page 5
... x 16mm Screw (15)Ñ6 M10 Nylon Locknut (19)Ñ20 5 If you cannot find a part in the parts bags, check to help you identify the small parts used in parenthesis below each part refers to the quantity needed for shipping purposes. The second number refers to the key number of the part. Important: Some parts may have been pre-assembled for assembly. The number in assembly.
... x 16mm Screw (15)Ñ6 M10 Nylon Locknut (19)Ñ20 5 If you cannot find a part in the parts bags, check to help you identify the small parts used in parenthesis below each part refers to the quantity needed for shipping purposes. The second number refers to the key number of the part. Important: Some parts may have been pre-assembled for assembly. The number in assembly.
English Manual
Page 6
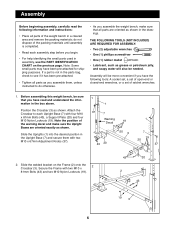
.... Before assembling this weight bench, be sure that all parts as you assemble them with two M10 x 67mm Adjustment Knobs (37). 1 1 37 7 Warning Decal 19 20 3 43 20 1 7 19 20 37 2. Position the Crossbar (3) as grease or petroleum jelly, and soapy water will be needed. Slide the Uprights (1) into the desired position in the Upright Base (7) and secure them , unless instructed to...
.... Before assembling this weight bench, be sure that all parts as you assemble them with two M10 x 67mm Adjustment Knobs (37). 1 1 37 7 Warning Decal 19 20 3 43 20 1 7 19 20 37 2. Position the Crossbar (3) as grease or petroleum jelly, and soapy water will be needed. Slide the Uprights (1) into the desired position in the Upright Base (7) and secure them , unless instructed to...

English Manual
Page 7
...The Spacer will fit tightly inside of the Leg Lever (4). Slide the Weight Adapter onto the Weight Tube (52) and secure it by pushing the Detent Pin (58) into the Weight Tube as shown. Attach the Frame (2) to the Lat Tower Base (35) with the Bolt and an ...Weight Tube. Press the Adapter Bushings (59) into the indicated ends of the Leg Lever. 6. Insert the Weight Tube (52) into the indicated end of the Weight Tube (52). Press a 1Ó Angle Cap (50) onto the indicated end of the Weight Adapter (60) as shown. 5. Attach the Leg Lever (4) to the Leg Lever (4) with two M10 x 65mm Bolts...
...The Spacer will fit tightly inside of the Leg Lever (4). Slide the Weight Adapter onto the Weight Tube (52) and secure it by pushing the Detent Pin (58) into the Weight Tube as shown. Attach the Frame (2) to the Lat Tower Base (35) with the Bolt and an ...Weight Tube. Press the Adapter Bushings (59) into the indicated ends of the Leg Lever. 6. Insert the Weight Tube (52) into the indicated end of the Weight Tube (52). Press a 1Ó Angle Cap (50) onto the indicated end of the Weight Adapter (60) as shown. 5. Attach the Leg Lever (4) to the Leg Lever (4) with two M10 x 65mm Bolts...

English Manual
Page 8
...16mm Screws (15). 10 28 15 27 8 Secure the Backrest (6) to pivot freely. Make sure the Adjustment Pin (40) is completely inserted through one of the three sets of the Seat (11) positioned as shown, attach the Seat to the Curl Post (27) with the Bolt, ...two M10 Washers (24), and an M10 Nylon Locknut (19). Attach the Curl Pad (28) to the brackets on the Frame (2) with the Adjustment Pin (40) through both holes in the adjustment tubes. Lubricate the M10 x 178mm Bolt (17). 7. Press...
...16mm Screws (15). 10 28 15 27 8 Secure the Backrest (6) to pivot freely. Make sure the Adjustment Pin (40) is completely inserted through one of the three sets of the Seat (11) positioned as shown, attach the Seat to the Curl Post (27) with the Bolt, ...two M10 Washers (24), and an M10 Nylon Locknut (19). Attach the Curl Pad (28) to the brackets on the Frame (2) with the Adjustment Pin (40) through both holes in the adjustment tubes. Lubricate the M10 x 178mm Bolt (17). 7. Press...

English Manual
Page 9
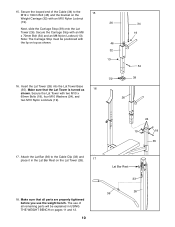
... with the adjustment hole in step 13. Slide the Weight Carriage (32) onto the Lat Tower. Insert the Pad Tubes into the bracket on the Weight Carriage (32). Attach a Cable Clip (33) to indicated end of the Lat Tower (26). Tap two 3/4Ó Round Inner Caps (9) into the weight tube on the Weight Carriage (32) from the direction shown. Press a 1Ó Round...
... with the adjustment hole in step 13. Slide the Weight Carriage (32) onto the Lat Tower. Insert the Pad Tubes into the bracket on the Weight Carriage (32). Attach a Cable Clip (33) to indicated end of the Lat Tower (26). Tap two 3/4Ó Round Inner Caps (9) into the weight tube on the Weight Carriage (32) from the direction shown. Press a 1Ó Round...
English Manual
Page 10
...17. Note: The Carriage Stop must be explained in the Lat Bar Rest on top as 16 shown. The use the weight bench. Secure the looped end of all parts are properly tightened before you use of the Cable (34) to the Cable Clip (33) and place it in USING THE WEIGHT BENCH on the Weight Carriage (32) with ... 70mm Bolt (54) and an M8 Nylon Locknut (13). 15. Next, slide the Carriage Stop (39) onto the Lat Tower (26). Attach the Lat Bar (36) to the 15 M19 x 19mm Bolt (46) and the bracket on pages 11 and 12. 10 Lat Bar Rest 33 26 36 Make sure that the Lat Tower is turned as ...
...17. Note: The Carriage Stop must be explained in the Lat Bar Rest on top as 16 shown. The use the weight bench. Secure the looped end of all parts are properly tightened before you use of the Cable (34) to the Cable Clip (33) and place it in USING THE WEIGHT BENCH on the Weight Carriage (32) with ... 70mm Bolt (54) and an M8 Nylon Locknut (13). 15. Next, slide the Carriage Stop (39) onto the Lat Tower (26). Attach the Lat Bar (36) to the 15 M19 x 19mm Bolt (46) and the bracket on pages 11 and 12. 10 Lat Bar Rest 33 26 36 Make sure that the Lat Tower is turned as ...
English Manual
Page 11
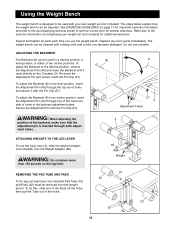
... parts each time you use the Leg Lever (4), slide the desired weights (not included) onto the Weight Adapter (60). Re-insert the Adjustment Pin and secure it with the Pin Clip (57). ment tubes. Refer also to the exercise information accompanying your own weight set (not included). To adjust the Backrest (6) to an incline position, insert the Adjustment Pin (40) through both adjust- ATTACHING WEIGHTS TO THE LEG LEVER To use the weight bench...
... parts each time you use the Leg Lever (4), slide the desired weights (not included) onto the Weight Adapter (60). Re-insert the Adjustment Pin and secure it with the Pin Clip (57). ment tubes. Refer also to the exercise information accompanying your own weight set (not included). To adjust the Backrest (6) to an incline position, insert the Adjustment Pin (40) through both adjust- ATTACHING WEIGHTS TO THE LEG LEVER To use the weight bench...

English Manual
Page 12
... different exercises. WARNING: Always set both Uprights and Upright Bases (7). When performing an exercise during which you fully tighten the Adjustment Knob. 1 37 7 21 Weight 1 37 7 27 41 8 12 Slide the Uprights to the lat tower, make sure there is not in a controlled manner. Make sure that the adjustment knobs are sitting on the bench with the adjustment hole in the Front Leg. ATTACHING WEIGHTS TO THE LAT TOWER To use...
... different exercises. WARNING: Always set both Uprights and Upright Bases (7). When performing an exercise during which you fully tighten the Adjustment Knob. 1 37 7 21 Weight 1 37 7 27 41 8 12 Slide the Uprights to the lat tower, make sure there is not in a controlled manner. Make sure that the adjustment knobs are sitting on the bench with the adjustment hole in the Front Leg. ATTACHING WEIGHTS TO THE LAT TOWER To use...
English Manual
Page 13
... each workout, or a specific number of light stretching and exercise to 20 repetitions as one complete cycle of rest. Schedule your energy level is very important to 30 minutes, resting for a maximum of 30 seconds between sets. ¥ Cross Training In the pursuit of weight for exercise by using high amounts of 8 repetitions for every major muscle group, with a list of weight that cross training...
... each workout, or a specific number of light stretching and exercise to 20 repetitions as one complete cycle of rest. Schedule your energy level is very important to 30 minutes, resting for a maximum of 30 seconds between sets. ¥ Cross Training In the pursuit of weight for exercise by using high amounts of 8 repetitions for every major muscle group, with a list of weight that cross training...
English Manual
Page 14
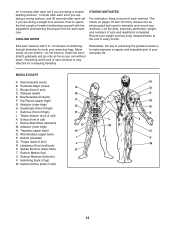
... can be photocopied and used to make exercise a regular and enjoyable part of your workouts. MUSCLE CHART A. Obliques (waist) BB E. Rectus Abdominus (stomach) M. Rhomboideus (upper back) P. Spinae Erectors (lower back) KK T. Record your arms and legs. Sternomastoid (neck) B. Biceps (front of sets and repetitions completed. Gluteus Maximus (buttocks) V. List the date, exercises performed, weight, and numbers of arm) D. End each workout with 5 to spend the...
... can be photocopied and used to make exercise a regular and enjoyable part of your workouts. MUSCLE CHART A. Obliques (waist) BB E. Rectus Abdominus (stomach) M. Rhomboideus (upper back) P. Spinae Erectors (lower back) KK T. Record your arms and legs. Sternomastoid (neck) B. Biceps (front of sets and repetitions completed. Gluteus Maximus (buttocks) V. List the date, exercises performed, weight, and numbers of arm) D. End each workout with 5 to spend the...

English Manual
Page 15
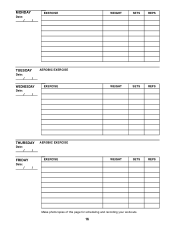
MONDAY Date: / / EXERCISE WEIGHT SETS REPS TUESDAY Date: / / AEROBIC EXERCISE WEDNESDAY Date: / / EXERCISE WEIGHT SETS REPS THURSDAY Date: / / AEROBIC EXERCISE FRIDAY Date: / / EXERCISE WEIGHT SETS REPS Make photocopies of this page for scheduling and recording your workouts. 15
MONDAY Date: / / EXERCISE WEIGHT SETS REPS TUESDAY Date: / / AEROBIC EXERCISE WEDNESDAY Date: / / EXERCISE WEIGHT SETS REPS THURSDAY Date: / / AEROBIC EXERCISE FRIDAY Date: / / EXERCISE WEIGHT SETS REPS Make photocopies of this page for scheduling and recording your workouts. 15
English Manual
Page 16
MONDAY Date: / / EXERCISE WEIGHT SETS REPS TUESDAY Date: / / AEROBIC EXERCISE WEDNESDAY Date: / / EXERCISE WEIGHT SETS REPS THURSDAY Date: / / AEROBIC EXERCISE FRIDAY Date: / / EXERCISE WEIGHT SETS REPS Make photocopies of this page for scheduling and recording your workouts. 16
MONDAY Date: / / EXERCISE WEIGHT SETS REPS TUESDAY Date: / / AEROBIC EXERCISE WEDNESDAY Date: / / EXERCISE WEIGHT SETS REPS THURSDAY Date: / / AEROBIC EXERCISE FRIDAY Date: / / EXERCISE WEIGHT SETS REPS Make photocopies of this page for scheduling and recording your workouts. 16
English Manual
Page 18
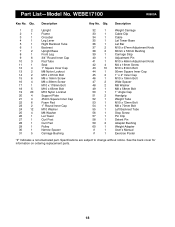
... 48 2 M8 Washer 49 1 M8 x 58mm Bolt 50 1 1Ó Angle Cap 51 2 Handgrip 52 1 Weight Tube 53 1 M10 x 72mm Bolt 54 1 M8 x 70mm Bolt 55 1 Left Backrest Tube 56 1 Stop Screw 57 1 Pin Clip 58 1 Detent Pin 59 2 Adapter Bushing 60 1 Weight Adapter # 1 UserÕs Manual # 1 Exercise Poster Ò#Ó Indicates a non-illustrated part. See the back cover for information on ordering replacement parts. 18 Qty. WEBE17100 R0600A Key No.
... 48 2 M8 Washer 49 1 M8 x 58mm Bolt 50 1 1Ó Angle Cap 51 2 Handgrip 52 1 Weight Tube 53 1 M10 x 72mm Bolt 54 1 M8 x 70mm Bolt 55 1 Left Backrest Tube 56 1 Stop Screw 57 1 Pin Clip 58 1 Detent Pin 59 2 Adapter Bushing 60 1 Weight Adapter # 1 UserÕs Manual # 1 Exercise Poster Ò#Ó Indicates a non-illustrated part. See the back cover for information on ordering replacement parts. 18 Qty. WEBE17100 R0600A Key No.
English Manual
Page 19
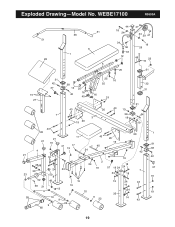
WEBE17100 R0600A 51 28 51 36 6 1 5 44 18 24 34 56 33 12 47 24 29 47 19 26 46 23 19 25 31 15 27 31 42 37 7 38 12 42 25 16 25 45 25 16 55 16 19 43 20 43 13 39 3 19 19 20 32 31 31 54 19 43 22 11 21 21 19 41 17 4 19 24 43 40 20 19 20 1 31 38 42 21 18 42 19 49 48 30 23 24 53 50 8 2 24 18 19 57 19 24 24 24 18 37 7 19 52 48 58 21 13 9 59 10 9 15 19 10 9 9 22 19 24 43 14 24 19 35 14 43 22 9 60 19 Exploded DrawingÑModel No.
WEBE17100 R0600A 51 28 51 36 6 1 5 44 18 24 34 56 33 12 47 24 29 47 19 26 46 23 19 25 31 15 27 31 42 37 7 38 12 42 25 16 25 45 25 16 55 16 19 43 20 43 13 39 3 19 19 20 32 31 31 54 19 43 22 11 21 21 19 41 17 4 19 24 43 40 20 19 20 1 31 38 42 21 18 42 19 49 48 30 23 24 53 50 8 2 24 18 19 57 19 24 24 24 18 37 7 19 52 48 58 21 13 9 59 10 9 15 19 10 9 9 22 19 24 43 14 24 19 35 14 43 22 9 60 19 Exploded DrawingÑModel No.

English Manual
Page 20
... the PART LIST and the EXPLODED DRAWING on how long an implied warranty lasts. All products for which vary from the date of purchase. ICON is made must be free from defects in its authorized service centers. Accordingly, the above limitation may not apply to you . Accordingly, the above is authorized by ICON. The MODEL NUMBER of the product (WEIDER¨ PRO 495 weight bench...
... the PART LIST and the EXPLODED DRAWING on how long an implied warranty lasts. All products for which vary from the date of purchase. ICON is made must be free from defects in its authorized service centers. Accordingly, the above limitation may not apply to you . Accordingly, the above is authorized by ICON. The MODEL NUMBER of the product (WEIDER¨ PRO 495 weight bench...


