
English Manual
Page 2
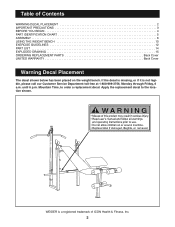
...trademark of Contents WARNING DECAL PLACEMENT 2 IMPORTANT PRECAUTIONS 3 BEFORE YOU BEGIN 4 PART IDENTIFICATION CHART 5 ASSEMBLY 6 USING THE WEIGHT BENCH 10 EXERCISE GUIDELINES 12 PART LIST 14 EXPLODED DRAWING 15 ORDERING REPLACEMENT PARTS Back Cover LIMITED WARRANTY Back Cover Warning Decal Placement... The decal shown below has been placed on the weight bench. Apply the replacement decal to order a replacement decal. until 6 p.m. WEIDER is not legible, please call our Customer Service Department toll-free at 1-800-999-3756,...
...trademark of Contents WARNING DECAL PLACEMENT 2 IMPORTANT PRECAUTIONS 3 BEFORE YOU BEGIN 4 PART IDENTIFICATION CHART 5 ASSEMBLY 6 USING THE WEIGHT BENCH 10 EXERCISE GUIDELINES 12 PART LIST 14 EXPLODED DRAWING 15 ORDERING REPLACEMENT PARTS Back Cover LIMITED WARRANTY Back Cover Warning Decal Placement... The decal shown below has been placed on the weight bench. Apply the replacement decal to order a replacement decal. until 6 p.m. WEIDER is not legible, please call our Customer Service Department toll-free at 1-800-999-3756,...
English Manual
Page 3
... the support tube is intended for foot protection while exercising. 9. Keep children under 12 and pets away from the front leg before using the weight bench. 1. The weight bench is plenty of space between your physician. The large threaded knob must always be inserted through the use only. ICON assumes no responsibility for persons...
... the support tube is intended for foot protection while exercising. 9. Keep children under 12 and pets away from the front leg before using the weight bench. 1. The weight bench is plenty of space between your physician. The large threaded knob must always be inserted through the use only. ICON assumes no responsibility for persons...
English Manual
Page 4
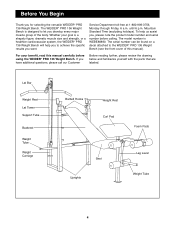
... a shapely figure, dramatic muscle size and strength, or a healthier cardiovascular system, the WEIDER¨ PRO 136 Weight Bench will help us assist you, please note the product model number and serial number before using the WEIDER¨ PRO 136 Weight Bench. If you for selecting the versatile WEIDER¨ PRO 136 Weight Bench. The model number is designed to achieve the specific results you develop...
... a shapely figure, dramatic muscle size and strength, or a healthier cardiovascular system, the WEIDER¨ PRO 136 Weight Bench will help us assist you, please note the product model number and serial number before using the WEIDER¨ PRO 136 Weight Bench. If you for selecting the versatile WEIDER¨ PRO 136 Weight Bench. The model number is designed to achieve the specific results you develop...
English Manual
Page 6
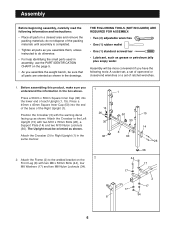
.... do otherwise. ¥ For help identifying the small parts used in assembly, use the PART IDENTIFICATION CHART on the page 5. ¥ As you assemble the weight bench, be more convenient if you assemble them, unless instructed to the welded bracket on the Front Leg (8) with the warning decal facing up as shown...
.... do otherwise. ¥ For help identifying the small parts used in assembly, use the PART IDENTIFICATION CHART on the page 5. ¥ As you assemble the weight bench, be more convenient if you assemble them, unless instructed to the welded bracket on the Front Leg (8) with the warning decal facing up as shown...
English Manual
Page 9
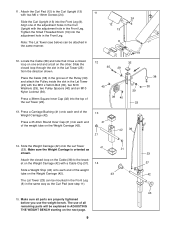
... and attach the Pulley inside the slot in the Lat Tower (23) with the adjustment hole in ADJUSTING THE WEIGHT BENCH starting on the other. The use of the Lat Tower (23). 11 24 12 13 8 19 12 32 ...(19) into the top of all parts are properly tightened before you use the weight bench. Press a 25.4mm Round Inner Cap (21) into the Front Leg (8). Slide the closed loop on one... onto each end of the adjustment holes in the same way as 21 shown. 23 Attach the closed loop on the Weight Carriage (42). 13 41 21 42 38 14. Attach the Curl Pad (12) to the brack- Note: The ...
... and attach the Pulley inside the slot in the Lat Tower (23) with the adjustment hole in ADJUSTING THE WEIGHT BENCH starting on the other. The use of the Lat Tower (23). 11 24 12 13 8 19 12 32 ...(19) into the top of all parts are properly tightened before you use the weight bench. Press a 25.4mm Round Inner Cap (21) into the Front Leg (8). Slide the closed loop on one... onto each end of the adjustment holes in the same way as 21 shown. 23 Attach the closed loop on the Weight Carriage (42). 13 41 21 42 38 14. Attach the Curl Pad (12) to the brack- Note: The ...

English Manual
Page 10
...EXERCISE GUIDELINES on the Leg Lever for each time you use the weight bench. The weight bench can be used with your weight set (not included). To use the Backrest in a level position, first lift the Backrest. ATTACHING WEIGHTS TO THE LEG LEVER Note: Remove the Curl Upright or Lat... Large Threaded Knobs (20) from the Uprights (1, 15). WARNING: Always set of adjustment brackets in the Uprights (1, 15). Using the Weight Bench The weight bench is designed to be used in a level position, two inclined positions or a declined position. Refer also to the desired height. Do not...
...EXERCISE GUIDELINES on the Leg Lever for each time you use the weight bench. The weight bench can be used with your weight set (not included). To use the Backrest in a level position, first lift the Backrest. ATTACHING WEIGHTS TO THE LEG LEVER Note: Remove the Curl Upright or Lat... Large Threaded Knobs (20) from the Uprights (1, 15). WARNING: Always set of adjustment brackets in the Uprights (1, 15). Using the Weight Bench The weight bench is designed to be used in a level position, two inclined positions or a declined position. Refer also to the desired height. Do not...
English Manual
Page 11
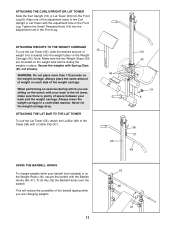
... 23 42 19 8 38 37 48 USING THE BARBELL HOOKS To change weights while your back to the lat tower, make sure there is on the Weight Carriage (42). Note: Make sure the two Weight Stops (43) are sitting on the bench with Spring Clips (45, not shown). 43 WARNING: Do not place more... than 110 pounds on the weight tube before sliding the weights in the Front Leg. Tighten the Small Threaded...
... 23 42 19 8 38 37 48 USING THE BARBELL HOOKS To change weights while your back to the lat tower, make sure there is on the Weight Carriage (42). Note: Make sure the two Weight Stops (43) are sitting on the bench with Spring Clips (45, not shown). 43 WARNING: Do not place more... than 110 pounds on the weight tube before sliding the weights in the Front Leg. Tighten the Small Threaded...
English Manual
Page 16
... under normal use , costs of removal, installation or other warranty beyond that specifically set forth herein. The MODEL NUMBER of the product (WEIDER¨ PRO 136 Weight Bench). 3. All returns must be prepared to the terms set forth above is a registered trademark of ICON Health & Fitness, Inc. The ... in China © 1999 ICON Health & Fitness, Inc. ICON HEALTH & FITNESS, INC., 1500 S. 1000 W., LOGAN, UT 84321-9813 WEIDER is authorized by an ICON authorized service center, products used as store display models. The SERIAL NUMBER of the product (see the PART LIST ...
... under normal use , costs of removal, installation or other warranty beyond that specifically set forth herein. The MODEL NUMBER of the product (WEIDER¨ PRO 136 Weight Bench). 3. All returns must be prepared to the terms set forth above is a registered trademark of ICON Health & Fitness, Inc. The ... in China © 1999 ICON Health & Fitness, Inc. ICON HEALTH & FITNESS, INC., 1500 S. 1000 W., LOGAN, UT 84321-9813 WEIDER is authorized by an ICON authorized service center, products used as store display models. The SERIAL NUMBER of the product (see the PART LIST ...


