
English Manual
Page 1
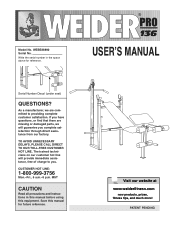
...;S MANUAL Serial Number Decal (under seat) QUESTIONS? MST CAUTION Read all precautions and instructions in the space above for future reference. PATENT PENDING The trained technicians on our customer hot line will guarantee you . Write the serial number in this manual before using this manual for reference. If you have questions, or find that there are committed to you complete satisfaction through direct...
...;S MANUAL Serial Number Decal (under seat) QUESTIONS? MST CAUTION Read all precautions and instructions in the space above for future reference. PATENT PENDING The trained technicians on our customer hot line will guarantee you . Write the serial number in this manual before using this manual for reference. If you have questions, or find that there are committed to you complete satisfaction through direct...
English Manual
Page 2
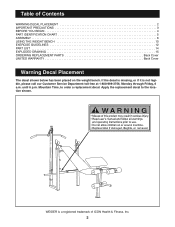
... Customer Service Department toll-free at 1-800-999-3756, Monday through Friday, 6 a.m. until 6 p.m. Mountain Time, to the location shown. If the decal is missing, or if it is a registered trademark of Contents WARNING DECAL PLACEMENT 2 IMPORTANT PRECAUTIONS 3 BEFORE YOU BEGIN 4 PART IDENTIFICATION CHART 5 ASSEMBLY 6 USING THE WEIGHT BENCH 10 EXERCISE GUIDELINES 12 PART LIST 14 EXPLODED DRAWING 15 ORDERING REPLACEMENT PARTS Back Cover LIMITED WARRANTY Back Cover Warning...
... Customer Service Department toll-free at 1-800-999-3756, Monday through Friday, 6 a.m. until 6 p.m. Mountain Time, to the location shown. If the decal is missing, or if it is a registered trademark of Contents WARNING DECAL PLACEMENT 2 IMPORTANT PRECAUTIONS 3 BEFORE YOU BEGIN 4 PART IDENTIFICATION CHART 5 ASSEMBLY 6 USING THE WEIGHT BENCH 10 EXERCISE GUIDELINES 12 PART LIST 14 EXPLODED DRAWING 15 ORDERING REPLACEMENT PARTS Back Cover LIMITED WARRANTY Back Cover Warning...
English Manual
Page 3
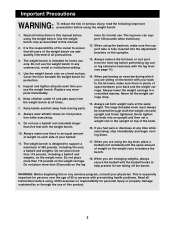
.... When you use . Always set a weight rest in any worn parts immediately. 6. Always lower the weight carriage in this or any time while exercising, stop immediately and begin cooling down. 17. Use the weight bench only on the weight rests to balance the bench. 18. The leg lever can support 100 pounds when stationary. 12. WARNING: Before beginning this manual. 2. Never tighten the knob into the adjustment brackets on...
.... When you use . Always set a weight rest in any worn parts immediately. 6. Always lower the weight carriage in this or any time while exercising, stop immediately and begin cooling down. 17. Use the weight bench only on the weight rests to balance the bench. 18. The leg lever can support 100 pounds when stationary. 12. WARNING: Before beginning this manual. 2. Never tighten the knob into the adjustment brackets on...
English Manual
Page 4
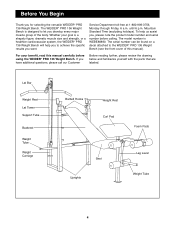
... cover of the body. until 6 p.m. Lat Bar Weight Rest Lat Tower Support Tube Backrest Weight Tube Weight Carriage Barbell Hooks Weight Rest Curl Pad Foam Pads Seat Uprights Leg Lever Weight Tube 4 The WEIDER¨ PRO 136 Weight Bench is WEBE88890. The model number is designed to let you have additional questions, please call our Customer Before reading further, please review the drawing below and familiarize yourself with the parts that are labeled. Service...
... cover of the body. until 6 p.m. Lat Bar Weight Rest Lat Tower Support Tube Backrest Weight Tube Weight Carriage Barbell Hooks Weight Rest Curl Pad Foam Pads Seat Uprights Leg Lever Weight Tube 4 The WEIDER¨ PRO 136 Weight Bench is WEBE88890. The model number is designed to let you have additional questions, please call our Customer Before reading further, please review the drawing below and familiarize yourself with the parts that are labeled. Service...
English Manual
Page 5
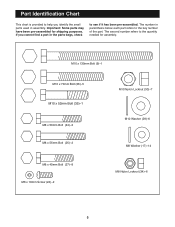
... Locknut (34)Ð6 5 Important: Some parts may have been pre-assembled for assembly. The second number refers to the key number of the part. If you cannot find a part in the parts bags, check to help you identify the small parts used in parenthesis below each part refers to the quantity needed for shipping purposes. Part Identification Chart This chart is provided to see if it...
... Locknut (34)Ð6 5 Important: Some parts may have been pre-assembled for assembly. The second number refers to the key number of the part. If you cannot find a part in the parts bags, check to help you identify the small parts used in parenthesis below each part refers to the quantity needed for shipping purposes. Part Identification Chart This chart is provided to see if it...
English Manual
Page 6
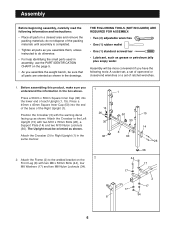
...) with two M10 x 70mm Bolts (26), a Support Plate (14) and two M10 Nylon Locknuts (30). Assembly will be more convenient if you assemble the weight bench, be oriented as shown. Press a 45mm x 45mm Square Inner Cap (50) into the lower end of each Upright (1, 15). Attach the Crossbar to Right Upright (1) in assembly, use the PART IDENTIFICATION CHART on the Front Leg (8) with the warning decal...
...) with two M10 x 70mm Bolts (26), a Support Plate (14) and two M10 Nylon Locknuts (30). Assembly will be more convenient if you assemble the weight bench, be oriented as shown. Press a 45mm x 45mm Square Inner Cap (50) into the lower end of each Upright (1, 15). Attach the Crossbar to Right Upright (1) in assembly, use the PART IDENTIFICATION CHART on the Front Leg (8) with the warning decal...
English Manual
Page 7
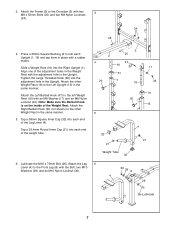
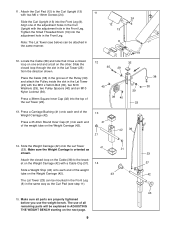
... Weight Tube 32 4 21 6. Attach the other Weight Rest in the Upright. Lubricate the M10 x 70mm Bolt (26). Attach the Left Barbell Hook (47) to the Left Upright (15) in the same manner. Tap a 25.4mm Round Inner Cap (21) into each end of the Leg Lever (4). Align one of the Weight Rest. 3. Tighten the Large Threaded Knob (20) into the Right Upright (1). Attach...
... Weight Tube 32 4 21 6. Attach the other Weight Rest in the Upright. Lubricate the M10 x 70mm Bolt (26). Attach the Left Barbell Hook (47) to the Left Upright (15) in the same manner. Tap a 25.4mm Round Inner Cap (21) into each end of the Leg Lever (4). Align one of the Weight Rest. 3. Tighten the Large Threaded Knob (20) into the Right Upright (1). Attach...
English Manual
Page 8
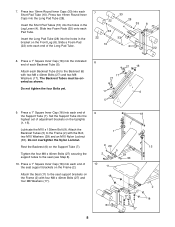
... Pad Tube (28). Lubricate the M10 x 130mm Bolt (9). Attach the Seat (11) to the Backrest (6) with four M8 x 40mm Bolts (27) and four M8 Washers (17). 9 18 7 1 9 29 15 5 2 29 30 10 11 18 17 17 2 18 27 8 Attach each Backrest Tube (5) to the seat support brackets on the Frame...). Attach the Backrest Tubes (5) to the seat (see Step 8). 10. Tighten the four M8 x 40mm Bolts (27) securing the support tubes to the Frame (2) with the Bolt, two M10 Washers (29) and an M10 Nylon Locknut (30). Press two 19mm Round Inner Caps into the holes in the Leg Lever (4). Press a...
... Pad Tube (28). Lubricate the M10 x 130mm Bolt (9). Attach the Seat (11) to the Backrest (6) with four M8 x 40mm Bolts (27) and four M8 Washers (17). 9 18 7 1 9 29 15 5 2 29 30 10 11 18 17 17 2 18 27 8 Attach each Backrest Tube (5) to the seat support brackets on the Frame...). Attach the Backrest Tubes (5) to the seat (see Step 8). 10. Tighten the four M8 x 40mm Bolts (27) securing the support tubes to the Frame (2) with the Bolt, two M10 Washers (29) and an M10 Nylon Locknut (30). Press two 19mm Round Inner Caps into the holes in the Leg Lever (4). Press a...
English Manual
Page 9
... Front Leg (8). Tighten the Small Threaded Knob (19) into the top of the Pulley (39) and attach the Pulley inside the slot in the Lat Tower (23) with the adjustment hole in the same manner. 12. Locate the Cable (38) and note that it has a closed loop on the Cable (38) to the Curl Upright (13) with a Cable Clip (37). 14 37 Slide a Weight Stop...
... Front Leg (8). Tighten the Small Threaded Knob (19) into the top of the Pulley (39) and attach the Pulley inside the slot in the Lat Tower (23) with the adjustment hole in the same manner. 12. Locate the Cable (38) and note that it has a closed loop on the Cable (38) to the Curl Upright (13) with a Cable Clip (37). 14 37 Slide a Weight Stop...

English Manual
Page 10
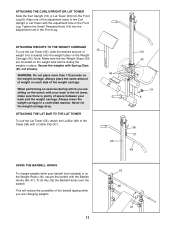
... upright on the Support Tube. WARNING: Always set (not included). Refer also to the desired height. ATTACHING WEIGHTS TO THE LEG LEVER Note: Remove the Curl Upright or Lat Tower before using the Leg lever (see the correct form for important exercise information, and refer to the accompanying exercise poster to see the next page). See EXERCISE GUIDELINES on page 12 for each time you use the weight bench...
... upright on the Support Tube. WARNING: Always set (not included). Refer also to the desired height. ATTACHING WEIGHTS TO THE LEG LEVER Note: Remove the Curl Upright or Lat Tower before using the Leg lever (see the correct form for important exercise information, and refer to the accompanying exercise poster to see the next page). See EXERCISE GUIDELINES on page 12 for each time you use the weight bench...
English Manual
Page 11
... amount of space between your back to the Cable (38) with the adjustment hole in the Front Leg. Never let the weight carriage drop. Tighten the Small Threaded Knob (19) into the Front Leg (8). Note: Make sure the two Weight Stops (43) are mounted on the bench with your back and the weight carriage. ATTACHING THE LAT BAR TO THE LAT TOWER To use the Lat Tower (23...
... amount of space between your back to the Cable (38) with the adjustment hole in the Front Leg. Never let the weight carriage drop. Tighten the Small Threaded Knob (19) into the Front Leg (8). Note: Make sure the two Weight Stops (43) are mounted on the bench with your back and the weight carriage. ATTACHING THE LAT BAR TO THE LAT TOWER To use the Lat Tower (23...
English Manual
Page 12
... weight and increase the number of repetitions in each set . Exercise for 20 to 30 minutes, resting for a maximum of 30 seconds between sets. ¥ Cross Training In the pursuit of a complete and well-balanced fitness program, many sets of repetitions in each repetition should be followed by using high amounts of weight. ¥ Weight Loss To lose weight, use a low amount of weight and increase the number...
... weight and increase the number of repetitions in each set . Exercise for 20 to 30 minutes, resting for a maximum of 30 seconds between sets. ¥ Cross Training In the pursuit of a complete and well-balanced fitness program, many sets of repetitions in each repetition should be followed by using high amounts of weight. ¥ Weight Loss To lose weight, use a low amount of weight and increase the number...
English Manual
Page 13
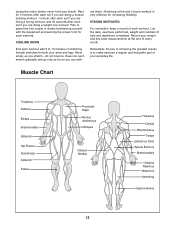
... workout. List the date, exercises performed, weight and numbers of each stretch gradually and go only as far as you are doing a muscle building workout, 1 minute after each set if you stretchÑdo not bounce. during the return stroke; Plan to spend the first couple of weeks familiarizing yourself with the equipment and learning the proper form...
... workout. List the date, exercises performed, weight and numbers of each stretch gradually and go only as far as you are doing a muscle building workout, 1 minute after each set if you stretchÑdo not bounce. during the return stroke; Plan to spend the first couple of weeks familiarizing yourself with the equipment and learning the proper form...
English Manual
Page 14
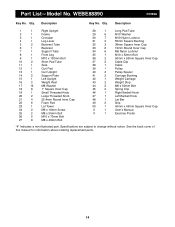
... 1 Weight Carriage 43 2 Weight Stop 44 2 M8 x 50mm Bolt 45 2 Spring Clip 46 1 Right Barbell Hook 47 1 Left Barbell Hook 48 1 Lat Bar 49 2 Grip 50 1 45mm x 45mm Square Inner Cap # 1 UserÕs Manual # 1 Exercise Poster Ò#Ó Indicates a non-illustrated part. Specifications are subject to change without notice. See the back cover of this manual for information about ordering replacement parts. 14 Part ListÑModel No. WEBE88890 R1099A Key...
... 1 Weight Carriage 43 2 Weight Stop 44 2 M8 x 50mm Bolt 45 2 Spring Clip 46 1 Right Barbell Hook 47 1 Left Barbell Hook 48 1 Lat Bar 49 2 Grip 50 1 45mm x 45mm Square Inner Cap # 1 UserÕs Manual # 1 Exercise Poster Ò#Ó Indicates a non-illustrated part. Specifications are subject to change without notice. See the back cover of this manual for information about ordering replacement parts. 14 Part ListÑModel No. WEBE88890 R1099A Key...
English Manual
Page 15
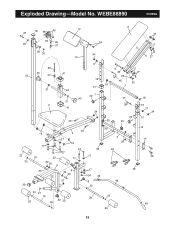
WEBE88890 R1099A 32 40 12 35 6 18 39 38 29 37 29 30 24 34 13 17 5 5 27 23 22 33 32 38 43 37 21 11 41 42 43 21 41 25 17 16 31 20 1 34 9 29 29 17 27 46 30 18 7 47 18 16 17 34 20 31 30 50 25 18 2 17 18 17 44 27 10 22 17 30 29 4 33 22 8 29 26 21 36 17 17 34 49 19 33 30 3 30 45 48 15 14 26 36 33 21 10 33 28 22 33 32 22 49 22 15 Exploded DrawingÑModel No.
WEBE88890 R1099A 32 40 12 35 6 18 39 38 29 37 29 30 24 34 13 17 5 5 27 23 22 33 32 38 43 37 21 11 41 42 43 21 41 25 17 16 31 20 1 34 9 29 29 17 27 46 30 18 7 47 18 16 17 34 20 31 30 50 25 18 2 17 18 17 44 27 10 22 17 30 29 4 33 22 8 29 26 21 36 17 17 34 49 19 33 30 3 30 45 48 15 14 26 36 33 21 10 33 28 22 33 32 22 49 22 15 Exploded DrawingÑModel No.
English Manual
Page 16
...-authorized by ICON. Limited Warranty ICON Health & Fitness, Inc. (ICON), warrants this manual). 4. The warranty extended hereunder is limited to you specific legal rights. This warranty gives you . The MODEL NUMBER of the product (WEBE88890). 2. The SERIAL NUMBER of the product (see the PART LIST and the EXPLODED DRAWING at one of its authorized service centers with respect to freight damage, abuse, misuse, improper or abnormal usage or repairs not...
...-authorized by ICON. Limited Warranty ICON Health & Fitness, Inc. (ICON), warrants this manual). 4. The warranty extended hereunder is limited to you specific legal rights. This warranty gives you . The MODEL NUMBER of the product (WEBE88890). 2. The SERIAL NUMBER of the product (see the PART LIST and the EXPLODED DRAWING at one of its authorized service centers with respect to freight damage, abuse, misuse, improper or abnormal usage or repairs not...


