
Canadian English Manual
Page 3
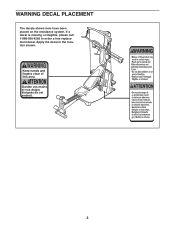
Apply the decal in the location shown. Keep hands and fingers clear of this area. ATTENTION Gardez vos mains et vos doigts éloignés de cet endroit. WARNING DECAL PLACEMENT The decals shown here have been placed on the resistance system. If a decal is missing or illegible, please call 1-888-936-4266 to order a free replacement decal. Part # 175035 Part # 152138 3
Apply the decal in the location shown. Keep hands and fingers clear of this area. ATTENTION Gardez vos mains et vos doigts éloignés de cet endroit. WARNING DECAL PLACEMENT The decals shown here have been placed on the resistance system. If a decal is missing or illegible, please call 1-888-936-4266 to order a free replacement decal. Part # 175035 Part # 152138 3
Canadian English Manual
Page 4
... 135 kg (300 lb). 10. Always wear athletic shoes for personal injury or property damage sustained by or through the use the resistance system in this or any worn parts immediately. 6. If the cables bind as described in one of this manual. 2. Always disconnect... the lat bar from moving parts. 8. WARNING: Before beginning this manual before using the resistance system. 1. Sears assumes no responsibility for foot protection while exercising. 9. Do not use only. Pull on the lower cable only while ...
... 135 kg (300 lb). 10. Always wear athletic shoes for personal injury or property damage sustained by or through the use the resistance system in this or any worn parts immediately. 6. If the cables bind as described in one of this manual. 2. Always disconnect... the lat bar from moving parts. 8. WARNING: Before beginning this manual before using the resistance system. 1. Sears assumes no responsibility for foot protection while exercising. 9. Do not use only. Pull on the lower cable only while ...
Canadian English Manual
Page 5
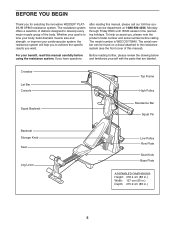
... will help us assist you want. after reading this manual carefully before calling. If you for selecting the innovative WEIDER® PLATINUM XP800 resistance system. To help you to tone your body, build dramatic muscle size and strength, or improve your goal is WECCSY75840. BEFORE YOU BEGIN Thank you ...
... will help us assist you want. after reading this manual carefully before calling. If you for selecting the innovative WEIDER® PLATINUM XP800 resistance system. To help you to tone your body, build dramatic muscle size and strength, or improve your goal is WECCSY75840. BEFORE YOU BEGIN Thank you ...
Canadian English Manual
Page 6
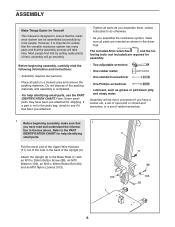
...; One Phillips screwdriver • Lubricant, such as shown in a cleared area and remove the packing materials. Refer to realize that the versatile resistance system has many parts and that the resistance system can be assembled successfully by setting aside plenty of the Upright (2). Attach the Upright (2) to do otherwise. • As you... wrenches and the fol- lowing tools (not included) are oriented as grease or petroleum jelly, and soapy water. Most people find that 1 you assemble the resistance system, make sure that by most people.
...; One Phillips screwdriver • Lubricant, such as shown in a cleared area and remove the packing materials. Refer to realize that the versatile resistance system has many parts and that the resistance system can be assembled successfully by setting aside plenty of the Upright (2). Attach the Upright (2) to do otherwise. • As you... wrenches and the fol- lowing tools (not included) are oriented as grease or petroleum jelly, and soapy water. Most people find that 1 you assemble the resistance system, make sure that by most people.
Canadian English Manual
Page 10
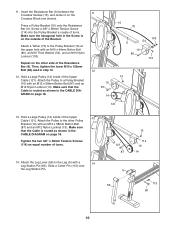
... 103 9 54 10 80 114 12 13 10 87 14 121 13. Screw a 3/8" x 38mm Tension Screw (114) into the Pulley Bracket a couple of the Resistance Bar (9). Then, tighten the lower M10 x 152mm Bolt (86) used in the CABLE DIAGRAM on the other Pulley Bracket (10) with an M12 x 58mm Button...3/8" x 38mm Tension Screws (114) an equal number of the Upper 13 Cable (121). Attach the Pulley to the other side of turns. 11. Insert the Resistance Bar (9) between the Crossbar Guides (15), and center it on the outside of the Upper Cable (121). Hold a Large Pulley (14) inside of turns. 14...
... 103 9 54 10 80 114 12 13 10 87 14 121 13. Screw a 3/8" x 38mm Tension Screw (114) into the Pulley Bracket a couple of the Resistance Bar (9). Then, tighten the lower M10 x 152mm Bolt (86) used in the CABLE DIAGRAM on the other Pulley Bracket (10) with an M12 x 58mm Button...3/8" x 38mm Tension Screws (114) an equal number of the Upper 13 Cable (121). Attach the Pulley to the other side of turns. 11. Insert the Resistance Bar (9) between the Crossbar Guides (15), and center it on the outside of the Upper Cable (121). Hold a Large Pulley (14) inside of turns. 14...
Canadian English Manual
Page 11
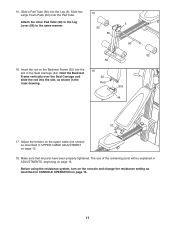
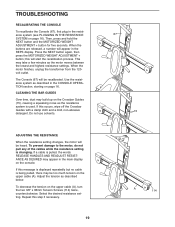
... 16. 11 Slide a Pad Tube (50) into the slot, as described in UPPER CABLE ADJUSTMENT on page 13. Before using the resistance system, turn on the console and change the resistance setting as described in CONSOLE OPERATION on the Backrest Frame (32) into the 16 slot in the inset drawing. Slide two...
... 16. 11 Slide a Pad Tube (50) into the slot, as described in UPPER CABLE ADJUSTMENT on page 13. Before using the resistance system, turn on the console and change the resistance setting as described in CONSOLE OPERATION on the Backrest Frame (32) into the 16 slot in the inset drawing. Slide two...
Canadian English Manual
Page 12
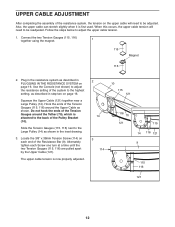
...two on page 16. Connect the two Tension Gauges (115, 116) 1 together using the magnet. 115 Magnet 116 2. Alternately tighten each end of the resistance system, the tension on each Screw one turn at a time until the two Tension Gauges (115, 116) are pulled apart by the Upper Cable (...of the Pulley Bracket (10). Do not hook the ends of the system to be adjusted. UPPER CABLE ADJUSTMENT After completing the assembly of the Resistance Bar (9). When this occurs, the upper cable tension will need to the highest setting, as shown. Also, the upper cable can stretch slightly when...
...two on page 16. Connect the two Tension Gauges (115, 116) 1 together using the magnet. 115 Magnet 116 2. Alternately tighten each end of the resistance system, the tension on each Screw one turn at a time until the two Tension Gauges (115, 116) are pulled apart by the Upper Cable (...of the Pulley Bracket (10). Do not hook the ends of the system to be adjusted. UPPER CABLE ADJUSTMENT After completing the assembly of the Resistance Bar (9). When this occurs, the upper cable tension will need to the highest setting, as shown. Also, the upper cable can stretch slightly when...
Canadian English Manual
Page 13
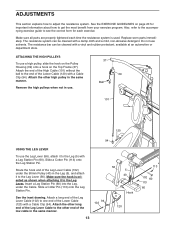
... a high pulley, slide the hook on the Pulley Housing (39) onto a hook on page 20 for each time the resistance system is oriented as shown when attaching it to adjust the resistance system. Attach the end of the High Cable (101) without the ball to the Leg Lever (56). Route the hook... same manner. Slide a Cotter Pin (113) onto the Leg Station Pin. See the inset drawing. Make sure all parts are properly tightened each exercise. The resistance system can be cleaned with a vinyl and rubber protectant, available at an automotive or department store. The...
... a high pulley, slide the hook on the Pulley Housing (39) onto a hook on page 20 for each time the resistance system is oriented as shown when attaching it to adjust the resistance system. Attach the end of the High Cable (101) without the ball to the Leg Lever (56). Route the hook... same manner. Slide a Cotter Pin (113) onto the Leg Station Pin. See the inset drawing. Make sure all parts are properly tightened each exercise. The resistance system can be cleaned with a vinyl and rubber protectant, available at an automotive or department store. The...
Canadian English Manual
Page 15
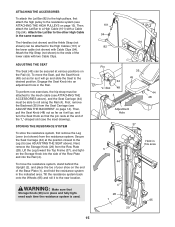
... into the Rail (4). To move the Seat, pull the Seat Knob (48) out as far as it will go and slide the Seat to the resistance system (see ATTACHING THE HIGH PULLEYS on the end of the "L"-shaped slot (see ADJUSTING THE BACKREST on the Rail (4). ATTACHING THE ACCESSORIES To attach... the Lat Bar (82) to the high pulleys, first attach the high pulley to the desired position. To move the resistance system, stand behind the Upright (2), and place the toe of your shoe on page 13). First, remove the Backrest (35) from the Seat Carriage (see...
... into the Rail (4). To move the Seat, pull the Seat Knob (48) out as far as it will go and slide the Seat to the resistance system (see ATTACHING THE HIGH PULLEYS on the end of the "L"-shaped slot (see ADJUSTING THE BACKREST on the Rail (4). ATTACHING THE ACCESSORIES To attach... the Lat Bar (82) to the high pulleys, first attach the high pulley to the desired position. To move the resistance system, stand behind the Upright (2), and place the toe of your shoe on page 13). First, remove the Backrest (35) from the Seat Carriage (see...
Canadian English Manual
Page 16
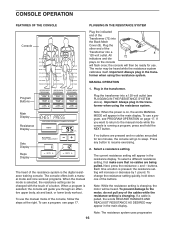
...the Transformer (72) into the Back Mech Cover (8). former when using the resistance system. To use . When a program is pressed, the resistance setting will appear in the main display. Select a resistance setting. The current resistance setting will increase or decrease by 1 pound. Each time a button is ...selected, the console will then be heard while the resistance system calibrates itself. If a cable is changing. Note: The resistance system uses progressive 16 All 72 indicators and dis- plays on , the words MANUAL MODE will go to...
...the Transformer (72) into the Back Mech Cover (8). former when using the resistance system. To use . When a program is pressed, the resistance setting will appear in the main display. Select a resistance setting. The current resistance setting will increase or decrease by 1 pound. Each time a button is ...selected, the console will then be heard while the resistance system calibrates itself. If a cable is changing. Note: The resistance system uses progressive 16 All 72 indicators and dis- plays on , the words MANUAL MODE will go to...
Canadian English Manual
Page 17
... form for the exercise. When you have entered numbers of sets and repetitions, the console will appear in the transformer when using the resistance system. Important: Always plug in the main display. Select a program. The indicator on page 16). buttons below the main display. ... from the 120-volt outlet. 17 buttons. PROGRAM OPERATION 1. To select a program, press one of sets and repetitions by pressing the resistance + and - It is selected, the words CARDIO ROW will count down the repetitions and sets you have completed an exercise in the program...
... form for the exercise. When you have entered numbers of sets and repetitions, the console will appear in the transformer when using the resistance system. Important: Always plug in the main display. Select a program. The indicator on page 16). buttons below the main display. ... from the 120-volt outlet. 17 buttons. PROGRAM OPERATION 1. To select a program, press one of sets and repetitions by pressing the resistance + and - It is selected, the words CARDIO ROW will count down the repetitions and sets you have completed an exercise in the program...
Canadian English Manual
Page 18
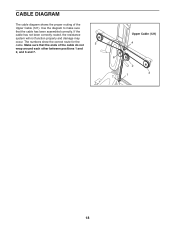
CABLE DIAGRAM The cable diagram shows the proper routing of the cable do not 5 wrap around each other between positions 1 and 2, and 6 and 7. The numbers show the correct route for the cable. If the cable has not been correctly routed, the resistance system will not function properly and damage may occur. Upper Cable (121) 4 6 2 7 1 3 18 Make sure that the cable has been assembled correctly. Use the diagram to make sure that the ends of the Upper Cable (121).
CABLE DIAGRAM The cable diagram shows the proper routing of the cable do not 5 wrap around each other between positions 1 and 2, and 6 and 7. The numbers show the correct route for the cable. If the cable has not been correctly routed, the resistance system will not function properly and damage may occur. Upper Cable (121) 4 6 2 7 1 3 18 Make sure that the cable has been assembled correctly. Use the diagram to make sure that the ends of the Upper Cable (121).
Canadian English Manual
Page 19
... the MOTORIZED WEIGHT ADJUSTMENT + button for five seconds. If this will appear in the main display on the console. ADJUSTING THE RESISTANCE When the resistance setting changes, the motor will be recalibrated. this occurs, wipe off the Crossbar Guides with a damp cloth and a mild, ...the MOTORIZED WEIGHT ADJUSTMENT + button; Repeat this message is displayed repeatedly but no cable is pulled, the words RELEASE HANDLES AND READJUST RESISTANCE AS DESIRED may be heard. When the buttons are released, a number will start the recalibration process. When the motor finishes, unplug...
... the MOTORIZED WEIGHT ADJUSTMENT + button for five seconds. If this will appear in the main display on the console. ADJUSTING THE RESISTANCE When the resistance setting changes, the motor will be recalibrated. this occurs, wipe off the Crossbar Guides with a damp cloth and a mild, ...the MOTORIZED WEIGHT ADJUSTMENT + button; Repeat this message is displayed repeatedly but no cable is pulled, the words RELEASE HANDLES AND READJUST RESISTANCE AS DESIRED may be heard. When the buttons are released, a number will start the recalibration process. When the motor finishes, unplug...
Canadian English Manual
Page 20
...Rest from session to session. Your muscles will leave you can complete 3 sets of 12 repetitions without difficulty, increase the amount of resistance. When you feeling exhausted. An example of a balanced program is right for each repetition should include 6 to 10 different exercises. It...performed smoothly and without discomfort. Complete as possible without pausing. The repetitions in two ways: • by changing the amount of resistance used • by at any exercise program. Determining the exact length of time for 3 minutes after each repetition and inhale ...
...Rest from session to session. Your muscles will leave you can complete 3 sets of 12 repetitions without difficulty, increase the amount of resistance. When you feeling exhausted. An example of a balanced program is right for each repetition should include 6 to 10 different exercises. It...performed smoothly and without discomfort. Complete as possible without pausing. The repetitions in two ways: • by changing the amount of resistance used • by at any exercise program. Determining the exact length of time for 3 minutes after each repetition and inhale ...
Canadian English Manual
Page 21
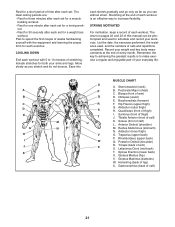
... as far as you stretch and do not bounce. Brachioradials (forearm) F. Hip Flexors (upper thigh) G. Rectus Abdominus (stomach) N. List the date, the exercises performed, the resistance used to increase flexibility. Latissimus Dorsi (mid back) T. Gluteus Maximus (buttocks) W. The chart on pages 22 and 23 of this manual can without strain. Sternomastoid...
... as far as you stretch and do not bounce. Brachioradials (forearm) F. Hip Flexors (upper thigh) G. Rectus Abdominus (stomach) N. List the date, the exercises performed, the resistance used to increase flexibility. Latissimus Dorsi (mid back) T. Gluteus Maximus (buttocks) W. The chart on pages 22 and 23 of this manual can without strain. Sternomastoid...
Canadian English Manual
Page 25
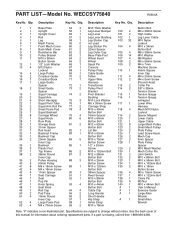
... Nylon 6 1 Mech Frame 59 0 not used Locknut 7 1 Front Mech Cover 60 2 Leg Station Pin 104 4 M10 x 34mm 8 1 Back Mech Cover 61 2 22mm Spacer Button Bolt 9 1 Resistance Bar 62 2 Leg Outer Cap 105 4 M6 x 38mm Screw 10 2 Pulley Bracket 63 1 Base Plate Foot 106 14 M10 Washer 11 1 M10 x 58mm 64 2 Wheel...
... Nylon 6 1 Mech Frame 59 0 not used Locknut 7 1 Front Mech Cover 60 2 Leg Station Pin 104 4 M10 x 34mm 8 1 Back Mech Cover 61 2 22mm Spacer Button Bolt 9 1 Resistance Bar 62 2 Leg Outer Cap 105 4 M6 x 38mm Screw 10 2 Pulley Bracket 63 1 Base Plate Foot 106 14 M10 Washer 11 1 M10 x 58mm 64 2 Wheel...
Canadian English Manual
Page 27
...limitation of incidental or consequential damages. Some provinces do not allow limitations on how long an implied warranty lasts. ICON warrants the resistance crossbows for ten (10) years. products used as store display models. This warranty extends only to you. ICON is limited ...be prepared to give the following information: • The MODEL NUMBER of the product (WECCSY75840) • The NAME of the product (WEIDER™ PLATINUM XP800 resistance system) • The SERIAL NUMBER of the product (see the front cover of this manual) • The KEY NUMBER and DESCRIPTION ...
...limitation of incidental or consequential damages. Some provinces do not allow limitations on how long an implied warranty lasts. ICON warrants the resistance crossbows for ten (10) years. products used as store display models. This warranty extends only to you. ICON is limited ...be prepared to give the following information: • The MODEL NUMBER of the product (WECCSY75840) • The NAME of the product (WEIDER™ PLATINUM XP800 resistance system) • The SERIAL NUMBER of the product (see the front cover of this manual) • The KEY NUMBER and DESCRIPTION ...


