
Canadian English Manual
Page 3
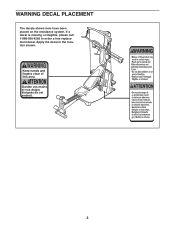
If a decal is missing or illegible, please call 1-888-936-4266 to order a free replacement decal. ATTENTION Gardez vos mains et vos doigts éloignés de cet endroit. Part # 175035 Part # 152138 3 Apply the decal in the location shown. WARNING DECAL PLACEMENT The decals shown here have been placed on the resistance system. Keep hands and fingers clear of this area.
If a decal is missing or illegible, please call 1-888-936-4266 to order a free replacement decal. ATTENTION Gardez vos mains et vos doigts éloignés de cet endroit. Part # 175035 Part # 152138 3 Apply the decal in the location shown. WARNING DECAL PLACEMENT The decals shown here have been placed on the resistance system. Keep hands and fingers clear of this area.
Canadian English Manual
Page 4
... shoes for home use of this manual. 2. Pull on the lower cable only while sitting on the bench or standing on the cables while the resistance level is being adjusted. 17. Do not pull on the base plate. Always disconnect the lat bar from moving parts. 8. Make sure that all users...one of the three positions closest to be used . Sears assumes no responsibility for persons over the age of 35 or persons with the included resistance. Keep hands and feet away from the high cables when performing an exercise that the cables remain on the base plate. 11. Pull on the...
... shoes for home use of this manual. 2. Pull on the lower cable only while sitting on the bench or standing on the cables while the resistance level is being adjusted. 17. Do not pull on the base plate. Always disconnect the lat bar from moving parts. 8. Make sure that all users...one of the three positions closest to be used . Sears assumes no responsibility for persons over the age of 35 or persons with the included resistance. Keep hands and feet away from the high cables when performing an exercise that the cables remain on the base plate. 11. Pull on the...
Canadian English Manual
Page 5
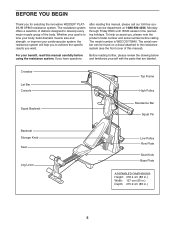
... designed to achieve the specific results you for selecting the innovative WEIDER® PLATINUM XP800 resistance system. To help you to develop every major muscle group of this manual). For your cardiovascular system, the resistance system will help us assist you have questions Before reading further,... drawing below and familiarize yourself with the parts that are labeled. Crossbar Lat Bar Console Top Frame High Pulley Squat Backrest Resistance Bar Squat Pin Backrest Storage Knob Seat Leg Lever Low Pulley Row Plate Seat Knob Base Plate ASSEMBLED DIMENSIONS: Height: 218...
... designed to achieve the specific results you for selecting the innovative WEIDER® PLATINUM XP800 resistance system. To help you to develop every major muscle group of this manual). For your cardiovascular system, the resistance system will help us assist you have questions Before reading further,... drawing below and familiarize yourself with the parts that are labeled. Crossbar Lat Bar Console Top Frame High Pulley Squat Backrest Resistance Bar Squat Pin Backrest Storage Knob Seat Leg Lever Low Pulley Row Plate Seat Knob Base Plate ASSEMBLED DIMENSIONS: Height: 218...
Canadian English Manual
Page 6
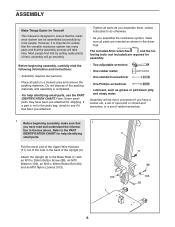
... parts in the parts bag, check to see if it is important to realize that the versatile resistance system has many parts and that the resistance system can be more convenient if you assemble the resistance system, make sure that by most people. Refer to the PART IDENTIFICATION CHART for help identifying small...
... parts in the parts bag, check to see if it is important to realize that the versatile resistance system has many parts and that the resistance system can be more convenient if you assemble the resistance system, make sure that by most people. Refer to the PART IDENTIFICATION CHART for help identifying small...
Canadian English Manual
Page 10
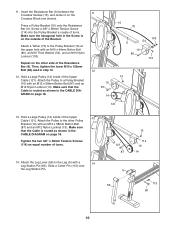
...). Slide a Cotter Pin (113) onto the Leg Station Pin. 121 87 13 114 10 14 5 56 113 60 10 Press a Pulley Bracket (10) onto the Resistance Bar (9). Hold a Large Pulley (14) inside of the Upper Cable (121). Make sure the hexagonal hole in the Screw is routed as shown in the... to the other side of the Bracket. Make sure that the Cable is on the outside of the Resistance Bar (9). 11. Hold a Large Pulley (14) inside of the Upper 13 Cable (121). Insert the Resistance Bar (9) between the Crossbar Guides (15), and center it on page 18. 11 15 70 103 9 54...
...). Slide a Cotter Pin (113) onto the Leg Station Pin. 121 87 13 114 10 14 5 56 113 60 10 Press a Pulley Bracket (10) onto the Resistance Bar (9). Hold a Large Pulley (14) inside of the Upper Cable (121). Make sure the hexagonal hole in the Screw is routed as shown in the... to the other side of the Bracket. Make sure that the Cable is on the outside of the Resistance Bar (9). 11. Hold a Large Pulley (14) inside of the Upper 13 Cable (121). Insert the Resistance Bar (9) between the Crossbar Guides (15), and center it on page 18. 11 15 70 103 9 54...
Canadian English Manual
Page 11
... Carriage and 32 slide the rod into the slot, as described in CONSOLE OPERATION on the console and change the resistance setting as shown in the Seat Carriage (44). Before using the resistance system, turn on page 16. 11 Adjust the tension on the upper cable (not shown) as described in the...
... Carriage and 32 slide the rod into the slot, as described in CONSOLE OPERATION on the console and change the resistance setting as shown in the Seat Carriage (44). Before using the resistance system, turn on page 16. 11 Adjust the tension on the upper cable (not shown) as described in the...
Canadian English Manual
Page 12
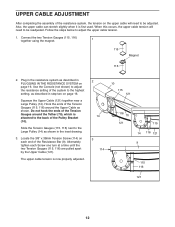
...Connect the two Tension Gauges (115, 116) 1 together using the magnet. 115 Magnet 116 2. Use the Console (not shown) to adjust the resistance setting of the Tension Gauges (115, 116) around the Tether (70), which is now properly adjusted. 2 14 3 114 10 115 121 116 ... together near a Large Pulley (14). Locate the 3/8" x 38mm Tension Screw (114) on page 16. UPPER CABLE ADJUSTMENT After completing the assembly of the resistance system, the tension on the upper cable will need to be readjusted. When this occurs, the upper cable tension will need to be adjusted. Follow...
...Connect the two Tension Gauges (115, 116) 1 together using the magnet. 115 Magnet 116 2. Use the Console (not shown) to adjust the resistance setting of the Tension Gauges (115, 116) around the Tether (70), which is now properly adjusted. 2 14 3 114 10 115 121 116 ... together near a Large Pulley (14). Locate the 3/8" x 38mm Tension Screw (114) on page 16. UPPER CABLE ADJUSTMENT After completing the assembly of the resistance system, the tension on the upper cable will need to be readjusted. When this occurs, the upper cable tension will need to be adjusted. Follow...
Canadian English Manual
Page 13
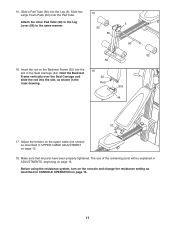
... guide to see the correct form for important information about how to one end of the Lower Cable (120) with a Cable Clip (94). The resistance system can be cleaned with a vinyl and rubber protectant, available at an automotive or department store. Attach a long end of the Leg Lever Cable ...the Cable. See the inset drawing. Replace worn parts immediately. Attach the end of the High Cable (101) without the ball to adjust the resistance system. ADJUSTMENTS This section explains how to the end of the low cable in use. 37 39 Ball 101 120 94 USING THE LEG LEVER...
... guide to see the correct form for important information about how to one end of the Lower Cable (120) with a Cable Clip (94). The resistance system can be cleaned with a vinyl and rubber protectant, available at an automotive or department store. Attach a long end of the Leg Lever Cable ...the Cable. See the inset drawing. Replace worn parts immediately. Attach the end of the High Cable (101) without the ball to adjust the resistance system. ADJUSTMENTS This section explains how to the end of the low cable in use. 37 39 Ball 101 120 94 USING THE LEG LEVER...
Canadian English Manual
Page 15
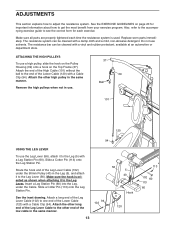
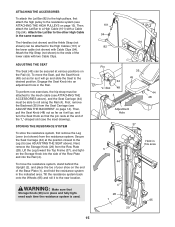
... end of the lower cable with a Cable Clip (94). Attach the Lat Bar to the new location. Next, remove the Storage Knob (29) from the resistance system. To perform row exercises, the hip strap must be attached to the mech cable (see ADJUSTING THE SEAT above ), and the Seat Carriage (44... to roll along the Rail (4). ATTACHING THE ACCESSORIES To attach the Lat Bar (82) to the high pulleys, first attach the high pulley to the resistance system (see ADJUSTING THE BACKREST on page 14). Then, attach the Lat Bar to a High Cable (101) with two Cable Clips. First, remove the Backrest...
... end of the lower cable with a Cable Clip (94). Attach the Lat Bar to the new location. Next, remove the Storage Knob (29) from the resistance system. To perform row exercises, the hip strap must be attached to the mech cable (see ADJUSTING THE SEAT above ), and the Seat Carriage (44... to roll along the Rail (4). ATTACHING THE ACCESSORIES To attach the Lat Bar (82) to the high pulleys, first attach the high pulley to the resistance system (see ADJUSTING THE BACKREST on page 14). Then, attach the Lat Bar to a High Cable (101) with two Cable Clips. First, remove the Backrest...
Canadian English Manual
Page 16
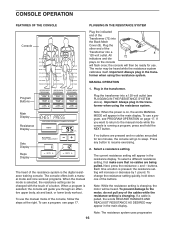
... you want to return to sleep. buttons. the console will increase or decrease by 1 pound. Important: Always plug in the transformer when using the resistance system. Important: Always plug in the trans- If you through an effective upper body, ab and back, or lower body workout. To use . ...To change the resistance setting quickly, hold the NEXT button. If a cable is the digital resistance training console. Press any button to the motor, do not pull any of the console, follow the steps at ...
... you want to return to sleep. buttons. the console will increase or decrease by 1 pound. Important: Always plug in the transformer when using the resistance system. Important: Always plug in the trans- If you through an effective upper body, ab and back, or lower body workout. To use . ...To change the resistance setting quickly, hold the NEXT button. If a cable is the digital resistance training console. Press any button to the motor, do not pull any of the console, follow the steps at ...
Canadian English Manual
Page 17
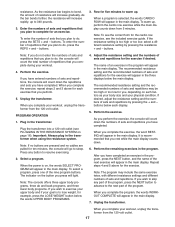
.... Perform the exercise. When you complete the exercise, repeat steps 2 and 3 above for the cardio row exercise, see PLUGGING IN THE RESISTANCE SYSTEM on the button you press will appear in the program will count down the repetitions and sets you perform. 5. Unplug the transformer.... To select a program, press one of sets and repetitions. The recommended resistance setting and the recommended numbers of sets and repetitions for you, depending on , the words SELECT PROGRAM will count down the numbers of ...
.... Perform the exercise. When you complete the exercise, repeat steps 2 and 3 above for the cardio row exercise, see PLUGGING IN THE RESISTANCE SYSTEM on the button you press will appear in the program will count down the repetitions and sets you perform. 5. Unplug the transformer.... To select a program, press one of sets and repetitions. The recommended resistance setting and the recommended numbers of sets and repetitions for you, depending on , the words SELECT PROGRAM will count down the numbers of ...
Canadian English Manual
Page 18
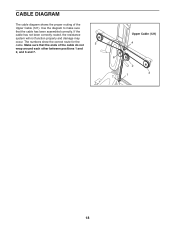
Use the diagram to make sure that the ends of the Upper Cable (121). CABLE DIAGRAM The cable diagram shows the proper routing of the cable do not 5 wrap around each other between positions 1 and 2, and 6 and 7. Make sure that the cable has been assembled correctly. The numbers show the correct route for the cable. Upper Cable (121) 4 6 2 7 1 3 18 If the cable has not been correctly routed, the resistance system will not function properly and damage may occur.
Use the diagram to make sure that the ends of the Upper Cable (121). CABLE DIAGRAM The cable diagram shows the proper routing of the cable do not 5 wrap around each other between positions 1 and 2, and 6 and 7. Make sure that the cable has been assembled correctly. The numbers show the correct route for the cable. Upper Cable (121) 4 6 2 7 1 3 18 If the cable has not been correctly routed, the resistance system will not function properly and damage may occur.
Canadian English Manual
Page 19
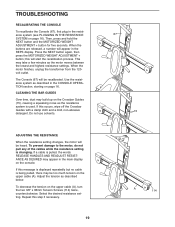
... few minutes as the motor moves between the lowest and highest resistance settings. Select the desired resistance setting. Repeat this will be too much tension on the console. ADJUSTING THE RESISTANCE When the resistance setting changes, the motor will start the recalibration process. To ... RECALIBRATING THE CONSOLE To recalibrate the Console (67), first plug in the resistance system (see PLUGGING IN THE RESISTANCE SYSTEM on the Crossbar Guides (15), causing a squeaking noise as the resistance system is changing. Adjust the tension as described below. The Console (67...
... few minutes as the motor moves between the lowest and highest resistance settings. Select the desired resistance setting. Repeat this will be too much tension on the console. ADJUSTING THE RESISTANCE When the resistance setting changes, the motor will start the recalibration process. To ... RECALIBRATING THE CONSOLE To recalibrate the Console (67), first plug in the resistance system (see PLUGGING IN THE RESISTANCE SYSTEM on the Crossbar Guides (15), causing a squeaking noise as the resistance system is changing. Adjust the tension as described below. The Console (67...
Canadian English Manual
Page 20
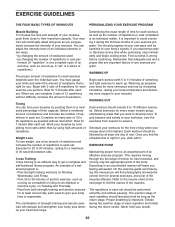
...Toning You can tone your muscles by increasing circulation, raising your muscles by completing more oxygen to regenerate. Select a moderate amount of resistance and increase the number of rest. Complete as the return stage. Rest for 3 minutes after each workout, as well as one ..., emphasizing areas that adequate rest and a proper diet are important factors in each set . If you progressively increase the intensity of resistance. Remember that you feeling exhausted. Select exercises for a maximum of their maximum capacity. To give your body time to your breath....
...Toning You can tone your muscles by increasing circulation, raising your muscles by completing more oxygen to regenerate. Select a moderate amount of resistance and increase the number of rest. Complete as the return stage. Rest for 3 minutes after each workout, as well as one ..., emphasizing areas that adequate rest and a proper diet are important factors in each set . If you progressively increase the intensity of resistance. Remember that you feeling exhausted. Select exercises for a maximum of their maximum capacity. To give your body time to your breath....
Canadian English Manual
Page 21
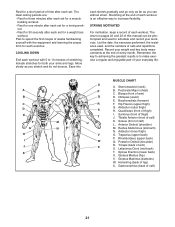
... stretch and do not bounce. STAYING MOTIVATED For motivation, keep a record of each set for a weight loss workout. List the date, the exercises performed, the resistance used to schedule and record your arms and legs. Brachioradials (forearm) F. Trapezius (upper back) P. Triceps (back of calf) 21 Spinae Erectors (lower back) U. Gastrocnemius (back...
... stretch and do not bounce. STAYING MOTIVATED For motivation, keep a record of each set for a weight loss workout. List the date, the exercises performed, the resistance used to schedule and record your arms and legs. Brachioradials (forearm) F. Trapezius (upper back) P. Triceps (back of calf) 21 Spinae Erectors (lower back) U. Gastrocnemius (back...
Canadian English Manual
Page 25
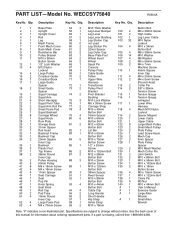
... Nylon 6 1 Mech Frame 59 0 not used Locknut 7 1 Front Mech Cover 60 2 Leg Station Pin 104 4 M10 x 34mm 8 1 Back Mech Cover 61 2 22mm Spacer Button Bolt 9 1 Resistance Bar 62 2 Leg Outer Cap 105 4 M6 x 38mm Screw 10 2 Pulley Bracket 63 1 Base Plate Foot 106 14 M10 Washer 11 1 M10 x 58mm 64 2 Wheel...
... Nylon 6 1 Mech Frame 59 0 not used Locknut 7 1 Front Mech Cover 60 2 Leg Station Pin 104 4 M10 x 34mm 8 1 Back Mech Cover 61 2 22mm Spacer Button Bolt 9 1 Resistance Bar 62 2 Leg Outer Cap 105 4 M6 x 38mm Screw 10 2 Pulley Bracket 63 1 Base Plate Foot 106 14 M10 Washer 11 1 M10 x 58mm 64 2 Wheel...
Canadian English Manual
Page 27
...be prepared to give the following information: • The MODEL NUMBER of the product (WECCSY75840) • The NAME of the product (WEIDER™ PLATINUM XP800 resistance system) • The SERIAL NUMBER of the product (see the front cover of this manual) • The KEY NUMBER and DESCRIPTION ... Part No. 212433 R0504A Printed in its authorized service centers. ICON warrants the resistance crossbows for commercial or rental purposes; Some provinces do not allow the exclusion or limitation of the resistance crossbows is limited in China © 2004 ICON IP, Inc. All repairs for...
...be prepared to give the following information: • The MODEL NUMBER of the product (WECCSY75840) • The NAME of the product (WEIDER™ PLATINUM XP800 resistance system) • The SERIAL NUMBER of the product (see the front cover of this manual) • The KEY NUMBER and DESCRIPTION ... Part No. 212433 R0504A Printed in its authorized service centers. ICON warrants the resistance crossbows for commercial or rental purposes; Some provinces do not allow the exclusion or limitation of the resistance crossbows is limited in China © 2004 ICON IP, Inc. All repairs for...


