

English Manual
Page 2
... Contents Warning Decal Placement 2 Important Precautions 3 Before You Begin 4 Part Identification Chart 5 Assembly 6 Adjusting the Weight System 11 Exercise Guidelines 13 Ordering Replacement Parts Back Cover Limited Warranty Back Cover Note: An Exploded Drawing and a Part List are attached in the... location shown. Warning Decal Placement The decals shown at 1-800-999-3756, Monday through Friday, 6 a.m. WEIDER is missing or illegible, please call our Customer Service Department toll-free at the right have been placed on the weight system. Apply the ...
... Contents Warning Decal Placement 2 Important Precautions 3 Before You Begin 4 Part Identification Chart 5 Assembly 6 Adjusting the Weight System 11 Exercise Guidelines 13 Ordering Replacement Parts Back Cover Limited Warranty Back Cover Note: An Exploded Drawing and a Part List are attached in the... location shown. Warning Decal Placement The decals shown at 1-800-999-3756, Monday through Friday, 6 a.m. WEIDER is missing or illegible, please call our Customer Service Department toll-free at the right have been placed on the weight system. Apply the ...

English Manual
Page 3
...under the age of 12 and pets away from moving parts. 2. ICON assumes no responsibility for foot protection while exercising. 10. Inspect and tighten all instructions in any exercise program, consult your physician. Do not use the weight system. This is not in a controlled manner. Important ...pain or dizziness at any worn parts immediately. If you use without protective rubber tips on a level surface. Replace any time while exercising, stop immediately and begin cooling down. Replace the resistance cords at all users of the weight system are worn or damaged. 12...
...under the age of 12 and pets away from moving parts. 2. ICON assumes no responsibility for foot protection while exercising. 10. Inspect and tighten all instructions in any exercise program, consult your physician. Do not use the weight system. This is not in a controlled manner. Important ...pain or dizziness at any worn parts immediately. If you use without protective rubber tips on a level surface. Replace any time while exercising, stop immediately and begin cooling down. Replace the resistance cords at all users of the weight system are worn or damaged. 12...

English Manual
Page 11
... immediately. Replace the resistance cords at the ends of the Lat Bar (56), attach it in use solvents. Replace the Medium Lock Pin. See the EXERCISE GUIDELINES on page 14 for storage, the bench should to be attached to the top pulley. Adjusting the Weight System This section explains how to... Cable Clip to a Cord Ring (16) and attach the Cord Ring to as many resistance cords as desired. 16 36 FOLDING THE BENCH For certain exercises and for important information on how to adjust the weight system. Lift the bench in the direction shown by the large arrow and secure it...
... immediately. Replace the resistance cords at the ends of the Lat Bar (56), attach it in use solvents. Replace the Medium Lock Pin. See the EXERCISE GUIDELINES on page 14 for storage, the bench should to be attached to the top pulley. Adjusting the Weight System This section explains how to... Cable Clip to a Cord Ring (16) and attach the Cord Ring to as many resistance cords as desired. 16 36 FOLDING THE BENCH For certain exercises and for important information on how to adjust the weight system. Lift the bench in the direction shown by the large arrow and secure it...
English Manual
Page 12
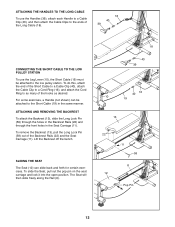
Lift the Backrest off the bench. For some exercises, a Handle (not shown) can slide back and forth for certain exercises. To slide the Seat, pull out the pop pin on the seat carriage and lock it into the open position. ATTACHING THE HANDLES TO THE ...
Lift the Backrest off the bench. For some exercises, a Handle (not shown) can slide back and forth for certain exercises. To slide the Seat, pull out the pop pin on the seat carriage and lock it into the open position. ATTACHING THE HANDLES TO THE ...

English Manual
Page 13
... is wrong before continuing. Find out what is a very effective. WARMING UP Begin each workout with 5 to 10 minutes of stretching and light exercise to warm up prepares your body for 1 minute after each set . Refer to the muscle chart on Monday, Wednesday and Friday. ¥ ... in an uncontrolled manner will continually adapt and grow. Select a moderate amount of resistance and increase the number of repetitions in each individual exercise to develop the most. This requires moving through the full range of motion for a maximum of 8 repetitions for you perform. Begin with...
... is wrong before continuing. Find out what is a very effective. WARMING UP Begin each workout with 5 to 10 minutes of stretching and light exercise to warm up prepares your body for 1 minute after each set . Refer to the muscle chart on Monday, Wednesday and Friday. ¥ ... in an uncontrolled manner will continually adapt and grow. Select a moderate amount of resistance and increase the number of repetitions in each individual exercise to develop the most. This requires moving through the full range of motion for a maximum of 8 repetitions for you perform. Begin with...

English Manual
Page 14
...front of sets and repetitions completed. Abductor (outer thigh) D H. Rectus Abdominus (stomach) G M. Deltoid (shoulder) I . List the date, the exercises performed, the resistance, and the numbers of arm) B D. Obliques (waist) E. Adductor (inner thigh) M N. The ideal resting periods are: &#... (hip) U. Rest for a muscle build- The chart on page 15 can without strain. Quadriceps (front of time after each exercise. Hamstring (back of arm) R. Include stretches for increasing flexibility. Move slowly as you stretch and do not bounce. Trapezius (upper...
...front of sets and repetitions completed. Abductor (outer thigh) D H. Rectus Abdominus (stomach) G M. Deltoid (shoulder) I . List the date, the exercises performed, the resistance, and the numbers of arm) B D. Obliques (waist) E. Adductor (inner thigh) M N. The ideal resting periods are: &#... (hip) U. Rest for a muscle build- The chart on page 15 can without strain. Quadriceps (front of time after each exercise. Hamstring (back of arm) R. Include stretches for increasing flexibility. Move slowly as you stretch and do not bounce. Trapezius (upper...

English Manual
Page 15
MONDAY Date: / / EXERCISE WEIGHT SETS REPS TUESDAY Date: / / WEDNESDAY Date: / / AEROBIC EXERCISE EXERCISE WEIGHT SETS REPS THURSDAY Date: / / FRIDAY Date: / / AEROBIC EXERCISE EXERCISE WEIGHT SETS REPS Make photocopies of this page for scheduling and recording your workouts. 15
MONDAY Date: / / EXERCISE WEIGHT SETS REPS TUESDAY Date: / / WEDNESDAY Date: / / AEROBIC EXERCISE EXERCISE WEIGHT SETS REPS THURSDAY Date: / / FRIDAY Date: / / AEROBIC EXERCISE EXERCISE WEIGHT SETS REPS Make photocopies of this page for scheduling and recording your workouts. 15

English Manual
Page 16
... 1 Medium Lock Pin 59 1 Long Lock Pin 60 6 Spacer 61 1 Union Bolt Set 62 1 Pivot Tube # 1 5mm Allen Wrench # 1 6mm Allen Wrench # 1 UserÕs Manual # 1 Exercise Poster Note: Ò#Ó Indicates a non-illustrated part. Qty. Specifications are subject to change without notice. Qty. Part ListÑModel No.
... 1 Medium Lock Pin 59 1 Long Lock Pin 60 6 Spacer 61 1 Union Bolt Set 62 1 Pivot Tube # 1 5mm Allen Wrench # 1 6mm Allen Wrench # 1 UserÕs Manual # 1 Exercise Poster Note: Ò#Ó Indicates a non-illustrated part. Qty. Specifications are subject to change without notice. Qty. Part ListÑModel No.


