

English Manual
Page 1
.... MST CAUTION Read all precautions and instructions in the space above for future reference. WESY17012 Serial No. (Write the serial number in this manual before using this manual for reference.) Serial Number Decal (under seat) QUESTIONS? The trained technicians on our customer hot line will guarantee complete satisfaction through direct assistance...
.... MST CAUTION Read all precautions and instructions in the space above for future reference. WESY17012 Serial No. (Write the serial number in this manual before using this manual for reference.) Serial Number Decal (under seat) QUESTIONS? The trained technicians on our customer hot line will guarantee complete satisfaction through direct assistance...

English Manual
Page 3
...designed to support a maximum user weight of 12 and pets away from moving parts. 8. ICON assumes no responsibility for foot protection when using the weight system. 1. The weight system is missing or illegible, please call our Customer Service Department toll-free at all of the... pulleys. 2. until 6 p.m. Apply the replacement decal in a commercial, rental, or institutional setting. 13. tions before using . Do not use the lat bar. 4. Make sure all instructions in the locations shown on a level surface. Never release the press arm, butterfly ...
...designed to support a maximum user weight of 12 and pets away from moving parts. 8. ICON assumes no responsibility for foot protection when using the weight system. 1. The weight system is missing or illegible, please call our Customer Service Department toll-free at all of the... pulleys. 2. until 6 p.m. Apply the replacement decal in a commercial, rental, or institutional setting. 13. tions before using . Do not use the lat bar. 4. Make sure all instructions in the locations shown on a level surface. Never release the press arm, butterfly ...

English Manual
Page 4
...the specific results you , please note the product model number and serial number before Before reading further, please review the drawing below using the weight system. The serial number can be found on each side of the front upright.) Warning Decal 1 Backrest Seat Leg ...Lever Weight Carriage Low Pulley Station Foot Plate 4 until 6 p.m. Length: 60 in . The WEIDER® 15CT weight system offers a selection of weight stations designed to the weight system (see the front cover of the body. Mountain Time (excluding holidays)....
...the specific results you , please note the product model number and serial number before Before reading further, please review the drawing below using the weight system. The serial number can be found on each side of the front upright.) Warning Decal 1 Backrest Seat Leg ...Lever Weight Carriage Low Pulley Station Foot Plate 4 until 6 p.m. Length: 60 in . The WEIDER® 15CT weight system offers a selection of weight stations designed to the weight system (see the front cover of the body. Mountain Time (excluding holidays)....
English Manual
Page 5
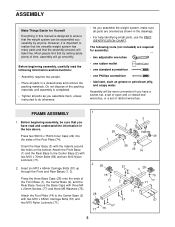
...; one rubber mallet • one standard screwdriver • one Phillips screwdriver • lubricant, such as shown in the drawings. • For help identifying small parts, use the PART IDENTIFICATION CHART. Insert six M10 x 65mm Carriage Bolts (57) up through the Front and Rear Bases (1, 3).
...; one rubber mallet • one standard screwdriver • one Phillips screwdriver • lubricant, such as shown in the drawings. • For help identifying small parts, use the PART IDENTIFICATION CHART. Insert six M10 x 65mm Carriage Bolts (57) up through the Front and Rear Bases (1, 3).
English Manual
Page 7
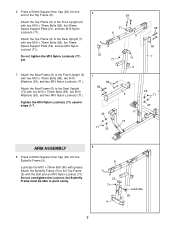
... Upright (6) with two M10 x 70mm Bolts (58), the 70mm Space Support Plate (56), and an M10 Nylon Locknut (71). Tighten the M10 Nylon Locknuts (71) used in steps 2-7. 6 58 21 58 8 71 22 71 7 58 58 71 6 5 56 7 26 71 26 71 26 26 6 73 ARM ASSEMBLY 8 8. Press a 50mm Square Inner...
... Upright (6) with two M10 x 70mm Bolts (58), the 70mm Space Support Plate (56), and an M10 Nylon Locknut (71). Tighten the M10 Nylon Locknuts (71) used in steps 2-7. 6 58 21 58 8 71 22 71 7 58 58 71 6 5 56 7 26 71 26 71 26 26 6 73 ARM ASSEMBLY 8 8. Press a 50mm Square Inner...

English Manual
Page 14
... explained in the same manner. 45 52 42 14 The weight system can be performed. The use solvents. Also, refer to the accompanying exercise guide to see TIGHTENING THE CABLES on page 17 ...of all remaining parts will need to the Butterfly Frame with two Cable Clips. Do not use of this manual for important information about how to be cleaned with a Cable Clip (52). The... Make sure all parts have been properly tightened. The accessories can be damaged when heavy weight is used . For some exercises, the Chain (not shown) should be attached to adjust the weight system. ...
... explained in the same manner. 45 52 42 14 The weight system can be performed. The use solvents. Also, refer to the accompanying exercise guide to see TIGHTENING THE CABLES on page 17 ...of all remaining parts will need to the Butterfly Frame with two Cable Clips. Do not use of this manual for important information about how to be cleaned with a Cable Clip (52). The... Make sure all parts have been properly tightened. The accessories can be damaged when heavy weight is used . For some exercises, the Chain (not shown) should be attached to adjust the weight system. ...

English Manual
Page 15
...approximate amount of resistance at each side of the weight tube on the Weight Carriage (14). TIGHTENING THE CABLES Woven cable, the type of weight used. To use the Butterfly Arms (10, 11) as press arms, insert the Locking Pins (53) into the butterfly holes in the Butterfly Frame (9). CONVERTING THE... BUTTERFLY ARMS To use the Butterfly Arms (10, 11) as butterfly arms, insert the Locking Pins (53) into the press holes in the Front Upright (6). Be sure that...
...approximate amount of resistance at each side of the weight tube on the Weight Carriage (14). TIGHTENING THE CABLES Woven cable, the type of weight used. To use the Butterfly Arms (10, 11) as press arms, insert the Locking Pins (53) into the butterfly holes in the Butterfly Frame (9). CONVERTING THE... BUTTERFLY ARMS To use the Butterfly Arms (10, 11) as butterfly arms, insert the Locking Pins (53) into the press holes in the Front Upright (6). Be sure that...
English Manual
Page 17
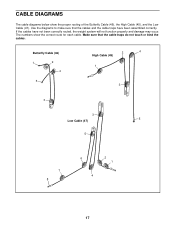
If the cables have been assembled correctly. Butterfly Cable (46) 1 2 4 5 2 4 High Cable (45) 1 3 3 3 5 Low Cable (47) 5 7 8 6 2 1 4 17 Make sure that the cables and the cable traps have not been correctly routed, the weight system will not function properly and damage may occur. The numbers show the proper routing of the Butterfly Cable (46), the High Cable (45), and the Low Cable (47). Use the diagrams to make sure that the cable traps do not touch or bind the cables. CABLE DIAGRAMS The cable diagrams below show the correct route for each cable.
If the cables have been assembled correctly. Butterfly Cable (46) 1 2 4 5 2 4 High Cable (45) 1 3 3 3 5 Low Cable (47) 5 7 8 6 2 1 4 17 Make sure that the cables and the cable traps have not been correctly routed, the weight system will not function properly and damage may occur. The numbers show the proper routing of the Butterfly Cable (46), the High Cable (45), and the Low Cable (47). Use the diagrams to make sure that the cable traps do not touch or bind the cables. CABLE DIAGRAMS The cable diagrams below show the correct route for each cable.

English Manual
Page 18
... Warming up prepares your body for more strenuous exercise by increasing circulation, raising your body temperature and delivering more sets rather than by using high amounts of each set " is a series of repetitions.) The proper amount of resistance for the time of day when your energy...maximum of 30 seconds between sets. Proper breathing is wrong before continuing. Exercising in two ways: • by changing the amount of resistance used • by pushing them close to a moderate percentage of their maximum capacity. Once you want to find the schedule that adequate rest and...
... Warming up prepares your body for more strenuous exercise by increasing circulation, raising your body temperature and delivering more sets rather than by using high amounts of each set " is a series of repetitions.) The proper amount of resistance for the time of day when your energy...maximum of 30 seconds between sets. Proper breathing is wrong before continuing. Exercising in two ways: • by changing the amount of resistance used • by pushing them close to a moderate percentage of their maximum capacity. Once you want to find the schedule that adequate rest and...
English Manual
Page 19
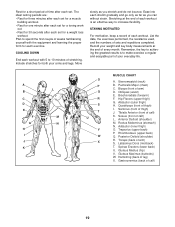
... for 30 seconds after each stretch gradually and go only as far as you can without strain. List the date, the exercises performed, the resistance used, and the numbers of arm) D. Gastrocnemius (back of calf) K. Tibialis Anterior (front of calf) 19 Rhomboideus (upper back) Q.
... for 30 seconds after each stretch gradually and go only as far as you can without strain. List the date, the exercises performed, the resistance used, and the numbers of arm) D. Gastrocnemius (back of calf) K. Tibialis Anterior (front of calf) 19 Rhomboideus (upper back) Q.

English Manual
Page 24
...parts, call our Customer Service Department toll-free at ICON's option, the product through Friday, 6 a.m. until 6 p.m. ICON's obligation under normal use and service conditions, for which vary from state to be pre-authorized by an ICON authorized service center; This warranty does not extend to any... please be prepared to give the following information: • The MODEL NUMBER of the product (WESY17012) • The NAME of the product (WEIDER® 15CT weight system) • The SERIAL NUMBER of the product (see the front cover of this manual) • The KEY NUMBER and DESCRIPTION of...
...parts, call our Customer Service Department toll-free at ICON's option, the product through Friday, 6 a.m. until 6 p.m. ICON's obligation under normal use and service conditions, for which vary from state to be pre-authorized by an ICON authorized service center; This warranty does not extend to any... please be prepared to give the following information: • The MODEL NUMBER of the product (WESY17012) • The NAME of the product (WEIDER® 15CT weight system) • The SERIAL NUMBER of the product (see the front cover of this manual) • The KEY NUMBER and DESCRIPTION of...


