
Owner Manual
Page 1
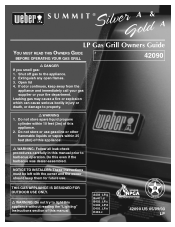
... Gas Grill Owners Guide YOU MUST READ THIS OWNERS GUIDE # BEFORE OPERATING YOUR GAS GRILL 42090 ƽ DANGER If you smell gas: 1. Shut off gas to property. ƽ WARNING 1. Open lid 4. Extinguish any open flames. 3. THIS GAS APPLIANCE IS DESIGNED FOR OUTDOOR USE ONLY. ƽ WARNING: Do not try to barbecue operation. Do not store spare liquid propane cylinder within 25 feet (8m) of this appliance. 2. NOTICE TO INSTALLER: These instructions...
... Gas Grill Owners Guide YOU MUST READ THIS OWNERS GUIDE # BEFORE OPERATING YOUR GAS GRILL 42090 ƽ DANGER If you smell gas: 1. Shut off gas to property. ƽ WARNING 1. Open lid 4. Extinguish any open flames. 3. THIS GAS APPLIANCE IS DESIGNED FOR OUTDOOR USE ONLY. ƽ WARNING: Do not try to barbecue operation. Do not store spare liquid propane cylinder within 25 feet (8m) of this appliance. 2. NOTICE TO INSTALLER: These instructions...

Owner Manual
Page 2
... in operation, turn all gas valves off all parts are in place. The conversion or attempted use this barbecue. ƽ Improper assembly may be checked by children. LIQUID PROPANE GAS UNITS ONLY: ƽ Use the regulator that is supplied with your Weber® gas barbecue. ƽ Do not attempt to disconnect the gas regulator or any heated surfaces. ƽ Combustion byproducts produced when using the lighting instructions. ƽ Do not use a liquid propane cylinder...
... in operation, turn all gas valves off all parts are in place. The conversion or attempted use this barbecue. ƽ Improper assembly may be checked by children. LIQUID PROPANE GAS UNITS ONLY: ƽ Use the regulator that is supplied with your Weber® gas barbecue. ƽ Do not attempt to disconnect the gas regulator or any heated surfaces. ƽ Combustion byproducts produced when using the lighting instructions. ƽ Do not use a liquid propane cylinder...

Owner Manual
Page 3
Contents Danger & Warnings A-2 Warranty A-4 General Instructions A-5 Grilling Methods A-6 Cleaning A-6 Exploded Views A-7 Parts List A-11 Assembly Instructions B-a Gas Instructions C-1 Leak Checking C-4 Operating D-1 Grilling Methods D-1 Lighting ...D-3 Manual Lighting D-4 Troubleshooting D-5 Maintenance E-1 Replacing Main Burners E-2 Crossover® Ignition System Operations E-5 A-3
Contents Danger & Warnings A-2 Warranty A-4 General Instructions A-5 Grilling Methods A-6 Cleaning A-6 Exploded Views A-7 Parts List A-11 Assembly Instructions B-a Gas Instructions C-1 Leak Checking C-4 Operating D-1 Grilling Methods D-1 Lighting ...D-3 Manual Lighting D-4 Troubleshooting D-5 Maintenance E-1 Replacing Main Burners E-2 Crossover® Ignition System Operations E-5 A-3
Owner Manual
Page 4
... assembled and operated in accordance with the printed instructions accompanying it any other express warrants except as set out in duration to your date of this Weber® gas grill that prove defective under normal use and service and which is not covered by insects within the burner tubes, as follows: Aluminum Castings, lifetime, 1 year paint Stainless Steel Hood Section, 25 years Burners, 10 years Igniter...
... assembled and operated in accordance with the printed instructions accompanying it any other express warrants except as set out in duration to your date of this Weber® gas grill that prove defective under normal use and service and which is not covered by insects within the burner tubes, as follows: Aluminum Castings, lifetime, 1 year paint Stainless Steel Hood Section, 25 years Burners, 10 years Igniter...
Owner Manual
Page 5
...; gas barbecue should also be stored outdoors in the food. Liquid Propane (LP) gas supply is not disconnected from the Weber® gas barbecue, the appliance and LP tank must be checked for LP gas only. • Do not use with natural (piped in Canada These instructions, while generally acceptable, do not necessarily comply with the Canadian Installation codes, particularly with liquid propane (LP) gas only. The valves, orifices, hose...
...; gas barbecue should also be stored outdoors in the food. Liquid Propane (LP) gas supply is not disconnected from the Weber® gas barbecue, the appliance and LP tank must be checked for LP gas only. • Do not use with natural (piped in Canada These instructions, while generally acceptable, do not necessarily comply with the Canadian Installation codes, particularly with liquid propane (LP) gas only. The valves, orifices, hose...
Owner Manual
Page 6
... Cooking grates - Inside cooking module - DO NOT ENLARGE BURNER PORTS (OPENINGS). General Instructions Grilling Methods NOTE: If grill looses heat while cooking refer to the troubleshooting section of this manual. ƽ WARNING: Do not move the Weber® gas barbecue when operating or while barbecue is warm, wipe inside with paper towel to prevent grease build-up. You can line the catch pan with your region using...
... Cooking grates - Inside cooking module - DO NOT ENLARGE BURNER PORTS (OPENINGS). General Instructions Grilling Methods NOTE: If grill looses heat while cooking refer to the troubleshooting section of this manual. ƽ WARNING: Do not move the Weber® gas barbecue when operating or while barbecue is warm, wipe inside with paper towel to prevent grease build-up. You can line the catch pan with your region using...

Owner Manual
Page 8
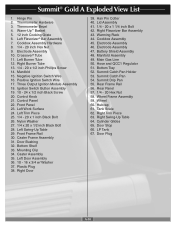
.... Cooking Box Assembly 44. Main Gas Line 49. Hubcap 59. Summit® Silver A Exploded View List 1. Hinge Pin 2. Thermometer Hardware 3. Thermometer Bezel 4. Warm-Up™ Basket 5. 12 inch Cooking Grate 6. Cookbox Assembly Hardware 8. 1/4 - 20 inch Hex Nut 9. Crossover® Tube 11. Left Burner Tube 12. 1/4 - 20 x 1/2 inch Phillips Screw 13. Negative Ignition Switch Wire 15. Positive Ignition Switch Wire 16. Two Output Ignition Module Assembly 17. Ignition Switch Button Assembly 18...
.... Cooking Box Assembly 44. Main Gas Line 49. Hubcap 59. Summit® Silver A Exploded View List 1. Hinge Pin 2. Thermometer Hardware 3. Thermometer Bezel 4. Warm-Up™ Basket 5. 12 inch Cooking Grate 6. Cookbox Assembly Hardware 8. 1/4 - 20 inch Hex Nut 9. Crossover® Tube 11. Left Burner Tube 12. 1/4 - 20 x 1/2 inch Phillips Screw 13. Negative Ignition Switch Wire 15. Positive Ignition Switch Wire 16. Two Output Ignition Module Assembly 17. Ignition Switch Button Assembly 18...
Owner Manual
Page 10
.... Summit Catch Pan Holder 53. Left Burner Tube 12. Negative Ignition Switch Wire 16. Front Panel 23. Caster Frame Assembly 31. Door Bushing 32. Left Door Assembly 36. 10 - 16 x 3/4 w/ Washer 37. Lid Assembly 41. 1/4 - 20 x 1 1/4 inch Bolt 42. Right Flavorizer Bar Assembly 43. Battery Shield Assembly 48. Summit Catch Pan 54. Rear Panel 57. 1/4 - 20 Hex Nut 58. LP Tank 67. Three Output Ignition Module Assembly 18. Control Knob...
.... Summit Catch Pan Holder 53. Left Burner Tube 12. Negative Ignition Switch Wire 16. Front Panel 23. Caster Frame Assembly 31. Door Bushing 32. Left Door Assembly 36. 10 - 16 x 3/4 w/ Washer 37. Lid Assembly 41. 1/4 - 20 x 1 1/4 inch Bolt 42. Right Flavorizer Bar Assembly 43. Battery Shield Assembly 48. Summit Catch Pan 54. Rear Panel 57. 1/4 - 20 Hex Nut 58. LP Tank 67. Three Output Ignition Module Assembly 18. Control Knob...
Owner Manual
Page 14
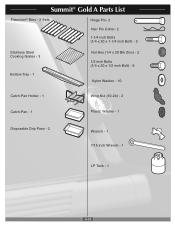
Summit® Gold A Parts List Flavorizor® Bars - 2 Sets Hinge Pin- 2 Hair Pin Cotter- 2 1-1/4 inch Bolts (1/4 x 20 x 1-1/4 inch Bolt) - 2 Stainless Steel Cooking Grates - 3 Bottom Tray - 1 Nut Hex (1/4 x 20 Blk Zinc) - 2 1/2 inch Bolts (1/4 x 20 x 1/2 inch Bolt) - 8 Nylon Washer - 10 Catch-Pan Holder - 1 Wing Nut (10-24) - 2 Catch-Pan - 1 Plastic Washer - 1 Disposable Drip Pans - 2 Wrench - 1 7/16 inch Wrench - 1 LP Tank - 1 A-14
Summit® Gold A Parts List Flavorizor® Bars - 2 Sets Hinge Pin- 2 Hair Pin Cotter- 2 1-1/4 inch Bolts (1/4 x 20 x 1-1/4 inch Bolt) - 2 Stainless Steel Cooking Grates - 3 Bottom Tray - 1 Nut Hex (1/4 x 20 Blk Zinc) - 2 1/2 inch Bolts (1/4 x 20 x 1/2 inch Bolt) - 8 Nylon Washer - 10 Catch-Pan Holder - 1 Wing Nut (10-24) - 2 Catch-Pan - 1 Plastic Washer - 1 Disposable Drip Pans - 2 Wrench - 1 7/16 inch Wrench - 1 LP Tank - 1 A-14

Owner Manual
Page 30
... a question regarding the cylinder, call the cylinder manufacturer's customer service center. Check that the LP cylinder valve is responsible for gas leaks. If they do this grill outdoors in an upright position, and should check to be removed from a new liquid propane cylinder before attempting to check for the materials, workmanship and performance of liquid propane cylinders, see Section "Operating". The cylinder connection is equipped...
... a question regarding the cylinder, call the cylinder manufacturer's customer service center. Check that the LP cylinder valve is responsible for gas leaks. If they do this grill outdoors in an upright position, and should check to be removed from a new liquid propane cylinder before attempting to check for the materials, workmanship and performance of liquid propane cylinders, see Section "Operating". The cylinder connection is equipped...

Owner Manual
Page 31
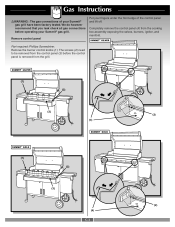
... of the Weber® gas barbecue. If there is the metal protective ring around the valve.) One series of the tanks have differing top collar assembles. (The top collar is a leak, turn gas supply OFF at the source and rinse connections with the valve facing front. Gas Instructions We utilize various LP tank manufacturers. Turn the gas back on the cylinder valve. 2) Loosen the cylinder lock...
... of the Weber® gas barbecue. If there is the metal protective ring around the valve.) One series of the tanks have differing top collar assembles. (The top collar is a leak, turn gas supply OFF at the source and rinse connections with the valve facing front. Gas Instructions We utilize various LP tank manufacturers. Turn the gas back on the cylinder valve. 2) Loosen the cylinder lock...
Owner Manual
Page 32
... check all gas connections before the control panel is removed from the cooking box assembly exposing the valves, burners, igniter, and manifold. Remove control panel Put your Summit® gas grill. The screws (2) need to be removed from the control panel (3) before operating your fingers under the front edge of your Summit® gas grill have been factory tested. Part required: Phillips Screwdriver. Completely remove the control panel (4) from the grill. (1) (2) (3) (2) (4) (1) (2) (3) (2) (4) C-3 Remove the burner control knobs (1). Gas Instructions ƽWARNING...
... check all gas connections before the control panel is removed from the cooking box assembly exposing the valves, burners, igniter, and manifold. Remove control panel Put your Summit® gas grill. The screws (2) need to be removed from the control panel (3) before operating your fingers under the front edge of your Summit® gas grill have been factory tested. Part required: Phillips Screwdriver. Completely remove the control panel (4) from the grill. (1) (2) (3) (2) (4) (1) (2) (3) (2) (4) C-3 Remove the burner control knobs (1). Gas Instructions ƽWARNING...

Owner Manual
Page 37
... meet government, American Gas Association, and Underwriters Laboratories requirements. Liquid Propane Cylinder requirements s Replacement LP cylinders supplied by weight. If you refill. LP gas is in your region using the contact information sheet provided with your LP cylinder, make sure the plastic dust cover is a gas at an authorized LP gas dealer, by a qualified attendant, who fills the tank by Weber satisfy the above requirements...
... meet government, American Gas Association, and Underwriters Laboratories requirements. Liquid Propane Cylinder requirements s Replacement LP cylinders supplied by weight. If you refill. LP gas is in your region using the contact information sheet provided with your LP cylinder, make sure the plastic dust cover is a gas at an authorized LP gas dealer, by a qualified attendant, who fills the tank by Weber satisfy the above requirements...
Owner Manual
Page 38
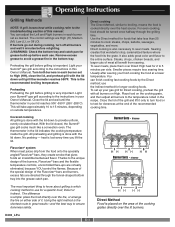
... to provide uniform, evenly circulated heat. Smaller pieces require less searing time. use . Remove excess grease to avoid a grease fire in your Summit® gas grill according to the instructions in the bottom tray. The thermometer in the recipe. Flavorizer® system When meat juices drip from searing. You can adjust the Left and Right burners in each burner set to High (HH), close the...
... to provide uniform, evenly circulated heat. Smaller pieces require less searing time. use . Remove excess grease to avoid a grease fire in your Summit® gas grill according to the instructions in the bottom tray. The thermometer in the recipe. Flavorizer® system When meat juices drip from searing. You can adjust the Left and Right burners in each burner set to High (HH), close the...
Owner Manual
Page 39
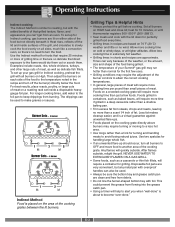
...a roasting rack set up your Summit® gas grill may run hotter than a shallow baking pan. • Trim excess fat from an oven. heat for 10 minutes, or until thermometer registers 500˚-550˚F (260˚-288˚C). • Sear meats and cook...grate directly above burners may require the adjustment of meat. Use two spatulas for foods that require 25 minutes or more cooking time per pound than a fork for Indirect cooking, gas burners are so delicate that direct exposure to become "over-done." After flames subside, relight the grill. This could prevent the grease...
...a roasting rack set up your Summit® gas grill may run hotter than a shallow baking pan. • Trim excess fat from an oven. heat for 10 minutes, or until thermometer registers 500˚-550˚F (260˚-288˚C). • Sear meats and cook...grate directly above burners may require the adjustment of meat. Use two spatulas for foods that require 25 minutes or more cooking time per pound than a fork for Indirect cooking, gas burners are so delicate that direct exposure to become "over-done." After flames subside, relight the grill. This could prevent the grease...
Owner Manual
Page 40
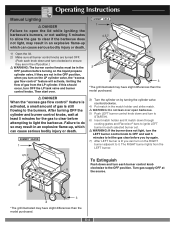
... using only Weber® authorized replacement hose. If this should see a flame. ƽ WARNING: If the burner does not light, turn the LEFT burner control knob to OFF and wait 5 minutes to let the gas clear before turning on by turning the cylinder valve counterclockwise. ƽ WARNING: Do not lean over . ƽ DANGER: When the "excess gas flow control" feature is activated, a small amount of barbecue...
... using only Weber® authorized replacement hose. If this should see a flame. ƽ WARNING: If the burner does not light, turn the LEFT burner control knob to OFF and wait 5 minutes to let the gas clear before turning on by turning the cylinder valve counterclockwise. ƽ WARNING: Do not lean over . ƽ DANGER: When the "excess gas flow control" feature is activated, a small amount of barbecue...
Owner Manual
Page 41
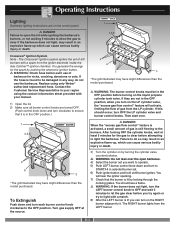
... LEFT burner is still flowing to the burners. Turn gas supply OFF at least 5 minutes for the gas to clear before turning on the liquid propane cylinder valve. If they are turned OFF. (Push each burner control knob 6 clockwise to the OFF position. Operating Instructions Manual Lighting ƽ DANGER Failure to open barbecue. 5) Push LEFT burner control knob down and turn to START/HI. 6) Insert match holder and lit match down...
... LEFT burner is still flowing to the burners. Turn gas supply OFF at least 5 minutes for the gas to clear before turning on the liquid propane cylinder valve. If they are turned OFF. (Push each burner control knob 6 clockwise to the OFF position. Operating Instructions Manual Lighting ƽ DANGER Failure to open barbecue. 5) Push LEFT burner control knob down and turn to START/HI. 6) Insert match holder and lit match down...
Owner Manual
Page 42
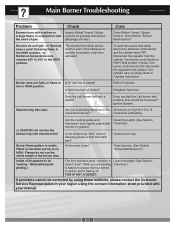
... not line the bottom tray with a match, then check the Crossover® Ignition System. Burners have activated. Is the bottom tray "dirty" and not allowing grease to carbon and is stainless steel, not paint. If problems cannot be "peeling." (Resembles paint peeling.) The lid is flaking off. Is fuel hose bent or kinked? Refer to cylinder connection, may have a small flickering flame in...
... not line the bottom tray with a match, then check the Crossover® Ignition System. Burners have activated. Is the bottom tray "dirty" and not allowing grease to carbon and is stainless steel, not paint. If problems cannot be "peeling." (Resembles paint peeling.) The lid is flaking off. Is fuel hose bent or kinked? Refer to cylinder connection, may have a small flickering flame in...

Owner Manual
Page 43
.... Remove the manifold. Check and clean the valve orifices at the ends of burners. Once the spider/insect screens and burners are fully open. ƽCAUTION: Do not enlarge the burner ports when cleaning. Main Burner Flame Pattern The Weber® gas barbecue burners have been factory set for spiders and other insects access to the burner tubes through the air shutter openings. (1) Lightly tap the burner to...
.... Remove the manifold. Check and clean the valve orifices at the ends of burners. Once the spider/insect screens and burners are fully open. ƽCAUTION: Do not enlarge the burner ports when cleaning. Main Burner Flame Pattern The Weber® gas barbecue burners have been factory set for spiders and other insects access to the burner tubes through the air shutter openings. (1) Lightly tap the burner to...
Owner Manual
Page 47
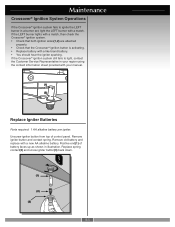
... region using the contact information sheet provided with your manual. (1) (2) Replace Igniter Batteries Parts required: 1 AA alkaline battery per igniter. Maintenance Crossover® Ignition System Operations If the Crossover® ignition system fails to light, contact the Customer Service Representative in a burner set, light the LEFT burner with a match. Positive end(1) of control panel. Remove old battery and replace with a like brand battery. • You should hear the igniter sparking. If the LEFT burner lights with a match, then...
... region using the contact information sheet provided with your manual. (1) (2) Replace Igniter Batteries Parts required: 1 AA alkaline battery per igniter. Maintenance Crossover® Ignition System Operations If the Crossover® ignition system fails to light, contact the Customer Service Representative in a burner set, light the LEFT burner with a match. Positive end(1) of control panel. Remove old battery and replace with a like brand battery. • You should hear the igniter sparking. If the LEFT burner lights with a match, then...


