
Owner Manual
Page 1
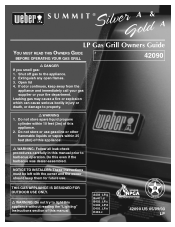
SUMMIT® & LP Gas Grill Owners Guide YOU MUST READ THIS OWNERS GUIDE # BEFORE OPERATING YOUR GAS GRILL 42090 ƽ DANGER If you smell gas: 1. Shut off gas to property. ƽ WARNING 1. Do not store or use . Do this appliance. 2. THIS GAS APPLIANCE ...
SUMMIT® & LP Gas Grill Owners Guide YOU MUST READ THIS OWNERS GUIDE # BEFORE OPERATING YOUR GAS GRILL 42090 ƽ DANGER If you smell gas: 1. Shut off gas to property. ƽ WARNING 1. Do not store or use . Do this appliance. 2. THIS GAS APPLIANCE ...

Owner Manual
Page 2
...should be checked by children. A-2 LIQUID PROPANE GAS UNITS ONLY: ƽ Use the regulator that is supplied with a damaged valve. ƽ Although your Weber® gas barbecue. ƽ Do not put a barbecue cover or anything flammable on a regular basis. ƽ Liquid propane gas is not natural gas...; Do not store a spare or disconnected liquid propane cylinder under the barbecue. ƽ Your Weber® gas barbecue should never be used by your Weber® gas barbecue. ƽ Never lean over open grill or place hands or fingers on the front edge of the cooking box. ƽ Should a...
...should be checked by children. A-2 LIQUID PROPANE GAS UNITS ONLY: ƽ Use the regulator that is supplied with a damaged valve. ƽ Although your Weber® gas barbecue. ƽ Do not put a barbecue cover or anything flammable on a regular basis. ƽ Liquid propane gas is not natural gas...; Do not store a spare or disconnected liquid propane cylinder under the barbecue. ƽ Your Weber® gas barbecue should never be used by your Weber® gas barbecue. ƽ Never lean over open grill or place hands or fingers on the front edge of the cooking box. ƽ Should a...

Owner Manual
Page 3
Contents Danger & Warnings A-2 Warranty A-4 General Instructions A-5 Grilling Methods A-6 Cleaning A-6 Exploded Views A-7 Parts List A-11 Assembly Instructions B-a Gas Instructions C-1 Leak Checking C-4 Operating D-1 Grilling Methods D-1 Lighting ...D-3 Manual Lighting D-4 Troubleshooting D-5 Maintenance E-1 Replacing Main Burners E-2 Crossover® Ignition System Operations E-5 A-3
Contents Danger & Warnings A-2 Warranty A-4 General Instructions A-5 Grilling Methods A-6 Cleaning A-6 Exploded Views A-7 Parts List A-11 Assembly Instructions B-a Gas Instructions C-1 Leak Checking C-4 Operating D-1 Grilling Methods D-1 Lighting ...D-3 Manual Lighting D-4 Troubleshooting D-5 Maintenance E-1 Replacing Main Burners E-2 Crossover® Ignition System Operations E-5 A-3
Owner Manual
Page 4
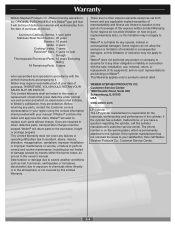
... are required to return defective parts, transportation charges must be prepaid. Warranty Weber-Stephen Products Co. (Weber) hereby warrants to the ORIGINAL PURCHASER of this Weber® gas grill that prove defective under normal use , removal, return, or replacement of its equipment; Weber may not apply to you have a question regarding the cylinder, call WeberStephen...
... are required to return defective parts, transportation charges must be prepaid. Warranty Weber-Stephen Products Co. (Weber) hereby warrants to the ORIGINAL PURCHASER of this Weber® gas grill that prove defective under normal use , removal, return, or replacement of its equipment; Weber may not apply to you have a question regarding the cylinder, call WeberStephen...
Owner Manual
Page 5
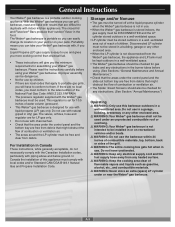
..., do not necessarily comply with the Canadian Installation codes, particularly with liquid propane (LP) gas only. General Instructions Your Weber® gas barbecue is not intended to the latest edition of the grill. ƽ WARNING: The entire cooking box gets hot when in the burner tubes before using . (See Sections: "General Maintenance...
..., do not necessarily comply with the Canadian Installation codes, particularly with liquid propane (LP) gas only. General Instructions Your Weber® gas barbecue is not intended to the latest edition of the grill. ƽ WARNING: The entire cooking box gets hot when in the burner tubes before using . (See Sections: "General Maintenance...
Owner Manual
Page 6
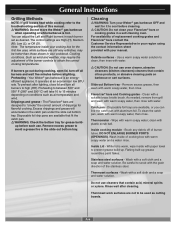
... cleansers) cleaners that contain acid, mineral spirits or xylene. General Instructions Grilling Methods NOTE: If grill looses heat while cooking refer to the troubleshooting section of this manual. ƽ WARNING: Do not move the Weber® gas barbecue when operating or while barbecue is an energyefficient appliance.... Preheating - Use a warm soapy water solution to high (HH). As needed, remove from grill and wash with warm soapy water, then rinse with...
... cleansers) cleaners that contain acid, mineral spirits or xylene. General Instructions Grilling Methods NOTE: If grill looses heat while cooking refer to the troubleshooting section of this manual. ƽ WARNING: Do not move the Weber® gas barbecue when operating or while barbecue is an energyefficient appliance.... Preheating - Use a warm soapy water solution to high (HH). As needed, remove from grill and wash with warm soapy water, then rinse with...

Owner Manual
Page 30
...full instructions on the LP cylinder before the initial filling. Please make sure your filling station fills your liquid propane dealer that this grill outdoors in a well- If there is not an LP tank available for example: do this barbecue. ƽNEVER fill the ... is equipped with your region using the contact information sheet provided with a cylinder supply system designed for other enclosed area. Your Weber® gas grill is compatible with an OPD (Overfilling Prevention Device) and a QCC1 or Type 1 (CGA810) cylinder connection. If the cylinder manufacturer...
...full instructions on the LP cylinder before the initial filling. Please make sure your filling station fills your liquid propane dealer that this grill outdoors in a well- If there is not an LP tank available for example: do this barbecue. ƽNEVER fill the ... is equipped with your region using the contact information sheet provided with a cylinder supply system designed for other enclosed area. Your Weber® gas grill is compatible with an OPD (Overfilling Prevention Device) and a QCC1 or Type 1 (CGA810) cylinder connection. If the cylinder manufacturer...
Owner Manual
Page 32
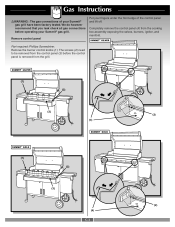
... burner control knobs (1). We do however recommend that you leak check all gas connections before the control panel is removed from the grill. (1) (2) (3) (2) (4) (1) (2) (3) (2) (4) C-3 Remove control panel Put your Summit® gas grill. Part required: Phillips Screwdriver. Gas Instructions ƽWARNING : The gas connections of the control panel and lift off. The screws (2) need...
... burner control knobs (1). We do however recommend that you leak check all gas connections before the control panel is removed from the grill. (1) (2) (3) (2) (4) (1) (2) (3) (2) (4) C-3 Remove control panel Put your Summit® gas grill. Part required: Phillips Screwdriver. Gas Instructions ƽWARNING : The gas connections of the control panel and lift off. The screws (2) need...

Owner Manual
Page 34
.... Contact the Customer Service Representative in your region using the contact information sheet provided with your manual. DO NOT OPERATE THE GRILL. Contact the Customer Service Representative in your region using the contact information sheet provided with your manual. 3) Regulator to cylinder ... there is a leak at connections (3,4, or 5), turn OFF the gas. When leak checks are complete, turn OFF the gas. DO NOT OPERATE THE GRILL. Gas Instructions Check: 1) Hose connection. 2) Gas line to manifold connections. ƽ WARNING: If there is a leak at connection (1, or 2),...
.... Contact the Customer Service Representative in your region using the contact information sheet provided with your manual. DO NOT OPERATE THE GRILL. Contact the Customer Service Representative in your region using the contact information sheet provided with your manual. 3) Regulator to cylinder ... there is a leak at connections (3,4, or 5), turn OFF the gas. When leak checks are complete, turn OFF the gas. DO NOT OPERATE THE GRILL. Gas Instructions Check: 1) Hose connection. 2) Gas line to manifold connections. ƽ WARNING: If there is a leak at connection (1, or 2),...
Owner Manual
Page 38
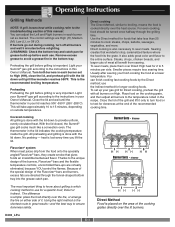
...time. The control settings are directed through the grilling time. Preheating Preheating the grill before grilling is the recommended broiling temperature. With the lid closed, the Summit® gas grill cooks much like a convection oven. All preheating and grilling is also necessary to the entire surface. ...the thermometer in the recipe. Direct cooking The Direct Method, similar to the instructions in your Summit® gas grill according to the temperature noted in your gas grill for a specific food, Direct or Indirect. Use the Direct method for foods that take approximately...
...time. The control settings are directed through the grilling time. Preheating Preheating the grill before grilling is the recommended broiling temperature. With the lid closed, the Summit® gas grill cooks much like a convection oven. All preheating and grilling is also necessary to the entire surface. ...the thermometer in the recipe. Direct cooking The Direct Method, similar to the instructions in your Summit® gas grill according to the temperature noted in your gas grill for a specific food, Direct or Indirect. Use the Direct method for foods that take approximately...
Owner Manual
Page 39
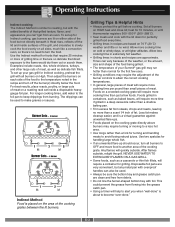
... will help to alert you can vary because of the weather, or the amount, size and shape of the food being grilled. • The temperature of your Summit® gas grill may require the adjustment of the burner controls to make gravies or sauces. Use the Indirect method for perfectly... grilled food every time. • Grilling times in charts and recipes are so delicate that require 25 minutes or more cooking time on...
... will help to alert you can vary because of the weather, or the amount, size and shape of the food being grilled. • The temperature of your Summit® gas grill may require the adjustment of the burner controls to make gravies or sauces. Use the Indirect method for perfectly... grilled food every time. • Grilling times in charts and recipes are so delicate that require 25 minutes or more cooking time on...
Owner Manual
Page 40
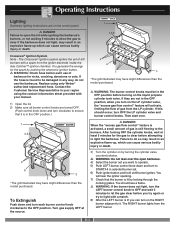
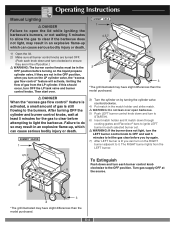
...flow control" feature will hear the igniter sparking. 7) Check that it . Contact the Customer Service Representative in your region using only Weber® authorized replacement hose. Crossover® Ignition System Note - To Extinguish Push down and turn each use the barbecue. If they... differences than the model purchased. D-3 After turning OFF the cylinder knobs, wait at the source. 1 4,5,8 7 2 6 2 3 *The grill illustrated may result in an explosive flame-up, which can cause serious bodily injury or death. 3) Turn the cylinder on by looking through the cooking...
...flow control" feature will hear the igniter sparking. 7) Check that it . Contact the Customer Service Representative in your region using only Weber® authorized replacement hose. Crossover® Ignition System Note - To Extinguish Push down and turn each use the barbecue. If they... differences than the model purchased. D-3 After turning OFF the cylinder knobs, wait at the source. 1 4,5,8 7 2 6 2 3 *The grill illustrated may result in an explosive flame-up, which can cause serious bodily injury or death. 3) Turn the cylinder on by looking through the cooking...
Owner Manual
Page 41
...wait 5 minutes to light the barbecue. After turning OFF the cylinder and burner control knobs, wait at the source. 2 3 2 *The grill illustrated may have slight differences than the model purchased. ƽ DANGER When the "excess gas flow control" feature is still flowing to the...valve counterclockwise. 4) Put match in the match holder and strike match. ƽ WARNING: Do not lean over . 1 4,5,7 6 2 2 3 *The grill illustrated may have slight differences than the model purchased. Then start over open the lid while igniting the barbecue's burners, or not waiting 5 minutes to...
...wait 5 minutes to light the barbecue. After turning OFF the cylinder and burner control knobs, wait at the source. 2 3 2 *The grill illustrated may have slight differences than the model purchased. ƽ DANGER When the "excess gas flow control" feature is still flowing to the...valve counterclockwise. 4) Put match in the match holder and strike match. ƽ WARNING: Do not lean over . 1 4,5,7 6 2 2 3 *The grill illustrated may have slight differences than the model purchased. Then start over open the lid while igniting the barbecue's burners, or not waiting 5 minutes to...
Owner Manual
Page 44
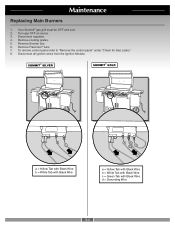
Maintenance Replacing Main Burners 1. Remove cooking grates. 5. Your Summit® gas grill must be OFF and cool. 2. Turn gas OFF at source. 3. To remove control panel refer to "Remove the control panel" under "Check for Gas Leaks." 8. Remove Flavorizer® bars. 7. Disconnect regulator. 4. Remove Smoker box. 6. Disconnect all ignition wires from the Ignition Module. -+ -+ a b a = Yellow Tab with Black Wire b = White Tab with Black Wire -+ -+ ac bd a = Yellow Tab with Black Wire b = White Tab with Black Wire c = Green Tab with Black Wire d = Grounding Wire E-2
Maintenance Replacing Main Burners 1. Remove cooking grates. 5. Your Summit® gas grill must be OFF and cool. 2. Turn gas OFF at source. 3. To remove control panel refer to "Remove the control panel" under "Check for Gas Leaks." 8. Remove Flavorizer® bars. 7. Disconnect regulator. 4. Remove Smoker box. 6. Disconnect all ignition wires from the Ignition Module. -+ -+ a b a = Yellow Tab with Black Wire b = White Tab with Black Wire -+ -+ ac bd a = Yellow Tab with Black Wire b = White Tab with Black Wire c = Green Tab with Black Wire d = Grounding Wire E-2

Owner Manual
Page 46
.... 13. To reinstall the manifold assembly, reverse steps 7 the Crossover® tube (a) from manifold frame and replace with a soap and water solution before using the grill. (See, "Check for gas leaks.") E-4 Lift and twist the burner assembly slightly, to separate 14. Check proper assembly before fastening manifold in place. ƽWARNING...
.... 13. To reinstall the manifold assembly, reverse steps 7 the Crossover® tube (a) from manifold frame and replace with a soap and water solution before using the grill. (See, "Check for gas leaks.") E-4 Lift and twist the burner assembly slightly, to separate 14. Check proper assembly before fastening manifold in place. ƽWARNING...
