

Owner Manual
Page 2
... gas in operation. ƽ A dented or rusty liquid propane cylinder may be properly assembled according to correct the problem yourself. 3. A-2 Accessible parts of the barbecue may be hazardous and should exercise reasonable care when operating your fire department. LIQUID PROPANE GAS UNITS ONLY: ƽ Use the ...to disconnect any gas fitting while your Weber® gas barbecue. ƽ Never lean over open grill or place hands or fingers on the front edge of the cooking box. ƽ Should a grease fire occur, turn all gas valves off all parts are in place. Do not use ...
... gas in operation. ƽ A dented or rusty liquid propane cylinder may be properly assembled according to correct the problem yourself. 3. A-2 Accessible parts of the barbecue may be hazardous and should exercise reasonable care when operating your fire department. LIQUID PROPANE GAS UNITS ONLY: ƽ Use the ...to disconnect any gas fitting while your Weber® gas barbecue. ƽ Never lean over open grill or place hands or fingers on the front edge of the cooking box. ƽ Should a grease fire occur, turn all gas valves off all parts are in place. Do not use ...

Owner Manual
Page 3
Contents Danger & Warnings A-2 Warranty A-4 General Instructions A-5 Grilling Methods A-6 Cleaning A-6 Exploded Views A-7 Parts List A-11 Assembly Instructions B-a Gas Instructions C-1 Leak Checking C-4 Operating D-1 Grilling Methods D-1 Lighting ...D-3 Manual Lighting D-4 Troubleshooting D-5 Maintenance E-1 Replacing Main Burners E-2 Crossover® Ignition System Operations E-5 A-3
Contents Danger & Warnings A-2 Warranty A-4 General Instructions A-5 Grilling Methods A-6 Cleaning A-6 Exploded Views A-7 Parts List A-11 Assembly Instructions B-a Gas Instructions C-1 Leak Checking C-4 Operating D-1 Grilling Methods D-1 Lighting ...D-3 Manual Lighting D-4 Troubleshooting D-5 Maintenance E-1 Replacing Main Burners E-2 Crossover® Ignition System Operations E-5 A-3
Owner Manual
Page 4
... perform normal and routine maintenance, including but not limited to damage caused by this Limited Warranty. Weber® will elect to replace such parts without charge. There are no such representations are required to return defective parts, transportation charges must be free of defects in material and workmanship from the date of purchase...
... perform normal and routine maintenance, including but not limited to damage caused by this Limited Warranty. Weber® will elect to replace such parts without charge. There are no such representations are required to return defective parts, transportation charges must be free of defects in material and workmanship from the date of purchase...

Owner Manual
Page 12
Summit® Silver A Parts List Flavorizor® Bars - 2 Sets Hinge Pin- 2 Hair Pin Cotter- 2 1-1/4 inch Bolts (1/4 x 20 x 1-1/4 inch Bolt) - 2 Stainless Steel Cooking Grates - 2 Bottom Tray - 1 Nut Hex (1/4 x 20 Blk Zinc) - 2 1/2 inch Bolts (1/4 x 20 x 1/2 inch Bolt) - 8 Nylon Washer - 10 Catch-Pan Holder - 1 Wing Nut (10-24) - 2 Catch-Pan - 1 Plastic Washer - 1 Disposable Drip Pans - 2 Wrench - 1 7/16 inch Wrench - 1 LP Tank - 1 A-12
Summit® Silver A Parts List Flavorizor® Bars - 2 Sets Hinge Pin- 2 Hair Pin Cotter- 2 1-1/4 inch Bolts (1/4 x 20 x 1-1/4 inch Bolt) - 2 Stainless Steel Cooking Grates - 2 Bottom Tray - 1 Nut Hex (1/4 x 20 Blk Zinc) - 2 1/2 inch Bolts (1/4 x 20 x 1/2 inch Bolt) - 8 Nylon Washer - 10 Catch-Pan Holder - 1 Wing Nut (10-24) - 2 Catch-Pan - 1 Plastic Washer - 1 Disposable Drip Pans - 2 Wrench - 1 7/16 inch Wrench - 1 LP Tank - 1 A-12
Owner Manual
Page 14
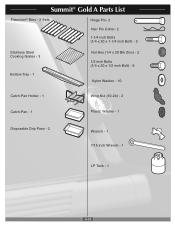
Summit® Gold A Parts List Flavorizor® Bars - 2 Sets Hinge Pin- 2 Hair Pin Cotter- 2 1-1/4 inch Bolts (1/4 x 20 x 1-1/4 inch Bolt) - 2 Stainless Steel Cooking Grates - 3 Bottom Tray - 1 Nut Hex (1/4 x 20 Blk Zinc) - 2 1/2 inch Bolts (1/4 x 20 x 1/2 inch Bolt) - 8 Nylon Washer - 10 Catch-Pan Holder - 1 Wing Nut (10-24) - 2 Catch-Pan - 1 Plastic Washer - 1 Disposable Drip Pans - 2 Wrench - 1 7/16 inch Wrench - 1 LP Tank - 1 A-14
Summit® Gold A Parts List Flavorizor® Bars - 2 Sets Hinge Pin- 2 Hair Pin Cotter- 2 1-1/4 inch Bolts (1/4 x 20 x 1-1/4 inch Bolt) - 2 Stainless Steel Cooking Grates - 3 Bottom Tray - 1 Nut Hex (1/4 x 20 Blk Zinc) - 2 1/2 inch Bolts (1/4 x 20 x 1/2 inch Bolt) - 8 Nylon Washer - 10 Catch-Pan Holder - 1 Wing Nut (10-24) - 2 Catch-Pan - 1 Plastic Washer - 1 Disposable Drip Pans - 2 Wrench - 1 7/16 inch Wrench - 1 LP Tank - 1 A-14
Owner Manual
Page 32
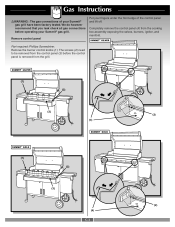
...; gas grill. Remove the burner control knobs (1). The screws (2) need to be removed from the control panel (3) before operating your Summit® gas grill have been factory tested. Part required: Phillips Screwdriver. Completely remove the control panel (4) from the grill. (1) (2) (3) (2) (4) (1) (2) (3) (2) (4) C-3 We do however recommend that you leak check all gas connections before...
...; gas grill. Remove the burner control knobs (1). The screws (2) need to be removed from the control panel (3) before operating your Summit® gas grill have been factory tested. Part required: Phillips Screwdriver. Completely remove the control panel (4) from the grill. (1) (2) (3) (2) (4) (1) (2) (3) (2) (4) C-3 We do however recommend that you leak check all gas connections before...

Owner Manual
Page 35
... of the control panel, replace the two wires(1,2) of the cooking box. (1) Line up screws with Black Wire d = Grounding Wire C-6 Gas Instructions Reinstall control panel Parts required: control panel, screws, and burner control knobs. Place the control panel back onto the control panel brackets on either side of the front of...
... of the control panel, replace the two wires(1,2) of the cooking box. (1) Line up screws with Black Wire d = Grounding Wire C-6 Gas Instructions Reinstall control panel Parts required: control panel, screws, and burner control knobs. Place the control panel back onto the control panel brackets on either side of the front of...
Owner Manual
Page 42
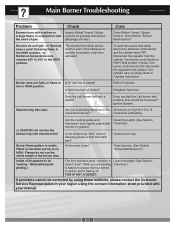
...(See Section Flavorizer® bars heavily coated with your manual. Is fuel hose bent or kinked? Clean bottom tray Burner flame pattern is part of lid appears to 300˚ in the HIGH position. Flames do not light. -or- Experiencing flare-ups: Are you can light... preheating. ƽ CAUTION: Do not line the bottom tray with a match? Main Burner Troubleshooting Problem Check Burners burn with a yellow or Inspect Weber® Insect / Spider orange flame, in conjunction with a match, then check the Crossover® Ignition System. Turn cylinder valve on grease? Flame...
...(See Section Flavorizer® bars heavily coated with your manual. Is fuel hose bent or kinked? Clean bottom tray Burner flame pattern is part of lid appears to 300˚ in the HIGH position. Flames do not light. -or- Experiencing flare-ups: Are you can light... preheating. ƽ CAUTION: Do not line the bottom tray with a match? Main Burner Troubleshooting Problem Check Burners burn with a yellow or Inspect Weber® Insect / Spider orange flame, in conjunction with a match, then check the Crossover® Ignition System. Turn cylinder valve on grease? Flame...

Owner Manual
Page 43
... Annual Maintenance Inspection and cleaning of the burner tube. If there is dust or dirt on the screens, remove the burners for replacement parts. Use a Steel bristle brush to property. an old toothbrush). ƽ CAUTION: Do not clean the spider/insect screens with a soft bristle ... spiders and other insects access to the burner tubes through the air shutter openings. (1) Lightly tap the burner to be cleaned, call Weber-Stephen Products Customer Service for cleaning the screens. Do not dislodge the spider/ insect screens or enlarge the screen openings. Brush the spider...
... Annual Maintenance Inspection and cleaning of the burner tube. If there is dust or dirt on the screens, remove the burners for replacement parts. Use a Steel bristle brush to property. an old toothbrush). ƽ CAUTION: Do not clean the spider/insect screens with a soft bristle ... spiders and other insects access to the burner tubes through the air shutter openings. (1) Lightly tap the burner to be cleaned, call Weber-Stephen Products Customer Service for cleaning the screens. Do not dislodge the spider/ insect screens or enlarge the screen openings. Brush the spider...
Owner Manual
Page 47
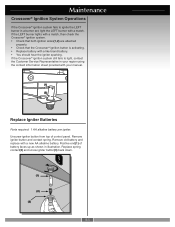
... Crossover® Ignition System Operations If the Crossover® ignition system fails to light, contact the Customer Service Representative in your manual. (1) (2) Replace Igniter Batteries Parts required: 1 AA alkaline battery per igniter.
... Crossover® Ignition System Operations If the Crossover® ignition system fails to light, contact the Customer Service Representative in your manual. (1) (2) Replace Igniter Batteries Parts required: 1 AA alkaline battery per igniter.