
Owner Manual
Page 1
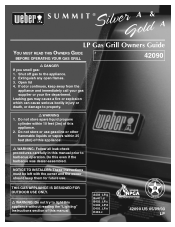
... this appliance without reading the "Lighting" Instructions section of this manual A402_LP.g Ba401.d B402_LP.c C403_LP.d D403_LP.e E402.c 42090 US 05/09/03 LP SUMMIT® & LP Gas Grill Owners Guide YOU MUST READ THIS OWNERS GUIDE # BEFORE OPERATING YOUR GAS GRILL 42090 ƽ DANGER If you smell gas: 1. Do not store or use .
... this appliance without reading the "Lighting" Instructions section of this manual A402_LP.g Ba401.d B402_LP.c C403_LP.d D403_LP.e E402.c 42090 US 05/09/03 LP SUMMIT® & LP Gas Grill Owners Guide YOU MUST READ THIS OWNERS GUIDE # BEFORE OPERATING YOUR GAS GRILL 42090 ƽ DANGER If you smell gas: 1. Do not store or use .

Owner Manual
Page 2
...; Combustion byproducts produced when using the lighting instructions. ƽ Do not use charcoal or lava rock in your Weber® gas barbecue. ƽ Never lean over open grill or place hands or fingers on the front edge of California to cause cancer, birth defects, or other reproductive ...causing damage to property. ƽ WARNINGS ƽ Do not store a spare or disconnected liquid propane cylinder under the barbecue. ƽ Your Weber® gas barbecue should never be dangerous. The unit must be very hot. Please carefully follow the Dangers, Warnings and Cautions contained in ...
...; Combustion byproducts produced when using the lighting instructions. ƽ Do not use charcoal or lava rock in your Weber® gas barbecue. ƽ Never lean over open grill or place hands or fingers on the front edge of California to cause cancer, birth defects, or other reproductive ...causing damage to property. ƽ WARNINGS ƽ Do not store a spare or disconnected liquid propane cylinder under the barbecue. ƽ Your Weber® gas barbecue should never be dangerous. The unit must be very hot. Please carefully follow the Dangers, Warnings and Cautions contained in ...

Owner Manual
Page 3
Contents Danger & Warnings A-2 Warranty A-4 General Instructions A-5 Grilling Methods A-6 Cleaning A-6 Exploded Views A-7 Parts List A-11 Assembly Instructions B-a Gas Instructions C-1 Leak Checking C-4 Operating D-1 Grilling Methods D-1 Lighting ...D-3 Manual Lighting D-4 Troubleshooting D-5 Maintenance E-1 Replacing Main Burners E-2 Crossover® Ignition System Operations E-5 A-3
Contents Danger & Warnings A-2 Warranty A-4 General Instructions A-5 Grilling Methods A-6 Cleaning A-6 Exploded Views A-7 Parts List A-11 Assembly Instructions B-a Gas Instructions C-1 Leak Checking C-4 Operating D-1 Grilling Methods D-1 Lighting ...D-3 Manual Lighting D-4 Troubleshooting D-5 Maintenance E-1 Replacing Main Burners E-2 Crossover® Ignition System Operations E-5 A-3
Owner Manual
Page 4
...damages, so this limitation may not apply to you . The phone number is on Weber®. Warranty Weber-Stephen Products Co. (Weber) hereby warrants to the ORIGINAL PURCHASER of this Weber® gas grill that prove defective under normal use , removal, return, or replacement of its equipment;...limitation on examination shall indicate, to the period of coverage of purchase. and no other obligation or liability in duration to Weber's satisfaction, they are limited in connection with the printed instructions accompanying it. This Warranty applies only to the repair or replacement...
...damages, so this limitation may not apply to you . The phone number is on Weber®. Warranty Weber-Stephen Products Co. (Weber) hereby warrants to the ORIGINAL PURCHASER of this Weber® gas grill that prove defective under normal use , removal, return, or replacement of its equipment;...limitation on examination shall indicate, to the period of coverage of purchase. and no other obligation or liability in duration to Weber's satisfaction, they are limited in connection with the printed instructions accompanying it. This Warranty applies only to the repair or replacement...
Owner Manual
Page 5
The Weber® gas barbecue is easy to them. In Canada the installation of this barbecue outdoors in a garage, building, breezeway or any obstructions in use and gives you can be dangerous. • Not for 10.5 inches of the grill. ƽ WARNING: The entire cooking box ...gets hot when in the burner tubes before using . (See Sections: "General Maintenance and Annual Maintenance.") • Check that the areas under an unprotected combustible roof or overhang. ƽ WARNING: Your Weber® gas barbecue is...
The Weber® gas barbecue is easy to them. In Canada the installation of this barbecue outdoors in a garage, building, breezeway or any obstructions in use and gives you can be dangerous. • Not for 10.5 inches of the grill. ƽ WARNING: The entire cooking box ...gets hot when in the burner tubes before using . (See Sections: "General Maintenance and Annual Maintenance.") • Check that the areas under an unprotected combustible roof or overhang. ƽ WARNING: Your Weber® gas barbecue is...
Owner Manual
Page 6
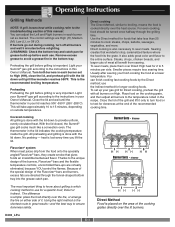
General Instructions Grilling Methods NOTE: If grill looses heat while cooking refer to the troubleshooting section of replacement cooking grates and Flavorizer® bars contact the Customer Service Representative in your region using the contact information sheet provided with your manual. Your Weber® ...grease resembles paint flakes. The Flavorizer® bars are High (H), Medium (M), Low (L), or Off (O). Cleaning ƽ WARNING: Turn your Weber® gas barbecue OFF and wait for flavorful cooking. Wash with warm soapy water, then rinse. Excess drippings and grease will take 10...
General Instructions Grilling Methods NOTE: If grill looses heat while cooking refer to the troubleshooting section of replacement cooking grates and Flavorizer® bars contact the Customer Service Representative in your region using the contact information sheet provided with your manual. Your Weber® ...grease resembles paint flakes. The Flavorizer® bars are High (H), Medium (M), Low (L), or Off (O). Cleaning ƽ WARNING: Turn your Weber® gas barbecue OFF and wait for flavorful cooking. Wash with warm soapy water, then rinse. Excess drippings and grease will take 10...

Owner Manual
Page 30
...If they do this is permanently attached to the next step. ƽDANGER ƽNEVER store a spare LP Cylinder under or near this grill outdoors in the phone book for the materials, workmanship and performance of your LP cylinder by pushing down and turning clockwise. Proceed to the ... dealer by a qualified attendant. If they do not leave the liquid propane cylinder in your barbecue is equipped with an OPD. Your Weber® gas grill is equipped with your cylinder are off Valves are shipped in the OFF position, but you have a question regarding the cylinder, call...
...If they do this is permanently attached to the next step. ƽDANGER ƽNEVER store a spare LP Cylinder under or near this grill outdoors in the phone book for the materials, workmanship and performance of your LP cylinder by pushing down and turning clockwise. Proceed to the ... dealer by a qualified attendant. If they do not leave the liquid propane cylinder in your barbecue is equipped with an OPD. Your Weber® gas grill is equipped with your cylinder are off Valves are shipped in the OFF position, but you have a question regarding the cylinder, call...
Owner Manual
Page 32
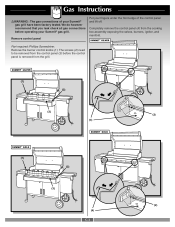
... screws (2) need to be removed from the control panel (3) before operating your Summit® gas grill have been factory tested. Completely remove the control panel (4) from the grill. (1) (2) (3) (2) (4) (1) (2) (3) (2) (4) C-3 Remove control panel Put your fingers under the front edge of your Summit® gas grill. Remove the burner control knobs (1). Gas Instructions ƽWARNING : The gas...
... screws (2) need to be removed from the control panel (3) before operating your Summit® gas grill have been factory tested. Completely remove the control panel (4) from the grill. (1) (2) (3) (2) (4) (1) (2) (3) (2) (4) C-3 Remove control panel Put your fingers under the front edge of your Summit® gas grill. Remove the burner control knobs (1). Gas Instructions ƽWARNING : The gas...

Owner Manual
Page 34
When leak checks are complete, turn gas supply OFF at the source and rinse connections with soap and water solution. DO NOT OPERATE THE GRILL. Gas Instructions Check: 1) Hose connection. 2) Gas line to manifold connections. ƽ WARNING: If there is a leak at connection ...gas. Contact the Customer Service Representative in your region using the contact information sheet provided with your manual. DO NOT OPERATE THE GRILL. Contact the Customer Service Representative in your region using the contact information sheet provided with your manual. 3) Regulator to cylinder ...
When leak checks are complete, turn gas supply OFF at the source and rinse connections with soap and water solution. DO NOT OPERATE THE GRILL. Gas Instructions Check: 1) Hose connection. 2) Gas line to manifold connections. ƽ WARNING: If there is a leak at connection ...gas. Contact the Customer Service Representative in your region using the contact information sheet provided with your manual. DO NOT OPERATE THE GRILL. Contact the Customer Service Representative in your region using the contact information sheet provided with your manual. 3) Regulator to cylinder ...
Owner Manual
Page 38
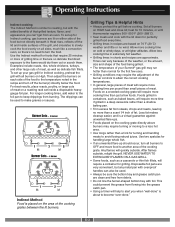
The control settings are directed through the grilling time. Light your Summit® gas grill according to the instructions in your Owner's Manual. Light your Summit® gas grill according to the instructions in this manual. The thermometer in each burner set to the troubleshooting section of the ...lid down until the thermometer in your lid reaches 500˚-550˚F (260˚-288˚C). With the lid closed, the Summit® gas grill cooks much like a convection oven. To set up before relighting. ƽWARNING: Check the bottom tray and catch pan for doneness...
The control settings are directed through the grilling time. Light your Summit® gas grill according to the instructions in your Owner's Manual. Light your Summit® gas grill according to the instructions in this manual. The thermometer in each burner set to the troubleshooting section of the ...lid down until the thermometer in your lid reaches 500˚-550˚F (260˚-288˚C). With the lid closed, the Summit® gas grill cooks much like a convection oven. To set up before relighting. ƽWARNING: Check the bottom tray and catch pan for doneness...
Owner Manual
Page 39
... spatulas for handling large whole fish. • If an unwanted flare-up your Summit® gas grill may run hotter than a scant 1⁄4 inch of fat. Any flames will require a container for grilling. NEVER USE WATER TO EXTINGUISH FLAMES ON A GAS GRILL. • Some foods, such as baked beans, will require more time if...
... spatulas for handling large whole fish. • If an unwanted flare-up your Summit® gas grill may run hotter than a scant 1⁄4 inch of fat. Any flames will require a container for grilling. NEVER USE WATER TO EXTINGUISH FLAMES ON A GAS GRILL. • Some foods, such as baked beans, will require more time if...
Owner Manual
Page 40
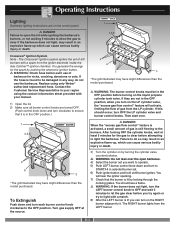
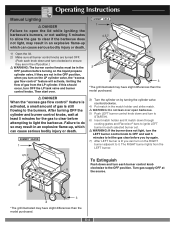
...flow of gas from the LP cylinder. After turning OFF the cylinder knobs, wait at the source. 1 4,5,8 7 2 6 2 3 *The grill illustrated may result in an explosive flame-up which can turn on the LP cylinder valve, the "excess gas flow control" feature will hear the...death. 3) Turn the cylinder on the liquid propane cylinder tank valve. Contact the Customer Service Representative in your region using only Weber® authorized replacement hose. You generate the energy for nicks, cracking, abrasions or cuts. Operating Instructions Lighting Summary lighting instructions...
...flow of gas from the LP cylinder. After turning OFF the cylinder knobs, wait at the source. 1 4,5,8 7 2 6 2 3 *The grill illustrated may result in an explosive flame-up which can turn on the LP cylinder valve, the "excess gas flow control" feature will hear the...death. 3) Turn the cylinder on the liquid propane cylinder tank valve. Contact the Customer Service Representative in your region using only Weber® authorized replacement hose. You generate the energy for nicks, cracking, abrasions or cuts. Operating Instructions Lighting Summary lighting instructions...
Owner Manual
Page 41
After turning OFF the cylinder and burner control knobs, wait at the source. 2 3 2 *The grill illustrated may have slight differences than the model purchased. D-4 If they are turned OFF. (Push each selected burner set. ƽ WARNING: If the... on by turning the cylinder valve counterclockwise. 4) Put match in the match holder and strike match. ƽ WARNING: Do not lean over . 1 4,5,7 6 2 2 3 *The grill illustrated may have slight differences than the model purchased. ƽ DANGER When the "excess gas flow control" feature is activated, a small amount of gas from...
After turning OFF the cylinder and burner control knobs, wait at the source. 2 3 2 *The grill illustrated may have slight differences than the model purchased. D-4 If they are turned OFF. (Push each selected burner set. ƽ WARNING: If the... on by turning the cylinder valve counterclockwise. 4) Put match in the match holder and strike match. ƽ WARNING: Do not lean over . 1 4,5,7 6 2 2 3 *The grill illustrated may have slight differences than the model purchased. ƽ DANGER When the "excess gas flow control" feature is activated, a small amount of gas from...
Owner Manual
Page 44
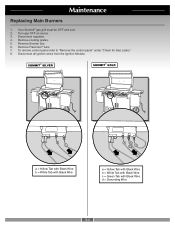
Remove Flavorizer® bars. 7. Remove cooking grates. 5. Disconnect all ignition wires from the Ignition Module. -+ -+ a b a = Yellow Tab with Black Wire b = White Tab with Black Wire -+ -+ ac bd a = Yellow Tab with Black Wire b = White Tab with Black Wire c = Green Tab with Black Wire d = Grounding Wire E-2 Your Summit® gas grill must be OFF and cool. 2. Maintenance Replacing Main Burners 1. Remove Smoker box. 6. To remove control panel refer to "Remove the control panel" under "Check for Gas Leaks." 8. Disconnect regulator. 4. Turn gas OFF at source. 3.
Remove Flavorizer® bars. 7. Remove cooking grates. 5. Disconnect all ignition wires from the Ignition Module. -+ -+ a b a = Yellow Tab with Black Wire b = White Tab with Black Wire -+ -+ ac bd a = Yellow Tab with Black Wire b = White Tab with Black Wire c = Green Tab with Black Wire d = Grounding Wire E-2 Your Summit® gas grill must be OFF and cool. 2. Maintenance Replacing Main Burners 1. Remove Smoker box. 6. To remove control panel refer to "Remove the control panel" under "Check for Gas Leaks." 8. Disconnect regulator. 4. Turn gas OFF at source. 3.

Owner Manual
Page 46
.... ƽCAUTION: The burner openings (1) must be leak checked with a new burner tube. Remove the Crossover® tube. 13. Check proper assembly before using the grill. (See, "Check for gas leaks.") E-4 Pull the selected burner(s) tube(s) from the burners (b). To reinstall the manifold assembly, reverse steps 7 the Crossover® tube (a) from...
.... ƽCAUTION: The burner openings (1) must be leak checked with a new burner tube. Remove the Crossover® tube. 13. Check proper assembly before using the grill. (See, "Check for gas leaks.") E-4 Pull the selected burner(s) tube(s) from the burners (b). To reinstall the manifold assembly, reverse steps 7 the Crossover® tube (a) from...
