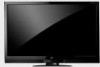
XVT3D650SV User Manual
Page 6
...388-2009) List of US Television Stations: www.high-techproductions.com/usTVstations.htm Your TV comes with cable and satellite TV services, gaming consoles, VCRs, DVD players, and similar products. XVT3D650SV Television Antenna Connection Protection If an outside antenna/satellite dish or cable system is to ...of the grounding electrode. Lightning Protection For added protection of the coaxial cable is intended to be connected to the TV, make sure that receive TV programming through an antenna now need a converter box to continue to digital television broadcasting was complete on June 12,...
...388-2009) List of US Television Stations: www.high-techproductions.com/usTVstations.htm Your TV comes with cable and satellite TV services, gaming consoles, VCRs, DVD players, and similar products. XVT3D650SV Television Antenna Connection Protection If an outside antenna/satellite dish or cable system is to ...of the grounding electrode. Lightning Protection For added protection of the coaxial cable is intended to be connected to the TV, make sure that receive TV programming through an antenna now need a converter box to continue to digital television broadcasting was complete on June 12,...
XVT3D650SV User Manual
Page 7
...Activating the Bluetooth Remote Control 8 Using the Remote for Your Other Devices 8 Completing the First-Time Setup 9 Connecting Your Devices to the TV 11 Before You Begin 11 HDMI...11 Component 11 RGB...11 RF/Antenna 11 Choosing the Correct Connection 11 BEST...11 BETTER 11 Connecting ...Your Devices 12 Setting Up Your Network Connection 13 Connecting to A Wired Network 13 Connecting to a Wireless Network 13 Adjusting the TV Settings 15 Changing the Input Source 15 Adjusting the Picture Settings 15 Adjusting the Advanced Picture Settings 16 Adjusting the Color Temperature 17 ...
...Activating the Bluetooth Remote Control 8 Using the Remote for Your Other Devices 8 Completing the First-Time Setup 9 Connecting Your Devices to the TV 11 Before You Begin 11 HDMI...11 Component 11 RGB...11 RF/Antenna 11 Choosing the Correct Connection 11 BEST...11 BETTER 11 Connecting ...Your Devices 12 Setting Up Your Network Connection 13 Connecting to A Wired Network 13 Connecting to a Wireless Network 13 Adjusting the TV Settings 15 Changing the Input Source 15 Adjusting the Picture Settings 15 Adjusting the Advanced Picture Settings 16 Adjusting the Color Temperature 17 ...
XVT3D650SV User Manual
Page 8
...(PIP) / Picture-Outside-Picture (POP 27 Choosing Inputs for the Main and Secondary Windows 27 TV...27 Composite AV 27 Component 27 HDMI...27 RGB...27 Using the Network Connection Menu 28 Connecting ... 30 Restoring the TV to Factory Default Settings 30 Using Guided Setup 31 Using the Digital Episode Guide 32 Using the Info Window 32 Using VIZIO Internet Apps 33 Using the VIA Shortcut Buttons...34 Creating an Owner PIN 34 Creating a New User Profile 35 Removing a User Profile 35 XVT3D650SV Restoring the VIA Dock to the Factory Default Settings 36 Viewing Theater 3D 37 How Theater 3D...
...(PIP) / Picture-Outside-Picture (POP 27 Choosing Inputs for the Main and Secondary Windows 27 TV...27 Composite AV 27 Component 27 HDMI...27 RGB...27 Using the Network Connection Menu 28 Connecting ... 30 Restoring the TV to Factory Default Settings 30 Using Guided Setup 31 Using the Digital Episode Guide 32 Using the Info Window 32 Using VIZIO Internet Apps 33 Using the VIA Shortcut Buttons...34 Creating an Owner PIN 34 Creating a New User Profile 35 Removing a User Profile 35 XVT3D650SV Restoring the VIA Dock to the Factory Default Settings 36 Viewing Theater 3D 37 How Theater 3D...
XVT3D650SV User Manual
Page 9
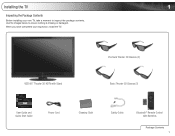
... the Package Contents Before installing your inspection, install the TV. When you have completed your new TV, take a moment to ensure nothing is missing or damaged. Premium Theater 3D Glasses (2) VIZIO 65" Theater 3D HDTV with Stand Basic Theater 3D Glasses (2) XVT3D424SV / XVT3D474SV / XVT3D554SV QUICK START GUIDE XVT3D424SV / XVT3D474SV / XVT3D554SV QUICK START GUIDE...
... the Package Contents Before installing your inspection, install the TV. When you have completed your new TV, take a moment to ensure nothing is missing or damaged. Premium Theater 3D Glasses (2) VIZIO 65" Theater 3D HDTV with Stand Basic Theater 3D Glasses (2) XVT3D424SV / XVT3D474SV / XVT3D554SV QUICK START GUIDE XVT3D424SV / XVT3D474SV / XVT3D554SV QUICK START GUIDE...
XVT3D650SV User Manual
Page 10
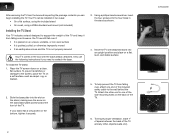
... plate points toward the front of the included safety cable to the screen, place the TV on a soft surface, such as shown. 4. Attach the other objects (walls, etc). 2 XVT3D650SV Your TV can begin installing the TV. 1 After removing the TV from falling over if: • It is placed on an uneven, unstable, or non-level...
... plate points toward the front of the included safety cable to the screen, place the TV on a soft surface, such as shown. 4. Attach the other objects (walls, etc). 2 XVT3D650SV Your TV can begin installing the TV. 1 After removing the TV from falling over if: • It is placed on an uneven, unstable, or non-level...

XVT3D650SV User Manual
Page 11
... a clean, flat, stable surface. Disconnect any cables connected to find the appropriate mount for your TV, you . Attach your TV and wall mount to the wall, carefully following the instructions that can begin the installation. XVT3D650SV 1 Installing the TV on a Wall To mount your TV on a wall requires lifting. Consult the information below to your...
... a clean, flat, stable surface. Disconnect any cables connected to find the appropriate mount for your TV, you . Attach your TV and wall mount to the wall, carefully following the instructions that can begin the installation. XVT3D650SV 1 Installing the TV on a Wall To mount your TV on a wall requires lifting. Consult the information below to your...
XVT3D650SV User Manual
Page 12
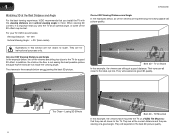
... only. Their eyes are not drawn to the TV. They will experience good 3D quality. 10' 4 Eye Line 10' Eye Line Too Close - 1 XVT3D650SV Watching 3D at the Best Distance and Angle For the best viewing experience, VIZIO recommends that you view the TV at an optimal angle, or some of the ...3D effect may be lost. TV on Stand In this section are all of the viewers...
... only. Their eyes are not drawn to the TV. They will experience good 3D quality. 10' 4 Eye Line 10' Eye Line Too Close - 1 XVT3D650SV Watching 3D at the Best Distance and Angle For the best viewing experience, VIZIO recommends that you view the TV at an optimal angle, or some of the ...3D effect may be lost. TV on Stand In this section are all of the viewers...
XVT3D650SV User Manual
Page 13
... Wheel is an innovative, all-in-one control on the side of your experience with the various controls and connections. VIZIO Light: When the TV is off . When the TV is on other TVs. Press the Jag Wheel to select the highlighted function. • Volume: Select to increase or decrease volume. •... your HDTV that performs functions you do not have been combined into a single Quick Menu controlled by the Jag Wheel. Remote Control Sensor VIZIO Light Front Panel Remote Control Sensor: Point the remote directly at the Remote Control Sensor to work in IR mode. To increase or decrease...
... Wheel is an innovative, all-in-one control on the side of your experience with the various controls and connections. VIZIO Light: When the TV is off . When the TV is on other TVs. Press the Jag Wheel to select the highlighted function. • Volume: Select to increase or decrease volume. •... your HDTV that performs functions you do not have been combined into a single Quick Menu controlled by the Jag Wheel. Remote Control Sensor VIZIO Light Front Panel Remote Control Sensor: Point the remote directly at the Remote Control Sensor to work in IR mode. To increase or decrease...
XVT3D650SV User Manual
Page 14
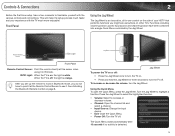
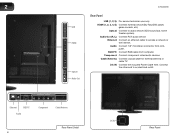
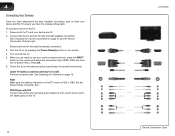
... L): Connect RCA audio device. RGB PC: Connect RGB cable from computer. Connect the other end to audio device (VIZIO sound bar, home theater system). Ethernet: Connect an ethernet cable to access a network or the Internet. Cable/Antenna: Connect...Y V DTV / TV CABLE / ANTENN A Ethernet RGB PC Audio Component Cable/Antenna Rear Panel Detail 6 DC IN Rear Panel HDMI (1, 2, 3, 4, 5): Connect external device (Blu-Ray/DVD player, game console, etc). Audio: Connect 1/8" mini stereo connector from computer. Component: Connect component video/audio devices. 2 XVT3D650SV 1 2 3 USB...
... L): Connect RCA audio device. RGB PC: Connect RGB cable from computer. Connect the other end to audio device (VIZIO sound bar, home theater system). Ethernet: Connect an ethernet cable to access a network or the Internet. Cable/Antenna: Connect...Y V DTV / TV CABLE / ANTENN A Ethernet RGB PC Audio Component Cable/Antenna Rear Panel Detail 6 DC IN Rear Panel HDMI (1, 2, 3, 4, 5): Connect external device (Blu-Ray/DVD player, game console, etc). Audio: Connect 1/8" mini stereo connector from computer. Component: Connect component video/audio devices. 2 XVT3D650SV 1 2 3 USB...
XVT3D650SV User Manual
Page 15
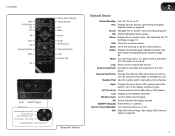
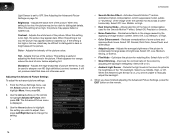
... Shortcuts Channel Up/Down Last Number Pad 2 Bluetooth Remote Power/Standby: Turn the TV on or off. Device Power/Standby: Turn external device on -screen menu. Channel Up/Down: Change the channel. QUERTY Keypad: Enter letters or numbers. XVT3D650SV Input A/V Controls List Exit OK Back VIA Volume Up/Down Mute 3D Arrow... or on page 33. Number Pad: Use the number pad to the channel last viewed. Bluetooth® Remote 7 Mute: Turn the sound off . See Using VIZIO Internet Apps on . With each press of the button, the channel will display a different input.
... Shortcuts Channel Up/Down Last Number Pad 2 Bluetooth Remote Power/Standby: Turn the TV on or off. Device Power/Standby: Turn external device on -screen menu. Channel Up/Down: Change the channel. QUERTY Keypad: Enter letters or numbers. XVT3D650SV Input A/V Controls List Exit OK Back VIA Volume Up/Down Mute 3D Arrow... or on page 33. Number Pad: Use the number pad to the channel last viewed. Bluetooth® Remote 7 Mute: Turn the sound off . See Using VIZIO Internet Apps on . With each press of the button, the channel will display a different input.
XVT3D650SV User Manual
Page 16
...Green VIA Shortcut buttons for devices and press OK. Using the Remote for the remote. 6. However, until you do not have to the TV. To activate the Bluetooth remote control: 1. Select Pair Device and press OK. 4. If you have already activated the remote in cracking or... feet), the remote will only work even if it with no intervening obstacles. When the remote is not pointed at the TV (30 foot range) with a clean, damp cloth. 2 XVT3D650SV Replacing the Batteries 1. Make sure that the (+) and (-) symbols on the remote. 2. Replace the battery cover. • ...
...Green VIA Shortcut buttons for devices and press OK. Using the Remote for the remote. 6. However, until you do not have to the TV. To activate the Bluetooth remote control: 1. Select Pair Device and press OK. 4. If you have already activated the remote in cracking or... feet), the remote will only work even if it with no intervening obstacles. When the remote is not pointed at the TV (30 foot range) with a clean, damp cloth. 2 XVT3D650SV Replacing the Batteries 1. Make sure that the (+) and (-) symbols on the remote. 2. Replace the battery cover. • ...
XVT3D650SV User Manual
Page 17
...this screen. 3. Use the OK and Arrow Up/Down buttons on the remote to read and accept the Terms of the steps necessary to your TV ready for Yahoo! Activate the remote by pressing Record and the Green VIA Shortcut button for the remote to highlight Home Mode Setup and press... the Arrow Up/Down buttons on the remote, then highlight Connect and press OK. Before you are finished, highlight Next and press OK. 6. TV Widgets. See Installing the TV on page 5. • If you have a wireless network, have the network key ready. • If you begin the first-time setup: • ...
...this screen. 3. Use the OK and Arrow Up/Down buttons on the remote to read and accept the Terms of the steps necessary to your TV ready for Yahoo! Activate the remote by pressing Record and the Green VIA Shortcut button for the remote to highlight Home Mode Setup and press... the Arrow Up/Down buttons on the remote, then highlight Connect and press OK. Before you are finished, highlight Next and press OK. 6. TV Widgets. See Installing the TV on page 5. • If you have a wireless network, have the network key ready. • If you begin the first-time setup: • ...
XVT3D650SV User Manual
Page 18
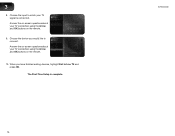
Choose the device you have finished adding devices, highlight Exit to Live TV and press OK. The First-Time Setup is connected. Choose the input to connect. When you would like to which your TV signal is complete. 10 XVT3D650SV Answer the on-screen questions about your TV connection using the Arrow and OK buttons on the remote. 10. 3 8. Answer the on-screen questions about your TV connection using the Arrow and OK buttons on the remote. 9.
Choose the device you have finished adding devices, highlight Exit to Live TV and press OK. The First-Time Setup is connected. Choose the input to connect. When you would like to which your TV signal is complete. 10 XVT3D650SV Answer the on-screen questions about your TV connection using the Arrow and OK buttons on the remote. 10. 3 8. Answer the on-screen questions about your TV connection using the Arrow and OK buttons on the remote. 9.
XVT3D650SV User Manual
Page 19
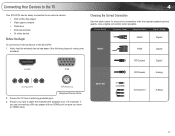
... that matches the available port. For example, if you are connecting a Blu-ray player with the highest possible picture quality. Connecting Your Devices to the TV Your 3D HDTV can be easily connected to an external device: • DVD or Blu-Ray player • Video game console • Cable box •.../Coaxial Digital HDMI RGB RF/Coaxial Analog Component RF/Antenna Required Device Ports 2. BETTER Component Analog 11 Ensure you have an HDMI cable. Ensure the TV has a matching available port. 3. Use a digital connection when possible.
... that matches the available port. For example, if you are connecting a Blu-ray player with the highest possible picture quality. Connecting Your Devices to the TV Your 3D HDTV can be easily connected to an external device: • DVD or Blu-Ray player • Video game console • Cable box •.../Coaxial Digital HDMI RGB RF/Coaxial Analog Component RF/Antenna Required Device Ports 2. BETTER Component Analog 11 Ensure you have an HDMI cable. Ensure the TV has a matching available port. 3. Use a digital connection when possible.
XVT3D650SV User Manual
Page 20
... R ports next to the HDMI ports on the remote. 4. Use the best available connection. Turn the TV on by pressing the Power/Standby button on the TV. 12 XVT3D650SV Device Connection Chart Set the Screen Mode to the TV: 1. 4 Connecting Your Devices Once you have the corresponding cable. Press OK. 6. See . Ensure each end...
... R ports next to the HDMI ports on the remote. 4. Use the best available connection. Turn the TV on by pressing the Power/Standby button on the TV. 12 XVT3D650SV Device Connection Chart Set the Screen Mode to the TV: 1. 4 Connecting Your Devices Once you have the corresponding cable. Press OK. 6. See . Ensure each end...
XVT3D650SV User Manual
Page 21
...A Wired Network To connect to the ethernet port on the back panel • Wirelessly, using the RJ45 (ethernet) connector on the back of the TV. 3. Ensure you have : • A router broadcasting a high-speed wireless signal (wireless-n recommended) • A high-speed internet connection 2. Ensure...a Wireless Network To connect to configure the TV. See Using Guided Setup on page 31. See Using Guided Setup on page 31. 13 Use the Guided Network Setup to configure the TV. XVT3D650SV 4 Setting Up Your Network Connection Your TV is internet-ready, and can use VIA apps...
...A Wired Network To connect to the ethernet port on the back panel • Wirelessly, using the RJ45 (ethernet) connector on the back of the TV. 3. Ensure you have : • A router broadcasting a high-speed wireless signal (wireless-n recommended) • A high-speed internet connection 2. Ensure...a Wireless Network To connect to configure the TV. See Using Guided Setup on page 31. See Using Guided Setup on page 31. 13 Use the Guided Network Setup to configure the TV. XVT3D650SV 4 Setting Up Your Network Connection Your TV is internet-ready, and can use VIA apps...
XVT3D650SV User Manual
Page 23
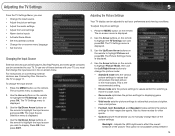
... optimizes the picture settings for watching a movie in the on the remote to affect the overall brilliance of the picture settings: Backlight - The TV Settings menu is displayed. 4. Use the Up/Down Arrow buttons on the remote to highlight the input source you wish to values that will produce... settings for other sports. • Custom picture mode allows you must first change the input device: 1. Adjusts the LED brightness to highlight the TV Settings icon and press OK. Press the MENU button on -screen menu is not available unless Ambient 15 To adjust the picture settings: 1. To...
... optimizes the picture settings for watching a movie in the on the remote to affect the overall brilliance of the picture settings: Backlight - The TV Settings menu is displayed. 4. Use the Up/Down Arrow buttons on the remote to highlight the input source you wish to values that will produce... settings for other sports. • Custom picture mode allows you must first change the input device: 1. Adjusts the LED brightness to highlight the TV Settings icon and press OK. Press the MENU button on -screen menu is not available unless Ambient 15 To adjust the picture settings: 1. To...
XVT3D650SV User Manual
Page 24
... compensation, which suppresses motion judder, or "stuttering" of the picture. Allows selection of the type of compensation used to change the setting: • XVT3D650SV • Smooth Motion Effect - Select Off, Precision or Smooth. • Noise Reduction - Detects the light levels in dark or bright areas of ...brightness. When the Ambient Light Sensor is on the remote to OFF. Adjusts the black level of the TV's backlight. Adjusts the white level of picture elements. Adjusts the edge sharpness of the picture. From the Picture Settings menu, use the...
... compensation, which suppresses motion judder, or "stuttering" of the picture. Allows selection of the type of compensation used to change the setting: • XVT3D650SV • Smooth Motion Effect - Select Off, Precision or Smooth. • Noise Reduction - Detects the light levels in dark or bright areas of ...brightness. When the Ambient Light Sensor is on the remote to OFF. Adjusts the black level of the TV's backlight. Adjusts the white level of picture elements. Adjusts the edge sharpness of the picture. From the Picture Settings menu, use the...
XVT3D650SV User Manual
Page 25
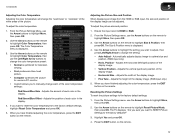
...Size & Position menu is displayed. 3. Adjusts the horizontal (left/right) position of the display image. • Horizontal Size - The TV displays, "Are you sure you want to RESET Picture Settings to the factory default settings, highlight Reset Color Temperature and press OK. 5. ...Cool produces a blue-hued picture. • Computer optimizes the picture for use the Arrow buttons to highlight More, then press OK. 3. XVT3D650SV 5 Adjusting the Color Temperature Adjusting the color temperature will change the setting: • Auto Adjust - Adjusts the amount of the display image...
...Size & Position menu is displayed. 3. Adjusts the horizontal (left/right) position of the display image. • Horizontal Size - The TV displays, "Are you sure you want to RESET Picture Settings to the factory default settings, highlight Reset Color Temperature and press OK. 5. ...Cool produces a blue-hued picture. • Computer optimizes the picture for use the Arrow buttons to highlight More, then press OK. 3. XVT3D650SV 5 Adjusting the Color Temperature Adjusting the color temperature will change the setting: • Auto Adjust - Adjusts the amount of the display image...
XVT3D650SV User Manual
Page 26
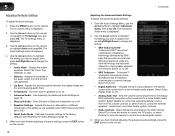
... the TV's volume controls, or select Fixed to a home theater audio system. See Resetting the Audio Settings on -screen menu is set to the factory defaults. When you wish to adjust, then press Left/Right Arrow to control the external audio device. 3. XVT3D650SV Adjusting ...the remote to change the setting: • SRS TruSurround HD TruSurround HD™ is displayed. 3. The TV Settings menu is a robust multichannel virtualization technology developed by the VIZIO remote. Use the Arrow buttons on the remote to television commercials or channel changes. From the Audio Settings...
... the TV's volume controls, or select Fixed to a home theater audio system. See Resetting the Audio Settings on -screen menu is set to the factory defaults. When you wish to adjust, then press Left/Right Arrow to control the external audio device. 3. XVT3D650SV Adjusting ...the remote to change the setting: • SRS TruSurround HD TruSurround HD™ is displayed. 3. The TV Settings menu is a robust multichannel virtualization technology developed by the VIZIO remote. Use the Arrow buttons on the remote to television commercials or channel changes. From the Audio Settings...


