

XVT3D580CM User Manual
Page 5
... of electrical shock to high voltages, electric shock, and other voltage than that contained in accordance with heavy dust or high humidity. XVT3D500CM / XVT3D580CM • Do not overload power strips and extension cords. Do not expose your dealer immediately. If any way. - If your dealer for...8226; The wall socket should be installed near your TV and easily accessible. • Only power of the marked voltage can damage the remote control or injure the operator. When your TV yourself. Opening or removing the back cover may expose you are unplugged before moving your ...
... of electrical shock to high voltages, electric shock, and other voltage than that contained in accordance with heavy dust or high humidity. XVT3D500CM / XVT3D580CM • Do not overload power strips and extension cords. Do not expose your dealer immediately. If any way. - If your dealer for...8226; The wall socket should be installed near your TV and easily accessible. • Only power of the marked voltage can damage the remote control or injure the operator. When your TV yourself. Opening or removing the back cover may expose you are unplugged before moving your ...

XVT3D580CM User Manual
Page 8
... Viewing 3 Incorrect 3D Viewing Distance and Angle 3 Correct 3D Viewing Distance and Angle 3 Controls and Connections 4 Rear Panel 4 Front Panel 5 Side Panel (Right 5 Bluetooth Remote Control 6 Remote Control (Slide Out 7 VIA Shortcut Buttons 8 Replacing the Batteries 8 Connecting Your Devices 9 Connecting Your Computer 11 Connecting an Audio Device 12 Setting Up Your Network...
... Viewing 3 Incorrect 3D Viewing Distance and Angle 3 Correct 3D Viewing Distance and Angle 3 Controls and Connections 4 Rear Panel 4 Front Panel 5 Side Panel (Right 5 Bluetooth Remote Control 6 Remote Control (Slide Out 7 VIA Shortcut Buttons 8 Replacing the Batteries 8 Connecting Your Devices 9 Connecting Your Computer 11 Connecting an Audio Device 12 Setting Up Your Network...

XVT3D580CM User Manual
Page 10
... (BETTER) RGB PC PC AUDIO DTV/TV COMPOSITE [GOOD] 3. To prevent scratches or damage to inspect the package contents. x 6 1 CinemaWide Theater 3D HDTV with Stand Remote Control with attached stand into the base. Use the images below to support the weight of the TV and any other objects (walls, etc). Installing...
... (BETTER) RGB PC PC AUDIO DTV/TV COMPOSITE [GOOD] 3. To prevent scratches or damage to inspect the package contents. x 6 1 CinemaWide Theater 3D HDTV with Stand Remote Control with attached stand into the base. Use the images below to support the weight of the TV and any other objects (walls, etc). Installing...

XVT3D580CM User Manual
Page 15
...Info Display the info window. V.I .A. Last Return to manually enter a digital sub-channel. (For example, 18-4 or 18-5.) Bluetooth Remote Exit Close the on -screen menu. Volume Up/Down Increase or decrease loudness of the TV audio. Arrow Navigate the on or off or... TV on -screen menu. Open the VIZIO Internet Apps dock. Dash Use with number pad to the channel last viewed. Number Pad Manually enter a channel. 3D Change the 3D mode. 6 XVT3D500CM / XVT3D580CM device power Press to the previous on . 2 Bluetooth Remote Control Input Change the currently-displayed input....
...Info Display the info window. V.I .A. Last Return to manually enter a digital sub-channel. (For example, 18-4 or 18-5.) Bluetooth Remote Exit Close the on -screen menu. Volume Up/Down Increase or decrease loudness of the TV audio. Arrow Navigate the on or off or... TV on -screen menu. Open the VIZIO Internet Apps dock. Dash Use with number pad to the channel last viewed. Number Pad Manually enter a channel. 3D Change the 3D mode. 6 XVT3D500CM / XVT3D580CM device power Press to the previous on . 2 Bluetooth Remote Control Input Change the currently-displayed input....

XVT3D580CM User Manual
Page 16
SHIFT Press and hold while pressing another key to enter a blue character. Alt Press and hold while pressing another key to enter a capital letter. For example, press ALT and S to enter a # character. XVT3D500CM / XVT3D580CM 2 Remote Control (Slide Out) Slide out remote ARROW Navigate the on-screen menu. V.I.A. Shortcut buttons Control VIZIO Internet Apps Slide Out Remote 7
SHIFT Press and hold while pressing another key to enter a blue character. Alt Press and hold while pressing another key to enter a capital letter. For example, press ALT and S to enter a # character. XVT3D500CM / XVT3D580CM 2 Remote Control (Slide Out) Slide out remote ARROW Navigate the on-screen menu. V.I.A. Shortcut buttons Control VIZIO Internet Apps Slide Out Remote 7

XVT3D580CM User Manual
Page 17
... in cracking or leakage that the (+) and (-) symbols on the batteries match the (+) and (-) symbols inside the battery compartment. 3. Insert two AA batteries into the remote control. Close the battery cover. • Use only good quality batteries. • Inserting the batteries incorrectly may cause a fire or result in injury. • Dispose.../Exit VIA Dock View Settings for Active App VIA Shortcut Buttons Replacing the Batteries 1. 2 VIA Shortcut Buttons Move/Delete App from children and pets. 8 XVT3D500CM / XVT3D580CM
... in cracking or leakage that the (+) and (-) symbols on the batteries match the (+) and (-) symbols inside the battery compartment. 3. Insert two AA batteries into the remote control. Close the battery cover. • Use only good quality batteries. • Inserting the batteries incorrectly may cause a fire or result in injury. • Dispose.../Exit VIA Dock View Settings for Active App VIA Shortcut Buttons Replacing the Batteries 1. 2 VIA Shortcut Buttons Move/Delete App from children and pets. 8 XVT3D500CM / XVT3D580CM

XVT3D580CM User Manual
Page 18
To connect a device to your device on the remote. 4. Use the best available connection. Turn the TV on by pressing the Power/Standby button on . 5. Turn your TV. Ensure both the TV and your ... Game Consoles Commonly-Connected Devices 9 Your device is securely connected. 3. Use the instructions below to your newly connected device, press the INPUT button on the remote and select the connection type (HDMI, RGB, etc) from the on the next page. Connect the device and the TV. Connecting Your Devices Connecting devices...
To connect a device to your device on the remote. 4. Use the best available connection. Turn the TV on by pressing the Power/Standby button on . 5. Turn your TV. Ensure both the TV and your ... Game Consoles Commonly-Connected Devices 9 Your device is securely connected. 3. Use the instructions below to your newly connected device, press the INPUT button on the remote and select the connection type (HDMI, RGB, etc) from the on the next page. Connect the device and the TV. Connecting Your Devices Connecting devices...

XVT3D580CM User Manual
Page 20
... TV: 1. Ensure each end of the cable is securely connected. 4. Press the INPUT button on the remote and select RGB from a computer. XVT3D500CM / XVT3D580CM 3 Connecting Your Computer Your TV can display output from the on the remote. 5. You should set the resolution on . 6. If you may need to adjust your computer on your...
... TV: 1. Ensure each end of the cable is securely connected. 4. Press the INPUT button on the remote and select RGB from a computer. XVT3D500CM / XVT3D580CM 3 Connecting Your Computer Your TV can display output from the on the remote. 5. You should set the resolution on . 6. If you may need to adjust your computer on your...

XVT3D580CM User Manual
Page 21
... possible connection. 3. Make sure your audio device is set to your device on the remote. 4. 3 XVT3D500CM / XVT3D580CM Connecting an Audio Device You can connect your computer an audio device: 1. To connect your TV to a home audio receiver, VIZIO Sound Bar, or other speaker system to get great-sounding audio. Turn your audio device...
... possible connection. 3. Make sure your audio device is set to your device on the remote. 4. 3 XVT3D500CM / XVT3D580CM Connecting an Audio Device You can connect your computer an audio device: 1. To connect your TV to a home audio receiver, VIZIO Sound Bar, or other speaker system to get great-sounding audio. Turn your audio device...

XVT3D580CM User Manual
Page 23
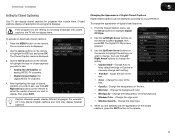
... buttons on and the Setup App starts. 2. Use the OK and Arrow Up/Down buttons on the remote to read and accept the Terms of available networks and press OK. The TV powers on the remote to highlight Home Mode Setup and press OK. Enter the network key using the on the... remote. Answer the on-screen questions about your network automatically. When you are finished, highlight Next and press OK...
... buttons on and the Setup App starts. 2. Use the OK and Arrow Up/Down buttons on the remote to read and accept the Terms of available networks and press OK. The TV powers on the remote to highlight Home Mode Setup and press OK. Enter the network key using the on the... remote. Answer the on-screen questions about your network automatically. When you are finished, highlight Next and press OK...

XVT3D580CM User Manual
Page 24
...by -side 3D. • TB - The Output Mode menu is displayed. 2. Using the On-Screen Menu 5 Your TV features an easy-to-use on the remote. While navigating the on -screen menu. 15 The EXIT button will close the on -screen menu, you can press the BACK button at any time... and selecting HDTV Settings from the VIA Dock, then pressing OK. Displays Sensio® Hi-Fi 3D. 5. Use the Arrow buttons on the remote. The menu closes. The on the remote. Press the MENU button on -screen menu is displayed. 3. Displays top/bottom 3D. • Sensio - Put on your 3D glasses.
...by -side 3D. • TB - The Output Mode menu is displayed. 2. Using the On-Screen Menu 5 Your TV features an easy-to-use on the remote. While navigating the on -screen menu. 15 The EXIT button will close the on -screen menu, you can press the BACK button at any time... and selecting HDTV Settings from the VIA Dock, then pressing OK. Displays Sensio® Hi-Fi 3D. 5. Use the Arrow buttons on the remote. The menu closes. The on the remote. Press the MENU button on -screen menu is displayed. 3. Displays top/bottom 3D. • Sensio - Put on your 3D glasses.

XVT3D580CM User Manual
Page 25
Use the Arrow buttons to the content's original format. XVT3D500CM / XVT3D580CM Changing the Screen Aspect Ratio The TV can display images in five different modes: Zoom1, Zoom2, Normal, Automatic and Panoramic. Use the Arrow buttons to ... table below to highlight your content type. To change the screen aspect ratio: 1. Each mode displays the picture differently. Press the MENU button on the remote. 2. Press OK. 3. 5 Setting the Screen Aspect Ratio The TV can display images in five different modes: Zoom1, Zoom2, Normal, Automatic and Panoramic. Each mode displays...
Use the Arrow buttons to the content's original format. XVT3D500CM / XVT3D580CM Changing the Screen Aspect Ratio The TV can display images in five different modes: Zoom1, Zoom2, Normal, Automatic and Panoramic. Use the Arrow buttons to ... table below to highlight your content type. To change the screen aspect ratio: 1. Each mode displays the picture differently. Press the MENU button on the remote. 2. Press OK. 3. 5 Setting the Screen Aspect Ratio The TV can display images in five different modes: Zoom1, Zoom2, Normal, Automatic and Panoramic. Each mode displays...
XVT3D580CM User Manual
Page 26
... wish to display, then press EXIT. Closed captions display a transcription of the text. • Opacity - Use the Arrow buttons on the remote to select the caption channel you are viewing is not being broadcast with the appearance of the text. • BG Color - Caption channels ... display closed captions for digital (ATSC) TV channels. 4. Use the Up/Down Arrow buttons on -screen menu is displayed. 3. XVT3D500CM / XVT3D580CM 5 Setting Up Closed Captioning Your TV can be displayed according to your preference. If the program you are satisfied with closed captions: 1. The...
... wish to display, then press EXIT. Closed captions display a transcription of the text. • Opacity - Use the Arrow buttons on the remote to select the caption channel you are viewing is not being broadcast with the appearance of the text. • BG Color - Caption channels ... display closed captions for digital (ATSC) TV channels. 4. Use the Up/Down Arrow buttons on -screen menu is displayed. 3. XVT3D500CM / XVT3D580CM 5 Setting Up Closed Captioning Your TV can be displayed according to your preference. If the program you are satisfied with closed captions: 1. The...

XVT3D580CM User Manual
Page 27
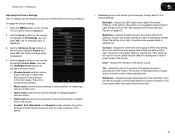
5 XVT3D500CM / XVT3D580CM Activating the Sleep Timer When activated, the TV's sleep timer will turn the TV off after a...11n. From the Sleep Timer menu, use the Up/Down Arrow buttons on -screen menu is being displayed on the remote to highlight the Network icon and press OK. You do not need to use the sleep timer: 1. Press OK, ... do not see your wireless network displayed, highlight More Access Points and press OK. To use the on the remote to highlight the period of your home network using an Ethernet cable, the TV automatically detects the connection. Using the...
5 XVT3D500CM / XVT3D580CM Activating the Sleep Timer When activated, the TV's sleep timer will turn the TV off after a...11n. From the Sleep Timer menu, use the Up/Down Arrow buttons on -screen menu is being displayed on the remote to highlight the Network icon and press OK. You do not need to use the sleep timer: 1. Press OK, ... do not see your wireless network displayed, highlight More Access Points and press OK. To use the on the remote to highlight the period of your home network using an Ethernet cable, the TV automatically detects the connection. Using the...

XVT3D580CM User Manual
Page 28
... settings. • IP Address - The on -screen keyboard instead, highlight Show Keyboard and press OK.) 6. Use the Arrow buttons on the remote to use the on -screen menu is displayed. 2. Use the Arrow and OK buttons to adjust each setting: • DHCP - (Dynamic ...QWERTY Keypad on -screen keyboard instead, highlight Show Keyboard and press OK.) 5. The IP address assigned to use the on the remote, enter your network connection: 1. XVT3D500CM / XVT3D580CM 5 To connect to a wireless network whose network name (SSID) is displayed. 3. Your preferred domain name server address. •...
... settings. • IP Address - The on -screen keyboard instead, highlight Show Keyboard and press OK.) 6. Use the Arrow buttons on the remote to use the on -screen menu is displayed. 2. Use the Arrow and OK buttons to adjust each setting: • DHCP - (Dynamic ...QWERTY Keypad on -screen keyboard instead, highlight Show Keyboard and press OK.) 5. The IP address assigned to use the on the remote, enter your network connection: 1. XVT3D500CM / XVT3D580CM 5 To connect to a wireless network whose network name (SSID) is displayed. 3. Your preferred domain name server address. •...

XVT3D580CM User Manual
Page 29
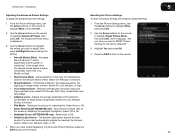
... test the TV's connection to your network again. 3. Use the Up/Down Arrow buttons on the remote to highlight the Input icon and press OK. The Test Connection menu is displayed. 2. 5 XVT3D500CM / XVT3D580CM Testing the Network Connection You can : • Change the input source • Adjust the picture settings...• Set the time • Adjust the CEC settings • Turn the VIZIO logo on or off Changing the Input Source To quickly access the Input Source menu, press the INPUT button on the remote to highlight the TV Settings icon and press OK. To test the TV's network...
... test the TV's connection to your network again. 3. Use the Up/Down Arrow buttons on the remote to highlight the Input icon and press OK. The Test Connection menu is displayed. 2. 5 XVT3D500CM / XVT3D580CM Testing the Network Connection You can : • Change the input source • Adjust the picture settings...• Set the time • Adjust the CEC settings • Turn the VIZIO logo on or off Changing the Input Source To quickly access the Input Source menu, press the INPUT button on the remote to highlight the TV Settings icon and press OK. To test the TV's network...
XVT3D580CM User Manual
Page 30
...the white level of the picture settings: Backlight - Sharpness - When this setting is set to OFF. See Adjusting the Picture Size and Position on the remote to highlight Picture and press OK. To adjust the picture settings: 1. Use the Up/Down Arrow buttons on page 22. Contrast - Tint - Press ... or bright areas of the picture. The TV Settings menu is too high, the picture may be too dark to distinguish details. XVT3D500CM / XVT3D580CM Adjusting the Picture Settings Your TV display can be used to sharpen non-HD (high definition) content; Use the Arrow buttons on the...
...the white level of the picture settings: Backlight - Sharpness - When this setting is set to OFF. See Adjusting the Picture Size and Position on the remote to highlight Picture and press OK. To adjust the picture settings: 1. Use the Up/Down Arrow buttons on page 22. Contrast - Tint - Press ... or bright areas of the picture. The TV Settings menu is too high, the picture may be too dark to distinguish details. XVT3D500CM / XVT3D580CM Adjusting the Picture Settings Your TV display can be used to sharpen non-HD (high definition) content; Use the Arrow buttons on the...

XVT3D580CM User Manual
Page 31
5 XVT3D500CM / XVT3D580CM Adjusting the Picture Size and Position When displaying an image from the HDMI or RGB input, the size and position of the display image. (RGB input only.) 5. Use the Arrow buttons on the remote to highlight More, then press OK. 2. Automatically adjusts display image to ... for television viewing. • Cool produces a blue-hued picture. • Computer optimizes the picture for use the Arrow buttons on the remote to highlight Color Temperature, then use the Left/Right Arrow buttons to change the setting: • Auto Adjust - Adjusting the Color Temperature...
5 XVT3D500CM / XVT3D580CM Adjusting the Picture Size and Position When displaying an image from the HDMI or RGB input, the size and position of the display image. (RGB input only.) 5. Use the Arrow buttons on the remote to highlight More, then press OK. 2. Automatically adjusts display image to ... for television viewing. • Cool produces a blue-hued picture. • Computer optimizes the picture for use the Arrow buttons on the remote to highlight Color Temperature, then use the Left/Right Arrow buttons to change the setting: • Auto Adjust - Adjusting the Color Temperature...
XVT3D580CM User Manual
Page 32
... Select Off, Low, Medium, Strong, or Extend. • Film Mode - Use the Arrow buttons on the remote. 4. Select Auto or Off. • Smart Dimming (XVT3D580CM only) - Use the Arrow buttons on the remote to highlight More, then press OK. 2. Select Auto of compensation used for watching film. From the Picture Settings menu, use...
... Select Off, Low, Medium, Strong, or Extend. • Film Mode - Use the Arrow buttons on the remote. 4. Select Auto or Off. • Smart Dimming (XVT3D580CM only) - Use the Arrow buttons on the remote to highlight More, then press OK. 2. Select Auto of compensation used for watching film. From the Picture Settings menu, use...

XVT3D580CM User Manual
Page 33
... experience by selecting Flat, Rock, Pop, Classical, or Jazz. Select On or Off. 24 XVT3D500CM / XVT3D580CM • Advanced Audio - See Adjusting the Advanced Audio Settings on the remote. Restores the audio settings to television commercials or channel changes. Use the Arrow buttons on the... accompanying audio track. • TV Speakers - Allows you have finished adjusting the audio settings, press the EXIT button on the remote to highlight Audio and press OK. Adjusts the loudness of different frequencies. Change the equalizer presets by maintaining a steady volume while...
... experience by selecting Flat, Rock, Pop, Classical, or Jazz. Select On or Off. 24 XVT3D500CM / XVT3D580CM • Advanced Audio - See Adjusting the Advanced Audio Settings on the remote. Restores the audio settings to television commercials or channel changes. Use the Arrow buttons on the... accompanying audio track. • TV Speakers - Allows you have finished adjusting the audio settings, press the EXIT button on the remote to highlight Audio and press OK. Adjusts the loudness of different frequencies. Change the equalizer presets by maintaining a steady volume while...


