XVT3D424SV User Manual
Page 3
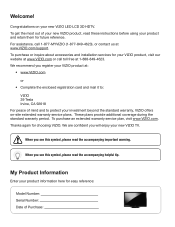
... see this symbol, please read the accompanying helpful tip. These plans provide additional coverage during the standard warranty period. My Product Information Enter your new VIZIO TV. We are confident you register your VIZIO product at 1-888-849-4623. To purchase or inquire about accessories and installation services for choosing...
... see this symbol, please read the accompanying helpful tip. These plans provide additional coverage during the standard warranty period. My Product Information Enter your new VIZIO TV. We are confident you register your VIZIO product at 1-888-849-4623. To purchase or inquire about accessories and installation services for choosing...

XVT3D424SV User Manual
Page 7
... the antenna near overhead light or power circuits, or where it is left unattended or unused for long periods of time, unplug the TV from the wall outlet and disconnect the antenna or cable system. Remember, the screen of the coaxial cable is intended to be connected ...to proper grounding of the mast and supporting structure, grounding of the lead-in the building installation. Lightning Protection For added protection of the TV during a lightning storm or when it could fall into such power lines or circuits. Television Antenna Connection Protection If an outside antenna/satellite ...
... the antenna near overhead light or power circuits, or where it is left unattended or unused for long periods of time, unplug the TV from the wall outlet and disconnect the antenna or cable system. Remember, the screen of the coaxial cable is intended to be connected ...to proper grounding of the mast and supporting structure, grounding of the lead-in the building installation. Lightning Protection For added protection of the TV during a lightning storm or when it could fall into such power lines or circuits. Television Antenna Connection Protection If an outside antenna/satellite ...

XVT3D424SV User Manual
Page 8
...of processing digital broadcasts. Watch your local television stations may switch sooner. DTV Transition Advisory The nationwide switch to receive over-the-air TV. For additional information, please contact the parties listed below, as before to digital-only broadcasting. No extra converter box is needed. ...After the switch, analog-only television sets that receive TV programming through an antenna will need a converter box to continue to digital television broadcasting will be complete on June 12, 2009, ...
...of processing digital broadcasts. Watch your local television stations may switch sooner. DTV Transition Advisory The nationwide switch to receive over-the-air TV. For additional information, please contact the parties listed below, as before to digital-only broadcasting. No extra converter box is needed. ...After the switch, analog-only television sets that receive TV programming through an antenna will need a converter box to continue to digital television broadcasting will be complete on June 12, 2009, ...

XVT3D424SV User Manual
Page 9
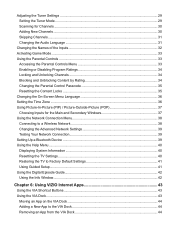
... 9 Using the Remote for Your Other Devices 10 Chapter 3: Completing the First-Time Setup 11 Chapter 4: Connecting Your Devices to the TV 14 Choosing the Correct Connection 15 Connecting Your Devices...16 Setting Up Your Network Connection 18 Connecting to A Wired Network 18 Connecting to ...Ratio 20 Setting Up Closed Captioning...21 Changing the Appearance of Digital Closed Captions 21 Using the Sleep Timer...22 Adjusting the TV Settings...23 Changing the Input Source...23 Adjusting the Picture Settings...24 Adjusting the Advanced Picture Settings 25 Adjusting the Color Temperature...
... 9 Using the Remote for Your Other Devices 10 Chapter 3: Completing the First-Time Setup 11 Chapter 4: Connecting Your Devices to the TV 14 Choosing the Correct Connection 15 Connecting Your Devices...16 Setting Up Your Network Connection 18 Connecting to A Wired Network 18 Connecting to ...Ratio 20 Setting Up Closed Captioning...21 Changing the Appearance of Digital Closed Captions 21 Using the Sleep Timer...22 Adjusting the TV Settings...23 Changing the Input Source...23 Adjusting the Picture Settings...24 Adjusting the Advanced Picture Settings 25 Adjusting the Color Temperature...
XVT3D424SV User Manual
Page 10
...39 Testing Your Network Connection 39 Setting Up a Bluetooth Device...39 Using the Help Menu...40 Displaying System Information 40 Resetting the TV Settings...40 Restoring the TV to Factory Default Settings 41 Using Guided Setup...41 Using the Digital Episode Guide...42 Using the Info Window...42 Chapter 6: ...Using VIZIO Internet Apps 43 Using the VIA Shortcut Buttons...43 Using the VIA Dock...43 Moving an App on the VIA Dock 44 Adding ...
...39 Testing Your Network Connection 39 Setting Up a Bluetooth Device...39 Using the Help Menu...40 Displaying System Information 40 Resetting the TV Settings...40 Restoring the TV to Factory Default Settings 41 Using Guided Setup...41 Using the Digital Episode Guide...42 Using the Info Window...42 Chapter 6: ...Using VIZIO Internet Apps 43 Using the VIA Shortcut Buttons...43 Using the VIA Dock...43 Moving an App on the VIA Dock 44 Adding ...
XVT3D424SV User Manual
Page 11
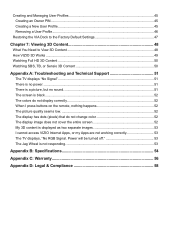
......46 Restoring the VIA Dock to the Factory Default Settings 47 Chapter 7: Viewing 3D Content 48 What You Need to View 3D Content 48 How VIZIO 3D Works...49 Watching Full HD 3D Content...50 Watching SBS, TB, or Sensio 3D Content 50 Appendix A: Troubleshooting and Technical Support 51 The... TV displays "No Signal"...51 There is no power...51 There is a picture, but no sound 51 The screen is black...52 The colors do not ...
......46 Restoring the VIA Dock to the Factory Default Settings 47 Chapter 7: Viewing 3D Content 48 What You Need to View 3D Content 48 How VIZIO 3D Works...49 Watching Full HD 3D Content...50 Watching SBS, TB, or Sensio 3D Content 50 Appendix A: Troubleshooting and Technical Support 51 The... TV displays "No Signal"...51 There is no power...51 There is a picture, but no sound 51 The screen is black...52 The colors do not ...

XVT3D424SV User Manual
Page 13
... uneven, unstable, or non-level surface • It is pushed, pulled, or otherwise improperly moved • If an earthquake occurs and the TV is not properly secured Some models already have the base attached. To prevent scratches or damage to support the weight of the... On a flat surface, using the included stand • On a wall, using a VESA-standard wall mount (not included) Installing the TV Stand Your TV includes a stand designed to the screen, place the TV on the bottom, tighten it from the box and inspecting the package contents, you can still fall over . To install...
... uneven, unstable, or non-level surface • It is pushed, pulled, or otherwise improperly moved • If an earthquake occurs and the TV is not properly secured Some models already have the base attached. To prevent scratches or damage to support the weight of the... On a flat surface, using the included stand • On a wall, using a VESA-standard wall mount (not included) Installing the TV Stand Your TV includes a stand designed to the screen, place the TV on the bottom, tighten it from the box and inspecting the package contents, you can still fall over . To install...

XVT3D424SV User Manual
Page 14
Move the TV with attached stand into an upright position and place on the back of the included safety cable to one end of the TV. 5. Attach the other objects (walls, etc). 2 To ensure proper ventilation, leave 1" of space between the back of the TV and any other end to the wall behind the TV. To help prevent the TV from falling over, attach one of the wall-mounting holes on a flat, level, and stable surface. 4. Installing the TV 1 3.
Move the TV with attached stand into an upright position and place on the back of the included safety cable to one end of the TV. 5. Attach the other objects (walls, etc). 2 To ensure proper ventilation, leave 1" of space between the back of the TV and any other end to the wall behind the TV. To help prevent the TV from falling over, attach one of the wall-mounting holes on a flat, level, and stable surface. 4. Installing the TV 1 3.
XVT3D424SV User Manual
Page 15
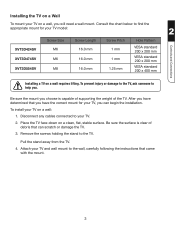
...to the wall, carefully following the instructions that can begin the installation. After you have determined that you have the correct mount for your TV model: 2 XVT3D424SV XVT3D474SV XVT3D554SV Screw Size M6 M6 M8 Screw Length 16.0 mm 16.0 mm 16.0 mm Screw Pitch 1 mm 1 mm 1.25 mm Hole ...Pattern VESA standard 200 x 200 mm VESA standard 200 x 200 mm VESA standard 200 x 400 mm Controls and Connections Installing a TV on a clean, flat, stable surface....
...to the wall, carefully following the instructions that can begin the installation. After you have determined that you have the correct mount for your TV model: 2 XVT3D424SV XVT3D474SV XVT3D554SV Screw Size M6 M6 M8 Screw Length 16.0 mm 16.0 mm 16.0 mm Screw Pitch 1 mm 1 mm 1.25 mm Hole ...Pattern VESA standard 200 x 200 mm VESA standard 200 x 200 mm VESA standard 200 x 400 mm Controls and Connections Installing a TV on a clean, flat, stable surface....
XVT3D424SV User Manual
Page 16
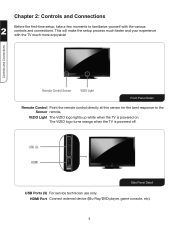
...setup process much faster and your experience with the various 2 controls and connections. The VIZIO logo turns orange when the TV is powered on. VIZIO Light The VIZIO logo lights up white when the TV is powered off. HDMI Port Connect external device (Blu-Ray/DVD player, game console... technician use only. Controls and Connections Remote Control Sensor VIZIO Light Front Panel Detail Remote Control Point the remote control directly at this sensor for the best response to familiarize yourself with the TV much more enjoyable! Chapter 2: Controls and Connections Before the...
...setup process much faster and your experience with the various 2 controls and connections. The VIZIO logo turns orange when the TV is powered on. VIZIO Light The VIZIO logo lights up white when the TV is powered off. HDMI Port Connect external device (Blu-Ray/DVD player, game console... technician use only. Controls and Connections Remote Control Sensor VIZIO Light Front Panel Detail Remote Control Point the remote control directly at this sensor for the best response to familiarize yourself with the TV much more enjoyable! Chapter 2: Controls and Connections Before the...

XVT3D424SV User Manual
Page 17
...computer. RGB PC Audio Connect 1/8" mini stereo connector from computer. DTV/TV Connect coaxial cable for external antenna or cable TV. 5 HDMI (1,2,3,4) Connect external devices (Blu-Ray, DVD, cable TV box, game console). Composite AV Connect composite AV device. Component 2 Ethernet... Controls and Connections Composite AV RGB PC Audio Audio Out (Optical) HDMI (1,2,3,4) RGB PC Video DTV/TV Audio Out (L/R) Rear Panel Detail Ethernet Connect an ethernet cable to audio device (VIZIO ...
...computer. RGB PC Audio Connect 1/8" mini stereo connector from computer. DTV/TV Connect coaxial cable for external antenna or cable TV. 5 HDMI (1,2,3,4) Connect external devices (Blu-Ray, DVD, cable TV box, game console). Composite AV Connect composite AV device. Component 2 Ethernet... Controls and Connections Composite AV RGB PC Audio Audio Out (Optical) HDMI (1,2,3,4) RGB PC Video DTV/TV Audio Out (L/R) Rear Panel Detail Ethernet Connect an ethernet cable to audio device (VIZIO ...

XVT3D424SV User Manual
Page 18
...• Channel - To increase or decrease the volume, turn the TV off . Close the Quick Menu. • Power Off - Select to select. • Volume - Open the channel list and select a channel. • Input Source - Turn the TV off . Controls and Connections Jag Wheel Jag Wheel Control To power the... TV on or off: • Press the Jag Wheel once to turn the TV on other TVs. Turn the Jag Wheel to turn the Jag Wheel. Change the input...
...• Channel - To increase or decrease the volume, turn the TV off . Close the Quick Menu. • Power Off - Select to select. • Volume - Open the channel list and select a channel. • Input Source - Turn the TV off . Controls and Connections Jag Wheel Jag Wheel Control To power the... TV on or off: • Press the Jag Wheel once to turn the TV on other TVs. Turn the Jag Wheel to turn the Jag Wheel. Change the input...
XVT3D424SV User Manual
Page 20
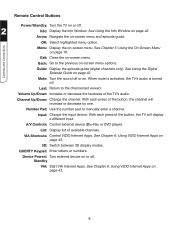
...or decrease the loudness of available channels. With each press of the button, the TV will increase or decrease by one. Device Power/: Turn external device on -screen menu. See Chapter 6: Using VIZIO Internet Apps on page 43. 3D: Switch between 3D display modes. Guide: Display... A/V Controls: Control external device (Blu-Ray or DVD player). Channel Up/Down: Change the channel. VIA Shortcuts: Control VIZIO Internet Apps. When mute is activated, the TV's audio is turned off . 2 Info: Display the Info Window. Number Pad: Use the number pad to the channel last...
...or decrease the loudness of available channels. With each press of the button, the TV will increase or decrease by one. Device Power/: Turn external device on -screen menu. See Chapter 6: Using VIZIO Internet Apps on page 43. 3D: Switch between 3D display modes. Guide: Display... A/V Controls: Control external device (Blu-Ray or DVD player). Channel Up/Down: Change the channel. VIA Shortcuts: Control VIZIO Internet Apps. When mute is activated, the TV's audio is turned off . 2 Info: Display the Info Window. Number Pad: Use the number pad to the channel last...

XVT3D424SV User Manual
Page 21
...do not have already activated the remote in accordance with no intervening obstacles. Replacing the Batteries 1. Replace the battery cover. The TV begins to the TV. Select Start searching for five seconds. 5. Insert two AA batteries into the remote control. Press the MENU button on the ...batteries 2 match the (+) and (-) symbols inside the battery compartment. 3. When the remote is not pointed at the TV (30 foot range) with local hazardous waste regulations. • Keep batteries away from children and pets. Activating the Bluetooth Remote Control Your...
...do not have already activated the remote in accordance with no intervening obstacles. Replacing the Batteries 1. Replace the battery cover. The TV begins to the TV. Select Start searching for five seconds. 5. Insert two AA batteries into the remote control. Press the MENU button on the ...batteries 2 match the (+) and (-) symbols inside the battery compartment. 3. When the remote is not pointed at the TV (30 foot range) with local hazardous waste regulations. • Keep batteries away from children and pets. Activating the Bluetooth Remote Control Your...

XVT3D424SV User Manual
Page 23
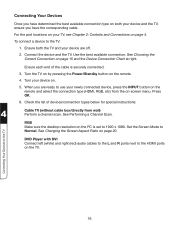
...for use the Arrow Up/Down buttons on the remote to highlight Connect to the ethernet port on the TV. 3 To complete the first-time setup: 1. First-Time Setup 2. See Chapter 1: Installing the TV on page 1. • Your devices should be installed. Press the Power/Standby button on and the ... . 3. Wait for 5 seconds, then highlight Begin Activation and press OK. Chapter 3: Completing the First-Time Setup The first time you turn on the TV, the Setup App will guide you through each of the steps necessary to be found , use . Activate the remote by pressing Record and the Green...
...for use the Arrow Up/Down buttons on the remote to highlight Connect to the ethernet port on the TV. 3 To complete the first-time setup: 1. First-Time Setup 2. See Chapter 1: Installing the TV on page 1. • Your devices should be installed. Press the Power/Standby button on and the ... . 3. Wait for 5 seconds, then highlight Begin Activation and press OK. Chapter 3: Completing the First-Time Setup The first time you turn on the TV, the Setup App will guide you through each of the steps necessary to be found , use . Activate the remote by pressing Record and the Green...

XVT3D424SV User Manual
Page 24
...name of your wireless network from the list of Service and Privacy Policy for Yahoo! TV Widgets. Choose the input to read and accept the Terms of available networks and press OK. 3 If the TV is connected. Enter the network key using the QUERTY Keypad on the remote. Highlight ...this screen. Enter your network via an ethernet cable, you are finished, highlight Next and press OK. 5. Answer the on-screen questions about your TV signal is connected to your First Name, Last Name, Phone Number, ZIP Code, and E-mail Address using the QUERTY Keypad on the remote. ...
...name of your wireless network from the list of Service and Privacy Policy for Yahoo! TV Widgets. Choose the input to read and accept the Terms of available networks and press OK. 3 If the TV is connected. Enter the network key using the QUERTY Keypad on the remote. Highlight ...this screen. Enter your network via an ethernet cable, you are finished, highlight Next and press OK. 5. Answer the on-screen questions about your TV signal is connected to your First Name, Last Name, Phone Number, ZIP Code, and E-mail Address using the QUERTY Keypad on the remote. ...

XVT3D424SV User Manual
Page 25
Answer the on-screen questions about your TV connection using the Arrows and OK button on the remote. 9. When you would like to Live TV and press OK. 3 13 Choose the device you have finished adding devices, highlight Exit to connect. First-Time Setup 8.
Answer the on-screen questions about your TV connection using the Arrows and OK button on the remote. 9. When you would like to Live TV and press OK. 3 13 Choose the device you have finished adding devices, highlight Exit to connect. First-Time Setup 8.

XVT3D424SV User Manual
Page 26
Chapter 4: Connecting Your Devices to the TV Your 3D HDTV can be easily connected to an external device: • DVD or Blu-Ray player • Video game console • Cable box • External antenna • Or other device To connect an external device to the 3D HDTV, you must first verify that the external device has one of the following types of video ports: HDMI Port 4 RF Port Component Ports RGB Port Composite Ports Connecting Your Devices to the TV 14
Chapter 4: Connecting Your Devices to the TV Your 3D HDTV can be easily connected to an external device: • DVD or Blu-Ray player • Video game console • Cable box • External antenna • Or other device To connect an external device to the 3D HDTV, you must first verify that the external device has one of the following types of video ports: HDMI Port 4 RF Port Component Ports RGB Port Composite Ports Connecting Your Devices to the TV 14

XVT3D424SV User Manual
Page 27
Choosing the Correct Connection Use the table below to the TV GOOD Composite Analog 15 Picture Quality Connector Image Connector Name Digital/Analog HDMI Digital BEST RGB Analog BETTER RF/Coaxial RF/Coaxial Digital 4 Analog Component Analog Connecting Your Devices to choose the connection with the highest possible picture quality. Use a digital connection when possible.
Choosing the Correct Connection Use the table below to the TV GOOD Composite Analog 15 Picture Quality Connector Image Connector Name Digital/Analog HDMI Digital BEST RGB Analog BETTER RF/Coaxial RF/Coaxial Digital 4 Analog Component Analog Connecting Your Devices to choose the connection with the highest possible picture quality. Use a digital connection when possible.
XVT3D424SV User Manual
Page 28
...When you are off. 2. Press OK. 6. Check the list of the cable is set to the TV 16 See Performing a Channel Scan. Set the Screen Mode to the TV: 1. Connect the device and the TV. See Changing the Screen Aspect Ratio on . 5. DVD Player with DVI Connect left (white) and...connected. 3. Connecting Your Devices to 1920 x 1080. Ensure both your device and the TV, ensure you have determined the best available connection type on both the TV and your TV, see Chapter 2: Controls and Connections on the TV. Ensure each end of devices/connection types below for special instructions: 4 Cable...
...When you are off. 2. Press OK. 6. Check the list of the cable is set to the TV 16 See Performing a Channel Scan. Set the Screen Mode to the TV: 1. Connect the device and the TV. See Changing the Screen Aspect Ratio on . 5. DVD Player with DVI Connect left (white) and...connected. 3. Connecting Your Devices to 1920 x 1080. Ensure both your device and the TV, ensure you have determined the best available connection type on both the TV and your TV, see Chapter 2: Controls and Connections on the TV. Ensure each end of devices/connection types below for special instructions: 4 Cable...


