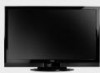

XVT3D424SV User Manual
Page 5
... unstable cart, stand, or table. If your outlet does not accommodate the three-pronged, have an electrician install the correct outlet, or use a liquid or a spray cleaner for ventilation. To reduce the risk of electric shock or component damage, switch off the power before connecting other components to your HDTV. • Unplug the power cord before cleaning your HDTV. When a cart is used, use , and...
... unstable cart, stand, or table. If your outlet does not accommodate the three-pronged, have an electrician install the correct outlet, or use a liquid or a spray cleaner for ventilation. To reduce the risk of electric shock or component damage, switch off the power before connecting other components to your HDTV. • Unplug the power cord before cleaning your HDTV. When a cart is used, use , and...

XVT3D424SV User Manual
Page 6
.... • The wall socket should be installed near your HDTV and easily accessible. • Only power of the marked voltage can damage the remote control or injure the operator. • If any smoke or odor becomes apparent, unplug the power cord and contact your HDTV. - Pulling on the power cord may cause fire or electric shock. • Follow instructions for moving your HDTV. • When...
.... • The wall socket should be installed near your HDTV and easily accessible. • Only power of the marked voltage can damage the remote control or injure the operator. • If any smoke or odor becomes apparent, unplug the power cord and contact your HDTV. - Pulling on the power cord may cause fire or electric shock. • Follow instructions for moving your HDTV. • When...

XVT3D424SV User Manual
Page 9
... a Wall...3 Chapter 2: Controls and Connections 4 Using the Jag Wheel Control...6 Using the Quick Menu...6 Remote Control Buttons...8 Replacing the Batteries...9 Activating the Bluetooth Remote Control 9 Using the Remote for Your Other Devices 10 Chapter 3: Completing the First-Time Setup 11 Chapter 4: Connecting Your Devices to the TV 14 Choosing the Correct Connection 15 Connecting Your Devices...16 Setting Up Your Network Connection 18 Connecting to A Wired Network 18 Connecting to a Wireless Network 18 Chapter 5: Using the On-Screen Menu 19 Changing the 3D Mode...
... a Wall...3 Chapter 2: Controls and Connections 4 Using the Jag Wheel Control...6 Using the Quick Menu...6 Remote Control Buttons...8 Replacing the Batteries...9 Activating the Bluetooth Remote Control 9 Using the Remote for Your Other Devices 10 Chapter 3: Completing the First-Time Setup 11 Chapter 4: Connecting Your Devices to the TV 14 Choosing the Correct Connection 15 Connecting Your Devices...16 Setting Up Your Network Connection 18 Connecting to A Wired Network 18 Connecting to a Wireless Network 18 Chapter 5: Using the On-Screen Menu 19 Changing the 3D Mode...
XVT3D424SV User Manual
Page 10
... Game Mode...33 Using the Parental Controls...33 Accessing the Parental Controls Menu 33 Enabling or Disabling Program Ratings 34 Locking and Unlocking Channels 34 Blocking and Unblocking Content by Rating 34 Changing the Parental Control Passcode 35 Resetting the Content Locks...35 Changing the On-Screen Menu Language 36 Setting the Time Zone...36 Using Picture-In-Picture (PIP) / Picture-Outside-Picture (POP 37 Choosing Inputs for the Main and Secondary Windows 37 Using the Network Connection Menu 38 Connecting to a Wireless Network 38 Changing the Advanced Network Settings...
... Game Mode...33 Using the Parental Controls...33 Accessing the Parental Controls Menu 33 Enabling or Disabling Program Ratings 34 Locking and Unlocking Channels 34 Blocking and Unblocking Content by Rating 34 Changing the Parental Control Passcode 35 Resetting the Content Locks...35 Changing the On-Screen Menu Language 36 Setting the Time Zone...36 Using Picture-In-Picture (PIP) / Picture-Outside-Picture (POP 37 Choosing Inputs for the Main and Secondary Windows 37 Using the Network Connection Menu 38 Connecting to a Wireless Network 38 Changing the Advanced Network Settings...
XVT3D424SV User Manual
Page 11
... the Factory Default Settings 47 Chapter 7: Viewing 3D Content 48 What You Need to View 3D Content 48 How VIZIO 3D Works...49 Watching Full HD 3D Content...50 Watching SBS, TB, or Sensio 3D Content 50 Appendix A: Troubleshooting and Technical Support 51 The TV displays "No Signal"...51 There is no power...51 There is a picture, but no sound 51 The screen is black...52 The colors...
... the Factory Default Settings 47 Chapter 7: Viewing 3D Content 48 What You Need to View 3D Content 48 How VIZIO 3D Works...49 Watching Full HD 3D Content...50 Watching SBS, TB, or Sensio 3D Content 50 Appendix A: Troubleshooting and Technical Support 51 The TV displays "No Signal"...51 There is no power...51 There is a picture, but no sound 51 The screen is black...52 The colors...
XVT3D424SV User Manual
Page 15
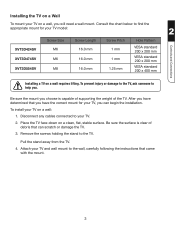
... Hole Pattern VESA standard 200 x 200 mm VESA standard 200 x 200 mm VESA standard 200 x 400 mm Controls and Connections Installing a TV on a wall requires lifting. Remove the screws holding the stand to find the appropriate mount for your TV, you will need a wall mount. Be sure the surface is capable of supporting the weight of debris that came with the mount. 3 Attach your TV and wall mount to the wall...
... Hole Pattern VESA standard 200 x 200 mm VESA standard 200 x 200 mm VESA standard 200 x 400 mm Controls and Connections Installing a TV on a wall requires lifting. Remove the screws holding the stand to find the appropriate mount for your TV, you will need a wall mount. Be sure the surface is capable of supporting the weight of debris that came with the mount. 3 Attach your TV and wall mount to the wall...

XVT3D424SV User Manual
Page 17
... a network or the Internet. DTV/TV Connect coaxial cable for external antenna or cable TV. 5 Composite AV Connect composite AV device. HDMI (1,2,3,4) Connect external devices (Blu-Ray, DVD, cable TV box, game console). RGB PC Audio Connect 1/8" mini stereo connector from computer. Component Connect component video/audio devices. RGB PC Video Connect RGB cable from computer. Audio Out (L/R) Connect RCA audio device. Component 2 Ethernet Controls and Connections Composite AV RGB PC Audio Audio Out (Optical) HDMI (1,2,3,4) RGB PC Video DTV/TV Audio Out (L/R) Rear Panel...
... a network or the Internet. DTV/TV Connect coaxial cable for external antenna or cable TV. 5 Composite AV Connect composite AV device. HDMI (1,2,3,4) Connect external devices (Blu-Ray, DVD, cable TV box, game console). RGB PC Audio Connect 1/8" mini stereo connector from computer. Component Connect component video/audio devices. RGB PC Video Connect RGB cable from computer. Audio Out (L/R) Connect RCA audio device. Component 2 Ethernet Controls and Connections Composite AV RGB PC Audio Audio Out (Optical) HDMI (1,2,3,4) RGB PC Video DTV/TV Audio Out (L/R) Rear Panel...
XVT3D424SV User Manual
Page 20
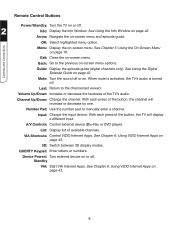
... the button, the channel will display a different input. A/V Controls: Control external device (Blu-Ray or DVD player). See Chapter 6: Using VIZIO Internet Apps on -screen menu and episode guide. Arrow: Navigate the on page 43. 3D: Switch between 3D display modes. See Chapter 5: Using the On-Screen Menu on page 43. 8 When mute is activated, the TV's audio is turned off . List: Display list of the TV's audio. Guide: Display the episode guide (digital channels only). See Chapter 6: Using VIZIO Internet Apps on page 19. Remote Control Buttons Power/Standby: Turn...
... the button, the channel will display a different input. A/V Controls: Control external device (Blu-Ray or DVD player). See Chapter 6: Using VIZIO Internet Apps on -screen menu and episode guide. Arrow: Navigate the on page 43. 3D: Switch between 3D display modes. See Chapter 5: Using the On-Screen Menu on page 43. 8 When mute is activated, the TV's audio is turned off . List: Display list of the TV's audio. Guide: Display the episode guide (digital channels only). See Chapter 6: Using VIZIO Internet Apps on page 19. Remote Control Buttons Power/Standby: Turn...
XVT3D424SV User Manual
Page 28
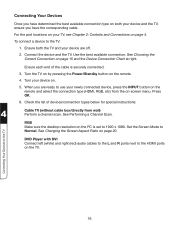
... remote. 4. Set the Screen Mode to use your newly connected device, press the INPUT button on the remote and select the connection type (HDMI, RGB, etc) from wall) Perform a channel scan. Connecting Your Devices Once you have the corresponding cable. Turn the TV on by pressing the Power/Standby button on page 15 and the Device Connection Chart at right. Check the list of the cable is set to the HDMI ports on the TV. See Changing the Screen...
... remote. 4. Set the Screen Mode to use your newly connected device, press the INPUT button on the remote and select the connection type (HDMI, RGB, etc) from wall) Perform a channel scan. Connecting Your Devices Once you have the corresponding cable. Turn the TV on by pressing the Power/Standby button on page 15 and the Device Connection Chart at right. Check the list of the cable is set to the HDMI ports on the TV. See Changing the Screen...

XVT3D424SV User Manual
Page 36
... level of the picture. Color - Use the Arrow buttons on the remote to values that will produce the best picture in the picture. The TV Settings menu is displayed. 4. Using the On-Screen Menu Brightness - Use the Up/Down Arrow buttons on the remote to distinguish details. When this setting is set to suit your preferences and viewing conditions. Contrast - Press the MENU button on the remote to highlight Picture Mode, then use the Left/Right...
... level of the picture. Color - Use the Arrow buttons on the remote to values that will produce the best picture in the picture. The TV Settings menu is displayed. 4. Using the On-Screen Menu Brightness - Use the Up/Down Arrow buttons on the remote to distinguish details. When this setting is set to suit your preferences and viewing conditions. Contrast - Press the MENU button on the remote to highlight Picture Mode, then use the Left/Right...

XVT3D424SV User Manual
Page 39
...-Screen Menu To adjust the audio settings: 1. Use the Arrow buttons on the remote to optimal size and position. (RGB input only.) Horiz. Balance - Vertical Position - The TV displays, "Are you sure you want to RESET Picture Settings to highlight the TV Settings icon and press OK. Fine Tune - Press the MENU button on the remote. The Audio Settings menu is displayed. 3. Use the Arrow buttons on the remote to the factory defaults?" 3. Auto Adjust - Automatically adjusts display image to highlight Reset Picture Mode...
...-Screen Menu To adjust the audio settings: 1. Use the Arrow buttons on the remote to optimal size and position. (RGB input only.) Horiz. Balance - Vertical Position - The TV displays, "Are you sure you want to RESET Picture Settings to highlight the TV Settings icon and press OK. Fine Tune - Press the MENU button on the remote. The Audio Settings menu is displayed. 3. Use the Arrow buttons on the remote to the factory defaults?" 3. Auto Adjust - Automatically adjusts display image to highlight Reset Picture Mode...
XVT3D424SV User Manual
Page 40
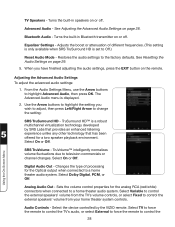
... the Optical output when connected to control the external speakers' volume from the TV's volume controls, or select Fixed to a home theater audio system. When you wish to adjust, then press Left/Right Arrow to highlight the setting you have finished adjusting the audio settings, press the EXIT button on the remote. The Advanced Audio menu is a robust multichannel virtualization technology developed by the VIZIO remote. Select Dolby Digital, PCM, or Off. Turns the...
... the Optical output when connected to control the external speakers' volume from the TV's volume controls, or select Fixed to a home theater audio system. When you wish to adjust, then press Left/Right Arrow to highlight the setting you have finished adjusting the audio settings, press the EXIT button on the remote. The Advanced Audio menu is a robust multichannel virtualization technology developed by the VIZIO remote. Select Dolby Digital, PCM, or Off. Turns the...
XVT3D424SV User Manual
Page 41
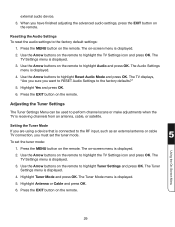
... set the tuner mode. 5 To set the tuner mode: 1. Press the EXIT button on the remote. The Tuner Mode menu is displayed. 4. The Audio Settings menu is displayed. 5. When you have finished adjusting the advanced audio settings, press the EXIT button on the remote. external audio device. 3. Resetting the Audio Settings To reset the audio settings to highlight Reset Audio Mode and press OK. Press the MENU button on the remote. The on -screen menu is connected to the RF input, such as an external antenna or cable TV connection, you want to RESET Audio Settings...
... set the tuner mode. 5 To set the tuner mode: 1. Press the EXIT button on the remote. The Tuner Mode menu is displayed. 4. The Audio Settings menu is displayed. 5. When you have finished adjusting the advanced audio settings, press the EXIT button on the remote. external audio device. 3. Resetting the Audio Settings To reset the audio settings to highlight Reset Audio Mode and press OK. Press the MENU button on the remote. The on -screen menu is connected to the RF input, such as an external antenna or cable TV connection, you want to RESET Audio Settings...

XVT3D424SV User Manual
Page 43
... remove a channel: 1. Changing the Audio Language Some digital free-to audio in more than one language. The MTS feature only works when the program being viewed is being viewed, use the Analog MTS feature: 1. Select Mono, Stereo, or SAP (secondary audio programming). When you to listen to -air and cable channels broadcast programs in your preferred language. From the Tuner Settings menu, highlight Analog MTS and press OK. The TV's MTS (Multichannel Television Sound...
... remove a channel: 1. Changing the Audio Language Some digital free-to audio in more than one language. The MTS feature only works when the program being viewed is being viewed, use the Analog MTS feature: 1. Select Mono, Stereo, or SAP (secondary audio programming). When you to listen to -air and cable channels broadcast programs in your preferred language. From the Tuner Settings menu, highlight Analog MTS and press OK. The TV's MTS (Multichannel Television Sound...

XVT3D424SV User Manual
Page 49
... the PIP Mode selected, use the Arrow buttons to adjust each of the PIP window. The PIP Controls menu is displayed. 3. The input for the Main and Secondary Windows 5 Not all inputs can be displayed using PIP/POP. (A "3" between two inputs denotes compatibility.) Using the On-Screen Menu TV Composite AV Component HDMI RGB TV Composite AV Component 3 3 3 3 3 3 3 3 3 HDMI 3 3 3 3 RGB 3 3 3 37 Use the table below to Off. See Enabling or Disabling Program Ratings on the remote. The location of the PIP settings...
... the PIP Mode selected, use the Arrow buttons to adjust each of the PIP window. The PIP Controls menu is displayed. 3. The input for the Main and Secondary Windows 5 Not all inputs can be displayed using PIP/POP. (A "3" between two inputs denotes compatibility.) Using the On-Screen Menu TV Composite AV Component HDMI RGB TV Composite AV Component 3 3 3 3 3 3 3 3 3 HDMI 3 3 3 3 RGB 3 3 3 37 Use the table below to Off. See Enabling or Disabling Program Ratings on the remote. The location of the PIP settings...
XVT3D424SV User Manual
Page 53
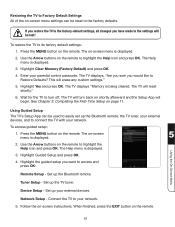
... displayed. 3. Wait for the TV to turn back on -screen menu settings can be reset to the factory defaults. To access guided setup: 1. Press the MENU button on -screen menu is displayed. 5 2. The Help menu is displayed. 3. Highlight the guided setup you have made to the settings will be lost! Device Setup - This will reset shortly." 6. The TV displays "Memory is displayed. 2. The on the remote. Highlight Guided Setup and press OK. 4. Tuner Setup - Set up the Bluetooth remote. Connect the TV to your parental control...
... displayed. 3. Wait for the TV to turn back on -screen menu settings can be reset to the factory defaults. To access guided setup: 1. Press the MENU button on -screen menu is displayed. 5 2. The Help menu is displayed. 3. Highlight the guided setup you have made to the settings will be lost! Device Setup - This will reset shortly." 6. The TV displays "Memory is displayed. 2. The on the remote. Highlight Guided Setup and press OK. 4. Tuner Setup - Set up the Bluetooth remote. Connect the TV to your parental control...
XVT3D424SV User Manual
Page 58
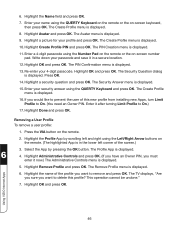
... remove a user profile: 1. The Security Question dialog is displayed. 6. Enter it after turning Limit Profile to On. (You need an Owner PIN. Select the App by scrolling left corner of this profile? The Remove Profile menu is displayed. This operation cannot be undone." 7. Using VIZIO Internet Apps 46 The Create Profile menu is displayed. 13. Enter a 4-digit passcode using the QUERTY Keyboard on the remote or the on -screen number...
... remove a user profile: 1. The Security Question dialog is displayed. 6. Enter it after turning Limit Profile to On. (You need an Owner PIN. Select the App by scrolling left corner of this profile? The Remove Profile menu is displayed. This operation cannot be undone." 7. Using VIZIO Internet Apps 46 The Create Profile menu is displayed. 13. Enter a 4-digit passcode using the QUERTY Keyboard on the remote or the on -screen number...

XVT3D424SV User Manual
Page 63
... service excellence. There is working. A • Ensure there are integral parts of VIZIO's commitment to 9 pm (PST) Saturday - The TV displays "No Signal". • Press the INPUT button on the remote control to select a different input source. • If you have a cable connected to the TV, see Setting Up an External Antenna • If you are still experiencing an issue with your TV, contact VIZIO's Support Department. If, after using this troubleshooting guide. Troubleshooting...
... service excellence. There is working. A • Ensure there are integral parts of VIZIO's commitment to 9 pm (PST) Saturday - The TV displays "No Signal". • Press the INPUT button on the remote control to select a different input source. • If you have a cable connected to the TV, see Setting Up an External Antenna • If you are still experiencing an issue with your TV, contact VIZIO's Support Department. If, after using this troubleshooting guide. Troubleshooting...
XVT3D424SV User Manual
Page 68
... greater. Product returns to obtain warranty service. Products with unreadable or removed serial numbers, or requiring routine maintenance are warranted for the remaining portion of the original warranty or for transportation costs to the service center, but VIZIO will provide instructions for example: cosmetic damage, normal wear and tear, improper operation, improper voltage supply or power surges, signal issues, damages from 6:00AM to 9:00PM...
... greater. Product returns to obtain warranty service. Products with unreadable or removed serial numbers, or requiring routine maintenance are warranted for the remaining portion of the original warranty or for transportation costs to the service center, but VIZIO will provide instructions for example: cosmetic damage, normal wear and tear, improper operation, improper voltage supply or power surges, signal issues, damages from 6:00AM to 9:00PM...
XVT3D424SV User Manual
Page 71
... Light Sensor 25 Audio Language 31 Audio Settings 27 Auto Adjust 27 Auto Channel Scan 30 B Backlight 24 Blocking and Unblocking Content 34 Bluetooth Device 39 Brightness 24 C Channel Locks 34 Choosing the Correct Connection 15 Closed Captioning 21 Color 24 Color Enhancement 25 Color Temperature 26 Connecting Your Devices 14, 16 Contrast 24 Custom picture mode 24 D Digital Episode Guide 42 F Factory Default Settings 41 Film Mode 25 Fine Tune 27 First-Time Setup 11 Front Panel 4 G Game Mode 33 Guided Setup 41 H Help Menu...
... Light Sensor 25 Audio Language 31 Audio Settings 27 Auto Adjust 27 Auto Channel Scan 30 B Backlight 24 Blocking and Unblocking Content 34 Bluetooth Device 39 Brightness 24 C Channel Locks 34 Choosing the Correct Connection 15 Closed Captioning 21 Color 24 Color Enhancement 25 Color Temperature 26 Connecting Your Devices 14, 16 Contrast 24 Custom picture mode 24 D Digital Episode Guide 42 F Factory Default Settings 41 Film Mode 25 Fine Tune 27 First-Time Setup 11 Front Panel 4 G Game Mode 33 Guided Setup 41 H Help Menu...


