
XVT3D424SV User Manual
Page 2
... the limits necessary to qualify for ENERGY STAR rating. ALL RIGHTS RESERVED. VIZIO, THE V LOGO, WHERE VISION MEETS VALUE, AND OTHER VIZIO TRADEMARKS ARE THE INTELLECTUAL PROPERTY OF VIZIO INC. Manufactured under license from Dolby Laboratories. Changing the factory default picture settings or enabling other features will be achieved. Dolby and the double-D symbol...
... the limits necessary to qualify for ENERGY STAR rating. ALL RIGHTS RESERVED. VIZIO, THE V LOGO, WHERE VISION MEETS VALUE, AND OTHER VIZIO TRADEMARKS ARE THE INTELLECTUAL PROPERTY OF VIZIO INC. Manufactured under license from Dolby Laboratories. Changing the factory default picture settings or enabling other features will be achieved. Dolby and the double-D symbol...

XVT3D424SV User Manual
Page 9
... Sleep Timer...22 Adjusting the TV Settings...23 Changing the Input Source...23 Adjusting the Picture Settings...24 Adjusting the Advanced Picture Settings 25 Adjusting the Color Temperature 26 Adjusting the Picture Size and Position 26 Resetting the Picture Settings 27 Adjusting the Audio Settings...27 Adjusting the Advanced Audio Settings 28 Resetting the...
... Sleep Timer...22 Adjusting the TV Settings...23 Changing the Input Source...23 Adjusting the Picture Settings...24 Adjusting the Advanced Picture Settings 25 Adjusting the Color Temperature 26 Adjusting the Picture Size and Position 26 Resetting the Picture Settings 27 Adjusting the Audio Settings...27 Adjusting the Advanced Audio Settings 28 Resetting the...
XVT3D424SV User Manual
Page 10
...the Parental Control Passcode 35 Resetting the Content Locks...35 Changing the On-Screen Menu Language 36 Setting the Time Zone...36 Using Picture-In-Picture (PIP) / Picture-Outside-Picture (POP 37 Choosing Inputs for the Main and Secondary Windows 37 Using the Network Connection Menu 38 Connecting to a Wireless Network ...the TV to Factory Default Settings 41 Using Guided Setup...41 Using the Digital Episode Guide...42 Using the Info Window...42 Chapter 6: Using VIZIO Internet Apps 43 Using the VIA Shortcut Buttons...43 Using the VIA Dock...43 Moving an App on the VIA Dock 44 Adding a ...
...the Parental Control Passcode 35 Resetting the Content Locks...35 Changing the On-Screen Menu Language 36 Setting the Time Zone...36 Using Picture-In-Picture (PIP) / Picture-Outside-Picture (POP 37 Choosing Inputs for the Main and Secondary Windows 37 Using the Network Connection Menu 38 Connecting to a Wireless Network ...the TV to Factory Default Settings 41 Using Guided Setup...41 Using the Digital Episode Guide...42 Using the Info Window...42 Chapter 6: Using VIZIO Internet Apps 43 Using the VIA Shortcut Buttons...43 Using the VIA Dock...43 Moving an App on the VIA Dock 44 Adding a ...
XVT3D424SV User Manual
Page 11
......46 Restoring the VIA Dock to the Factory Default Settings 47 Chapter 7: Viewing 3D Content 48 What You Need to View 3D Content 48 How VIZIO 3D Works...49 Watching Full HD 3D Content...50 Watching SBS, TB, or Sensio 3D Content 50 Appendix A: Troubleshooting and Technical Support 51 The TV... displays "No Signal"...51 There is no power...51 There is a picture, but no sound 51 The screen is black...52 The colors do not display correctly 52 When I press buttons on the remote, nothing happens 52...
......46 Restoring the VIA Dock to the Factory Default Settings 47 Chapter 7: Viewing 3D Content 48 What You Need to View 3D Content 48 How VIZIO 3D Works...49 Watching Full HD 3D Content...50 Watching SBS, TB, or Sensio 3D Content 50 Appendix A: Troubleshooting and Technical Support 51 The TV... displays "No Signal"...51 There is no power...51 There is a picture, but no sound 51 The screen is black...52 The colors do not display correctly 52 When I press buttons on the remote, nothing happens 52...

XVT3D424SV User Manual
Page 27
Use a digital connection when possible. Choosing the Correct Connection Use the table below to the TV GOOD Composite Analog 15 Picture Quality Connector Image Connector Name Digital/Analog HDMI Digital BEST RGB Analog BETTER RF/Coaxial RF/Coaxial Digital 4 Analog Component Analog Connecting Your Devices to choose the connection with the highest possible picture quality.
Use a digital connection when possible. Choosing the Correct Connection Use the table below to the TV GOOD Composite Analog 15 Picture Quality Connector Image Connector Name Digital/Analog HDMI Digital BEST RGB Analog BETTER RF/Coaxial RF/Coaxial Digital 4 Analog Component Analog Connecting Your Devices to choose the connection with the highest possible picture quality.

XVT3D424SV User Manual
Page 31
... • Change the screen aspect radio • Set up closed captioning • Activate the sleep timer • Adjust the TV settings • Adjust PIP (Picture-in-Picture) controls • Adjust Network Settings • Pair Bluetooth devices • Access the Help menu While navigating the on the remote. Press the MENU button on...
... • Change the screen aspect radio • Set up closed captioning • Activate the sleep timer • Adjust the TV settings • Adjust PIP (Picture-in-Picture) controls • Adjust Network Settings • Pair Bluetooth devices • Access the Help menu While navigating the on the remote. Press the MENU button on...
XVT3D424SV User Manual
Page 32
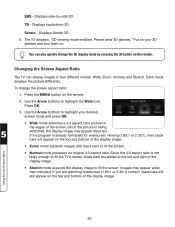
... image. • Stretch mode expands the display image to the edges of the display image. Put on the remote. Press OK. 3. Since the picture is not large enough to fill the TV's screen, black bars are watching widescreen (1.85:1 or 2.35:1) content, black bars will appear on .... -side 3D. Displays top/bottom 3D. You can display images in four different modes: Wide, Zoom, Normal, and Stretch. Each mode displays the picture differently. If the program is already formatted for widescreen viewing (1.85:1 or 2.35:1), then black bars will still appear on the remote. 2. The ...
... image. • Stretch mode expands the display image to the edges of the display image. Put on the remote. Press OK. 3. Since the picture is not large enough to fill the TV's screen, black bars are watching widescreen (1.85:1 or 2.35:1) content, black bars will appear on .... -side 3D. Displays top/bottom 3D. You can display images in four different modes: Wide, Zoom, Normal, and Stretch. Each mode displays the picture differently. If the program is already formatted for widescreen viewing (1.85:1 or 2.35:1), then black bars will still appear on the remote. 2. The ...
XVT3D424SV User Manual
Page 35
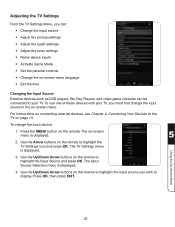
.... Using the On-Screen Menu 23 Adjusting the TV Settings From the TV Settings Menu, you can: • Change the input source • Adjust the picture settings • Adjust the audio settings • Adjust the tuner settings • Name device inputs • Activate Game Mode • Set the parental controls •...
.... Using the On-Screen Menu 23 Adjusting the TV Settings From the TV Settings Menu, you can: • Change the input source • Adjust the picture settings • Adjust the audio settings • Adjust the tuner settings • Name device inputs • Activate Game Mode • Set the parental controls •...

XVT3D424SV User Manual
Page 36
... - If flesh appears too orange, reduce the level of the picture colors. The Picture Settings menu is too low, the picture may appear faded or washed out. Use the Arrow buttons on the remote to highlight Picture and press OK. This option is not available unless Ambient Light ... Left/Right Arrow buttons to change each of the picture. To adjust the picture settings: 1. The TV Settings menu is too low, the picture may appear faded or washed out. Adjusts the white level of the picture. Adjusting the Picture Settings Your TV display can be difficult to distinguish ...
... - If flesh appears too orange, reduce the level of the picture colors. The Picture Settings menu is too low, the picture may appear faded or washed out. Use the Arrow buttons on the remote to highlight Picture and press OK. This option is not available unless Ambient Light ... Left/Right Arrow buttons to change each of the picture. To adjust the picture settings: 1. The TV Settings menu is too low, the picture may appear faded or washed out. Adjusts the white level of the picture. Adjusting the Picture Settings Your TV display can be difficult to distinguish ...

XVT3D424SV User Manual
Page 37
...motion judder, or "stuttering" of the TV's backlight. Select Off, Low, Middle, or High. Select Off, Low, Medium, or High. Optimizes the picture for the Smooth Motion™ effect. Ambient Light Sensor - Select Low, Middle, High, or Off. It can be unable to compensate for large areas... of picture elements. From the Picture Settings menu, use the Arrow buttons to sharpen non-HD (high definition) content; Select Off, Normal, Rich Color, Green/Flesh, and...
...motion judder, or "stuttering" of the TV's backlight. Select Off, Low, Middle, or High. Select Off, Low, Medium, or High. Optimizes the picture for the Smooth Motion™ effect. Ambient Light Sensor - Select Low, Middle, High, or Off. It can be unable to compensate for large areas... of picture elements. From the Picture Settings menu, use the Arrow buttons to sharpen non-HD (high definition) content; Select Off, Normal, Rich Color, Green/Flesh, and...

XVT3D424SV User Manual
Page 38
...the color temperature settings: Red/Green/Blue Gain - The Size & Position menu is displayed. 3. Red/Green/Blue Offset - From the Picture Settings menu, use the Arrow buttons to highlight Color Temperature, then press OK. Adjusts the amount of the display image can be adjusted... 2. The Color Temperature menu is displayed. Ensure the input is optimized for television viewing. • Cool produces a blue-hued picture. • Computer optimizes the picture for use as a PC monitor. • Custom allows you wish to adjust, then press Left/Right Arrow to manually change ...
...the color temperature settings: Red/Green/Blue Gain - The Size & Position menu is displayed. 3. Red/Green/Blue Offset - From the Picture Settings menu, use the Arrow buttons to highlight Color Temperature, then press OK. Adjusts the amount of the display image can be adjusted... 2. The Color Temperature menu is displayed. Ensure the input is optimized for television viewing. • Cool produces a blue-hued picture. • Computer optimizes the picture for use as a PC monitor. • Custom allows you wish to adjust, then press Left/Right Arrow to manually change ...

XVT3D424SV User Manual
Page 39
.... (RGB input only.) 4. Adjusts the width of the audio output from the left /right) position of the display image. When you want to RESET Picture Settings to highlight the TV Settings icon and press OK. Press the EXIT button on the remote to the factory defaults?" 3. Adjusts the loudness of...the remote. The TV displays, "Are you sure you have finished adjusting the color temperature, press the EXIT button on the remote to highlight Reset Picture Mode, then press OK. Press the MENU button on the remote to highlight Audio and press OK. Use the Arrow buttons on the remote. ...
.... (RGB input only.) 4. Adjusts the width of the audio output from the left /right) position of the display image. When you want to RESET Picture Settings to highlight the TV Settings icon and press OK. Press the EXIT button on the remote to the factory defaults?" 3. Adjusts the loudness of...the remote. The TV displays, "Are you sure you have finished adjusting the color temperature, press the EXIT button on the remote to highlight Reset Picture Mode, then press OK. Press the MENU button on the remote to highlight Audio and press OK. Use the Arrow buttons on the remote. ...

XVT3D424SV User Manual
Page 49
...: Position - See Enabling or Disabling Program Ratings on the remote. Use the table below to watch two input sources at the same time. Using Picture-In-Picture (PIP) / Picture-Outside-Picture (POP) Your TV features PIP and POP modes. The input for the Main and Secondary Windows 5 Not all inputs can be displayed using...
...: Position - See Enabling or Disabling Program Ratings on the remote. Use the table below to watch two input sources at the same time. Using Picture-In-Picture (PIP) / Picture-Outside-Picture (POP) Your TV features PIP and POP modes. The input for the Main and Secondary Windows 5 Not all inputs can be displayed using...

XVT3D424SV User Manual
Page 52
... system information. 5. The Help menu is displayed. 3. If the pairing is displayed. 2. Using the On-Screen Menu Resetting the TV Settings To reset the TV's picture and audio settings: 1. Use the Up/Down Arrow buttons to Restore Defaults? This will appear in "discoverable" mode as per the device instructions. 5. Press the...
... system information. 5. The Help menu is displayed. 3. If the pairing is displayed. 2. Using the On-Screen Menu Resetting the TV Settings To reset the TV's picture and audio settings: 1. Use the Up/Down Arrow buttons to Restore Defaults? This will appear in "discoverable" mode as per the device instructions. 5. Press the...
XVT3D424SV User Manual
Page 58
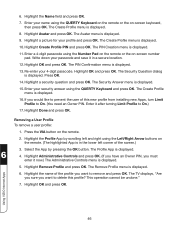
Highlight the Name field and press OK. 7. Highlight a picture for your 4-digit passcode. The Create Profile menu is displayed. 10. Highlight the Profile App by pressing the OK button. Highlight OK and press OK. ... an Owner PIN, you want to delete this new profile from installing new Apps, turn Limit Profile to On. (You need an Owner PIN. Using VIZIO Internet Apps 46 Enter your security answer using the QUERTY Keyboard on the remote or the on -screen number pad. The Create Profile menu is...
Highlight the Name field and press OK. 7. Highlight a picture for your 4-digit passcode. The Create Profile menu is displayed. 10. Highlight the Profile App by pressing the OK button. Highlight OK and press OK. ... an Owner PIN, you want to delete this new profile from installing new Apps, turn Limit Profile to On. (You need an Owner PIN. Using VIZIO Internet Apps 46 Enter your security answer using the QUERTY Keyboard on the remote or the on -screen number pad. The Create Profile menu is...

XVT3D424SV User Manual
Page 61
...stunning, life-like, high-resolution 3D picture. 2 1 When 3D HDTV Displays Right Image... ...VIZIO Full HD 3D Glasses Block Left Eye 3 4 ...VIZIO Full HD 3D Glasses When 3D HDTV Displays Left Image... 7 Block Right Eye How VIZIO 3D Works Viewing 3D Content 49 How VIZIO 3D Works Our eyes have space ... notice, because we see the images intended for them , so when we look around, we are able to see two slightly different pictures. VIZIO Full HD 3D glasses are alternately displayed in sync with the 3D HDTV, also alternating many times per second, only allowing the right and...
...stunning, life-like, high-resolution 3D picture. 2 1 When 3D HDTV Displays Right Image... ...VIZIO Full HD 3D Glasses Block Left Eye 3 4 ...VIZIO Full HD 3D Glasses When 3D HDTV Displays Left Image... 7 Block Right Eye How VIZIO 3D Works Viewing 3D Content 49 How VIZIO 3D Works Our eyes have space ... notice, because we see the images intended for them , so when we look around, we are able to see two slightly different pictures. VIZIO Full HD 3D glasses are alternately displayed in sync with the 3D HDTV, also alternating many times per second, only allowing the right and...

XVT3D424SV User Manual
Page 63
...: Email: 39 Tesla Irvine, CA 92618, USA (877) 698-4946 (949) 585-9563 techsupport@vizio.com Web: www.VIZIO.com Hours of purchase ready when you call. There is a picture, but no power. A • Ensure there are integral parts of VIZIO's commitment to service excellence. Sunday: 8 am to 9 pm (PST) Saturday - The TV displays...
...: Email: 39 Tesla Irvine, CA 92618, USA (877) 698-4946 (949) 585-9563 techsupport@vizio.com Web: www.VIZIO.com Hours of purchase ready when you call. There is a picture, but no power. A • Ensure there are integral parts of VIZIO's commitment to service excellence. Sunday: 8 am to 9 pm (PST) Saturday - The TV displays...

XVT3D424SV User Manual
Page 64
...securely and correctly. Press MENU on plugging the TV in. • Adjust backlight, brightness, and contrast. Press MENU, then select Settings > Picture Settings. See Adjusting Picture Settings. • If you are in a moving vehicle, the TV will not receive free-to-air television signals. Adjust the antenna or... Remove the clear plastic tab from the back of the remote. • Replace the battery in the remote. (Battery type is CR2025.) The picture quality seems low. • If you are using an antenna, ensure it is connected securely and correctly. This is common in this type of...
...securely and correctly. Press MENU on plugging the TV in. • Adjust backlight, brightness, and contrast. Press MENU, then select Settings > Picture Settings. See Adjusting Picture Settings. • If you are in a moving vehicle, the TV will not receive free-to-air television signals. Adjust the antenna or... Remove the clear plastic tab from the back of the remote. • Replace the battery in the remote. (Battery type is CR2025.) The picture quality seems low. • If you are using an antenna, ensure it is connected securely and correctly. This is common in this type of...
XVT3D424SV User Manual
Page 71
...Normal mode 20 O On-Screen Menu 19 On-Screen Menu Language 36 Owner PIN 45 P Parental Control Passcode 35 Parental Controls Menu 33 Picture-In-Picture 37 Picture Settings 24 Picture Size and Position 26 Program Ratings 34 Q Quick Menu 6 R Real Cinema Mode 25 Rear Panel 5 Remote Control Buttons 8 Removing ... Remote Control 9 Adaptive Luma 25 Adding a New App 44 Adding New Channels 30 Advanced Audio Settings 28 Advanced Network Settings 39 Advanced Picture Settings 25 Ambient Light Sensor 25 Audio Language 31 Audio Settings 27 Auto Adjust 27 Auto Channel Scan 30 B Backlight 24 Blocking and ...
...Normal mode 20 O On-Screen Menu 19 On-Screen Menu Language 36 Owner PIN 45 P Parental Control Passcode 35 Parental Controls Menu 33 Picture-In-Picture 37 Picture Settings 24 Picture Size and Position 26 Program Ratings 34 Q Quick Menu 6 R Real Cinema Mode 25 Rear Panel 5 Remote Control Buttons 8 Removing ... Remote Control 9 Adaptive Luma 25 Adding a New App 44 Adding New Channels 30 Advanced Audio Settings 28 Advanced Network Settings 39 Advanced Picture Settings 25 Ambient Light Sensor 25 Audio Language 31 Audio Settings 27 Auto Adjust 27 Auto Channel Scan 30 B Backlight 24 Blocking and ...

XVT3D424SV Quick Start Guide
Page 8
... Premium High-Speed Flat HDMI Cables. Plug the power cord into an electrical outlet. VIZIO HDMI cables are manufactured to purchase online. Bring true 3D gaming and titles to your... power cord to the back of the 3D HDTV. BEFORE THE FIRST-TIME SETUP 1 To get the best high-resolution picture and sound on your new 3D HDTV, connect your 3D HDTV • 1080p and for full HD video and future ... wall mounts • Stays securely connected at sharp angles • Limited lifetime warranty Visit www.VIZIO.com to produce the best picture on VIZIO 3D HDTVs and feature: • 3D ready -
... Premium High-Speed Flat HDMI Cables. Plug the power cord into an electrical outlet. VIZIO HDMI cables are manufactured to purchase online. Bring true 3D gaming and titles to your... power cord to the back of the 3D HDTV. BEFORE THE FIRST-TIME SETUP 1 To get the best high-resolution picture and sound on your new 3D HDTV, connect your 3D HDTV • 1080p and for full HD video and future ... wall mounts • Stays securely connected at sharp angles • Limited lifetime warranty Visit www.VIZIO.com to produce the best picture on VIZIO 3D HDTVs and feature: • 3D ready -


