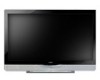
User Manual
Page 2
... the User Manual. Do not turn on the VU42L FHDTV10A cabinet. If the VU42L FHDTV10A falls, it from overheating, be observed for the installation, use a liquid or a spray cleaner for moving the product. • Hold the power connector when removing the power cable. Do not install the product close to your home, consult your outlet does not accommodate the three-wire plug...
... the User Manual. Do not turn on the VU42L FHDTV10A cabinet. If the VU42L FHDTV10A falls, it from overheating, be observed for the installation, use a liquid or a spray cleaner for moving the product. • Hold the power connector when removing the power cable. Do not install the product close to your home, consult your outlet does not accommodate the three-wire plug...
User Manual
Page 5
... correct power rating. Version 12/17/2007 5 www.VIZIO.com VIZIO VU42L FHDTV10A User Manual Additional Certified Accessories for the VIZIO VU42L FULLHDTV HD TV are sold separately Wall Mounts High Definition Cables Extra or replacement Remote VIZIO also offers Installation Services and Extended Warranty Services for your VIZIO VU42L FHDTV10A To purchase or inquire about 280W, please use a lag bolt, again using a washer under the screw head. Fix one with a Wall Mount, a Safety...
... correct power rating. Version 12/17/2007 5 www.VIZIO.com VIZIO VU42L FHDTV10A User Manual Additional Certified Accessories for the VIZIO VU42L FULLHDTV HD TV are sold separately Wall Mounts High Definition Cables Extra or replacement Remote VIZIO also offers Installation Services and Extended Warranty Services for your VIZIO VU42L FHDTV10A To purchase or inquire about 280W, please use a lag bolt, again using a washer under the screw head. Fix one with a Wall Mount, a Safety...
User Manual
Page 6
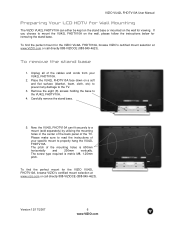
VIZIO VU42L FHDTV10A User Manual Preparing Your LCD HDTV for Wall Mounting The VIZIO VU42L FHDTV10A can fit securely to a mount (sold separately) by utilizing the mounting holes in the center of the back panel of your VU42L FHDTV10A. 2. If you choose to mount the VU42L FHDTV10A on the wall for removing the stand base. To remove the stand base 1. Carefully remove the stand base. 5. The pitch of the cables and cords from your specific mount to...
VIZIO VU42L FHDTV10A User Manual Preparing Your LCD HDTV for Wall Mounting The VIZIO VU42L FHDTV10A can fit securely to a mount (sold separately) by utilizing the mounting holes in the center of the back panel of your VU42L FHDTV10A. 2. If you choose to mount the VU42L FHDTV10A on the wall for removing the stand base. To remove the stand base 1. Carefully remove the stand base. 5. The pitch of the cables and cords from your specific mount to...
User Manual
Page 7
... Side Connections ...10 1.4 Rear Panel Connections ...10 1.5 VIZIO Universal Remote Control ...12 1.5.1 Insertion of Batteries in the Remote Control 15 1.5.2 Remote Control Range ...15 1.5.3 VIZIO Universal Remote Control Precautions 15 Chapter 2 Connecting Equipment 16 2.1 Which Video Connection Should I Use?...16 2.2 Connecting Your Cable or Satellite Box ...17 2.2.1 Using HDMI ...17 2.2.2 Using Component Video...19 2.3 Connecting Coaxial (RF) ...20 2.3.1 Using Your Antenna or Digital Cable for DTV 20 2.3.2 Using Your Antenna or Cable for TV ...21 2.3.3 Using the Antenna or Cable through...
... Side Connections ...10 1.4 Rear Panel Connections ...10 1.5 VIZIO Universal Remote Control ...12 1.5.1 Insertion of Batteries in the Remote Control 15 1.5.2 Remote Control Range ...15 1.5.3 VIZIO Universal Remote Control Precautions 15 Chapter 2 Connecting Equipment 16 2.1 Which Video Connection Should I Use?...16 2.2 Connecting Your Cable or Satellite Box ...17 2.2.1 Using HDMI ...17 2.2.2 Using Component Video...19 2.3 Connecting Coaxial (RF) ...20 2.3.1 Using Your Antenna or Digital Cable for DTV 20 2.3.2 Using Your Antenna or Cable for TV ...21 2.3.3 Using the Antenna or Cable through...

User Manual
Page 8
... ...56 4.17 PC Input Setup ...56 4.18 Understanding Viewing Modes...57 4.18.1 Picture-In-Picture (PIP) Mode...58 4.18.2 Adjusting Basic PIP/POP Settings ...58 4.18.3 Setting the Sleep Timer ...59 4.19 Programming the VIZIO Universal Remote Control 59 4.19.1 Programming for VCR ...59 4.19.2 Programming for Cable Set-Top Box...60 4.19.3 Programming for DVD Player ...60 4.19.4 Searching for Component Codes ...61 4.20 Using a Cable or Satellite Remote ...61 Chapter 5 Maintenance and Troubleshooting 61 5.1 Maintenance...61 5.2 Troubleshooting Guide ...62 5.3 Telephone & Technical Support ...63...
... ...56 4.17 PC Input Setup ...56 4.18 Understanding Viewing Modes...57 4.18.1 Picture-In-Picture (PIP) Mode...58 4.18.2 Adjusting Basic PIP/POP Settings ...58 4.18.3 Setting the Sleep Timer ...59 4.19 Programming the VIZIO Universal Remote Control 59 4.19.1 Programming for VCR ...59 4.19.2 Programming for Cable Set-Top Box...60 4.19.3 Programming for DVD Player ...60 4.19.4 Searching for Component Codes ...61 4.20 Using a Cable or Satellite Remote ...61 Chapter 5 Maintenance and Troubleshooting 61 5.1 Maintenance...61 5.2 Troubleshooting Guide ...62 5.3 Telephone & Technical Support ...63...
User Manual
Page 11
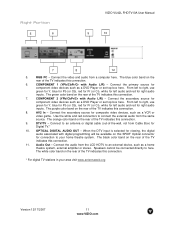
... indicates this connection. 9. The white color band on this SPDIF Optical connector for connection to right, use green for Y, blue for Pb (or Cb), red for Pr (or Cr), white for Digital TV.* 10. COMPONENT 1 (YPb/CbPr/Cr with Audio L/R) - From left audio and red for viewing, the digital audio associated with digital programming will be connected directly to an external device, such as a DVD Player or set top box here. The blue color band on...
... indicates this connection. 9. The white color band on this SPDIF Optical connector for connection to right, use green for Y, blue for Pb (or Cb), red for Pr (or Cr), white for Digital TV.* 10. COMPONENT 1 (YPb/CbPr/Cr with Audio L/R) - From left audio and red for viewing, the digital audio associated with digital programming will be connected directly to an external device, such as a DVD Player or set top box here. The blue color band on...
User Manual
Page 12
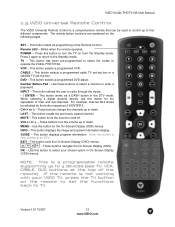
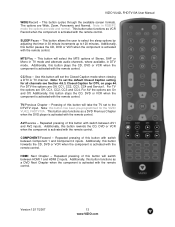
... a programmed cable TV set-top box or a satellite TV set the functions back to set -top box. DVD - This button works as a DASH button in On-Screen Display (OSD) menus. This button recalls the previously viewed channel. This button turns the sound on the following pages. Use this button to turn the volume up to select your VIZIO TV, press the TV button on from the Standby mode. EXIT - This button exits the On-Screen Display (OSD) menus. - VIZIO VU42L FHDTV10A User Manual 1.5 VIZIO Universal Remote Control The VIZIO Universal Remote Control...
... a programmed cable TV set-top box or a satellite TV set the functions back to set -top box. DVD - This button works as a DASH button in On-Screen Display (OSD) menus. This button recalls the previously viewed channel. This button turns the sound on the following pages. Use this button to turn the volume up to select your VIZIO TV, press the TV button on from the Standby mode. EXIT - This button exits the On-Screen Display (OSD) menus. - VIZIO VU42L FHDTV10A User Manual 1.5 VIZIO Universal Remote Control The VIZIO Universal Remote Control...
User Manual
Page 13
... TV mode and alternate audio channels, where available, in RGB/PC mode the options are Off, CC1, CC2, CC3, CC4 and Service1. HDMI/ Next Chapter - Additionally, this button forwards the CD, DVD or VCR when the component is activated with switch between Component 1 and Component 2 inputs. This button will set the default Closed Caption setting for all channels see Section 4.6.3, Closed Caption for the VIZIO VU42L FHDTV10A. SLEEP/Pause - Additionally, this button functions as a DVD...
... TV mode and alternate audio channels, where available, in RGB/PC mode the options are Off, CC1, CC2, CC3, CC4 and Service1. HDMI/ Next Chapter - Additionally, this button forwards the CD, DVD or VCR when the component is activated with switch between Component 1 and Component 2 inputs. This button will set the default Closed Caption setting for all channels see Section 4.6.3, Closed Caption for the VIZIO VU42L FHDTV10A. SLEEP/Pause - Additionally, this button functions as a DVD...

User Manual
Page 16
...16 www.VIZIO.com The video signal is separated into three signals, one containing the black-and-white information and the other two containing the color information. Left hand side panel of TV set -top box, DVD player, or A/V receiver and an audio and/or video monitor, such as a set S-Video (AV1) - Connection Quality (type) Connector Rear Panel Color Codes Description Best (digital) Best (digital Good (analog) Best (analog) Better (analog) Good (analog) White HDMI (High-Definition Multimedia Interface) - TV Coaxial RF. Separating the color in color. HDMI...
...16 www.VIZIO.com The video signal is separated into three signals, one containing the black-and-white information and the other two containing the color information. Left hand side panel of TV set -top box, DVD player, or A/V receiver and an audio and/or video monitor, such as a set S-Video (AV1) - Connection Quality (type) Connector Rear Panel Color Codes Description Best (digital) Best (digital Good (analog) Best (analog) Better (analog) Good (analog) White HDMI (High-Definition Multimedia Interface) - TV Coaxial RF. Separating the color in color. HDMI...
User Manual
Page 17
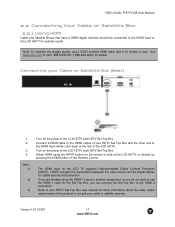
... Protection (HDCP). If you are already using the INPUT button on the remote or side of the LCD HDTV, or directly by pressing the HDMI button on the Remote Control. Note: c) d) e) Turn off the power to the LCD HDTV and HDTV Set-Top Box. Select HDMI using the HDMI 1 input for another component, or you do not want to use a VIZIO certified HDMI cable that have a HDMI digital interface should be connected to the HDMI Input (white color area) at the rear of the LCD HDTV.
... Protection (HDCP). If you are already using the INPUT button on the remote or side of the LCD HDTV, or directly by pressing the HDMI button on the Remote Control. Note: c) d) e) Turn off the power to the LCD HDTV and HDTV Set-Top Box. Select HDMI using the HDMI 1 input for another component, or you do not want to use a VIZIO certified HDMI cable that have a HDMI digital interface should be connected to the HDMI Input (white color area) at the rear of the LCD HDTV.
User Manual
Page 19
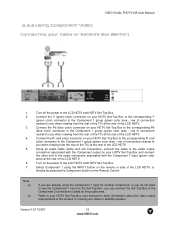
... the LCD HDTV. 4. Using an audio cable (white and red connectors), connect the cable to the audio output connectors associated with the Component output on your HDTV Set-Top Box and connect the other end to you when viewing from the rear of the TV) at the rear of the LCD HDTV. 5. VIZIO VU42L FHDTV10A User Manual 2.2.2 Using Component Video Connecting your cable or satellite operator. row of connectors nearest to the audio connectors associated with the Component 1 input (green color area) at the rear of the LCD HDTV...
... the LCD HDTV. 4. Using an audio cable (white and red connectors), connect the cable to the audio output connectors associated with the Component output on your HDTV Set-Top Box and connect the other end to you when viewing from the rear of the TV) at the rear of the LCD HDTV. 5. VIZIO VU42L FHDTV10A User Manual 2.2.2 Using Component Video Connecting your cable or satellite operator. row of connectors nearest to the audio connectors associated with the Component 1 input (green color area) at the rear of the LCD HDTV...
User Manual
Page 29
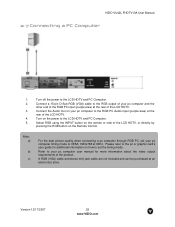
... graphic card's user guide for additional information on the Remote Control. Turn off the power to VESA 1360x768 at the rear of the LCD HDTV, or directly by pressing the RGB button on how to set your pc computer user manual for more information about the video output requirements of your pc computer to the RGB PC input (purple area) at an electronics store. VIZIO VU42L FHDTV10A User Manual 2.7 Connecting a PC...
... graphic card's user guide for additional information on the Remote Control. Turn off the power to VESA 1360x768 at the rear of the LCD HDTV, or directly by pressing the RGB button on how to set your pc computer user manual for more information about the video output requirements of your pc computer to the RGB PC input (purple area) at an electronics store. VIZIO VU42L FHDTV10A User Manual 2.7 Connecting a PC...

User Manual
Page 42
... to turn the internal speakers On or Off. Press the selection. button to highlight the Tuner Mode Press the button to choose Cable or Antenna depending upon which equipment you wish to remove, press the MENU and buttons to open the TV TUNER SETUP menu and then press the button to select this channel using the number buttons on the PICTURE menu page. You will automatically search for the simulated surround sound...
... to turn the internal speakers On or Off. Press the selection. button to highlight the Tuner Mode Press the button to choose Cable or Antenna depending upon which equipment you wish to remove, press the MENU and buttons to open the TV TUNER SETUP menu and then press the button to select this channel using the number buttons on the PICTURE menu page. You will automatically search for the simulated surround sound...
User Manual
Page 58
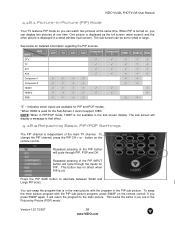
... remote control. One picture is displayed as the full screen (main screen) and the other picture is independent of the PIP INPUT button will cycle through the inputs for PIP and POP modes. *When HDMI is off. Repeated pressing of the main TV channel. You can swap the program that effect. 4.18.2 Adjusting Basic PIP/POP Settings The PIP channel is displayed in the PIP sub-picture. If you press SWAP again, it cannot support...
... remote control. One picture is displayed as the full screen (main screen) and the other picture is independent of the PIP INPUT button will cycle through the inputs for PIP and POP modes. *When HDMI is off. Repeated pressing of the main TV channel. You can swap the program that effect. 4.18.2 Adjusting Basic PIP/POP Settings The PIP channel is displayed in the PIP sub-picture. If you press SWAP again, it cannot support...

User Manual
Page 59
... User Manual 4.18.3 Setting the Sleep Timer The Sleep Timer lets you set the Sleep Timer using the remote control: 1. To set a time delay to turn on the screen. 4.19 Programming the VIZIO Universal Remote Control You can program the remote control to four different pieces of equipment including your VCR, Cable Box and DVD Player. 4.19.1 Programming for the component and manufacturer. 5. The choices are the steps for your brand is entered. Manually turn off the sleep time using the remote control, press the SLEEP button repeatedly until the LED LIGHT flashes...
... User Manual 4.18.3 Setting the Sleep Timer The Sleep Timer lets you set the Sleep Timer using the remote control: 1. To set a time delay to turn on the screen. 4.19 Programming the VIZIO Universal Remote Control You can program the remote control to four different pieces of equipment including your VCR, Cable Box and DVD Player. 4.19.1 Programming for the component and manufacturer. 5. The choices are the steps for your brand is entered. Manually turn off the sleep time using the remote control, press the SLEEP button repeatedly until the LED LIGHT flashes...
User Manual
Page 60
... brand. Note: a) b) If your Cable Set-Top Box does not respond, try all the codes for Cable Set-Top Box 1. The DVD Player will turn on the remote control. 3. VIZIO VU42L FHDTV10A User Manual 4.19.2 Programming for your brand. Try other codes that may include more functionality. 4.19.3 Programming for Component Codes." If the code is accepted, the LED flashes twice after the last digit is entered. Press and hold the SET button until the LED LIGHT flashes twice. 4.
... brand. Note: a) b) If your Cable Set-Top Box does not respond, try all the codes for Cable Set-Top Box 1. The DVD Player will turn on the remote control. 3. VIZIO VU42L FHDTV10A User Manual 4.19.2 Programming for your brand. Try other codes that may include more functionality. 4.19.3 Programming for Component Codes." If the code is accepted, the LED flashes twice after the last digit is entered. Press and hold the SET button until the LED LIGHT flashes twice. 4.

User Manual
Page 61
... the remote control at the component and then alternate between pressing the POWER button and the component button on the remote control until the LED flashes twice. 4. Version 12/17/2007 61 www.VIZIO.com Press and hold the SET button until the component turns off. To use a cable or satellite remote to work the LCD HDTV, refer to your cable or satellite remote user guide for more information on your LCD HDTV. Typically power, volume and mute will work , 10178...
... the remote control at the component and then alternate between pressing the POWER button and the component button on the remote control until the LED flashes twice. 4. Version 12/17/2007 61 www.VIZIO.com Press and hold the SET button until the component turns off. To use a cable or satellite remote to work the LCD HDTV, refer to your cable or satellite remote user guide for more information on your LCD HDTV. Typically power, volume and mute will work , 10178...

User Manual
Page 62
... Source settings. Control buttons do not work . Make sure that the power cord is black. Make sure the video cable supplied with the following instructions. Batteries could be image quality issues. Problem Solution No power. Remote Control does not Make sure batteries are not connected If the screen is plugged into the housing. VIZIO VU42L FHDTV10A User Manual Cleaning the Screen 1. Do not scrape it appear. Wipe the display with a dry cloth after cleaning. 5.2 Troubleshooting Guide If...
... Source settings. Control buttons do not work . Make sure that the power cord is black. Make sure the video cable supplied with the following instructions. Batteries could be image quality issues. Problem Solution No power. Remote Control does not Make sure batteries are not connected If the screen is plugged into the housing. VIZIO VU42L FHDTV10A User Manual Cleaning the Screen 1. Do not scrape it appear. Wipe the display with a dry cloth after cleaning. 5.2 Troubleshooting Guide If...
User Manual
Page 63
... the last time you . You switch to you used a particular input and the screen size changes. (AV1, AV2, Component 1, Component 2, HDMI 1, HDMI 2 and TV). The LCD HDTV is within industry specifications are integral parts of your TV. Make sure that your LCD HDTV's digital capabilities exceed a digital broadcast signal, the the screen. signal is manufactured using TV, AV1, AV2 or Component with your TV specifications. Up- Best Image Quality will change. To use the WIDE button on the wall, try...
... the last time you . You switch to you used a particular input and the screen size changes. (AV1, AV2, Component 1, Component 2, HDMI 1, HDMI 2 and TV). The LCD HDTV is within industry specifications are integral parts of your TV. Make sure that your LCD HDTV's digital capabilities exceed a digital broadcast signal, the the screen. signal is manufactured using TV, AV1, AV2 or Component with your TV specifications. Up- Best Image Quality will change. To use the WIDE button on the wall, try...
User Manual
Page 67
... Picture Mode, 37 Sharpness, 39 Version 12/17/2007 VIZIO VU42L FHDTV10A User Manual Tint, 38 DTV Special Features Closed Caption, 43, 45 Closed Caption Style, 43, 45 Language, 42 Reset, 46 Sleep Timer, 44 DTV Tuner Setup Auto Search, 44 DVI Connecting your Cable Box, 18 Connecting your DVD Player, 23 Connecting your Satellite Box, 18 G Glossary, 66 H HDMI Connecting your Cable Box, 17 Connecting your DVD Player, 22 Connecting your Satellite Box, 17 HDMI Input Audio Adjustment, 51 Picture Adjustment, 51 Setup, 51 I Inputs Antenna, 3 Connectors, 16 Rear Label, 10 Rear...
... Picture Mode, 37 Sharpness, 39 Version 12/17/2007 VIZIO VU42L FHDTV10A User Manual Tint, 38 DTV Special Features Closed Caption, 43, 45 Closed Caption Style, 43, 45 Language, 42 Reset, 46 Sleep Timer, 44 DTV Tuner Setup Auto Search, 44 DVI Connecting your Cable Box, 18 Connecting your DVD Player, 23 Connecting your Satellite Box, 18 G Glossary, 66 H HDMI Connecting your Cable Box, 17 Connecting your DVD Player, 22 Connecting your Satellite Box, 17 HDMI Input Audio Adjustment, 51 Picture Adjustment, 51 Setup, 51 I Inputs Antenna, 3 Connectors, 16 Rear Label, 10 Rear...


