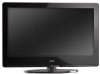

VA320M HDTV User Manual
Page 4
Package Contents 5! VIZIO Remote Control Precautions 11! Connecting Your HDTV Set-Top Box 15! Using S-Video (AV 19! Using your DVD Player (Better 19! Adjusting Settings 32! Understanding Viewing Modes 42! Maintaining and Troubleshooting 43! Cleaning the...Package 5! Preset PC Resolutions 22! Using Composite Video 17! FCC Bulletin for New TV Owners 3! Connecting Your VCR or Video Camera........... 20! VIZIO VA320M User's Manual Table of Contents 4! Unique TV Features 30! Index 52! 4 www.VIZIO.com Connecting a PC Computer 22! Regulations ...
Package Contents 5! VIZIO Remote Control Precautions 11! Connecting Your HDTV Set-Top Box 15! Using S-Video (AV 19! Using your DVD Player (Better 19! Adjusting Settings 32! Understanding Viewing Modes 42! Maintaining and Troubleshooting 43! Cleaning the...Package 5! Preset PC Resolutions 22! Using Composite Video 17! FCC Bulletin for New TV Owners 3! Connecting Your VCR or Video Camera........... 20! VIZIO VA320M User's Manual Table of Contents 4! Unique TV Features 30! Index 52! 4 www.VIZIO.com Connecting a PC Computer 22! Regulations ...

VA320M HDTV User Manual
Page 7
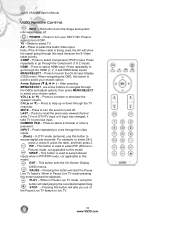
... it takes the TV back to the Input menu. Moves left and right in the OSD menus. CHANNEL + / ! INPUT ! Press repeatedly to the next screen (same as MENU/SELECT key on the remote). Turns your HDTV ON and OFF. MENU ! Moves up or down through the video inputs. ! If... a sub-menu is active, pressing MENU will proceed to cycle through controls in the OSD menus. Activates the On-Screen Display (OSD). ! Steps up and down through the TV channels. ! VIZIO VA320M User's Manual Version 5/19/2009 7 www.VIZIO.com Increases or decreases the...
... it takes the TV back to the Input menu. Moves left and right in the OSD menus. CHANNEL + / ! INPUT ! Press repeatedly to the next screen (same as MENU/SELECT key on the remote). Turns your HDTV ON and OFF. MENU ! Moves up or down through the video inputs. ! If... a sub-menu is active, pressing MENU will proceed to cycle through controls in the OSD menus. Activates the On-Screen Display (OSD). ! Steps up and down through the TV channels. ! VIZIO VA320M User's Manual Version 5/19/2009 7 www.VIZIO.com Increases or decreases the...

VA320M HDTV User Manual
Page 8
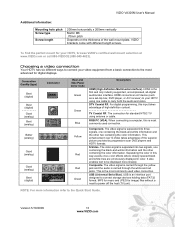
...here. Use white for left audio and red for right audio. mini plug stereo connector) from your HDTV to your home speakers. VIZIO VA320M User's Manual Rear and Side Panel Connections No. Connect a secondary source for Pr (or Cr) inputs. Connect an SPDIF Optical ... or digital cable for any purpose other than factory authorized service will void the manufacturer's warranty of this input for digital TV. Connect your area visit www.antennaweb.org. Connect the video from a computer here. Connection 1 HDMI 1 2 HDMI 2 3 HDMI 3 4 SERVICE 5 OPTICAL COMPONENT 1 6 (YPb/CbPr/...
...here. Use white for left audio and red for right audio. mini plug stereo connector) from your HDTV to your home speakers. VIZIO VA320M User's Manual Rear and Side Panel Connections No. Connect a secondary source for Pr (or Cr) inputs. Connect an SPDIF Optical ... or digital cable for any purpose other than factory authorized service will void the manufacturer's warranty of this input for digital TV. Connect your area visit www.antennaweb.org. Connect the video from a computer here. Connection 1 HDMI 1 2 HDMI 2 3 HDMI 3 4 SERVICE 5 OPTICAL COMPONENT 1 6 (YPb/CbPr/...

VA320M HDTV User Manual
Page 9
... back up your important document files as a DVD multimedia player or set-top box. Version 5/19/2009 9 www.VIZIO.com The S-Video, if connected will take priority over the video of data. The audio connectors (white and red) need to be connected in order to privately hearing the sound of... connectors to prevent lost of the RCA connector. 10 HDMI 11 USB 12 AV/S-Video 13 HEADPHONE Green Green Red Black VIZIO VA320M User's Manual Connect an extra audio/video source for MP3 and JPEG files (like a VCR or video game). Connect a source for composite (like a hard drive or thumb drive or...
... back up your important document files as a DVD multimedia player or set-top box. Version 5/19/2009 9 www.VIZIO.com The S-Video, if connected will take priority over the video of data. The audio connectors (white and red) need to be connected in order to privately hearing the sound of... connectors to prevent lost of the RCA connector. 10 HDMI 11 USB 12 AV/S-Video 13 HEADPHONE Green Green Red Black VIZIO VA320M User's Manual Connect an extra audio/video source for MP3 and JPEG files (like a VCR or video game). Connect a source for composite (like a hard drive or thumb drive or...
VA320M HDTV User Manual
Page 10
...and HDMI-Side) inputs. or ") - EXIT - AV - HDMI - Press to increase or decrease the speaker volume. Press to live TV. 10 www.VIZIO.com SWAP - After pressing MENU/SELECT, use this button pauses the playback. PLAY - Press to access digital sub-channels. Press to launch... in DTV/TV input or if input has changed, it again to turn the sound on or off . TV - VOL (! Press to go through the Component (1 & 2) inputs. Press to turn your chosen option. Press repeatedly to select the Audio Video input. VIZIO VA320M User's Manual VIZIO Remote Control ...
...and HDMI-Side) inputs. or ") - EXIT - AV - HDMI - Press to increase or decrease the speaker volume. Press to live TV. 10 www.VIZIO.com SWAP - After pressing MENU/SELECT, use this button pauses the playback. PLAY - Press to access digital sub-channels. Press to launch... in DTV/TV input or if input has changed, it again to turn the sound on or off . TV - VOL (! Press to go through the Component (1 & 2) inputs. Press to turn your chosen option. Press repeatedly to select the Audio Video input. VIZIO VA320M User's Manual VIZIO Remote Control ...
VA320M HDTV User Manual
Page 13
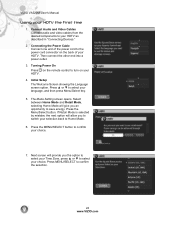
...lines are erroneously displayed in this input takes advantage of high-definition content TV Coaxial RF. It also enables text to carry both the audio and video. USB (Universal Serial Bus). VIZIO brackets come with different length screws. HDMI connects an AV device (such ...). The connection for your video equipment from a basic connection to the most commonly used video connection. To find the perfect mount for standard NTSC TV using one cable to be displayed more information refer to power off the host (TV) unit. VIZIO VA320M User's Manual Additional Information...
...lines are erroneously displayed in this input takes advantage of high-definition content TV Coaxial RF. It also enables text to carry both the audio and video. USB (Universal Serial Bus). VIZIO brackets come with different length screws. HDMI connects an AV device (such ...). The connection for your video equipment from a basic connection to the most commonly used video connection. To find the perfect mount for standard NTSC TV using one cable to be displayed more information refer to power off the host (TV) unit. VIZIO VA320M User's Manual Additional Information...

VA320M HDTV User Manual
Page 15
VIZIO VA320M User's Manual Note: The HDMI input on the power to your HDTV Set-Top Box (Best): 1. Length is being used, use a VIZIO certified HDMI cable. Connect a HDMI cable to the HDMI output of your HDTV Set-Top Box and the other end to the HDMI Input (green ... output connectors associated with DVI: 1. For HDTV Set-Top Boxes with the DVI output on the side of the LCD HDTV for more information about the video output requirements of the High Definition TV. 4. Turn on one end and 1/8" stereo connector at the rear of the product or consult your HDTV, or by...
VIZIO VA320M User's Manual Note: The HDMI input on the power to your HDTV Set-Top Box (Best): 1. Length is being used, use a VIZIO certified HDMI cable. Connect a HDMI cable to the HDMI output of your HDTV Set-Top Box and the other end to the HDMI Input (green ... output connectors associated with DVI: 1. For HDTV Set-Top Boxes with the DVI output on the side of the LCD HDTV for more information about the video output requirements of the High Definition TV. 4. Turn on one end and 1/8" stereo connector at the rear of the product or consult your HDTV, or by...

VA320M HDTV User Manual
Page 16
VIZIO VA320M User's Manual Connecting your HDTV Set-Top Box to the corresponding Pr (red color) connector in the Component 1 group. 5. Turn on the side of your HDTV). 3. and then select Component 2 in the Component 1 group. 4. Connect the Pr (red color) connector on your HDTV Set-Top Box (Better): Using Component Video...Refer to the corresponding Y (green color) connector in the Component 1 group (yellow area on the remote control. 8. CABLE BOX 16 www.VIZIO.com If Component 1 input is being used, use Component 2 as the input and follow the steps 1 through 6; Connect the Pb (blue...
VIZIO VA320M User's Manual Connecting your HDTV Set-Top Box to the corresponding Pr (red color) connector in the Component 1 group. 5. Turn on the side of your HDTV). 3. and then select Component 2 in the Component 1 group. 4. Connect the Pr (red color) connector on your HDTV Set-Top Box (Better): Using Component Video...Refer to the corresponding Y (green color) connector in the Component 1 group (yellow area on the remote control. 8. CABLE BOX 16 www.VIZIO.com If Component 1 input is being used, use Component 2 as the input and follow the steps 1 through 6; Connect the Pb (blue...

VA320M HDTV User Manual
Page 17
... associated with the Video output on the remote control. Using Coax (RF) 1. Select AV using the INPUT button on the remote or on the side of your HDTV, or by pressing the TV button on the side of the High Definition TV. 3. SET TOP BOX SET TOP BOX VIZIO VA320M User's Manual Connecting... Your Basic Set-Top Box Using Composite Video 1. Using the white and red connectors, connect the cable to the corresponding...
... associated with the Video output on the remote control. Using Coax (RF) 1. Select AV using the INPUT button on the remote or on the side of your HDTV, or by pressing the TV button on the side of the High Definition TV. 3. SET TOP BOX SET TOP BOX VIZIO VA320M User's Manual Connecting... Your Basic Set-Top Box Using Composite Video 1. Using the white and red connectors, connect the cable to the corresponding...

VA320M HDTV User Manual
Page 18
... on the power to the HDMI Input (green color area) at the rear of the High Definition TV 4. Using a HDMI-DVI cable, connect the DVI end to your HDTV: HDMI, Component, AV (S-Video or Composite) inputs. VIZIO VA320M User's Manual Connecting Your DVD Player You have a digital interface such as the input and follow... the power to the HDMI Input (green color area) at the other end to the High Definition TV and DVD player. 2. Note: Refer to the HDMI input for more information about the video output requirements of your DVD player and the other end to the HDTV and your HDTV Set-Top...
... on the power to the HDMI Input (green color area) at the rear of the High Definition TV 4. Using a HDMI-DVI cable, connect the DVI end to your HDTV: HDMI, Component, AV (S-Video or Composite) inputs. VIZIO VA320M User's Manual Connecting Your DVD Player You have a digital interface such as the input and follow... the power to the HDMI Input (green color area) at the other end to the High Definition TV and DVD player. 2. Note: Refer to the HDMI input for more information about the video output requirements of your DVD player and the other end to the HDTV and your HDTV Set-Top...

VA320M HDTV User Manual
Page 19
... 1 through 6; Turn off the power to the HDTV and DVD player. 2. Connect the S-Video jack on the remote control. 19 www.VIZIO.com CD DVD CD DVD Version 5/19/2009 VIZIO VA320M User's Manual Connecting your DVD Player (Good): Using S-Video (AV) 1. Select Component 1 using the INPUT button on the remote or on the side...
... 1 through 6; Turn off the power to the HDTV and DVD player. 2. Connect the S-Video jack on the remote control. 19 www.VIZIO.com CD DVD CD DVD Version 5/19/2009 VIZIO VA320M User's Manual Connecting your DVD Player (Good): Using S-Video (AV) 1. Select Component 1 using the INPUT button on the remote or on the side...

VA320M HDTV User Manual
Page 20
... AV group (in the AV group. 4. Select AV using the INPUT button on the remote or on the remote control. . VIZIO VA320M User's Manual Connecting your HDTV). 3. Connecting Your VCR or Video Camera 1. Connect an audio cable (white and red connectors) cable to the audio output connectors associated with the AV input on...
... AV group (in the AV group. 4. Select AV using the INPUT button on the remote or on the remote control. . VIZIO VA320M User's Manual Connecting your HDTV). 3. Connecting Your VCR or Video Camera 1. Connect an audio cable (white and red connectors) cable to the audio output connectors associated with the AV input on...

VA320M HDTV User Manual
Page 22
...is also possible 2. Note: For the best picture quality when connecting a pc computer through RGB PC, set the timing mode and the video output requirements of the product. Please refer to have it on the side of your HDTV has been turned off the power to either see... cable are not included and can be used as a slideshow) or listen to VESA 1366 x 768 at 60Hz. For Pause/Live TV a fast speed FAT32 storage device is also used . VIZIO VA320M User's Manual Connecting a PC Computer 1. COMPUTER Connecting a USB (FAT32 Format) Storage Device 1. Note: This input is also needed,...
...is also possible 2. Note: For the best picture quality when connecting a pc computer through RGB PC, set the timing mode and the video output requirements of the product. Please refer to have it on the side of your HDTV has been turned off the power to either see... cable are not included and can be used as a slideshow) or listen to VESA 1366 x 768 at 60Hz. For Pause/Live TV a fast speed FAT32 storage device is also used . VIZIO VA320M User's Manual Connecting a PC Computer 1. COMPUTER Connecting a USB (FAT32 Format) Storage Device 1. Note: This input is also needed,...
VA320M HDTV User Manual
Page 24
... Initial Setup The Welcome Screen showing the Language screen option. The Mode Setting screen opens. or " to confirm the selection. 24 www.VIZIO.com Turning Power On Press on the remote control to confirm your HDTV. 4. the next option will give you an opportunity to Home Mode... HDTV as described in "Connecting Devices." 2. or " to your selection back to save energy. Connect Audio and Video Cables Connect audio and video cables from the desired components to select your HDTV the first time 1. VIZIO VA320M User's Manual Using your language, and then press Menu/Select key. 5.
... Initial Setup The Welcome Screen showing the Language screen option. The Mode Setting screen opens. or " to confirm the selection. 24 www.VIZIO.com Turning Power On Press on the remote control to confirm your HDTV. 4. the next option will give you an opportunity to Home Mode... HDTV as described in "Connecting Devices." 2. or " to your selection back to save energy. Connect Audio and Video Cables Connect audio and video cables from the desired components to select your HDTV the first time 1. VIZIO VA320M User's Manual Using your language, and then press Menu/Select key. 5.

VA320M HDTV User Manual
Page 28
... input. The OnScreen Display (OSD) lets you to the previous option or vice versa. Your HDTV has the unique feature of this selection: DTV/TV, AV, Comp1, Comp2, HDMI1, HDMI2, HDMI3, HDMI-Side, RGB, Photos and Music. Channels: If the input signal is to select the ... would produce the video quality to the end user's preference. Following are eleven options under this selection: Ratings Locks, Channel Locks, User Control Lock, Change PIN and Reset Locks. There are the choices and features of saving your HDTV control the function settings. VIZIO VA320M User's Manual Using...
... input. The OnScreen Display (OSD) lets you to the previous option or vice versa. Your HDTV has the unique feature of this selection: DTV/TV, AV, Comp1, Comp2, HDMI1, HDMI2, HDMI3, HDMI-Side, RGB, Photos and Music. Channels: If the input signal is to select the ... would produce the video quality to the end user's preference. Following are eleven options under this selection: Ratings Locks, Channel Locks, User Control Lock, Change PIN and Reset Locks. There are the choices and features of saving your HDTV control the function settings. VIZIO VA320M User's Manual Using...

VA320M HDTV User Manual
Page 44
.... ! Make sure the power cord is securely connected to check peripherals as expected, contact the VIZIO for technical assistance by calling 1-877-MYVIZIO (877-6984946) or e-mail us at a time. ! TV to select a different source. ! If HD content is no screen image. You may be ...are inserted correctly. ! Press the correct source on your keyboard to "wake" your digital flat panel TV has video that the outlet is not muted. ! You may be white. ! VIZIO VA320M User's Manual Troubleshooting If your HDTV and on the same electrical circuit. Check the connections on the ...
.... ! Make sure the power cord is securely connected to check peripherals as expected, contact the VIZIO for technical assistance by calling 1-877-MYVIZIO (877-6984946) or e-mail us at a time. ! TV to select a different source. ! If HD content is no screen image. You may be ...are inserted correctly. ! Press the correct source on your keyboard to "wake" your digital flat panel TV has video that the outlet is not muted. ! You may be white. ! VIZIO VA320M User's Manual Troubleshooting If your HDTV and on the same electrical circuit. Check the connections on the ...

VA320M HDTV User Manual
Page 45
...on the screen The volume changes when you switch inputs The screen size changes when you used a particular input (AV, Component, HDMI, and TV). ! Compare the video input source's specifications with your HDTV. Make sure that the sound is not muted. ! Check the connections on the back of your HDTV ... Have your HDTV and on warranty service or repair, after the warranty period, contact our Support Department at the number below. VIZIO VA320M User's Manual Problem The picture has abnormal patterns The display image does not cover the entire screen There is a picture but no sound...
...on the screen The volume changes when you switch inputs The screen size changes when you used a particular input (AV, Component, HDMI, and TV). ! Compare the video input source's specifications with your HDTV. Make sure that the sound is not muted. ! Check the connections on the back of your HDTV ... Have your HDTV and on warranty service or repair, after the warranty period, contact our Support Department at the number below. VIZIO VA320M User's Manual Problem The picture has abnormal patterns The display image does not cover the entire screen There is a picture but no sound...

VA320M HDTV User Manual
Page 47
VIZIO VA320M User's Manual Specifications Specifications Product specifications may change without notice... for color temperature fine tuning, TV Signal Compatibility 480i (SDTV), 480P (EDTV), 720P (HDTV), 1080i (HDTV) and 720p (HDTV), Computer support at 50/60Hz Power Consumption 92W (average), Panel 32" Diagonal (31.55" Diagonal Viewing...power line connection Voltage Range 100-240 VAC at 640x480/800x600/1024x768/1366x768/1920x1080 via HDMI or Component video, Color temperature adjustments of 6500K/9300K/11000K, Independent Red/Green/Blue adjustments for ATSC/QAM, Signal ...
VIZIO VA320M User's Manual Specifications Specifications Product specifications may change without notice... for color temperature fine tuning, TV Signal Compatibility 480i (SDTV), 480P (EDTV), 720P (HDTV), 1080i (HDTV) and 720p (HDTV), Computer support at 50/60Hz Power Consumption 92W (average), Panel 32" Diagonal (31.55" Diagonal Viewing...power line connection Voltage Range 100-240 VAC at 640x480/800x600/1024x768/1366x768/1920x1080 via HDMI or Component video, Color temperature adjustments of 6500K/9300K/11000K, Independent Red/Green/Blue adjustments for ATSC/QAM, Signal ...

VA320M HDTV User Manual
Page 53
... VIZIO VA320M User's Manual speakers turning off and on, 35 support technical, 45 telephone, 45 S-Video Connecting your DVD Player, 19 Connecting your VCR, 20 Connecting your Video Camera, 21 Technical Specifications, 47 technical support, 45 telephone support, 45 tint adjusting, 34 troubleshooting, 43, 44 tuner mode selecting, 32 TV settings adjusting, 32 TV signal source selecting, 32 TV tuner...
... VIZIO VA320M User's Manual speakers turning off and on, 35 support technical, 45 telephone, 45 S-Video Connecting your DVD Player, 19 Connecting your VCR, 20 Connecting your Video Camera, 21 Technical Specifications, 47 technical support, 45 telephone support, 45 tint adjusting, 34 troubleshooting, 43, 44 tuner mode selecting, 32 TV settings adjusting, 32 TV signal source selecting, 32 TV tuner...


