
Quickstart Guide
Page 2
...it in fire. • Disconnect the mains plug to shut off the power before connecting other cables are provided for its installation, use, and maintenance. Doing so could short circuit parts causing a fire or electric shock. Operating your Unit in environments with heavy dust or ...openings in the back and bottom of the cabinet are unplugged before cleaning your Unit. Overloading can damage the remote control or injure the operator. • See the important note and rating located on the bottom of the unit. • WARNING - To totally disconnect power, unplug the power cord...
...it in fire. • Disconnect the mains plug to shut off the power before connecting other cables are provided for its installation, use, and maintenance. Doing so could short circuit parts causing a fire or electric shock. Operating your Unit in environments with heavy dust or ...openings in the back and bottom of the cabinet are unplugged before cleaning your Unit. Overloading can damage the remote control or injure the operator. • See the important note and rating located on the bottom of the unit. • WARNING - To totally disconnect power, unplug the power cord...
Quickstart Guide
Page 3
TABLE OF CONTENTS Table of Contents 3 Package Contents 4 Controls & Connections 5 FIrst-Time Setup 7 Bluetooth Pairing 12 Using Bluetooth Mode 13 Advanced Setup 14 Wall Mounting the Sound Bar 15 Adjusting Sound Bar Settings 17 Help & Troubleshooting 19 One-Year Limited Warranty 22 Legal & Compliance 23
TABLE OF CONTENTS Table of Contents 3 Package Contents 4 Controls & Connections 5 FIrst-Time Setup 7 Bluetooth Pairing 12 Using Bluetooth Mode 13 Advanced Setup 14 Wall Mounting the Sound Bar 15 Adjusting Sound Bar Settings 17 Help & Troubleshooting 19 One-Year Limited Warranty 22 Legal & Compliance 23

Quickstart Guide
Page 4
PACKAGE CONTENTS High Definition Sound Bar Remote Control with Batteries Quick Start Guide Power Cable Stereo RCA to 3.5mm Audio Cable Coaxial Audio Cable Digital Optical Cable 2 x Sound Bar Wall Mount Brackets 2 x Wall Mount Screws (Size: M4 x 10) 4 Wall Mount Template
PACKAGE CONTENTS High Definition Sound Bar Remote Control with Batteries Quick Start Guide Power Cable Stereo RCA to 3.5mm Audio Cable Coaxial Audio Cable Digital Optical Cable 2 x Sound Bar Wall Mount Brackets 2 x Wall Mount Screws (Size: M4 x 10) 4 Wall Mount Template

Quickstart Guide
Page 5
CONTROLS & CONNECTIONS Back of Sound Bar Power Port (USB 5) USB Port (Digital 3) Coaxial In (Aux 1) Analog Audio In (Optical 4) Digital Optical Audio In (Aux 2) Analog Audio In 5
CONTROLS & CONNECTIONS Back of Sound Bar Power Port (USB 5) USB Port (Digital 3) Coaxial In (Aux 1) Analog Audio In (Optical 4) Digital Optical Audio In (Aux 2) Analog Audio In 5

Quickstart Guide
Page 6
Back of Sound Bar Control Buttons are located here: Power Input Bluetooth Input (Hold to force pair, See "Bluetooth Pairing" on page 12) + - Volume 6
Back of Sound Bar Control Buttons are located here: Power Input Bluetooth Input (Hold to force pair, See "Bluetooth Pairing" on page 12) + - Volume 6
Quickstart Guide
Page 7
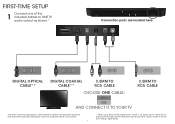
... TV audio output as shown.* Connection ports are located here: BETTER BETTER GOOD GOOD DIGITAL OPTICAL CABLE** DIGITAL COAXIAL CABLE** 3.5MM TO RCA CABLE CHOOSE ONE CABLE: BETTER GOOD AND CONNECT IT TO YOUR TV 3.5MM TO RCA CABLE *Not all TVs have the audio outputs shown above. To connect the Sound Bar directly to your other devices (Blu-ray player, game system, etc) see your device's user manual. 7 **When using...
... TV audio output as shown.* Connection ports are located here: BETTER BETTER GOOD GOOD DIGITAL OPTICAL CABLE** DIGITAL COAXIAL CABLE** 3.5MM TO RCA CABLE CHOOSE ONE CABLE: BETTER GOOD AND CONNECT IT TO YOUR TV 3.5MM TO RCA CABLE *Not all TVs have the audio outputs shown above. To connect the Sound Bar directly to your other devices (Blu-ray player, game system, etc) see your device's user manual. 7 **When using...

Quickstart Guide
Page 8
2 Connect a power cable to the sound bar. 3 Plug the power cable into a power outlet. 8
2 Connect a power cable to the sound bar. 3 Plug the power cable into a power outlet. 8

Quickstart Guide
Page 9
For the best surround sound experience, position the sound bar as shown. The sound bar should be close to ear level. 9 3 Sound bar is centered below the TV.
For the best surround sound experience, position the sound bar as shown. The sound bar should be close to ear level. 9 3 Sound bar is centered below the TV.
Quickstart Guide
Page 10
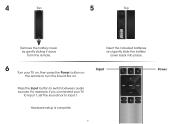
Hardware setup is complete. Input Power 10 Insert the included batteries and gently slide the battery cover back into place. Press the Input button to switch between audio sources. For example, if you connected your TV on, then press the Power button on the remote to turn the Sound Bar on. 4 Top 5 Top Remove the battery cover by gently sliding it away from the remote. 6 Turn your TV to Input 1, set the sound bar to Input 1.
Hardware setup is complete. Input Power 10 Insert the included batteries and gently slide the battery cover back into place. Press the Input button to switch between audio sources. For example, if you connected your TV on, then press the Power button on the remote to turn the Sound Bar on. 4 Top 5 Top Remove the battery cover by gently sliding it away from the remote. 6 Turn your TV to Input 1, set the sound bar to Input 1.
Quickstart Guide
Page 11
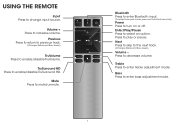
... REMOTE Input Press to turn on or off. Bluetooth Press to enter Bluetooth input. (To enter force pair mode, press and hold for 5 seconds) Power Press to change input source. Next Press to skip to enable/disable TruSurround HD. TruSurround HD Press to the next track. (Changes Treble and Bass levels) Volume - Mute Press to enable/disable TruVolume. Previous Press to return to previous track. (Changes...
... REMOTE Input Press to turn on or off. Bluetooth Press to enter Bluetooth input. (To enter force pair mode, press and hold for 5 seconds) Power Press to change input source. Next Press to skip to enable/disable TruSurround HD. TruSurround HD Press to the next track. (Changes Treble and Bass levels) Volume - Mute Press to enable/disable TruVolume. Previous Press to return to previous track. (Changes...

Quickstart Guide
Page 12
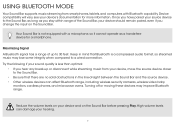
You can be controlled on the Sound Bar for the Sound Bar (VIZIO S4220w) using your Bluetooth device. Play audio from left to right and back again. Back of the Sound Bar will stop flashing. 2. Press and hold the Bluetooth button on your source device and the Sound Bar. Once the device is in Bluetooth Pairing Mode, the LED Indicators on the Display Panel on page 17). Volume can now search for...
You can be controlled on the Sound Bar for the Sound Bar (VIZIO S4220w) using your Bluetooth device. Play audio from left to right and back again. Back of the Sound Bar will stop flashing. 2. Press and hold the Bluetooth button on your source device and the Sound Bar. Once the device is in Bluetooth Pairing Mode, the LED Indicators on the Display Panel on page 17). Volume can now search for...
Quickstart Guide
Page 13
... optimal: • If you change the input on the Sound Bar before pressing Play. Turning off or moving these devices may lose some integrity when compared to the Sound Bar, as long as a hands-free device for more information. Reduce the volume levels on your source device to a wired connection. Your Sound Bar is a compressed audio format, so streamed music may improve Bluetooth range. USING BLUETOOTH MODE Your Sound Bar supports music streaming from your hearing...
... optimal: • If you change the input on the Sound Bar before pressing Play. Turning off or moving these devices may lose some integrity when compared to the Sound Bar, as long as a hands-free device for more information. Reduce the volume levels on your source device to a wired connection. Your Sound Bar is a compressed audio format, so streamed music may improve Bluetooth range. USING BLUETOOTH MODE Your Sound Bar supports music streaming from your hearing...
Quickstart Guide
Page 14
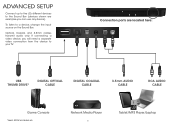
... THUMB DRIVE* DIGITAL OPTICAL CABLE DIGITAL COAXIAL CABLE 3.5mm AUDIO CABLE RCA AUDIO CABLE Game Console *Supports .WAV file format playback only Network Media Player 14 Tablet/MP3 Player/Laptop Optical, Coaxial, and 3.5mm cables transmit audio only. If connecting a video device, you can use any device). Connection ports are examples-you will need a separate video connection from the device to a device, change the input source on the Sound Bar. To listen...
... THUMB DRIVE* DIGITAL OPTICAL CABLE DIGITAL COAXIAL CABLE 3.5mm AUDIO CABLE RCA AUDIO CABLE Game Console *Supports .WAV file format playback only Network Media Player 14 Tablet/MP3 Player/Laptop Optical, Coaxial, and 3.5mm cables transmit audio only. If connecting a video device, you can use any device). Connection ports are examples-you will need a separate video connection from the device to a device, change the input source on the Sound Bar. To listen...

Quickstart Guide
Page 15
Mark the four bracket holes using a pencil. 15 WALL MOUNTING THE SOUND BAR 1 Back of Sound Bar Wall-Mount Screw Holes Insert and tighten two Wall-Mount Screws with a Phillips-head screwdriver into the Wall-Mount Screw Holes. 2 Place the included wall mounting template against the wall under your TV.
Mark the four bracket holes using a pencil. 15 WALL MOUNTING THE SOUND BAR 1 Back of Sound Bar Wall-Mount Screw Holes Insert and tighten two Wall-Mount Screws with a Phillips-head screwdriver into the Wall-Mount Screw Holes. 2 Place the included wall mounting template against the wall under your TV.

Quickstart Guide
Page 16
Wall mounting hardware is not included. 15.75 in the walls of your screws are unfamiliar with power tools or the layout of electrical wiring in (400 mm) If you are attached to wood studs or drywall anchors (for drywall) or concrete anchors (for brick/concrete walls). 3 Be sure your home, consult a professional installer. 16 Wall Mount Screw Screw Size: M4 x 10
Wall mounting hardware is not included. 15.75 in the walls of your screws are unfamiliar with power tools or the layout of electrical wiring in (400 mm) If you are attached to wood studs or drywall anchors (for drywall) or concrete anchors (for brick/concrete walls). 3 Be sure your home, consult a professional installer. 16 Wall Mount Screw Screw Size: M4 x 10
Quickstart Guide
Page 17
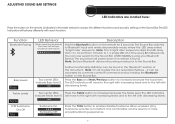
... Bluetooth Pairing LED Behavior (When searching for the Sound Bar (VIZIO S4220w) using your Bluetooth device into pairing mode prior to access the different functions and acoustic settings of this is found in the table below) to the Sound Bar. will behave differently with each function. Description Hold the Bluetooth button on the Sound Bar. Note: Set your Bluetooth Device. Treble Levels Two center LEDs Press the Treble button to Bluetooth input...
... Bluetooth Pairing LED Behavior (When searching for the Sound Bar (VIZIO S4220w) using your Bluetooth device into pairing mode prior to access the different functions and acoustic settings of this is found in the table below) to the Sound Bar. will behave differently with each function. Description Hold the Bluetooth button on the Sound Bar. Note: Set your Bluetooth Device. Treble Levels Two center LEDs Press the Treble button to Bluetooth input...

Quickstart Guide
Page 19
... muted. Consult your TV's user manual for more detailed information. • If using Bluetooth, ensure that the volume on the top of your Sound Bar to select a different input source. • When using a Bluetooth connection, some TVs do not pass through digital audio. • Your TV may not be set to FIXED or STANDARD, not VARIABLE. Confirm that the audio output setting is working . • Replace the remote batteries with the original device...
... muted. Consult your TV's user manual for more detailed information. • If using Bluetooth, ensure that the volume on the top of your Sound Bar to select a different input source. • When using a Bluetooth connection, some TVs do not pass through digital audio. • Your TV may not be set to FIXED or STANDARD, not VARIABLE. Confirm that the audio output setting is working . • Replace the remote batteries with the original device...

Quickstart Guide
Page 20
Sunday: 8 am to 4 pm (PST) We speak English • Se habla Español • Nous parlons Français We can help with: • New Product Setup • Connecting Your Devices • Technical Problems • And More Phone: (877) 878-4946 (TOLL-FREE) Email: techsupport@VIZIO.com Web: http://store.VIZIO.com/support Hours of operation: Monday - Friday: 5 am to 9 pm (PST) Saturday - YOUR PRODUCT INCLUDES FREE LIFETIME TECH SUPPORT The VIZIO support team is highly trained and is based in the United States. DO YOU HAVE QUESTIONS? LET US HELP!
Sunday: 8 am to 4 pm (PST) We speak English • Se habla Español • Nous parlons Français We can help with: • New Product Setup • Connecting Your Devices • Technical Problems • And More Phone: (877) 878-4946 (TOLL-FREE) Email: techsupport@VIZIO.com Web: http://store.VIZIO.com/support Hours of operation: Monday - Friday: 5 am to 9 pm (PST) Saturday - YOUR PRODUCT INCLUDES FREE LIFETIME TECH SUPPORT The VIZIO support team is highly trained and is based in the United States. DO YOU HAVE QUESTIONS? LET US HELP!
Quickstart Guide
Page 22
... an equal degree of protection.VIZIO Technical Support will either repair or replace the Product at its sole option and discretion. SPECIFICATIONS Sound Bar: Inputs: Two 3" Full-Range Drivers + Two 3" Deep Base Modules + Two 3/4" Tweeters 1 x 3.5mm Stereo Audio 1 x RCA Stereo Audio 1 x Optical (Toslink) 1 x USB 1 x Digital Coaxial Audio Frequency Response (System): 70 Hz - 19 KHz Voltage: 120 VAC, 60 Hz Compliances: UL, C-UL, FCC Sound Pressure Level (System): 98 dB 22 If...
... an equal degree of protection.VIZIO Technical Support will either repair or replace the Product at its sole option and discretion. SPECIFICATIONS Sound Bar: Inputs: Two 3" Full-Range Drivers + Two 3" Deep Base Modules + Two 3/4" Tweeters 1 x 3.5mm Stereo Audio 1 x RCA Stereo Audio 1 x Optical (Toslink) 1 x USB 1 x Digital Coaxial Audio Frequency Response (System): 70 Hz - 19 KHz Voltage: 120 VAC, 60 Hz Compliances: UL, C-UL, FCC Sound Pressure Level (System): 98 dB 22 If...
Quickstart Guide
Page 23
.... Shielded interface cables and AC power cord, if any radio or TV interference caused by the Federal Communications Commission of the user to local laws and regulations. The manufacturer is the responsibilities of the U.S. It is not responsible for exposure to radio frequency (RF) energy set by unauthorized modification to this product properly, according to correct such interference. Changing the factory...
.... Shielded interface cables and AC power cord, if any radio or TV interference caused by the Federal Communications Commission of the user to local laws and regulations. The manufacturer is the responsibilities of the U.S. It is not responsible for exposure to radio frequency (RF) energy set by unauthorized modification to this product properly, according to correct such interference. Changing the factory...


