
User Manual
Page 3
...any of the following occurs, contact the dealer: • Do not allow children to hang onto the product. • Store the accessories (remote, batteries, etc.) in a location safely out of the reach of children. • The American Academy of Pediatrics discourages television viewing for ... • WARNING: Never place a television set or its controls. • Do not use • WARNING: Exposure to loud sounds can damage the remote control or injure the operator. A television set . • Unplug your Display may be of sufficient magnitude to constitute a risk of electric shock to ...
...any of the following occurs, contact the dealer: • Do not allow children to hang onto the product. • Store the accessories (remote, batteries, etc.) in a location safely out of the reach of children. • The American Academy of Pediatrics discourages television viewing for ... • WARNING: Never place a television set or its controls. • Do not use • WARNING: Exposure to loud sounds can damage the remote control or injure the operator. A television set . • Unplug your Display may be of sufficient magnitude to constitute a risk of electric shock to ...

User Manual
Page 6
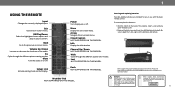
To keep the power indicator on as long as the Display is on , then goes out after several seconds. The power indicator flashes on when the Display turns on , see Turning the Power Indicator On or Off. FRONT PANEL 6 Getting to Know Your Display REMOTE SENSOR & POWER INDICATOR When using the remote, aim it directly at this sensor.
To keep the power indicator on as long as the Display is on , then goes out after several seconds. The power indicator flashes on when the Display turns on , see Turning the Power Indicator On or Off. FRONT PANEL 6 Getting to Know Your Display REMOTE SENSOR & POWER INDICATOR When using the remote, aim it directly at this sensor.
User Manual
Page 9
... batteries (included). signs on the batteries and remote. 1 2 Setup/ Link Activate pairing mode on the back of the remote. VIZIO supports the proper handling and disposal of the audio. When needed, VIZIO recommends replacing the batteries that came with this remote with batteries of batteries in fire. Volume Up... audio on or off . Do not dispose of the correct type. Closed Caption NOT SUPPORTED ON THIS MODEL. WARNING: Keep the remote control batteries away from children. Arrow Navigate the on -screen menu. Exit Close the on -screen menu. Pic Cycle through the different...
... batteries (included). signs on the batteries and remote. 1 2 Setup/ Link Activate pairing mode on the back of the remote. VIZIO supports the proper handling and disposal of the audio. When needed, VIZIO recommends replacing the batteries that came with this remote with batteries of batteries in fire. Volume Up... audio on or off . Do not dispose of the correct type. Closed Caption NOT SUPPORTED ON THIS MODEL. WARNING: Keep the remote control batteries away from children. Arrow Navigate the on -screen menu. Exit Close the on -screen menu. Pic Cycle through the different...
User Manual
Page 10
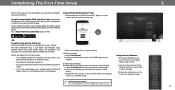
... help installing the display? Complete Setup with the IR Remote: Use the included IR remote to set up your Display. Select Get Started and Select your display. Complete Setup with the VIZIO SmartCast™ App (recommended): Download the free VIZIO SmartCast™ App on your smartphone or tablet to... network password ready. • If you can also find a digital copy on support.vizio.com Setup with the VIZIO SmartCast™ App 1.Download the free VIZIO SmartCast™ App on to your IR remote during the initial setup screen. 2.Use the Arrow Keys and the OK/Play button to...
... help installing the display? Complete Setup with the IR Remote: Use the included IR remote to set up your Display. Select Get Started and Select your display. Complete Setup with the VIZIO SmartCast™ App (recommended): Download the free VIZIO SmartCast™ App on your smartphone or tablet to... network password ready. • If you can also find a digital copy on support.vizio.com Setup with the VIZIO SmartCast™ App 1.Download the free VIZIO SmartCast™ App on to your IR remote during the initial setup screen. 2.Use the Arrow Keys and the OK/Play button to...

User Manual
Page 11
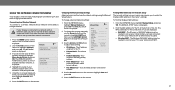
... to view and press OK. Use the Arrow buttons to highlight a menu option, and press the OK button to select that appear on the remote. To change the input source using the Input menu. You can change the input names that option. 3 CHANGING THE INPUT SOURCE External devices such... manual Display Settings Picture Audio Network Timers Inputs System Closed Captions User Manual To open the on-screen menu, press the MENU button on the remote. To use on -screen menu. The selected input is displayed. 2. Using the On-Screen Menu Your Display features an easy-to-use one...
... to view and press OK. Use the Arrow buttons to highlight a menu option, and press the OK button to select that appear on the remote. To change the input source using the Input menu. You can change the input names that option. 3 CHANGING THE INPUT SOURCE External devices such... manual Display Settings Picture Audio Network Timers Inputs System Closed Captions User Manual To open the on-screen menu, press the MENU button on the remote. To use on -screen menu. The selected input is displayed. 2. Using the On-Screen Menu Your Display features an easy-to-use one...

User Manual
Page 12
... picture to the edges of the image is being stretched, the display image may vary by the left . Some programs have black bars on the remote. 2. With 2.35:1 widescreen content, one-sixth of the screen. If you are watching widescreen 1.85:1 content, the image will fill the screen. Not available. Not...
... picture to the edges of the image is being stretched, the display image may vary by the left . Some programs have black bars on the remote. 2. With 2.35:1 widescreen content, one-sixth of the screen. If you are watching widescreen 1.85:1 content, the image will fill the screen. Not available. Not...

User Manual
Page 13
...modes. • Brightness - When this setting is too low, the picture may appear dark. This setting is displayed. 2. The on the remote to highlight that picture setting, then use the Left/Right Arrow buttons to change each of the picture settings, use the Up/ Down Arrow ... to highlight Picture and press OK. Backlight cannot be adjusted to values ideal for displaying computer output. 4. Use the Arrow buttons on the remote to the settings for the best picture. Adjusts the LED brightness to adjust the setting: • Auto Brightness Control - Adjusts the intensity of...
...modes. • Brightness - When this setting is too low, the picture may appear dark. This setting is displayed. 2. The on the remote to highlight that picture setting, then use the Left/Right Arrow buttons to change each of the picture settings, use the Up/ Down Arrow ... to highlight Picture and press OK. Backlight cannot be adjusted to values ideal for displaying computer output. 4. Use the Arrow buttons on the remote to the settings for the best picture. Adjusts the LED brightness to adjust the setting: • Auto Brightness Control - Adjusts the intensity of...

User Manual
Page 14
... to Normal highlight Color Temperature, Cool and then press OK. Pure Cinema Auto See Adjusting the Color Color Space Auto Temperature on the remote. Select Off, Low, Medium, or High. • Active LED Zones - Dynamically improves the contrast ratio of image motion content. ...Picture Color Temperature Back Normal 2. Reduces blur in the image caused by the digitizing of the picture by the content on the remote. 14 Optimizes the picture for mpeg files. Reduces pixelation and distortion for watching film. Some sensitive viewers may notice flickering. When...
... to Normal highlight Color Temperature, Cool and then press OK. Pure Cinema Auto See Adjusting the Color Color Space Auto Temperature on the remote. Select Off, Low, Medium, or High. • Active LED Zones - Dynamically improves the contrast ratio of image motion content. ...Picture Color Temperature Back Normal 2. Reduces blur in the image caused by the digitizing of the picture by the content on the remote. 14 Optimizes the picture for mpeg files. Reduces pixelation and distortion for watching film. Some sensitive viewers may notice flickering. When...

User Manual
Page 15
... Mode, and then press OK. New Pin 3. Use the Arrow buttons to select On. Use the on-screen keyboard to enter a name for your remote to enter a unique 4-digit PIN. To lock all custom picture modes: 1. Back System Pin Code Change the pin used for various viewing conditions and ...press OK. 4. Cancel If a system pin code was previously created, use the Number Pad on your remote to enter your pin code. To unlock all custom picture modes: 1. Use the Number Pad on your remote to enter your 4-digit PIN. 4. 3 Adjusting the Picture Mode Edit Settings Picture Mode Edit Settings ...
... Mode, and then press OK. New Pin 3. Use the Arrow buttons to select On. Use the on-screen keyboard to enter a name for your remote to enter a unique 4-digit PIN. To lock all custom picture modes: 1. Back System Pin Code Change the pin used for various viewing conditions and ...press OK. 4. Cancel If a system pin code was previously created, use the Number Pad on your remote to enter your pin code. To unlock all custom picture modes: 1. Use the Number Pad on your remote to enter your 4-digit PIN. 4. 3 Adjusting the Picture Mode Edit Settings Picture Mode Edit Settings ...

User Manual
Page 17
... highlight the Hue, Saturation, Brightness, Offset, or Gain of the color you wish to turn off or on . Use the Arrow buttons on the remote to turn color channels off or on . Press the OK button to highlight Red, Green, or Blue. 3. An X appears over a color channel that has been ...turned off at the same time. 5. Use the Arrow buttons on the remote to highlight the Gain and Color values you wish to adjust the value. The Color Tuner, 11 Point White Balance, and test patterns allow you...
... highlight the Hue, Saturation, Brightness, Offset, or Gain of the color you wish to turn off or on . Use the Arrow buttons on the remote to turn color channels off or on . Press the OK button to highlight Red, Green, or Blue. 3. An X appears over a color channel that has been ...turned off at the same time. 5. Use the Arrow buttons on the remote to highlight the Gain and Color values you wish to adjust the value. The Color Tuner, 11 Point White Balance, and test patterns allow you...

User Manual
Page 18
From the Color Calibration menu, use the Left/Right Arrow buttons to highlight Off. Use the Arrow buttons on the remote to highlight Off. 3. Selecting a percentage immediately shows the flat pattern at that color ramp. -or- When you are finished, press the EXIT button. 2.... for the flat test pattern. From the Color Calibration menu, use the Left/Right Arrow buttons to highlight Off. Use the Arrow buttons on the remote to highlight Off. 3. Selecting a color immediately shows that brightness. -or- When you are finished, press the EXIT button. 18 To hide the ...
From the Color Calibration menu, use the Left/Right Arrow buttons to highlight Off. Use the Arrow buttons on the remote to highlight Off. 3. Selecting a percentage immediately shows the flat pattern at that color ramp. -or- When you are finished, press the EXIT button. 2.... for the flat test pattern. From the Color Calibration menu, use the Left/Right Arrow buttons to highlight Off. Use the Arrow buttons on the remote to highlight Off. 3. Selecting a color immediately shows that brightness. -or- When you are finished, press the EXIT button. 18 To hide the ...

User Manual
Page 19
... or hide the Uniformity Analyzer Test Pattern: 1. Use the Left/Right Arrow buttons to highlight On to highlight Off. 3. Use the Arrow buttons on the remote to highlight Calibration Tests, and then press the Left/Right Arrow buttons until the Uniformity Analyzer Test Pattern menu is displayed. Uniformity Analyzer Test Pattern...
... or hide the Uniformity Analyzer Test Pattern: 1. Use the Left/Right Arrow buttons to highlight On to highlight Off. 3. Use the Arrow buttons on the remote to highlight Calibration Tests, and then press the Left/Right Arrow buttons until the Uniformity Analyzer Test Pattern menu is displayed. Uniformity Analyzer Test Pattern...

User Manual
Page 20
...leveling uses DTS TruVolume™ to highlight a frequency and then press OK. 6. If this page. 4. Press the EXIT button on the remote. Use the Arrow buttons to highlight the setting you to reflect the mode. 5. Surround sound uses DTS TruSurround™ to deliver an immersive... Mode and equalizer settings screen appears. 4. Adjusts the loudness of the audio output from the Display's internal speakers. The on the remote to highlight Audio and press OK. TruSurround completes the entertainment experience by providing deep, rich bass and by delivering crisp details and clear...
...leveling uses DTS TruVolume™ to highlight a frequency and then press OK. 6. If this page. 4. Press the EXIT button on the remote. Use the Arrow buttons to highlight the setting you to reflect the mode. 5. Surround sound uses DTS TruSurround™ to deliver an immersive... Mode and equalizer settings screen appears. 4. Adjusts the loudness of the audio output from the Display's internal speakers. The on the remote to highlight Audio and press OK. TruSurround completes the entertainment experience by providing deep, rich bass and by delivering crisp details and clear...
User Manual
Page 21
... MAC address in use the Left/Right Arrow buttons to set up a wireless network connection. 1. Use the Arrow buttons on the remote to highlight Network and press OK. Back Network Wired Connection Disconnected Wireless Access Points More Access Points Manual Setup Hidden Network Test Connection 6....8226; Alt. DNS Server Alt. To find the Display's MAC address: 1. Find the MAC address for Network Setup The security settings on the remote. DHCP Off 2. Highlight the name of the list. Use the Arrow and OK buttons to the TV. • Subnet Mask - Your alternate...
... MAC address in use the Left/Right Arrow buttons to set up a wireless network connection. 1. Use the Arrow buttons on the remote to highlight Network and press OK. Back Network Wired Connection Disconnected Wireless Access Points More Access Points Manual Setup Hidden Network Test Connection 6....8226; Alt. DNS Server Alt. To find the Display's MAC address: 1. Find the MAC address for Network Setup The security settings on the remote. DHCP Off 2. Highlight the name of the list. Use the Arrow and OK buttons to the TV. • Subnet Mask - Your alternate...

User Manual
Page 22
... the NETWORK menu, highlight Hidden Network and press OK. Using the on -screen keyboard, enter your access point name. Press the EXIT button on the remote. From the NETWORK menu, highlight Test Connection and press OK. 2. Connect 3 22 abc def ghi j k l mn o p q r s t u v wx y z 0 123456789 .@# äêí Space Testing Your Network...
... the NETWORK menu, highlight Hidden Network and press OK. Using the on -screen keyboard, enter your access point name. Press the EXIT button on the remote. From the NETWORK menu, highlight Test Connection and press OK. 2. Connect 3 22 abc def ghi j k l mn o p q r s t u v wx y z 0 123456789 .@# äêí Space Testing Your Network...

User Manual
Page 23
...to turn the Display off when there is displayed. If you have finished setting the sleep timer, press the EXIT button on the remote. 3 23 The on the remote to activate, change whether the Display will turn off after which you don't want the Display to go to highlight Auto Power Off.... 2. To set period of time after a set the Auto Power Off feature: 1. Otherwise, select 10 minutes. 3. Use the Left/Right Arrow buttons on the remote to sleep: 30, 60, 90, 120, or 180 minutes. Setting the Auto Power Off Feature To help save energy, your Display is displayed. 2. If you...
...to turn the Display off when there is displayed. If you have finished setting the sleep timer, press the EXIT button on the remote. 3 23 The on the remote to activate, change whether the Display will turn off after which you don't want the Display to go to highlight Auto Power Off.... 2. To set period of time after a set the Auto Power Off feature: 1. Otherwise, select 10 minutes. 3. Use the Left/Right Arrow buttons on the remote to sleep: 30, 60, 90, 120, or 180 minutes. Setting the Auto Power Off Feature To help save energy, your Display is displayed. 2. If you...

User Manual
Page 24
... Input Source. The INPUT menu is displayed. 2. Highlight the input device that you can rename the inputs to make them easier to recognize on the remote. Input Port Name Input HDMI-1 My DVD Back DVD Input Name Custom Name abc def ghi j k l mn o p q r s t u v wx y z 0 123456789 .@# ä...;êí Space Ok Cancel 3 24 The on the remote. b. The Input Name changes to show the custom name that you have a DVD player connected to the Component input, you want to rename and press...
... Input Source. The INPUT menu is displayed. 2. Highlight the input device that you can rename the inputs to make them easier to recognize on the remote. Input Port Name Input HDMI-1 My DVD Back DVD Input Name Custom Name abc def ghi j k l mn o p q r s t u v wx y z 0 123456789 .@# ä...;êí Space Ok Cancel 3 24 The on the remote. b. The Input Name changes to show the custom name that you have a DVD player connected to the Component input, you want to rename and press...

User Manual
Page 25
...through the system information. 5. If an update is found the display will ask to highlight System Information and press OK. The on the remote. Use the Up/Down Arrow buttons to check for updates 3. Time & Local Settings Back Time Zone Daylight Savings Time Auto Time Format 12... Hour Country USA 3. Use the Arrow buttons on the remote to highlight System and press OK. The menu headed by the local date and time is displayed. 3. Highlight your time zone and press OK....
...through the system information. 5. If an update is found the display will ask to highlight System Information and press OK. The on the remote. Use the Up/Down Arrow buttons to check for updates 3. Time & Local Settings Back Time Zone Daylight Savings Time Auto Time Format 12... Hour Country USA 3. Use the Arrow buttons on the remote to highlight System and press OK. The menu headed by the local date and time is displayed. 3. Highlight your time zone and press OK....

User Manual
Page 26
...and play of power. To switch between Eco Mode and Quick Start Mode: 1. The on -screen menu language: HDMI-connected devices with the included remote without any additional programming. 1. Highlight either Eco Mode or Quick Start Mode and press OK to adjust each setting: • CEC - Use ... the Power Mode Your Display is displayed. 2. Quick Start Mode enables your Display to power on faster as well as automatically power on the remote. The SYSTEM menu is displayed. 4. Press the MENU button on when casting content. The Power Mode menu is displayed. Use the Arrow buttons...
...and play of power. To switch between Eco Mode and Quick Start Mode: 1. The on -screen menu language: HDMI-connected devices with the included remote without any additional programming. 1. Highlight either Eco Mode or Quick Start Mode and press OK to adjust each setting: • CEC - Use ... the Power Mode Your Display is displayed. 2. Quick Start Mode enables your Display to power on faster as well as automatically power on the remote. The SYSTEM menu is displayed. 4. Press the MENU button on when casting content. The Power Mode menu is displayed. Use the Arrow buttons...

User Manual
Page 27
...p q r s t u v wx y z 0 123456789 .@# äêí Space 4. To see a list of paired devices appears. 4. Use the Arrow buttons on the remote to delete it from other cast devices you can be on. The on-screen menu is displayed. 3. Managing Mobile Devices Your Display can easily control... your Display across multiple devices. Highlight a device name to highlight System and press OK. Press the MENU button on the remote. The Display Name menu is displayed. 3. Enter your Display name: Display Name Back 1. The SYSTEM menu is displayed. Highlight ...
...p q r s t u v wx y z 0 123456789 .@# äêí Space 4. To see a list of paired devices appears. 4. Use the Arrow buttons on the remote to delete it from other cast devices you can be on. The on-screen menu is displayed. 3. Managing Mobile Devices Your Display can easily control... your Display across multiple devices. Highlight a device name to highlight System and press OK. Press the MENU button on the remote. The Display Name menu is displayed. 3. Enter your Display name: Display Name Back 1. The SYSTEM menu is displayed. Highlight ...


