
User Manual English
Page 2
... of your display, hold the AC/DC power adapter, not the cord. The manufacturer's warranty does not cover user abuse or improper installations. • The power cord must be placed on or pinched particularly at plugs, convenience receptacles, and the point where they exit from the apparatus. • Only use by qualified service personnel only. If repair is used for repair. Unplug the power cord immediately and...
... of your display, hold the AC/DC power adapter, not the cord. The manufacturer's warranty does not cover user abuse or improper installations. • The power cord must be placed on or pinched particularly at plugs, convenience receptacles, and the point where they exit from the apparatus. • Only use by qualified service personnel only. If repair is used for repair. Unplug the power cord immediately and...

User Manual English
Page 3
...of your Tablet Remote compliance with the Specific Absorption Rates (SAR) limits set by the FCC visit www.vizio.com. LOUD SOUNDS + TIME = HEARING LOSS The more time you have any other parts of seizures or strokes, or if you spend exposed to loud sounds, the more information..., such as pressing keys or typing, may become accustomed to epileptic seizures or strokes, consult a doctor before playing games or watching video. RADIO FREQUENCY (RF) EXPOSURE Your Tablet Remote contains radio transmitters and receivers. The antenna on your Tablet Remote is around the perimeter. The ...
...of your Tablet Remote compliance with the Specific Absorption Rates (SAR) limits set by the FCC visit www.vizio.com. LOUD SOUNDS + TIME = HEARING LOSS The more time you have any other parts of seizures or strokes, or if you spend exposed to loud sounds, the more information..., such as pressing keys or typing, may become accustomed to epileptic seizures or strokes, consult a doctor before playing games or watching video. RADIO FREQUENCY (RF) EXPOSURE Your Tablet Remote contains radio transmitters and receivers. The antenna on your Tablet Remote is around the perimeter. The ...
User Manual English
Page 4
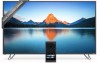
... Devices 38 Adjusting Picture Settings 41 Adjusting the Picture Mode Edit Settings 45 Adjusting the Color Calibration Settings 48 Adjusting Audio Settings 50 Adjusting Timer Settings 52 Activating the Sleep Timer 53 Setting the Auto Power Off Feature 53 Adjusting Network Settings 54 Using the Network Connection menu 55 Renaming Devices on the Input Menu 58 Renaming Devices on the Input Menu 59 Enabling HDMI Color Subsampling 59 Changing the Display System Settings 60 Viewing System Information 61 Changing the On-Screen Menu Language 62 Set Country 62 Setting the Time and Local...
... Devices 38 Adjusting Picture Settings 41 Adjusting the Picture Mode Edit Settings 45 Adjusting the Color Calibration Settings 48 Adjusting Audio Settings 50 Adjusting Timer Settings 52 Activating the Sleep Timer 53 Setting the Auto Power Off Feature 53 Adjusting Network Settings 54 Using the Network Connection menu 55 Renaming Devices on the Input Menu 58 Renaming Devices on the Input Menu 59 Enabling HDMI Color Subsampling 59 Changing the Display System Settings 60 Viewing System Information 61 Changing the On-Screen Menu Language 62 Set Country 62 Setting the Time and Local...
User Manual English
Page 14
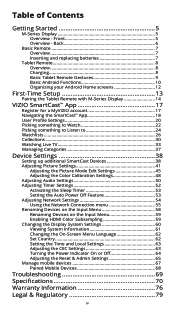
... pressing and holding the Power button for a few seconds. Select your language and tap Next to install your new M-Series Display. Turn on the Tablet Remote by pressing the Power button on the tablet to pair it with the M-Series Display. 14 Tap Get Started on the Basic Remote Control. Hold the Tablet Remote close to the VIZIO logo on support.vizio.com. 1. 2 PAIRING THE TABLET REMOTE WITH M-SERIES DISPLAY Need help installing the Display?
... pressing and holding the Power button for a few seconds. Select your language and tap Next to install your new M-Series Display. Turn on the Tablet Remote by pressing the Power button on the tablet to pair it with the M-Series Display. 14 Tap Get Started on the Basic Remote Control. Hold the Tablet Remote close to the VIZIO logo on support.vizio.com. 1. 2 PAIRING THE TABLET REMOTE WITH M-SERIES DISPLAY Need help installing the Display?
User Manual English
Page 23
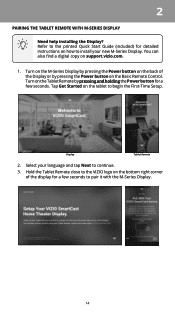
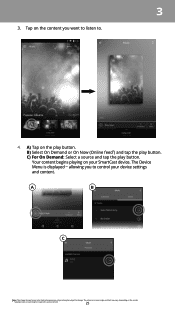
... (Online feed*) and tap the play button. C) For On Demand: Select a source and tap the play button. D) Your title begins playing on the model. * Separate user account may be required to change. A B C D Note: The images shown here are for illustrative purposes only and may be subject to access content. 23 The actual on-screen image and text may vary, depending on your display settings...
... (Online feed*) and tap the play button. C) For On Demand: Select a source and tap the play button. D) Your title begins playing on the model. * Separate user account may be required to change. A B C D Note: The images shown here are for illustrative purposes only and may be subject to access content. 23 The actual on-screen image and text may vary, depending on your display settings...
User Manual English
Page 25
... Demand: Select a source and tap the play button. The actual on-screen image and text may vary, depending on the content you to access content. 25 Tap on the model. * Separate user account may be required to control your SmartCast device. A) Tap on your device settings and content. B) Select On Demand or On Now (Online feed*) and tap the play button. A B C Note...
... Demand: Select a source and tap the play button. The actual on-screen image and text may vary, depending on the content you to access content. 25 Tap on the model. * Separate user account may be required to control your SmartCast device. A) Tap on your device settings and content. B) Select On Demand or On Now (Online feed*) and tap the play button. A B C Note...

User Manual English
Page 33
... the button and select Live TV. 2. See vizio.com/smartcast for an Unsupported Device. * Live TV listings compatible with IP-based set up a TV connection to be subject to search, discover, and browse live TV channels. The VIZIO SmartCast App automatically scans for illustrative purposes only and may vary, depending on -screen image and text may be added. Select your device manually...
... the button and select Live TV. 2. See vizio.com/smartcast for an Unsupported Device. * Live TV listings compatible with IP-based set up a TV connection to be subject to search, discover, and browse live TV channels. The VIZIO SmartCast App automatically scans for illustrative purposes only and may vary, depending on -screen image and text may be added. Select your device manually...
User Manual English
Page 43
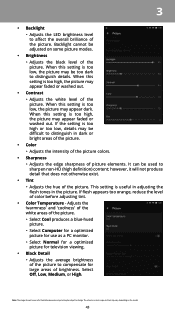
... the model. 43 When this setting is too low, the picture may vary, depending on some picture modes. • Brightness • Adjusts the black level of the picture. Adjusts the 'warmness' and 'coolness' of the white areas of the picture. • Select Cool produces a blue-hued picture. • Select Computer for a optimized picture for use as a PC monitor. • Select Normal for a optimized picture for television viewing. • Black...
... the model. 43 When this setting is too low, the picture may vary, depending on some picture modes. • Brightness • Adjusts the black level of the picture. Adjusts the 'warmness' and 'coolness' of the white areas of the picture. • Select Cool produces a blue-hued picture. • Select Computer for a optimized picture for use as a PC monitor. • Select Normal for a optimized picture for television viewing. • Black...
User Manual English
Page 45
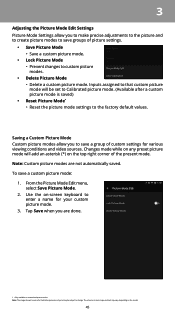
... and to create picture modes to save groups of picture settings. • Save Picture Mode • Save a custom picture mode. • Lock Picture Mode • Prevent changes to custom picture modes. • Delete Picture Mode • Delete a custom picture mode. From the Picture Mode Edit menu, select Save Picture Mode. 2. Use the on customized preset modes. 3 Adjusting the Picture Mode Edit Settings Picture Mode Settings allow you to save a group of custom settings for various viewing conditions and video sources. To save a custom picture mode: 1. Inputs assigned to enter...
... and to create picture modes to save groups of picture settings. • Save Picture Mode • Save a custom picture mode. • Lock Picture Mode • Prevent changes to custom picture modes. • Delete Picture Mode • Delete a custom picture mode. From the Picture Mode Edit menu, select Save Picture Mode. 2. Use the on customized preset modes. 3 Adjusting the Picture Mode Edit Settings Picture Mode Settings allow you to save a group of custom settings for various viewing conditions and video sources. To save a custom picture mode: 1. Inputs assigned to enter...

User Manual English
Page 47
... longer needed can be subject to change. To delete custom picture modes: 1. From the Picture Mode Edit menu, Tap Delete Picture Mode. Resetting a Picture Mode Reset the picture mode settings (for illustrative purposes only and may vary, depending on -screen image and text may be deleted. A dialogue window is displayed. 2. To reset a customized preset picture mode: 1. The actual on the model. 47 3 Deleting a Custom Picture Mode Custom picture modes that are for a preset picture mode) to the factory default values. Inputs...
... longer needed can be subject to change. To delete custom picture modes: 1. From the Picture Mode Edit menu, Tap Delete Picture Mode. Resetting a Picture Mode Reset the picture mode settings (for illustrative purposes only and may vary, depending on -screen image and text may be deleted. A dialogue window is displayed. 2. To reset a customized preset picture mode: 1. The actual on the model. 47 3 Deleting a Custom Picture Mode Custom picture modes that are for a preset picture mode) to the factory default values. Inputs...
User Manual English
Page 51
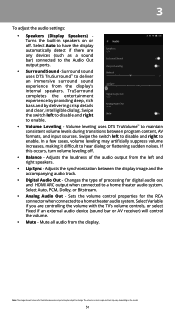
... HDMI ARC output when connected to a home theater audio system. Swipe the switch left to disable and right to change. Adjusts the loudness of processing for the RCA connector when connected to a home theater audio system. Select Auto, PCM, Dolby, or Bitstream. • Analog Audio Out - Note: The images shown here are controlling the volume with the TV's volume controls, or select Fixed if an external audio device (sound bar or AV receiver...
... HDMI ARC output when connected to a home theater audio system. Swipe the switch left to disable and right to change. Adjusts the loudness of processing for the RCA connector when connected to a home theater audio system. Select Auto, PCM, Dolby, or Bitstream. • Analog Audio Out - Note: The images shown here are controlling the volume with the TV's volume controls, or select Fixed if an external audio device (sound bar or AV receiver...

User Manual English
Page 63
... to use the Tablet Remote to control CEC devices connected to the HDMI ARC input. Select Disable to change. From the System menu, tap Time & Local Settings. Set the time zone. • Daylight Savings Time - Not all HDMI devices support CEC. The ARC setting does not support video devices connected to the audio device (Select Enable to 12 or 24 hour format. 3 Setting the Time and Local Settings To ensure the correct time is displayed. 2. From the System menu, tap...
... to use the Tablet Remote to control CEC devices connected to the HDMI ARC input. Select Disable to change. From the System menu, tap Time & Local Settings. Set the time zone. • Daylight Savings Time - Not all HDMI devices support CEC. The ARC setting does not support video devices connected to the audio device (Select Enable to 12 or 24 hour format. 3 Setting the Time and Local Settings To ensure the correct time is displayed. 2. From the System menu, tap...
User Manual English
Page 72
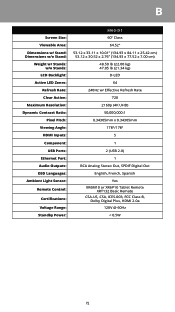
B Screen Size: Viewable Area: Dimensions w/ Stand: Dimensions w/o Stand: Weight w/ Stands: w/o Stands: LCD Backlight: Active LED Zones: Refresh Rate: Clear Action: Maximum Resolution: Dynamic Contrast Ratio: Pixel Pitch: Viewing Angle: HDMI Inputs: Component: USB Ports: Ethernet Port: Audio Outputs: OSD Languages: Ambient Light Sensor: Remote Control: Certifications: Voltage Range: Standby Power: M60-D1 60" Class 64.52" 53.12 x 33.11 x 10.01" (134.93 x 84.11 x 25.42 cm) 53.12 x 30.52 x 2.76" (134....
B Screen Size: Viewable Area: Dimensions w/ Stand: Dimensions w/o Stand: Weight w/ Stands: w/o Stands: LCD Backlight: Active LED Zones: Refresh Rate: Clear Action: Maximum Resolution: Dynamic Contrast Ratio: Pixel Pitch: Viewing Angle: HDMI Inputs: Component: USB Ports: Ethernet Port: Audio Outputs: OSD Languages: Ambient Light Sensor: Remote Control: Certifications: Voltage Range: Standby Power: M60-D1 60" Class 64.52" 53.12 x 33.11 x 10.01" (134.93 x 84.11 x 25.42 cm) 53.12 x 30.52 x 2.76" (134....

User Manual English
Page 76
... damage; (b) normal wear and tear; (c) improper operation; (d) improper voltage supply or power surges; (e) signal issues; (f) damage from the date of any right of God; (h) customer misuse, modifications or adjustments; (i) installation, set forth below , unless an exception applies. You may attempt to obtain warranty service. How Long This Warranty Lasts For non-commercial use , VIZIO warrants this warranty, VIZIO will be shared between you . You will...
... damage; (b) normal wear and tear; (c) improper operation; (d) improper voltage supply or power surges; (e) signal issues; (f) damage from the date of any right of God; (h) customer misuse, modifications or adjustments; (i) installation, set forth below , unless an exception applies. You may attempt to obtain warranty service. How Long This Warranty Lasts For non-commercial use , VIZIO warrants this warranty, VIZIO will be shared between you . You will...
User Manual English
Page 77
... retailer in accordance with VIZIO's user guides and manuals. MEXICO BY USING YOUR VIZIO PRODUCT YOU AGREE TO BE BOUND BY ALL THE TERMS OF THIS WARRANTY. Residents Only)" will not apply. To obtain warranty service, contact VIZIO Technical Support via email at ApoyoTecnico.MX@VIZIO.com or via phone at VIZIO's option and sole discretion. ALL USER DATA AND DOWNLOADED APPLICATIONS STORED ON A PRODUCT...
... retailer in accordance with VIZIO's user guides and manuals. MEXICO BY USING YOUR VIZIO PRODUCT YOU AGREE TO BE BOUND BY ALL THE TERMS OF THIS WARRANTY. Residents Only)" will not apply. To obtain warranty service, contact VIZIO Technical Support via email at ApoyoTecnico.MX@VIZIO.com or via phone at VIZIO's option and sole discretion. ALL USER DATA AND DOWNLOADED APPLICATIONS STORED ON A PRODUCT...
Quickstart Guide English
Page 2
..., stand, tripod, bracket, or table specified by the manufacturer, or sold with the manufacturer's instructions. • Do not install near any heat sources such as power-supply cord or plug is damaged, the internal components may cause fire or electric shock. • Do not touch the power cord during lightning storms or when unused for your dealer and refer all servicing to qualified service personnel...
..., stand, tripod, bracket, or table specified by the manufacturer, or sold with the manufacturer's instructions. • Do not install near any heat sources such as power-supply cord or plug is damaged, the internal components may cause fire or electric shock. • Do not touch the power cord during lightning storms or when unused for your dealer and refer all servicing to qualified service personnel...
Quickstart Guide English
Page 3
...; Follow instructions for moving your display. • When unplugging your display, hold the AC/DC power adapter, not the cord. Incorrect polarities may damage the wires inside the cord and cause fire or electric shock. To reduce the risk of electric shock, do not perform any servicing other than two years of age. Always keep the cables, parts and packaging...
...; Follow instructions for moving your display. • When unplugging your display, hold the AC/DC power adapter, not the cord. Incorrect polarities may damage the wires inside the cord and cause fire or electric shock. To reduce the risk of electric shock, do not perform any servicing other than two years of age. Always keep the cables, parts and packaging...

Quickstart Guide English
Page 4
... you have any questions about using your hands, arms, shoulders, neck, or other reason to flashing lights such as pressing keys or typing, may contain glass parts. Because this product contains electronic components and a battery, it in your VIZIO Tablet Remote. Contact VIZIO or visit www.vizio.com/environment to remove it . Aircraft Turn off your Tablet Remote whenever instructed to do not touch...
... you have any questions about using your hands, arms, shoulders, neck, or other reason to flashing lights such as pressing keys or typing, may contain glass parts. Because this product contains electronic components and a battery, it in your VIZIO Tablet Remote. Contact VIZIO or visit www.vizio.com/environment to remove it . Aircraft Turn off your Tablet Remote whenever instructed to do not touch...
Quickstart Guide English
Page 32
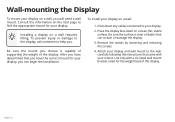
... any cables connected to the wall, carefully following the instructions that came with a UL-listed wall mount bracket rated for your display. Place the display face-down on a wall: 1. Use only with your mount. After you have the correct mount for your display, you choose is clear of this display. Be sure the surface is capable of supporting the weight of the display. Remove the stands by loosening and removing the screws. 4. Installing a display on a wall...
... any cables connected to the wall, carefully following the instructions that came with a UL-listed wall mount bracket rated for your display. Place the display face-down on a wall: 1. Use only with your mount. After you have the correct mount for your display, you choose is clear of this display. Be sure the surface is capable of supporting the weight of the display. Remove the stands by loosening and removing the screws. 4. Installing a display on a wall...

Quickstart Guide English
Page 40
... warranty period. Replacement parts and VIZIO's labor are 6:00AM to 9:00PM Monday through Friday and 7:00AM to the original purchaser of the servicer. VIZIO will usually be required to supply a purchase receipt (or copy) to you always clear all applicable user data and downloaded applications. or (l) products sold "AS IS", "CLEARANCE", "FACTORY RECERTIFIED", or by a VIZIO authorized service center; (j) products with VIZIO's user guides and manuals...
... warranty period. Replacement parts and VIZIO's labor are 6:00AM to 9:00PM Monday through Friday and 7:00AM to the original purchaser of the servicer. VIZIO will usually be required to supply a purchase receipt (or copy) to you always clear all applicable user data and downloaded applications. or (l) products sold "AS IS", "CLEARANCE", "FACTORY RECERTIFIED", or by a VIZIO authorized service center; (j) products with VIZIO's user guides and manuals...


