M420SV User Manual
Page 3
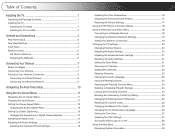
... Activating the Sleep Timer 14 Adjusting the Picture Settings 15 Adjusting the Advanced Picture Settings 16 Adjusting the Color Temperature 16 Adjusting the Picture Size and Position 17 Resetting the Picture Settings 17 Using the PIP (Picture-In-Picture) Feature 18 Using the Network Connection Menu 18 Connecting to a Wireless... the Names of the Inputs 26 Changing the On-Screen Menu Language 26 Setting the Time Zone 27 Adjusting the CEC Settings 27 Turning the VIZIO Logo On or Off 28 Using the Help Menu 28 Displaying System Information 28
... Activating the Sleep Timer 14 Adjusting the Picture Settings 15 Adjusting the Advanced Picture Settings 16 Adjusting the Color Temperature 16 Adjusting the Picture Size and Position 17 Resetting the Picture Settings 17 Using the PIP (Picture-In-Picture) Feature 18 Using the Network Connection Menu 18 Connecting to a Wireless... the Names of the Inputs 26 Changing the On-Screen Menu Language 26 Setting the Time Zone 27 Adjusting the CEC Settings 27 Turning the VIZIO Logo On or Off 28 Using the Help Menu 28 Displaying System Information 28
M420SV User Manual
Page 4
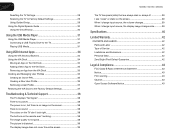
... Media Player 31 Connecting a USB Thumb Drive to the TV 31 Playing USB Media 31 Using VIZIO Internet Apps 34 Using the VIA Shortcut Buttons 34 Using the VIA Dock 34 Moving an App ...not good 38 The picture is distorted 39 The display image does not cover the entire screen 39 M420SV / M470SV / M550SV The TV has pixels (dots) that are always dark or always lit 39 I see "noise...When I change input source, the volume changes 39 When I change input source, the display image changes size 39 Specifications 40 Limited Warranty 42 ON PARTS AND LABOR 42 Parts and Labor 42 Type of Service 42...
... Media Player 31 Connecting a USB Thumb Drive to the TV 31 Playing USB Media 31 Using VIZIO Internet Apps 34 Using the VIA Shortcut Buttons 34 Using the VIA Dock 34 Moving an App ...not good 38 The picture is distorted 39 The display image does not cover the entire screen 39 M420SV / M470SV / M550SV The TV has pixels (dots) that are always dark or always lit 39 I see "noise...When I change input source, the volume changes 39 When I change input source, the display image changes size 39 Specifications 40 Limited Warranty 42 ON PARTS AND LABOR 42 Parts and Labor 42 Type of Service 42...
M420SV User Manual
Page 8
...and with regard to proper grounding of the mast and supporting structure, grounding of the lead-in the building installation. M420SV / M470SV / M550SV Television Antenna Connection Protection If an outside antenna/satellite dish or cable system is to be connected to earth in wire to ...an antenna discharge unit, size of the grounding conductors, location of antenna discharge unit, connection to grounding electrodes, and requirements of the grounding electrode. Watch your local...
...and with regard to proper grounding of the mast and supporting structure, grounding of the lead-in the building installation. M420SV / M470SV / M550SV Television Antenna Connection Protection If an outside antenna/satellite dish or cable system is to be connected to earth in wire to ...an antenna discharge unit, size of the grounding conductors, location of antenna discharge unit, connection to grounding electrodes, and requirements of the grounding electrode. Watch your local...
M420SV User Manual
Page 10
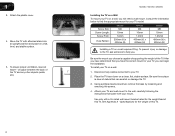
M420SV / M470SV / M550SV Installing the TV on a Wall To mount your TV on a flat, level, and stable surface. 5. Be sure the surface is capable of supporting the ... only with a UL-listed wall mount bracket rated for your mount. Move the TV with your TV model: Screw Size: Screw Length: Screw Pitch: Hole Pattern: M420SV M6 10mm 1.0mm 200mm (V) x 400mm (H) M470SV M6 10mm 1.0mm 400mm (V) x 400mm (H) M550SV M8 10mm 1.25mm 400mm (V) x 400mm (H) Installing a TV on a wall requires lifting. Consult the...
M420SV / M470SV / M550SV Installing the TV on a Wall To mount your TV on a flat, level, and stable surface. 5. Be sure the surface is capable of supporting the ... only with a UL-listed wall mount bracket rated for your mount. Move the TV with your TV model: Screw Size: Screw Length: Screw Pitch: Hole Pattern: M420SV M6 10mm 1.0mm 200mm (V) x 400mm (H) M470SV M6 10mm 1.0mm 400mm (V) x 400mm (H) M550SV M8 10mm 1.25mm 400mm (V) x 400mm (H) Installing a TV on a wall requires lifting. Consult the...
M420SV User Manual
Page 14
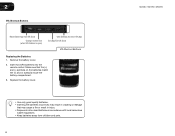
2 VIA Shortcut Buttons Move/Delete App from children and pets. 6 M420SV / M470SV / M550SV Remove the battery cover. 2. Replace the battery cover. • Use only good quality batteries. • Inserting the batteries incorrectly may cause a fire or result ...in injury. • Dispose of old or dead batteries in accordance with local hazardous waste regulations. • Keep batteries away from VIA Dock Change Screen Size (when VIA Sidebar is open) View Settings for Active VIA App Exit App/Exit VIA Dock VIA Shortcut Buttons Replacing the Batteries 1. Insert two AAA...
2 VIA Shortcut Buttons Move/Delete App from children and pets. 6 M420SV / M470SV / M550SV Remove the battery cover. 2. Replace the battery cover. • Use only good quality batteries. • Inserting the batteries incorrectly may cause a fire or result ...in injury. • Dispose of old or dead batteries in accordance with local hazardous waste regulations. • Keep batteries away from VIA Dock Change Screen Size (when VIA Sidebar is open) View Settings for Active VIA App Exit App/Exit VIA Dock VIA Shortcut Buttons Replacing the Batteries 1. Insert two AAA...
M420SV User Manual
Page 22
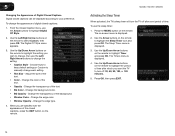
.../ Right Arrow buttons to your preference. The Timers menu is displayed. 3. The Digital CC Style menu appears. 3. Adjust the size of the text. • BG Color - M420SV / M470SV / M550SV Activating the Sleep Timer When activated, the TV's sleep timer will turn off after which you want the TV to ...Use the Up/Down Arrow buttons on the remote. Change the color of the background. • Window Color - To change each setting. • Text Size - Press OK, then press EXIT. 14 From the Closed Caption menu, use the sleep timer: 1. Choose Auto to keep default settings or Custom to ...
.../ Right Arrow buttons to your preference. The Timers menu is displayed. 3. The Digital CC Style menu appears. 3. Adjust the size of the text. • BG Color - M420SV / M470SV / M550SV Activating the Sleep Timer When activated, the TV's sleep timer will turn off after which you want the TV to ...Use the Up/Down Arrow buttons on the remote. Change the color of the background. • Window Color - To change each setting. • Text Size - Press OK, then press EXIT. 14 From the Closed Caption menu, use the sleep timer: 1. Choose Auto to keep default settings or Custom to ...
M420SV User Manual
Page 25
... setting: • Auto Adjust - Press the EXIT button on the remote. To adjust the picture size and position: 1. M420SV / M470SV / M550SV 5 Adjusting the Picture Size and Position When displaying an image from the HDMI or RGB input, the size and position of the display image. • Vertical Position - From the Picture Settings menu, use...
... setting: • Auto Adjust - Press the EXIT button on the remote. To adjust the picture size and position: 1. M420SV / M470SV / M550SV 5 Adjusting the Picture Size and Position When displaying an image from the HDMI or RGB input, the size and position of the display image. • Vertical Position - From the Picture Settings menu, use...

M420SV User Manual
Page 26
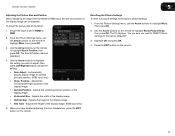
... 802.11n. Select the input source to a wireless network whose network name (SSID) is the network's SSID) and press OK. 4. Choose the size of the PIP window. Connecting to a Wireless Network To connect to be displayed side-by-side. Use the Arrow buttons on the remote to adjust... in the PIP window. • Position - Highlight the name of the PIP settings: • PIP Mode - To adjust the PIP settings: 1. 5 M420SV / M470SV / M550SV Using the PIP (Picture-In-Picture) Feature The PIP feature on your TV allows you to enable or disable PIP. Choose which audio source...
... 802.11n. Select the input source to a wireless network whose network name (SSID) is the network's SSID) and press OK. 4. Choose the size of the PIP window. Connecting to a Wireless Network To connect to be displayed side-by-side. Use the Arrow buttons on the remote to adjust... in the PIP window. • Position - Highlight the name of the PIP settings: • PIP Mode - To adjust the PIP settings: 1. 5 M420SV / M470SV / M550SV Using the PIP (Picture-In-Picture) Feature The PIP feature on your TV allows you to enable or disable PIP. Choose which audio source...

M420SV User Manual
Page 41
... press OK. You can move between files using the Arrow and OK buttons on the remote. Connected Sources Displays connected USB devices. M420SV / M470SV / M550SV Back Button Highlight this area and pressing Left/Right Arrow. 6 Folder Contents This area displays the contents of the currently selected folder.... by Name or Date View Thumbnails or List View Folder Settings Toggle Music/Photos Photo Infomation Displays name, resolution, and file size for currently selected photo. Current Folder Back Button Highlight and press OK to return to the previous screen. Photo Viewer Screen 33
... press OK. You can move between files using the Arrow and OK buttons on the remote. Connected Sources Displays connected USB devices. M420SV / M470SV / M550SV Back Button Highlight this area and pressing Left/Right Arrow. 6 Folder Contents This area displays the contents of the currently selected folder.... by Name or Date View Thumbnails or List View Folder Settings Toggle Music/Photos Photo Infomation Displays name, resolution, and file size for currently selected photo. Current Folder Back Button Highlight and press OK to return to the previous screen. Photo Viewer Screen 33

M420SV User Manual
Page 42
...on the remote. (The highlighted App is where all on the remote. (The highlighted App is also used to your home network. Change the size of your TV is open in the lower left and right using the Left/Right Arrow buttons on demand! Moving an App on page 9 if... VIA Dock You can personalize your TV. VIA features a selection of the screen.) V Button 3. Using VIZIO Internet Apps Using the VIA Dock The VIA Dock is in the sidebar. • Red - 7 VIZIO Internet Apps (VIA) delivers popular online content to move the App by pressing the Blue VIA Shortcut button...
...on the remote. (The highlighted App is where all on the remote. (The highlighted App is also used to your home network. Change the size of your TV is open in the lower left and right using the Left/Right Arrow buttons on demand! Moving an App on page 9 if... VIA Dock You can personalize your TV. VIA features a selection of the screen.) V Button 3. Using VIZIO Internet Apps Using the VIA Dock The VIA Dock is in the sidebar. • Red - 7 VIZIO Internet Apps (VIA) delivers popular online content to move the App by pressing the Blue VIA Shortcut button...
M420SV User Manual
Page 47
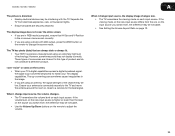
...you switch from electrical appliances, cars, or flourescent lights. • Ensure all cables are securely attached. I change input source, the display image changes size. • The TV remembers the viewing mode on each input source. Ensure your TV's digital capabilities exceed a digital broadcast signal, the signal is... connected securely to the TV and move the antenna around the room or close to adjust the volume. M420SV / M470SV / M550SV The picture is higher or lower than the level on the source you are using an extremely high level of technology. If...
...you switch from electrical appliances, cars, or flourescent lights. • Ensure all cables are securely attached. I change input source, the display image changes size. • The TV remembers the viewing mode on each input source. Ensure your TV's digital capabilities exceed a digital broadcast signal, the signal is... connected securely to the TV and move the antenna around the room or close to adjust the volume. M420SV / M470SV / M550SV The picture is higher or lower than the level on the source you are using an extremely high level of technology. If...

M420SV User Manual
Page 48
B Screen Size: Diagonal Viewable: Dimensions w/ Stand: w/o Stand: Weight w/ Stand: w/o Stand: TV Type: Refresh Rate: Maximum Resolution: Pixel Pitch: Dynamic Contrast Ratio: Response Time: Brightness: Viewing Angle: Ambient ... LED 120 Hz 1920 x 1080 .485 x .485 mm 200,000:1 5 ms 400 nits 178 (H) x 178 (V) Yes 4 1 1 (Shared w/ Component) 1 2 1 English, Spanish, French Optical Digital Audio Out 2 M470SV 47" Class 46.96" 43.71 x 29.75 x 9.67" 43.71 x 27.45 x 2.00" 46.52 lbs 42.11 lbs Edge Lit LED 240 Hz...
B Screen Size: Diagonal Viewable: Dimensions w/ Stand: w/o Stand: Weight w/ Stand: w/o Stand: TV Type: Refresh Rate: Maximum Resolution: Pixel Pitch: Dynamic Contrast Ratio: Response Time: Brightness: Viewing Angle: Ambient ... LED 120 Hz 1920 x 1080 .485 x .485 mm 200,000:1 5 ms 400 nits 178 (H) x 178 (V) Yes 4 1 1 (Shared w/ Component) 1 2 1 English, Spanish, French Optical Digital Audio Out 2 M470SV 47" Class 46.96" 43.71 x 29.75 x 9.67" 43.71 x 27.45 x 2.00" 46.52 lbs 42.11 lbs Edge Lit LED 240 Hz...

M420SV QSG
Page 13
The highlighted App is open) Move/Delete App from the App Bar and press OK. Change Screen Size (when VIA Sidebar is in the lower left corner of the screen. 2 3 View Settings for Active App Exit App/Exit VIA Dock Highlighted App To start an App, use the Arrow, OK, and VIA Shortcut buttons on the remote to highlight an App from VIA Dock Once you have started an App, use the Left/Right Arrow buttons to control the App.
The highlighted App is open) Move/Delete App from the App Bar and press OK. Change Screen Size (when VIA Sidebar is in the lower left corner of the screen. 2 3 View Settings for Active App Exit App/Exit VIA Dock Highlighted App To start an App, use the Arrow, OK, and VIA Shortcut buttons on the remote to highlight an App from VIA Dock Once you have started an App, use the Left/Right Arrow buttons to control the App.


