
M320SL User Manua
Page 3
...any heat sources such as radiators, heat registers, stoves, or other components to alert you either: • Register your VIZIO product at www.VIZIO.com • Complete and mail the enclosed registration card Extended Warranties For peace of your product and retain them for ... for Choosing VIZIO And congratulations on -site extended warranty service plans. These plans provide additional coverage during the standard warranty period. Misuse may result in accordance with the manufacturer's instructions. • Do not install near water. • Clean only with the cart, stand, tripod,...
...any heat sources such as radiators, heat registers, stoves, or other components to alert you either: • Register your VIZIO product at www.VIZIO.com • Complete and mail the enclosed registration card Extended Warranties For peace of your product and retain them for ... for Choosing VIZIO And congratulations on -site extended warranty service plans. These plans provide additional coverage during the standard warranty period. Misuse may result in accordance with the manufacturer's instructions. • Do not install near water. • Clean only with the cart, stand, tripod,...
M320SL User Manua
Page 8
...Installing the TV 3 Inspecting the Package Contents 3 Installing the TV 3 Installing the TV Stand 3 Installing the TV on a Wall 5 Controls and Connections 7 Rear Panel (Model M320SL 7 Rear Panel (Models M370SL, M420SL, M470SL, M550SL)..... 8 Side Panel 9 Front Panel 10 Remote Control (Models M320SL, M370SL 11...Connecting A Device 15 Connecting A PC 16 Connecting an audio device (Model M320SL 17 Connecting an audio device (Model M370SL, M420SL, M470SL, M550SL 18 Connecting to your network 19 Connecting to a Wired Network (Best 19 Connecting to a Wireless Network 30 Changing the ...
...Installing the TV 3 Inspecting the Package Contents 3 Installing the TV 3 Installing the TV Stand 3 Installing the TV on a Wall 5 Controls and Connections 7 Rear Panel (Model M320SL 7 Rear Panel (Models M370SL, M420SL, M470SL, M550SL)..... 8 Side Panel 9 Front Panel 10 Remote Control (Models M320SL, M370SL 11...Connecting A Device 15 Connecting A PC 16 Connecting an audio device (Model M320SL 17 Connecting an audio device (Model M370SL, M420SL, M470SL, M550SL 18 Connecting to your network 19 Connecting to a Wired Network (Best 19 Connecting to a Wireless Network 30 Changing the ...
M320SL User Manua
Page 10
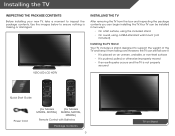
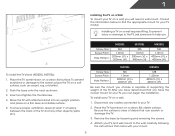
However, the TV can begin installing the TV. VIZIO LED LCD HDTV Installing the TV After removing the TV from falling over if: • It is placed on Stand Your TV can be installed in two ways: • On a flat surface, using the included stand • On a wall, using a VESA-standard...your new TV, take a moment to ensure nothing is not properly secured Quick Start Guide Power Cord (For Models M320SL, M370SL) (For Models M420SL, M470SL, M550SL) Remote Control with Batteries Package Contents 3 TV on an uneven, unstable, or non-level surface • It is pushed, pulled, or ...
However, the TV can begin installing the TV. VIZIO LED LCD HDTV Installing the TV After removing the TV from falling over if: • It is placed on Stand Your TV can be installed in two ways: • On a flat surface, using the included stand • On a wall, using a VESA-standard...your new TV, take a moment to ensure nothing is not properly secured Quick Start Guide Power Cord (For Models M320SL, M370SL) (For Models M420SL, M470SL, M550SL) Remote Control with Batteries Package Contents 3 TV on an uneven, unstable, or non-level surface • It is pushed, pulled, or ...
M320SL User Manua
Page 11
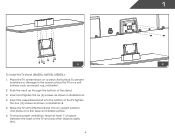
... ventilation, leave at least 1" of space between the back of the stand. 3. 1 A B To install the TV stand (M420SL, M470SL, M550SL): 1. Push the neck up through the bottom of the TV and any other objects (walls, etc). 4 Move the TV with attached stand into the bottom of the TV. Place the TV screen-down on... shown in illustration A. 4. Tighten the four (4) screws as carpet, rug, or blanket. 2. Insert and tighten the six (6) screws as shown in illustration B. 5. Insert the assembled stand into an upright position and place on a clean, flat surface.
... ventilation, leave at least 1" of space between the back of the stand. 3. 1 A B To install the TV stand (M420SL, M470SL, M550SL): 1. Push the neck up through the bottom of the TV and any other objects (walls, etc). 4 Move the TV with attached stand into the bottom of the TV. Place the TV screen-down on... shown in illustration A. 4. Tighten the four (4) screws as carpet, rug, or blanket. 2. Insert and tighten the six (6) screws as shown in illustration B. 5. Insert the assembled stand into an upright position and place on a clean, flat surface.
M320SL User Manua
Page 12
...Pitch: Hole Pattern: M6 1.0mm 200mm (V) x 200mm (H) M370SL M6 1.0mm 200mm (V) x 400mm (H) M420SL M6 1.0mm 400mm (V) x 400mm (H) To install the TV stand (M320SL, M370SL): 1. To install yovur TV on a clean, flat surface. Place the TV screen-down on a wall, you can scratch or damage the TV. 3. ... a flat, level, and stable surface. 5. Attach your TV and wall mount to find the appropriate mount for your TV, you will need a wall mount. M470SL M550SL Screw Size: Screw Pitch: Hole Pattern: M6 1.0mm 400mm (V) x 400mm (H) M8 1.25mm 400mm (V) x 400mm (H) Be sure the mount you . ...
...Pitch: Hole Pattern: M6 1.0mm 200mm (V) x 200mm (H) M370SL M6 1.0mm 200mm (V) x 400mm (H) M420SL M6 1.0mm 400mm (V) x 400mm (H) To install the TV stand (M320SL, M370SL): 1. To install yovur TV on a clean, flat surface. Place the TV screen-down on a wall, you can scratch or damage the TV. 3. ... a flat, level, and stable surface. 5. Attach your TV and wall mount to find the appropriate mount for your TV, you will need a wall mount. M470SL M550SL Screw Size: Screw Pitch: Hole Pattern: M6 1.0mm 400mm (V) x 400mm (H) M8 1.25mm 400mm (V) x 400mm (H) Be sure the mount you . ...
M320SL User Manua
Page 60
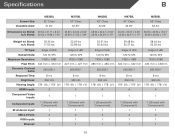
... Size: Viewable Area: M320SL 32" Class 31.55" M370SL 37" Class 36.50" M420SL 42" Class 42.02" M470SL 47" Class 46.96" M550SL 55" Class 54.64" Dimensions w/ Stand: 29.56 x 21.17 x 8.24" w/o Stand: 29.56 x 19.08 x 1.92" 33.89 x 23.62 x 8.24" 33.89 x 21.52 x 1.89" 38.94... x 24.59 x 1.97" 43.22 x 29.07 x 9.50" 50.09 x 32.96 x 10.21" 43.22 x 26.97 x 1.97 50.09 x 30.86 x 1.97" Weight w/ Stand: w/o Stand: 18.34 lbs 17.02 lbs 22.49 lbs 22.98 lbs 33.51 lbs 30.64 lbs 39.68 lbs 35.27 lbs 58...
... Size: Viewable Area: M320SL 32" Class 31.55" M370SL 37" Class 36.50" M420SL 42" Class 42.02" M470SL 47" Class 46.96" M550SL 55" Class 54.64" Dimensions w/ Stand: 29.56 x 21.17 x 8.24" w/o Stand: 29.56 x 19.08 x 1.92" 33.89 x 23.62 x 8.24" 33.89 x 21.52 x 1.89" 38.94... x 24.59 x 1.97" 43.22 x 29.07 x 9.50" 50.09 x 32.96 x 10.21" 43.22 x 26.97 x 1.97 50.09 x 30.86 x 1.97" Weight w/ Stand: w/o Stand: 18.34 lbs 17.02 lbs 22.49 lbs 22.98 lbs 33.51 lbs 30.64 lbs 39.68 lbs 35.27 lbs 58...
M470SL Quick Start Guide
Page 2
... apply pressure or throw objects at least three feet should be used , use attachments/accessories specified by the manufacturer. • Use only with the cart, stand, tripod, bracket, or table specified by qualified service personnel only. If the provided plug does not fit into your TV, unplug the power cord and...
... apply pressure or throw objects at least three feet should be used , use attachments/accessories specified by the manufacturer. • Use only with the cart, stand, tripod, bracket, or table specified by qualified service personnel only. If the provided plug does not fit into your TV, unplug the power cord and...
M470SL Quick Start Guide
Page 5
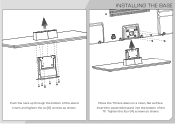
INSTALLING THE BASE Push the neck up through the bottom of the TV. Tighten the four (4) screws as shown. Insert and tighten the six (6) screws as shown. Place the TV face down on a clean, flat surface. Insert the assembled stand into the bottom of the stand.
INSTALLING THE BASE Push the neck up through the bottom of the TV. Tighten the four (4) screws as shown. Insert and tighten the six (6) screws as shown. Place the TV face down on a clean, flat surface. Insert the assembled stand into the bottom of the stand.

M470SL Quick Start Guide
Page 16
a perfect complement for a 40" HDTV and larger. Available at www.VIZIO.com This Product Sold Separately UPGRADE TO POWERFUL DIGITAL AUDIO The VIZIO Home Theater Sound Bar with Wireless Subwoofer delivers exceptional audio performance in your home theater up to 60 ft. away, and the sound bar offers either a table-stand or wall-mount option. Its wireless subwoofer fits nearly anywhere in a new sleeker, slimmer design - This powerful sound system is also remarkably versatile.
a perfect complement for a 40" HDTV and larger. Available at www.VIZIO.com This Product Sold Separately UPGRADE TO POWERFUL DIGITAL AUDIO The VIZIO Home Theater Sound Bar with Wireless Subwoofer delivers exceptional audio performance in your home theater up to 60 ft. away, and the sound bar offers either a table-stand or wall-mount option. Its wireless subwoofer fits nearly anywhere in a new sleeker, slimmer design - This powerful sound system is also remarkably versatile.
M470SL Data Sheet
Page 2
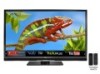
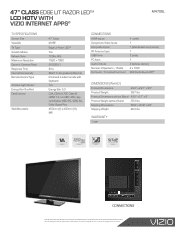
...Composite Inputs RF Antenna Input USB Ports PC Input Audio Outputs Number of vizio inc. 47" CLASS EDGE LIT RAZOR LEDTM LCD HDTV WITH VIZIO INTERNET APPS® M470SL TV SPECIFICATIONS Screen Size Viewable TV Type Smooth Motion Refresh Rate Maximum ... 43.2" x 29.1" x 9.5" Product Weight 39.7 lbs Product Dimensions without Stand 43.2" x 27" x 2" Product Weight without notice. © 2012 vizio inc. all rights reserved. rev 10262010 product features and specifications are subject to change without Stand 35.3 lbs Shipping Dimensions 50.8" x 30.9" x 4.6" Shipping Weight 46...
...Composite Inputs RF Antenna Input USB Ports PC Input Audio Outputs Number of vizio inc. 47" CLASS EDGE LIT RAZOR LEDTM LCD HDTV WITH VIZIO INTERNET APPS® M470SL TV SPECIFICATIONS Screen Size Viewable TV Type Smooth Motion Refresh Rate Maximum ... 43.2" x 29.1" x 9.5" Product Weight 39.7 lbs Product Dimensions without Stand 43.2" x 27" x 2" Product Weight without notice. © 2012 vizio inc. all rights reserved. rev 10262010 product features and specifications are subject to change without Stand 35.3 lbs Shipping Dimensions 50.8" x 30.9" x 4.6" Shipping Weight 46...


