M320SL User Manua
Page 8
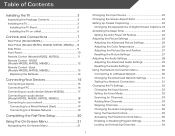
... 13 Replacing the Batteries 14 Connecting Your Devices 15 Connecting A Device 15 Connecting A PC 16 Connecting an audio device (Model M320SL 17 Connecting an audio device (Model M370SL, M420SL, M470SL, M550SL 18 Connecting to your network 19 Connecting to a Wired Network (Best 19 Connecting to a Wireless ...the Input Source 32 Setting the Tuner Mode 33 Scanning for Channels 33 Adding New Channels 33 Skipping Channels 34 Changing the Audio Language 35 Using the Parental Controls 35 Accessing the Parental Controls Menu 35 Enabling or Disabling Program Ratings 36 Locking and ...
... 13 Replacing the Batteries 14 Connecting Your Devices 15 Connecting A Device 15 Connecting A PC 16 Connecting an audio device (Model M320SL 17 Connecting an audio device (Model M370SL, M420SL, M470SL, M550SL 18 Connecting to your network 19 Connecting to a Wired Network (Best 19 Connecting to a Wireless ...the Input Source 32 Setting the Tuner Mode 33 Scanning for Channels 33 Adding New Channels 33 Skipping Channels 34 Changing the Audio Language 35 Using the Parental Controls 35 Accessing the Parental Controls Menu 35 Enabling or Disabling Program Ratings 36 Locking and ...
M320SL User Manua
Page 14
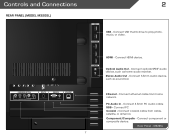
Optical Audio Out - Ethernet - Connect ethernet cable from cable, satellite, or antenna. PC Audio In - Connect 3.5mm PC audio cable RGB - Connect PC Coaxial - Connect coaxial cable from home network. Connect 3.5mm audio device, such as home audio receiver. Rear Panel - Stereo Audio Out - M320SL 7 Connect USB thumb drive to play photo, music, or video. HDMI - Controls and Connections Rear Panel (Model M320SL) 2 USB - Connect HDMI device. Connect component or composite device. Component/Compsite - Connect optical/SPDIF audio device, such as sound bar.
Optical Audio Out - Ethernet - Connect ethernet cable from cable, satellite, or antenna. PC Audio In - Connect 3.5mm PC audio cable RGB - Connect PC Coaxial - Connect coaxial cable from home network. Connect 3.5mm audio device, such as home audio receiver. Rear Panel - Stereo Audio Out - M320SL 7 Connect USB thumb drive to play photo, music, or video. HDMI - Controls and Connections Rear Panel (Model M320SL) 2 USB - Connect HDMI device. Connect component or composite device. Component/Compsite - Connect optical/SPDIF audio device, such as sound bar.
M320SL User Manua
Page 15
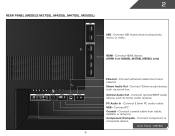
... photo, music, or video. Connect HDMI device. (HDMI 4 on M420SL, M470SL, M550SL only) Ethernet - Stereo Audio Out - Connect 3.5mm PC audio cable RGB - Optical Audio Out - Connect PC Coaxial - 2 Rear Panel (Models M370SL, M420SL, M470SL, M550SL) USB - Rear Panel - Connect optical/SPDIF audio device, such as sound bar. HDMI - PC Audio In - Connect component or composite device.
... photo, music, or video. Connect HDMI device. (HDMI 4 on M420SL, M470SL, M550SL only) Ethernet - Stereo Audio Out - Connect 3.5mm PC audio cable RGB - Optical Audio Out - Connect PC Coaxial - 2 Rear Panel (Models M370SL, M420SL, M470SL, M550SL) USB - Rear Panel - Connect optical/SPDIF audio device, such as sound bar. HDMI - PC Audio In - Connect component or composite device.

M320SL User Manua
Page 18
...window. Guide Display the info window. Dash Use with number pad to the previous on -screen menu. Exit Close the on . Mute Turn the audio off . Arrow Navigate the on or off or on -screen menu. V Button Open the VIA dock. Ok Select the highlighted menu option. ...Power Turn TV on -screen menu. Channel Up/Down Change the channel. Volume Up/Down Increase or decrease loudness of the audio. Menu Display the on -screen menu. 2 Remote Control (Models M320SL, M370SL) Input Change the currently-displayed input. Closed Captions Open the closed...
...window. Guide Display the info window. Dash Use with number pad to the previous on -screen menu. Exit Close the on . Mute Turn the audio off . Arrow Navigate the on or off or on -screen menu. V Button Open the VIA dock. Ok Select the highlighted menu option. ...Power Turn TV on -screen menu. Channel Up/Down Change the channel. Volume Up/Down Increase or decrease loudness of the audio. Menu Display the on -screen menu. 2 Remote Control (Models M320SL, M370SL) Input Change the currently-displayed input. Closed Captions Open the closed...

M320SL User Manua
Page 19
... Up/Down Change the channel. Dash Use with number pad to the previous on -screen menu. Mute Turn the audio off . Info Display the info window. Remote Control 12 FRONT (Models M420SL, M470SL, M550SL) Input Change the currently-displayed input. Guide Display the info window. V Button Open the VIA dock. 2 Remote Control...
... Up/Down Change the channel. Dash Use with number pad to the previous on -screen menu. Mute Turn the audio off . Info Display the info window. Remote Control 12 FRONT (Models M420SL, M470SL, M550SL) Input Change the currently-displayed input. Guide Display the info window. V Button Open the VIA dock. 2 Remote Control...
M320SL User Manua
Page 22
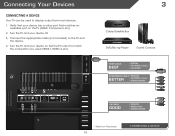
... Player Game Console HDMI CABLE BEST • DIGITAL • HD VIDEO (1080p)* • HD AUDIO COMPONENT CABLE • ANALOG BETTER • HD VIDEO (1080i)* • STEREO AUDIO AV CABLE GOOD • ANALOG • VIDEO (480i)* • STEREO AUDIO * Maximum Resolution 15 CONNECTING A DEVICE Connect the appropriate cable (not included) to display output from...
... Player Game Console HDMI CABLE BEST • DIGITAL • HD VIDEO (1080p)* • HD AUDIO COMPONENT CABLE • ANALOG BETTER • HD VIDEO (1080i)* • STEREO AUDIO AV CABLE GOOD • ANALOG • VIDEO (480i)* • STEREO AUDIO * Maximum Resolution 15 CONNECTING A DEVICE Connect the appropriate cable (not included) to display output from...

M320SL User Manua
Page 23
This cable transmits video. 2. See Appendix B - Connecting A PC Your TV can be used to your PC and the RGB port on the back of the TV. Connect an RGB cable (not included) to display output from a personal computer. Specifications. 3 Personal Computer 3.5mm Cable (For Audio) RGB Cable (For Video) CONNECTING A PC 16 Connect a 3.5mm cable (not included) to match the resolution of the TV. To use your PC and the PC Audio In port on the back of your TV. This cable transmits audio. 3. Set your PC's resolution to your TV as a PC display: 1.
This cable transmits video. 2. See Appendix B - Connecting A PC Your TV can be used to your PC and the RGB port on the back of the TV. Connect an RGB cable (not included) to display output from a personal computer. Specifications. 3 Personal Computer 3.5mm Cable (For Audio) RGB Cable (For Video) CONNECTING A PC 16 Connect a 3.5mm cable (not included) to match the resolution of the TV. To use your PC and the PC Audio In port on the back of your TV. This cable transmits audio. 3. Set your PC's resolution to your TV as a PC display: 1.
M320SL User Manua
Page 24
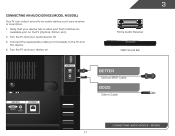
Verify that your device has a video port that matches an available port on . 3 Home Audio Receiver VIZIO Sound Bar BETTER Optical/SPDIF Cable GOOD 3.5mm Cable CONNECTING AUDIO DEVICE - Turn the TV and your device on the TV (Optical, 3.5mm, etc). 2. Connect the appropriate cable (not included) to an audio device, such as a receiver or sound bar. 1. Turn the TV and your audio device off. 3. M320SL 17 Connecting an audio device (Model M320SL) Your TV can output sound to the TV and the device. 4.
Verify that your device has a video port that matches an available port on . 3 Home Audio Receiver VIZIO Sound Bar BETTER Optical/SPDIF Cable GOOD 3.5mm Cable CONNECTING AUDIO DEVICE - Turn the TV and your device on the TV (Optical, 3.5mm, etc). 2. Connect the appropriate cable (not included) to an audio device, such as a receiver or sound bar. 1. Turn the TV and your audio device off. 3. M320SL 17 Connecting an audio device (Model M320SL) Your TV can output sound to the TV and the device. 4.

M320SL User Manua
Page 25
Home Audio Receiver VIZIO Sound Bar BETTER Optical/SPDIF Cable GOOD 3.5mm Cable CONNECTING AUDIO DEVICE 18 Connect the appropriate cable (not included) to an audio device, such as a receiver or sound bar. 1. Turn the TV and your device has a video port that your device on the TV (Optical, 3.5mm, etc). 2. 3 Connecting an audio device (Model M370SL, M420SL, M470SL, M550SL) Your TV can output sound to the TV and the device. 4. Verify that matches an available port on . Turn the TV and your audio device off. 3.
Home Audio Receiver VIZIO Sound Bar BETTER Optical/SPDIF Cable GOOD 3.5mm Cable CONNECTING AUDIO DEVICE 18 Connect the appropriate cable (not included) to an audio device, such as a receiver or sound bar. 1. Turn the TV and your device has a video port that your device on the TV (Optical, 3.5mm, etc). 2. 3 Connecting an audio device (Model M370SL, M420SL, M470SL, M550SL) Your TV can output sound to the TV and the device. 4. Verify that matches an available port on . Turn the TV and your audio device off. 3.

M320SL User Manua
Page 28
... source • Change the screen aspect ratio • Set up closed captioning • Activate the sleep timer • Adjust the picture settings • Adjust the audio settings • Change network settings • Change TV settings • Access the help menu Navigating the On-Screen Menu To open the on-screen menu...
... source • Change the screen aspect ratio • Set up closed captioning • Activate the sleep timer • Adjust the picture settings • Adjust the audio settings • Change network settings • Change TV settings • Access the help menu Navigating the On-Screen Menu To open the on-screen menu...
M320SL User Manua
Page 35
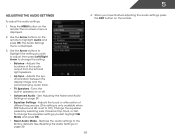
... - Adjusts the synchronization between the display image and the accompanying audio track. • TV Speakers - See Adjusting the Advanced Audio Settings on -screen menu is displayed. 2. See Resetting the Audio Settings on the remote. 28 The Audio Settings menu is set to Off.) Change the equalizer presets by... selecting Jazz, Classical, Pop, Rock, or Flat. When you wish to adjust, then press Left/Right Arrow to highlight Audio and press OK. Use the Arrow buttons on the remote. Adjusts the loudness of different frequencies. (This setting is only available when ...
... - Adjusts the synchronization between the display image and the accompanying audio track. • TV Speakers - See Adjusting the Advanced Audio Settings on -screen menu is displayed. 2. See Resetting the Audio Settings on the remote. 28 The Audio Settings menu is set to Off.) Change the equalizer presets by... selecting Jazz, Classical, Pop, Rock, or Flat. When you wish to adjust, then press Left/Right Arrow to highlight Audio and press OK. Use the Arrow buttons on the remote. Adjusts the loudness of different frequencies. (This setting is only available when ...
M320SL User Manua
Page 36
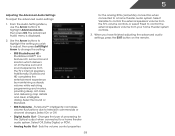
...RCA (red/white) connectors when connected to a home theater audio system. Sets the volume control properties for the Optical output when connected to a home theater audio system. Select On or Off. • Digital Audio Out - Additionally, StudioSound HD completes the entertainment experience by ...to control the external speakers' volume from the TV's internal speakers. From the Audio Settings Menu, use the Arrow buttons to television commercials or channel changes. The Advanced Audio menu is a feature-rich surround sound solution which delivers an immersive surround sound ...
...RCA (red/white) connectors when connected to a home theater audio system. Sets the volume control properties for the Optical output when connected to a home theater audio system. Select On or Off. • Digital Audio Out - Additionally, StudioSound HD completes the entertainment experience by ...to control the external speakers' volume from the TV's internal speakers. From the Audio Settings Menu, use the Arrow buttons to television commercials or channel changes. The Advanced Audio menu is a feature-rich surround sound solution which delivers an immersive surround sound ...
M320SL User Manua
Page 37
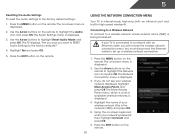
...the Arrow buttons on the remote to set up a wireless network connection. 1. If you do not see the wireless network connection menu. The Audio Settings menu is displayed. 4. Highlight Yes and press OK. 5. Press the EXIT button on the remote. Connecting to a Wireless Network To ...button on -screen keyboard, enter your wireless network displayed, highlight More Access Points and press OK. 5 Resetting the Audio Settings To reset the audio settings to highlight Reset Audio Mode and press OK. The TV displays, "Are you sure you will not see your network's password, then ...
...the Arrow buttons on the remote to set up a wireless network connection. 1. If you do not see the wireless network connection menu. The Audio Settings menu is displayed. 4. Highlight Yes and press OK. 5. Press the EXIT button on the remote. Connecting to a Wireless Network To ...button on -screen keyboard, enter your wireless network displayed, highlight More Access Points and press OK. 5 Resetting the Audio Settings To reset the audio settings to highlight Reset Audio Mode and press OK. The TV displays, "Are you sure you will not see your network's password, then ...
M320SL User Manua
Page 42
From the Tuner Settings menu, highlight Analog MTS and press OK. Select Mono, Stereo, or SAP (secondary audio programming). Press the EXIT button on -screen menu is being broadcast in the language you have not set a custom parental passcode, see Changing ...and press OK. Accessing the Parental Controls Menu To access the Parental Controls menu: 1. Press OK. 3. The Analog MTS menu is displayed. 3. 5 Changing the Audio Language Some digital free-to-air and cable channels broadcast programs in more than one language.The TV's MTS (Multichannel Television Sound) feature allows you...
From the Tuner Settings menu, highlight Analog MTS and press OK. Select Mono, Stereo, or SAP (secondary audio programming). Press the EXIT button on -screen menu is being broadcast in the language you have not set a custom parental passcode, see Changing ...and press OK. Accessing the Parental Controls Menu To access the Parental Controls menu: 1. Press OK. 3. The Analog MTS menu is displayed. 3. 5 Changing the Audio Language Some digital free-to-air and cable channels broadcast programs in more than one language.The TV's MTS (Multichannel Television Sound) feature allows you...
M320SL User Manua
Page 46
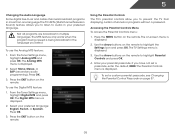
...Press the EXIT button on the remote. This is displayed. 2. The Settings menu is displayed. 3. The Settings menu is displayed. 3. Turning the VIZIO Logo On or Off The VIZIO logo on the front of your TV is set to determine if your device is connected and supports CEC. 5. To turn the... the logo to highlight the Settings icon and press OK. The on-screen menu is off, the VIZIO logo will be off : 1. See your device's user manual for details. You can control your device's audio using the TV's remote control. • Device Discovery - When the TV is displayed. 2. 5 Adjusting the ...
...Press the EXIT button on the remote. This is displayed. 2. The Settings menu is displayed. 3. The Settings menu is displayed. 3. Turning the VIZIO Logo On or Off The VIZIO logo on the front of your TV is set to determine if your device is connected and supports CEC. 5. To turn the... the logo to highlight the Settings icon and press OK. The on-screen menu is off, the VIZIO logo will be off : 1. See your device's user manual for details. You can control your device's audio using the TV's remote control. • Device Discovery - When the TV is displayed. 2. 5 Adjusting the ...
M320SL User Manua
Page 47
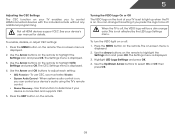
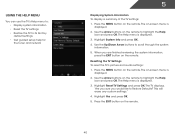
The on the remote. 40 The Help menu is displayed. 3. Resetting the TV Settings To reset the TV's picture and audio settings: 1. Press the EXIT button on -screen menu is displayed. 2. Press the MENU button on the remote. Highlight System Info and press OK. 4. When you ...
The on the remote. 40 The Help menu is displayed. 3. Resetting the TV Settings To reset the TV's picture and audio settings: 1. Press the EXIT button on -screen menu is displayed. 2. Press the MENU button on the remote. Highlight System Info and press OK. 4. When you ...
M320SL User Manua
Page 50
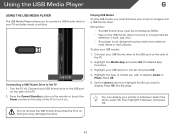
.../Standby button on the remote or touch the Power control on . Doing so may damage the drive. 43 Highlight your USB thumb drive to display: Audio or Photo. Turn the TV off. Playing USB Media To play music or photos. Highlight the type of the TV to turn it on the...
.../Standby button on the remote or touch the Power control on . Doing so may damage the drive. 43 Highlight your USB thumb drive to display: Audio or Photo. Turn the TV off. Playing USB Media To play music or photos. Highlight the type of the TV to turn it on the...
M320SL User Manua
Page 51
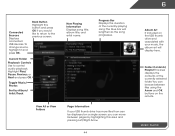
... drive and associated with your USB thumb drive has more files than can be displayed on a single screen, you would like to return to control audio playback. Highlight Play/ Pause, Previous, or Next and press OK. Current Folder Playback Controls Use to the previous screen. The blue bar will display here...
... drive and associated with your USB thumb drive has more files than can be displayed on a single screen, you would like to return to control audio playback. Highlight Play/ Pause, Previous, or Next and press OK. Current Folder Playback Controls Use to the previous screen. The blue bar will display here...

M320SL User Manua
Page 58
... Color and Tint settings in the Picture menu. See Scanning for channels. There is no headphones are connected to the TV. • Check the audio connections of external devices (Blu-ray player, game console, cable/satellite box) that are connected to the TV. • If you are using ...Resetting the Picture Settings on page 27 • Check all devices are securely attached. The power is on, but there is off. • Check the audio settings. The colors on page 14 51 The buttons on page 24 • Reset the picture settings. Devices differ; A The TV displays "No Signal."...
... Color and Tint settings in the Picture menu. See Scanning for channels. There is no headphones are connected to the TV. • Check the audio connections of external devices (Blu-ray player, game console, cable/satellite box) that are connected to the TV. • If you are using ...Resetting the Picture Settings on page 27 • Check all devices are securely attached. The power is on, but there is off. • Check the audio settings. The colors on page 14 51 The buttons on page 24 • Reset the picture settings. Devices differ; A The TV displays "No Signal."...
M470SL Quick Start Guide
Page 6
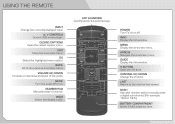
...USING THE REMOTE INPUT Change the currently-displayed input. OK Select the highlighted menu option. VOLUME UP/DOWN Increase or decrease loudness of the audio. WIDE Switch the display mode. INFO Display the info window. CHANNEL UP/DOWN Change the channel. CLOSED CAPTIONS Open the closed caption menu.... APP LAUNCHER Quickly launch the pictured app. MENU Display the on . MUTE Turn the audio off . NUMBER PAD Manually enter a channel. POWER Turn TV on -screen menu. ARROW Navigate the on or off or on -screen menu....
...USING THE REMOTE INPUT Change the currently-displayed input. OK Select the highlighted menu option. VOLUME UP/DOWN Increase or decrease loudness of the audio. WIDE Switch the display mode. INFO Display the info window. CHANNEL UP/DOWN Change the channel. CLOSED CAPTIONS Open the closed caption menu.... APP LAUNCHER Quickly launch the pictured app. MENU Display the on . MUTE Turn the audio off . NUMBER PAD Manually enter a channel. POWER Turn TV on -screen menu. ARROW Navigate the on or off or on -screen menu....


