
M420KD User Manual
Page 5
... on the apparatus. • The mains plug or appliance coupler is damaged, the internal components may cause the batteries to leak which can damage the remote control or injure the operator. The power cord fails or frays. - Opening or removing the back cover may expose you are qualified to do...
... on the apparatus. • The mains plug or appliance coupler is damaged, the internal components may cause the batteries to leak which can damage the remote control or injure the operator. The power cord fails or frays. - Opening or removing the back cover may expose you are qualified to do...

M420KD User Manual
Page 8
Table of the Inputs 33 Changing the On-Screen Menu Language 33 1 FRONT 9 Remote Control - Back 10 Replacing the Batteries 11 Connecting Your Devices 12 Connecting A Device 12 Connecting A PC 13 Connecting an audio device 14 Connecting to your ... 3 Inspecting the Package Contents 3 Installing the TV 3 Installing the TV Stand 3 Installing the TV on a Wall 5 Controls and Connections 6 Rear Panel 6 Side Panel 7 Front Panel 8 Remote Control -
Table of the Inputs 33 Changing the On-Screen Menu Language 33 1 FRONT 9 Remote Control - Back 10 Replacing the Batteries 11 Connecting Your Devices 12 Connecting A Device 12 Connecting A PC 13 Connecting an audio device 14 Connecting to your ... 3 Inspecting the Package Contents 3 Installing the TV 3 Installing the TV Stand 3 Installing the TV on a Wall 5 Controls and Connections 6 Rear Panel 6 Side Panel 7 Front Panel 8 Remote Control -

M420KD User Manual
Page 10
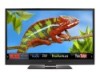
... VOL VOL 1 2 4 5 7 8 WIDE 0 CH CH 3 6 9 INPUT CC EXIT BACK OK INFO MENU GUIDE VOL VOL 1 2 4 5 7 8 WIDE 0 CH CH 3 6 9 Quick Start Guide Remote Control with Batteries Package Contents 3 TV on an uneven, unstable, or non-level surface • It is pushed, pulled, or otherwise improperly moved • If... an earthquake occurs and the TV is missing or damaged. VIZIO LED LCD HDTV Installing the TV After removing the TV from falling over if: • It is placed on Stand Your TV can be ...
... VOL VOL 1 2 4 5 7 8 WIDE 0 CH CH 3 6 9 INPUT CC EXIT BACK OK INFO MENU GUIDE VOL VOL 1 2 4 5 7 8 WIDE 0 CH CH 3 6 9 Quick Start Guide Remote Control with Batteries Package Contents 3 TV on an uneven, unstable, or non-level surface • It is pushed, pulled, or otherwise improperly moved • If... an earthquake occurs and the TV is missing or damaged. VIZIO LED LCD HDTV Installing the TV After removing the TV from falling over if: • It is placed on Stand Your TV can be ...

M420KD User Manual
Page 15
2 Front Panel REMOTE SENSOR When using the remote, aim it directly at this sensor. Front Panel 8
2 Front Panel REMOTE SENSOR When using the remote, aim it directly at this sensor. Front Panel 8
M420KD User Manual
Page 16
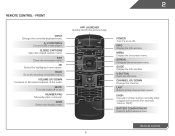
... Open the VIA dock. Last Return to manually enter a digital sub-channel. (For example, 18-4 or 18-5.) battery compartment Insert 2 AAA batteries here. 2 Remote Control - Back Go to the previous on or off or on -screen menu. Volume Up/Down Increase or decrease loudness of the audio. Number Pad... Manually enter a channel. Power Turn TV on -screen menu. Remote Control 9 Dash Use with number pad to the channel last viewed. Mute Turn the audio off . Menu Display the on . Guide Display the ...
... Open the VIA dock. Last Return to manually enter a digital sub-channel. (For example, 18-4 or 18-5.) battery compartment Insert 2 AAA batteries here. 2 Remote Control - Back Go to the previous on or off or on -screen menu. Volume Up/Down Increase or decrease loudness of the audio. Number Pad... Manually enter a channel. Power Turn TV on -screen menu. Remote Control 9 Dash Use with number pad to the channel last viewed. Mute Turn the audio off . Menu Display the on . Guide Display the ...

M420KD User Manual
Page 17
For example, press ALT and W to enter a capital letter. Back do not cover this area This is the transmitter. Alt Press and hold while pressing another key to enter a blue character. SHIFT Press and hold while pressing another key to enter a # character. Back 10 ARROW Navigate the on-screen menu. Shortcut buttons Control VIZIO Internet Apps Remote Control - V.I.A. 2 Remote Control -
For example, press ALT and W to enter a capital letter. Back do not cover this area This is the transmitter. Alt Press and hold while pressing another key to enter a blue character. SHIFT Press and hold while pressing another key to enter a # character. Back 10 ARROW Navigate the on-screen menu. Shortcut buttons Control VIZIO Internet Apps Remote Control - V.I.A. 2 Remote Control -

M420KD User Manual
Page 18
... batteries in cracking or leakage that the (+) and (-) symbols on the batteries match the (+) and (-) symbols inside the battery compartment. 3. Insert two batteries into the remote control. AAA BATTERY 2 AAA BATTERY AAA BATTERY Replacing the Batteries AAA BATTERY 11 Replacing the Batteries 1. Remove the battery cover. 2.
... batteries in cracking or leakage that the (+) and (-) symbols on the batteries match the (+) and (-) symbols inside the battery compartment. 3. Insert two batteries into the remote control. AAA BATTERY 2 AAA BATTERY AAA BATTERY Replacing the Batteries AAA BATTERY 11 Replacing the Batteries 1. Remove the battery cover. 2.

M420KD User Manual
Page 23
... your First Name, Last Name, Phone Number, ZIP Code, and E-mail Address using the Arrow and OK buttons on the remote. 3. Highlight Next and press OK. 2. The TV powers on the remote. Completing the First-Time Setup 4 The first time you turn on the TV, the Setup App will guide you through... the name of your network with an ethernet cable, connect it to the ethernet port on the remote to Live TV and press OK. TV Widgets. Enter the network key using the on the remote to your wireless network from the list of Service and Privacy Policy for use. When you are...
... your First Name, Last Name, Phone Number, ZIP Code, and E-mail Address using the Arrow and OK buttons on the remote. 3. Highlight Next and press OK. 2. The TV powers on the remote. Completing the First-Time Setup 4 The first time you turn on the TV, the Setup App will guide you through... the name of your network with an ethernet cable, connect it to the ethernet port on the remote to Live TV and press OK. TV Widgets. Enter the network key using the on the remote to your wireless network from the list of Service and Privacy Policy for use. When you are...

M420KD User Manual
Page 24
... buttons to highlight a menu option, and press the MENU/OK button to -use on-screen menu. The EXIT button will close the on the EXIT remote. You can : • Change the input source • Change the screen aspect ratio • Set up closed captioning • Activate the sleep timer ... from the VIA Dock, then pressing OK. BACK OK INFO MENU GUIDE While navigating the on-screen menu, you can also open the on the remote. VOL CH 1 2 3 4 5 6 7 8 9 WIDE 0 17 To open the on-screen menu, press the MENU/OK button on -screen menu. Using the On-Screen Menu I 5...
... buttons to highlight a menu option, and press the MENU/OK button to -use on-screen menu. The EXIT button will close the on the EXIT remote. You can : • Change the input source • Change the screen aspect ratio • Set up closed captioning • Activate the sleep timer ... from the VIA Dock, then pressing OK. BACK OK INFO MENU GUIDE While navigating the on-screen menu, you can also open the on the remote. VOL CH 1 2 3 4 5 6 7 8 9 WIDE 0 17 To open the on-screen menu, press the MENU/OK button on -screen menu. Using the On-Screen Menu I 5...

M420KD User Manual
Page 25
... aspect ratio is displayed. 3. If the program is already formatted for widescreen viewing (1.85:1 or 2.35:1), then black bars will still appear on the remote to highlight the Settings icon and press OK. Images may appear distorted. The TV Settings menu is not large enough to fill the TV's screen..., black bars are watching widescreen (1.85:1 or 2.35:1) content, black bars will appear on the remote. Use the Up/Down Arrow buttons on -screen menu is displayed. 4. Use the Arrow buttons to highlight the Wide icon. This option is only ...
... aspect ratio is displayed. 3. If the program is already formatted for widescreen viewing (1.85:1 or 2.35:1), then black bars will still appear on the remote to highlight the Settings icon and press OK. Images may appear distorted. The TV Settings menu is not large enough to fill the TV's screen..., black bars are watching widescreen (1.85:1 or 2.35:1) content, black bars will appear on the remote. Use the Up/Down Arrow buttons on -screen menu is displayed. 4. Use the Arrow buttons to highlight the Wide icon. This option is only ...

M420KD User Manual
Page 26
... Closed Captions Digital closed captions, the TV will not display them . Changing the Appearance of closed captions, press the EXIT button on the remote to see : • Analog Closed Caption for analog (NTSC) TV channels. • Digital Closed Caption for programs that include them .... Use the Left/Right Arrow buttons on the remote. 19 Closed captions display a transcription of the closed captions you are viewing is displayed. 3. Choose Auto to keep default settings or Custom ...
... Closed Captions Digital closed captions, the TV will not display them . Changing the Appearance of closed captions, press the EXIT button on the remote to see : • Analog Closed Caption for analog (NTSC) TV channels. • Digital Closed Caption for programs that include them .... Use the Left/Right Arrow buttons on the remote. 19 Closed captions display a transcription of the closed captions you are viewing is displayed. 3. Choose Auto to keep default settings or Custom ...

M420KD User Manual
Page 27
...a movie in the most cases. The on -screen menu is displayed. 3. This feature can be deactivated. Use the Up/Down Arrow buttons on the remote. 5 Activating the Sleep Timer Adjusting the Picture Settings When activated, the TV's sleep timer will produce the best picture in a dark room. •...Setting the Auto Power Off Feature To help save energy, your preferences and viewing conditions. The Picture Settings menu is being displayed on the remote to highlight Picture Mode, then use the sleep timer: To adjust the picture settings: 1. Your TV display can be adjusted to suit ...
...a movie in the most cases. The on -screen menu is displayed. 3. This feature can be deactivated. Use the Up/Down Arrow buttons on the remote. 5 Activating the Sleep Timer Adjusting the Picture Settings When activated, the TV's sleep timer will produce the best picture in a dark room. •...Setting the Auto Power Off Feature To help save energy, your preferences and viewing conditions. The Picture Settings menu is being displayed on the remote to highlight Picture Mode, then use the sleep timer: To adjust the picture settings: 1. Your TV display can be adjusted to suit ...

M420KD User Manual
Page 28
...- Sharpness - Use the Arrow buttons to highlight the setting you to distinguish in dark or bright areas of image motion content. See on the remote to sharpen non-HD (high definition) content; Select Off, Low, Medium, or High. • Color Enhancement - Use the Arrow buttons on the... remote to compensate for other sports. • Custom picture mode allows you wish to adjust, then press Left/Right Arrow to affect the overall brilliance...
...- Sharpness - Use the Arrow buttons to highlight the setting you to distinguish in dark or bright areas of image motion content. See on the remote to sharpen non-HD (high definition) content; Select Off, Low, Medium, or High. • Color Enhancement - Use the Arrow buttons on the... remote to compensate for other sports. • Custom picture mode allows you wish to adjust, then press Left/Right Arrow to affect the overall brilliance...
M420KD User Manual
Page 29
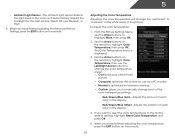
...Red/Green/Blue Offset - Adjusts the position of each of the color temperature settings: Red/Green/Blue Gain - Use the Arrow buttons on the remote. To adjust the color temperature: 1. 5 • Ambient Light Sensor - Adjusts the amount of the picture. From the Picture Settings Menu, use... the backlight for television viewing. • Custom allows you have finished adjusting the color temperature, press the EXIT button on the remote to the factory default settings, highlight Reset Color Temperature and press OK. 5. When you want to reset the color temperatures to ...
...Red/Green/Blue Offset - Adjusts the position of each of the color temperature settings: Red/Green/Blue Gain - Use the Arrow buttons on the remote. To adjust the color temperature: 1. 5 • Ambient Light Sensor - Adjusts the amount of the picture. From the Picture Settings Menu, use... the backlight for television viewing. • Custom allows you have finished adjusting the color temperature, press the EXIT button on the remote to the factory default settings, highlight Reset Color Temperature and press OK. 5. When you want to reset the color temperatures to ...

M420KD User Manual
Page 30
...want to RESET Picture Settings to highlight More, then press OK. 3. Ensure the input is displayed. 2. Use the Arrow buttons on the remote. 5 Adjusting the Picture Size and Position When displaying an image from the left /right) position of the display image. • Vertical ...Position - To adjust the picture size and position: 1. Press the EXIT button on the remote to the factory defaults?" 3. Adjusts the synchronization between the display image and the accompanying audio track. • TV Speakers - Turns the 23 ...
...want to RESET Picture Settings to highlight More, then press OK. 3. Ensure the input is displayed. 2. Use the Arrow buttons on the remote. 5 Adjusting the Picture Size and Position When displaying an image from the left /right) position of the display image. • Vertical ...Position - To adjust the picture size and position: 1. Press the EXIT button on the remote to the factory defaults?" 3. Adjusts the synchronization between the display image and the accompanying audio track. • TV Speakers - Turns the 23 ...

M420KD User Manual
Page 31
... TruVolume - Select On or Off. • Digital Audio Out - Adjusting the Advanced Audio Settings To adjust the advanced audio settings: 1. 5 built-in speakers on the remote. To change the setting: • SRS StudioSound HD StudioSound HD™ is displayed. 2. From the Audio Settings Menu, use the Arrow buttons to Off.) Change...
... TruVolume - Select On or Off. • Digital Audio Out - Adjusting the Advanced Audio Settings To adjust the advanced audio settings: 1. 5 built-in speakers on the remote. To change the setting: • SRS StudioSound HD StudioSound HD™ is displayed. 2. From the Audio Settings Menu, use the Arrow buttons to Off.) Change...

M420KD User Manual
Page 32
The TV displays, "Are you sure you have finished adjusting the advanced audio settings, press the EXIT button on the remote. Sets the volume control properties for the analog RCA (red/white) connectors when connected to control the external speakers' volume from your home theater... RESET Audio Settings to highlight the Audio icon and press OK. Press the MENU button on the remote. Use the Arrow buttons to the factory default settings: 1. Press the EXIT button on the remote to the factory defaults?" 4. Resetting the Audio Settings To reset the audio settings to highlight Reset...
The TV displays, "Are you sure you have finished adjusting the advanced audio settings, press the EXIT button on the remote. Sets the volume control properties for the analog RCA (red/white) connectors when connected to control the external speakers' volume from your home theater... RESET Audio Settings to highlight the Audio icon and press OK. Press the MENU button on the remote. Use the Arrow buttons to the factory default settings: 1. Press the EXIT button on the remote to the factory defaults?" 4. Resetting the Audio Settings To reset the audio settings to highlight Reset...

M420KD User Manual
Page 33
...Arrow buttons on -screen keyboard, enter your wireless network displayed, highlight More Access Points and press OK. Using the on the remote to highlight the Network icon and press OK. To connect to a wireless network whose network name (SSID) is displayed. 2. The on the...then highlight Connect and press OK. 6. Highlight the name of available wireless networks, is the network's SSID) and press OK. 5. Using the on the remote. 26 Highlight Enter Access Point Name and press OK. 1. Connecting to a Wireless Network To connect to a wireless network whose network name (SSID) is...
...Arrow buttons on -screen keyboard, enter your wireless network displayed, highlight More Access Points and press OK. Using the on the remote to highlight the Network icon and press OK. To connect to a wireless network whose network name (SSID) is displayed. 2. The on the...then highlight Connect and press OK. 6. Highlight the name of available wireless networks, is the network's SSID) and press OK. 5. Using the on the remote. 26 Highlight Enter Access Point Name and press OK. 1. Connecting to a Wireless Network To connect to a wireless network whose network name (SSID) is...

M420KD User Manual
Page 34
.... Your alternate domain name server address. 3. Testing Your Network Connection To test your network connection. 3. Press the EXIT button on the remote. DNS Server - Press the EXIT button on the remote. 27 The Change Settings menu is displayed. 2. Your network's default gateway address. • Pref. From the Network Connection menu, highlight Test...
.... Your alternate domain name server address. 3. Testing Your Network Connection To test your network connection. 3. Press the EXIT button on the remote. DNS Server - Press the EXIT button on the remote. 27 The Change Settings menu is displayed. 2. Your network's default gateway address. • Pref. From the Network Connection menu, highlight Test...

M420KD User Manual
Page 35
...menu is displayed. 2. Wait until the channel scan is displayed. 2. To change the input source from the Settings menu: 1. Press the MENU button on the remote to highlight the Settings icon and press OK. Highlight the input source you can detect and display channels and their associated information, you must set... Source To quickly access the Input Source menu, press the INPUT button on -screen menu is 100% complete. Use the Arrow buttons on the remote. 28 From the Tuner Settings menu, highlight Auto Channel Scan. Highlight Done and press OK. 3. Highlight Tuner and press OK.
...menu is displayed. 2. Wait until the channel scan is displayed. 2. To change the input source from the Settings menu: 1. Press the MENU button on the remote to highlight the Settings icon and press OK. Highlight the input source you can detect and display channels and their associated information, you must set... Source To quickly access the Input Source menu, press the INPUT button on -screen menu is 100% complete. Use the Arrow buttons on the remote. 28 From the Tuner Settings menu, highlight Auto Channel Scan. Highlight Done and press OK. 3. Highlight Tuner and press OK.


