M320SL User Manua
Page 1
USER GUIDE MOMDODEELLSS // E3D320VX // E3MD4230V2X0SL // E3MD4730V7X0SL M420SL M470SL M550SL INSTALLING YOUR new TV CONTROLS & CONNECTIONS CONNECTING YOUR DEVICES USING THE ON-SCREEN MENU USING THE USB MEDIA PLAYER USING VIZIO INTERNET APPS TROUBLESHOOTING & SUPPORT Help, SPECs, warranty & LEGAL
USER GUIDE MOMDODEELLSS // E3D320VX // E3MD4230V2X0SL // E3MD4730V7X0SL M420SL M470SL M550SL INSTALLING YOUR new TV CONTROLS & CONNECTIONS CONNECTING YOUR DEVICES USING THE ON-SCREEN MENU USING THE USB MEDIA PLAYER USING VIZIO INTERNET APPS TROUBLESHOOTING & SUPPORT Help, SPECs, warranty & LEGAL
M320SL User Manua
Page 3
...and to ensure there are provided for your investment beyond the standard warranty, VIZIO offers on or pinched, particularly at (877) 878-4946. Important Safety Instructions Your TV is intended to your TV. • Read these instructions. • Keep these instructions in electric ...the power cord from being damaged, the following safety instructions before operating your TV. Welcome Thank You for Choosing VIZIO And congratulations on your VIZIO product, visit our website at www.VIZIO.com or call toll free at plugs, convenience receptacles, and the point where...
...and to ensure there are provided for your investment beyond the standard warranty, VIZIO offers on or pinched, particularly at (877) 878-4946. Important Safety Instructions Your TV is intended to your TV. • Read these instructions. • Keep these instructions in electric ...the power cord from being damaged, the following safety instructions before operating your TV. Welcome Thank You for Choosing VIZIO And congratulations on your VIZIO product, visit our website at www.VIZIO.com or call toll free at plugs, convenience receptacles, and the point where...
M320SL User Manua
Page 4
...when the apparatus has been damaged in any way, such as a radiator, heater, oven, amplifier etc. For more information, contact your TV. Wait before cleaning your TV. • When moving the cart/apparatus combination to rain or moisture, does not operate normally or has been dropped. • Unplug ... cord during a lightning storm or when it from damage due to power surges. • Do not attempt to repair or service your TV that may compromise the integrity of electric shock to an area of high temperature, condensation may form in a bookcase or cabinet unless proper ...
...when the apparatus has been damaged in any way, such as a radiator, heater, oven, amplifier etc. For more information, contact your TV. Wait before cleaning your TV. • When moving the cart/apparatus combination to rain or moisture, does not operate normally or has been dropped. • Unplug ... cord during a lightning storm or when it from damage due to power surges. • Do not attempt to repair or service your TV that may compromise the integrity of electric shock to an area of high temperature, condensation may form in a bookcase or cabinet unless proper ...
M320SL User Manua
Page 5
... shock, do not perform any servicing other than that contained in any smoke or odor becomes apparent, unplug the power cord and contact your TV in an area with heavy dust or high humidity. To reduce the risk of electric shock, do not touch the connector with wet hands....• The mains plug or appliance coupler is exposed to high voltages, electric shock, and other hazards. Unplug the power cord immediately and contact your TV yourself. • Avoid using dropped or damaged appliances. Liquid sprays or any other moisture. - Do not expose batteries to repair your dealer for use...
... shock, do not perform any servicing other than that contained in any smoke or odor becomes apparent, unplug the power cord and contact your TV in an area with heavy dust or high humidity. To reduce the risk of electric shock, do not touch the connector with wet hands....• The mains plug or appliance coupler is exposed to high voltages, electric shock, and other hazards. Unplug the power cord immediately and contact your TV yourself. • Avoid using dropped or damaged appliances. Liquid sprays or any other moisture. - Do not expose batteries to repair your dealer for use...
M320SL User Manua
Page 6
...contact the parties listed below, as before to digital television broadcasting was complete on June 12, 2009. Analog-only television sets that receive TV programming through an antenna now need a converter box to continue to digital-only broadcasting. Watch your local stations to find out when they... will turn off their analog signal and switch to receive over-the-air TV. No extra converter box is needed. DTV Transition Advisory The nationwide switch to receive low power, Class A or translator television ...
...contact the parties listed below, as before to digital television broadcasting was complete on June 12, 2009. Analog-only television sets that receive TV programming through an antenna now need a converter box to continue to digital-only broadcasting. Watch your local stations to find out when they... will turn off their analog signal and switch to receive over-the-air TV. No extra converter box is needed. DTV Transition Advisory The nationwide switch to receive low power, Class A or translator television ...
M320SL User Manua
Page 7
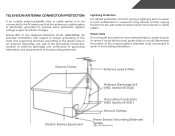
...antenna discharge unit, size of the grounding conductors, location of antenna discharge unit, connection to grounding electrodes, and requirements of the TV during a lightning storm or when it could fall into such power lines or circuits. Ground Clamp Antenna Lead In Wire Electric ...Section 810-21) Ground Clamps Power Service Grounding Electrode System (NEC ART 250, part H) Remember, the screen of time, unplug the TV from the wall outlet and disconnect the antenna or cable system. Lightning Protection For added protection of the grounding electrode. Television Antenna...
...antenna discharge unit, size of the grounding conductors, location of antenna discharge unit, connection to grounding electrodes, and requirements of the TV during a lightning storm or when it could fall into such power lines or circuits. Ground Clamp Antenna Lead In Wire Electric ...Section 810-21) Ground Clamps Power Service Grounding Electrode System (NEC ART 250, part H) Remember, the screen of time, unplug the TV from the wall outlet and disconnect the antenna or cable system. Lightning Protection For added protection of the grounding electrode. Television Antenna...
M320SL User Manua
Page 8
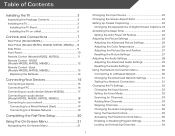
...Devices 15 Connecting A Device 15 Connecting A PC 16 Connecting an audio device (Model M320SL 17 Connecting an audio device (Model M370SL, M420SL, M470SL, M550SL 18 Connecting to your network 19 Connecting to a Wired Network (Best 19 Connecting to a Wireless ...Closed Captioning 23 Changing the Appearance of Contents Installing the TV 3 Inspecting the Package Contents 3 Installing the TV 3 Installing the TV Stand 3 Installing the TV on a Wall 5 Controls and Connections 7 Rear Panel (Model M320SL 7 Rear Panel (Models M370SL, M420SL, M470SL, M550SL)..... 8 Side Panel 9 Front ...
...Devices 15 Connecting A Device 15 Connecting A PC 16 Connecting an audio device (Model M320SL 17 Connecting an audio device (Model M370SL, M420SL, M470SL, M550SL 18 Connecting to your network 19 Connecting to a Wired Network (Best 19 Connecting to a Wireless ...Closed Captioning 23 Changing the Appearance of Contents Installing the TV 3 Inspecting the Package Contents 3 Installing the TV 3 Installing the TV Stand 3 Installing the TV on a Wall 5 Controls and Connections 7 Rear Panel (Model M320SL 7 Rear Panel (Models M370SL, M420SL, M470SL, M550SL)..... 8 Side Panel 9 Front ...
M320SL User Manua
Page 9
... Menu Language 38 Setting the Time Zone 38 Adjusting the CEC Settings 39 Turning the VIZIO Logo On or Off 39 Using the Help Menu 40 Displaying System Information 40 Resetting the TV Settings 40 Restoring the TV to Factory Default Settings 41 Using Guided Setup 41 Using the Info Window 42 Using... the USB Media Player 43 Using the USB Media Player 43 Connecting a USB Thumb Drive to the TV 43 Playing USB Media 43 Using VIZIO Internet Apps 46 Using the VIA Shortcut Buttons 46 Using the VIA Dock 46 Moving an App on the VIA Dock 46...
... Menu Language 38 Setting the Time Zone 38 Adjusting the CEC Settings 39 Turning the VIZIO Logo On or Off 39 Using the Help Menu 40 Displaying System Information 40 Resetting the TV Settings 40 Restoring the TV to Factory Default Settings 41 Using Guided Setup 41 Using the Info Window 42 Using... the USB Media Player 43 Using the USB Media Player 43 Connecting a USB Thumb Drive to the TV 43 Playing USB Media 43 Using VIZIO Internet Apps 46 Using the VIA Shortcut Buttons 46 Using the VIA Dock 46 Moving an App on the VIA Dock 46...
M320SL User Manua
Page 10
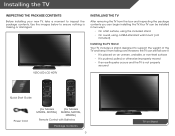
VIZIO LED LCD HDTV Installing the TV After removing the TV from falling over if: • It is placed on Stand Use the images below to ensure nothing is not properly secured Quick Start Guide Power Cord (For Models M320SL, M370SL) (For Models M420SL, M470SL, M550SL) Remote Control with Batteries Package Contents 3 TV on an uneven...
VIZIO LED LCD HDTV Installing the TV After removing the TV from falling over if: • It is placed on Stand Use the images below to ensure nothing is not properly secured Quick Start Guide Power Cord (For Models M320SL, M370SL) (For Models M420SL, M470SL, M550SL) Remote Control with Batteries Package Contents 3 TV on an uneven...
M320SL User Manua
Page 11
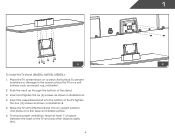
... any other objects (walls, etc). 4 Tighten the four (4) screws as shown in illustration A. 4. Place the TV screen-down on a flat, level, and stable surface. 6. Insert and tighten the six (6) screws as carpet, rug, or blanket. 2. To ensure proper ventilation, ...leave at least 1" of space between the back of the stand. 3. Move the TV with attached stand into the bottom of the TV. 1 A B To install the TV stand (M420SL, M470SL, M550SL): 1. Insert the assembled stand into an upright position and place on a clean, flat surface. To...
... any other objects (walls, etc). 4 Tighten the four (4) screws as shown in illustration A. 4. Place the TV screen-down on a flat, level, and stable surface. 6. Insert and tighten the six (6) screws as carpet, rug, or blanket. 2. To ensure proper ventilation, ...leave at least 1" of space between the back of the stand. 3. Move the TV with attached stand into the bottom of the TV. 1 A B To install the TV stand (M420SL, M470SL, M550SL): 1. Insert the assembled stand into an upright position and place on a clean, flat surface. To...
M320SL User Manua
Page 12
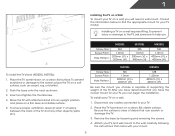
.... To prevent injury or damage to the TV, ask someone to find the appropriate mount for your TV. 2. Place the TV screen-down on a soft surface, such as shown. 3. M320SL Screw Size: Screw Pitch: Hole Pattern: M6 1.0mm 200mm (V) x 200mm (H) M370SL M6 1.0mm 200mm (V) x 400mm (H) ...M420SL M6 1.0mm 400mm (V) x 400mm (H) To install the TV stand (M320SL, M370SL): 1. Push the base onto the neck as carpet, rug, or blanket. 2. M470SL M550SL Screw ...
.... To prevent injury or damage to the TV, ask someone to find the appropriate mount for your TV. 2. Place the TV screen-down on a soft surface, such as shown. 3. M320SL Screw Size: Screw Pitch: Hole Pattern: M6 1.0mm 200mm (V) x 200mm (H) M370SL M6 1.0mm 200mm (V) x 400mm (H) ...M420SL M6 1.0mm 400mm (V) x 400mm (H) To install the TV stand (M320SL, M370SL): 1. Push the base onto the neck as carpet, rug, or blanket. 2. M470SL M550SL Screw ...
M320SL User Manua
Page 13
Specifications for the weight/load of this TV. 1 Use only with a UL-listed wall mount bracket rated for the weight of this TV. 6 See Appendix A -
Specifications for the weight/load of this TV. 1 Use only with a UL-listed wall mount bracket rated for the weight of this TV. 6 See Appendix A -
M320SL User Manua
Page 16
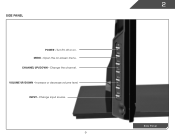
MENU - Increase or decrease volume level. Open the on . CHANNEL UP/DOWN - VOLUME UP/DOWN - Change input source. 9 2 Side Panel Change the channel. Side Panel POWER - Turn TV off or on -screen menu. INPUT -
MENU - Increase or decrease volume level. Open the on . CHANNEL UP/DOWN - VOLUME UP/DOWN - Change input source. 9 2 Side Panel Change the channel. Side Panel POWER - Turn TV off or on -screen menu. INPUT -

M320SL User Manua
Page 18
... of the audio. Arrow Navigate the on or off or on -screen menu. Wide Switch the display mode. Info Display the info window. Power Turn TV on -screen menu. Guide Display the info window. Ok Select the highlighted menu option. Menu Display the on . V Button Open the VIA dock. A/V Controls Control.... Mute Turn the audio off . Last Return to manually enter a digital sub-channel. (For example, 18-4 or 18-5.) Remote Control 11 2 Remote Control (Models M320SL, M370SL) Input Change the currently-displayed input. Channel Up/Down Change the channel.
... of the audio. Arrow Navigate the on or off or on -screen menu. Wide Switch the display mode. Info Display the info window. Power Turn TV on -screen menu. Guide Display the info window. Ok Select the highlighted menu option. Menu Display the on . V Button Open the VIA dock. A/V Controls Control.... Mute Turn the audio off . Last Return to manually enter a digital sub-channel. (For example, 18-4 or 18-5.) Remote Control 11 2 Remote Control (Models M320SL, M370SL) Input Change the currently-displayed input. Channel Up/Down Change the channel.

M320SL User Manua
Page 19
App launcher Quickly launch the pictured app. Power Turn TV on or off or on. Info Display the info window. Exit Close the on -screen menu. Volume Up/Down Increase or decrease loudness of the ...
App launcher Quickly launch the pictured app. Power Turn TV on or off or on. Info Display the info window. Exit Close the on -screen menu. Volume Up/Down Increase or decrease loudness of the ...
M320SL User Manua
Page 22
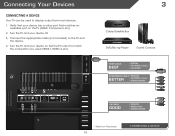
Connecting Your Devices Connecting A Device Your TV can be used (HDMI-1, HDM1-2, etc). 3 Cable/Satellite Box DVD/Blu-ray Player Game Console HDMI CABLE BEST • DIGITAL • HD VIDEO (1080p)* • ... • VIDEO (480i)* • STEREO AUDIO * Maximum Resolution 15 CONNECTING A DEVICE Connect the appropriate cable (not included) to display output from most devices. 1. Turn the TV and your device has a video port that matches an available port on . Set the...
Connecting Your Devices Connecting A Device Your TV can be used (HDMI-1, HDM1-2, etc). 3 Cable/Satellite Box DVD/Blu-ray Player Game Console HDMI CABLE BEST • DIGITAL • HD VIDEO (1080p)* • ... • VIDEO (480i)* • STEREO AUDIO * Maximum Resolution 15 CONNECTING A DEVICE Connect the appropriate cable (not included) to display output from most devices. 1. Turn the TV and your device has a video port that matches an available port on . Set the...

M320SL User Manua
Page 23
To use your PC and the PC Audio In port on the back of the TV. Specifications. 3 Personal Computer 3.5mm Cable (For Audio) RGB Cable (For Video) CONNECTING A PC 16 This cable transmits video. 2. This cable transmits audio. 3. See Appendix B - Connect a 3.5mm cable (not included) to your TV. Connecting A PC Your TV can be used to match the resolution of your PC and the RGB port on the back of the TV. Connect an RGB cable (not included) to your TV as a PC display: 1. Set your PC's resolution to display output from a personal computer.
To use your PC and the PC Audio In port on the back of the TV. Specifications. 3 Personal Computer 3.5mm Cable (For Audio) RGB Cable (For Video) CONNECTING A PC 16 This cable transmits video. 2. This cable transmits audio. 3. See Appendix B - Connect a 3.5mm cable (not included) to your TV. Connecting A PC Your TV can be used to match the resolution of your PC and the RGB port on the back of the TV. Connect an RGB cable (not included) to your TV as a PC display: 1. Set your PC's resolution to display output from a personal computer.
M320SL User Manua
Page 24
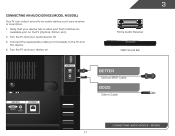
Turn the TV and your device on the TV (Optical, 3.5mm, etc). 2. Turn the TV and your device has a video port that matches an available port on . 3 Home Audio Receiver VIZIO Sound Bar BETTER Optical/SPDIF Cable GOOD 3.5mm Cable CONNECTING AUDIO DEVICE - M320SL 17 Connect the appropriate cable (not included) to an audio device, such as a receiver or sound bar. 1. Verify that your audio device off. 3. Connecting an audio device (Model M320SL) Your TV can output sound to the TV and the device. 4.
Turn the TV and your device on the TV (Optical, 3.5mm, etc). 2. Turn the TV and your device has a video port that matches an available port on . 3 Home Audio Receiver VIZIO Sound Bar BETTER Optical/SPDIF Cable GOOD 3.5mm Cable CONNECTING AUDIO DEVICE - M320SL 17 Connect the appropriate cable (not included) to an audio device, such as a receiver or sound bar. 1. Verify that your audio device off. 3. Connecting an audio device (Model M320SL) Your TV can output sound to the TV and the device. 4.

M320SL User Manua
Page 25
Connect the appropriate cable (not included) to an audio device, such as a receiver or sound bar. 1. Home Audio Receiver VIZIO Sound Bar BETTER Optical/SPDIF Cable GOOD 3.5mm Cable CONNECTING AUDIO DEVICE 18 Turn the TV and your device has a video port that matches an available port on . Verify that your device on the TV (Optical, 3.5mm, etc). 2. Turn the TV and your audio device off. 3. 3 Connecting an audio device (Model M370SL, M420SL, M470SL, M550SL) Your TV can output sound to the TV and the device. 4.
Connect the appropriate cable (not included) to an audio device, such as a receiver or sound bar. 1. Home Audio Receiver VIZIO Sound Bar BETTER Optical/SPDIF Cable GOOD 3.5mm Cable CONNECTING AUDIO DEVICE 18 Turn the TV and your device has a video port that matches an available port on . Verify that your device on the TV (Optical, 3.5mm, etc). 2. Turn the TV and your audio device off. 3. 3 Connecting an audio device (Model M370SL, M420SL, M470SL, M550SL) Your TV can output sound to the TV and the device. 4.

M320SL User Manua
Page 26
... Setup to a Wired Network (Best) 1. Connect an ethernet cable to your network on the back of the TV. Connecting to your router and to the ethernet port on page 19. Connecting to configure the TV. See Ethernet Cable Router / Modem CONNECTING TO A WIRED NETWORK 19 See below. 2. Ensure you have a router or... broadcasting as high-speed wireless signal (802.11n recommended). 2. Use the Guided Network Setup to a Wireless Network 1. It can be connected to your network Your TV is internet-ready. 3 Connecting to your home network with a Wired or Wireless connection.
... Setup to a Wired Network (Best) 1. Connect an ethernet cable to your network on the back of the TV. Connecting to your router and to the ethernet port on page 19. Connecting to configure the TV. See Ethernet Cable Router / Modem CONNECTING TO A WIRED NETWORK 19 See below. 2. Ensure you have a router or... broadcasting as high-speed wireless signal (802.11n recommended). 2. Use the Guided Network Setup to a Wireless Network 1. It can be connected to your network Your TV is internet-ready. 3 Connecting to your home network with a Wired or Wireless connection.


