
Download
Page 1
... of these applications. Re-buffering is . These activities can connect your network and get the best video streaming experience available. Your VIZIO smart device may be unknowingly sharing your signal with other video streaming. using a wired network connection for more information. Network Setup... you are two ways that your network is unsecured, you may need to: 1. What should I find out? Video Streaming FAQs Your smart VIZIO devices allow you to stream TV, movies, and games over the Internet.The information in this FAQ, see the glossary on the streaming app.
... of these applications. Re-buffering is . These activities can connect your network and get the best video streaming experience available. Your VIZIO smart device may be unknowingly sharing your signal with other video streaming. using a wired network connection for more information. Network Setup... you are two ways that your network is unsecured, you may need to: 1. What should I find out? Video Streaming FAQs Your smart VIZIO devices allow you to stream TV, movies, and games over the Internet.The information in this FAQ, see the glossary on the streaming app.
Download
Page 3
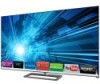
... the apparatus. • Only use this apparatus near any ventilation openings. To purchase an extended warranty service plan, visit www.VIZIO.com. Welcome Thank You for Choosing VIZIO And congratulations on your TV. • Read these instructions. • Keep these instructions. • Heed all warnings. • Follow all instructions. • Do not...
... the apparatus. • Only use this apparatus near any ventilation openings. To purchase an extended warranty service plan, visit www.VIZIO.com. Welcome Thank You for Choosing VIZIO And congratulations on your TV. • Read these instructions. • Keep these instructions. • Heed all warnings. • Follow all instructions. • Do not...
Download
Page 4
...stand, tripod, bracket, or table specified by the manufacturer, or sold with arrowhead symbol within an equilateral triangle is required, contact your TV close to constitute a risk of the display. Servicing is required when the apparatus has been damaged in any object into the apparatus, the...cart is provided. • Never push any way, such as a radiator, heater, oven, amplifier etc. To ensure reliable operation of your TV in fire or electric shock. • The wall socket should be replaced when using different voltage than the specified voltage may be sure these ...
...stand, tripod, bracket, or table specified by the manufacturer, or sold with arrowhead symbol within an equilateral triangle is required, contact your TV close to constitute a risk of the display. Servicing is required when the apparatus has been damaged in any object into the apparatus, the...cart is provided. • Never push any way, such as a radiator, heater, oven, amplifier etc. To ensure reliable operation of your TV in fire or electric shock. • The wall socket should be replaced when using different voltage than the specified voltage may be sure these ...
Download
Page 5
... may result in accordance with liquids, such as vases, shall be used as sunshine, fire or the like. • If any of your TV is dropped and the housing is intended to alert the user to do not perform any way. - If any abnormality occurs. Do not try ...substantially. • This apparatus shall not be of sufficient magnitude to repair your dealer for repair. Unplug the power cord immediately and contact your TV yourself. • Avoid using dropped or damaged appliances. Continued use of electrical shock to excessive heat such as the disconnect device, the disconnect ...
... may result in accordance with liquids, such as vases, shall be used as sunshine, fire or the like. • If any of your TV is dropped and the housing is intended to alert the user to do not perform any way. - If any abnormality occurs. Do not try ...substantially. • This apparatus shall not be of sufficient magnitude to repair your dealer for repair. Unplug the power cord immediately and contact your TV yourself. • Avoid using dropped or damaged appliances. Continued use of electrical shock to excessive heat such as the disconnect device, the disconnect ...

Download
Page 6
... where it is left unattended or unused for long periods of the lead-in the building installation. Lightning Protection For added protection of the TV during a lightning storm or when it could fall into such power lines or circuits. Ground Clamp Antenna Lead In Wire Electric Service Equipment ...Power Service Grounding Electrode System (NEC ART 250, part H) Remember, the screen of the coaxial cable is intended to be connected to the TV, make sure that the antenna or cable system is electrically grounded to earth in wire to an antenna discharge unit, size of the grounding ...
... where it is left unattended or unused for long periods of the lead-in the building installation. Lightning Protection For added protection of the TV during a lightning storm or when it could fall into such power lines or circuits. Ground Clamp Antenna Lead In Wire Electric Service Equipment ...Power Service Grounding Electrode System (NEC ART 250, part H) Remember, the screen of the coaxial cable is intended to be connected to the TV, make sure that the antenna or cable system is electrically grounded to earth in wire to an antenna discharge unit, size of the grounding ...
Download
Page 7
... Closed Captioning 32 Changing the Appearance of Digital Closed Captions.. 32 Changing the TV Settings 33 Displaying System Information 33 Changing the Names of Contents Installing the TV 3 Inspecting the Package Contents 3 Installing the TV 3 Installing the TV Stand 3 Installing the TV on a Wall 5 Controls and Connections 6 Back Panel 6 Side Panel 7 Front Panel 8 Remote Control...
... Closed Captioning 32 Changing the Appearance of Digital Closed Captions.. 32 Changing the TV Settings 33 Displaying System Information 33 Changing the Names of Contents Installing the TV 3 Inspecting the Package Contents 3 Installing the TV 3 Installing the TV Stand 3 Installing the TV on a Wall 5 Controls and Connections 6 Back Panel 6 Side Panel 7 Front Panel 8 Remote Control...
Download
Page 8
...Zone 37 Adjusting the CEC Settings 37 Turning the Power Indicator On or Off 38 Using the Reset & Admin Menu 38 Resetting the TV Settings 39 Restoring the TV to Factory Default Settings 39 Performing a Service Check 39 Using the Guided Setup Menu 40 Using Guided Setup 40 Using the Info ...Window 41 Using the USB Media Player 42 Using the USB Media Player 42 Connecting a USB Thumb Drive to the TV 42 Playing USB Media 42 Using VIZIO Internet Apps 46 Using the VIA Dock 46 Using the Hot Keys 46 Troubleshooting & Technical Support 47 Specifications 50 Limited Warranty 52...
...Zone 37 Adjusting the CEC Settings 37 Turning the Power Indicator On or Off 38 Using the Reset & Admin Menu 38 Resetting the TV Settings 39 Restoring the TV to Factory Default Settings 39 Performing a Service Check 39 Using the Guided Setup Menu 40 Using Guided Setup 40 Using the Info ...Window 41 Using the USB Media Player 42 Using the USB Media Player 42 Connecting a USB Thumb Drive to the TV 42 Playing USB Media 42 Using VIZIO Internet Apps 46 Using the VIA Dock 46 Using the Hot Keys 46 Troubleshooting & Technical Support 47 Specifications 50 Limited Warranty 52...
Download
Page 9
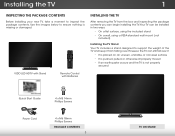
... VOL GUIDE CH 3D 1 2 3 4 5 6 7 8 9 ENTER 0 Installing the TV After removing the TV from falling over if: • It is placed on Stand Use the images below to ensure nothing is not properly secured VIZIO LED HDTV with Stand Remote Control with Batteries Quick Start Guide 4 x M5 14mm... Phillips Screws Power Cord 4 x M6 18mm Phillips Screws Package Contents 3 TV on an uneven, unstable, or non-level surface • It...
... VOL GUIDE CH 3D 1 2 3 4 5 6 7 8 9 ENTER 0 Installing the TV After removing the TV from falling over if: • It is placed on Stand Use the images below to ensure nothing is not properly secured VIZIO LED HDTV with Stand Remote Control with Batteries Quick Start Guide 4 x M5 14mm... Phillips Screws Power Cord 4 x M6 18mm Phillips Screws Package Contents 3 TV on an uneven, unstable, or non-level surface • It...

Download
Page 10
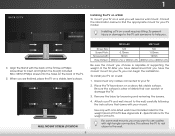
Use a Phillips screwdriver to the screen, place the TV on a soft surface such as a blanket. 2. To prevent scratches or damage to insert and tighten the four(4) included M5 x 14mm Phillips screws into the holes on a clean, flat surface. It is recommended that two people take part in the base installation. 1 To install the base: 1. Place the TV screen-down on the bottom of the Base. 4 Align the Neck piece with the Base. 3. Remove any plastic wrapping from the TV and the stand.
Use a Phillips screwdriver to the screen, place the TV on a soft surface such as a blanket. 2. To prevent scratches or damage to insert and tighten the four(4) included M5 x 14mm Phillips screws into the holes on a clean, flat surface. It is recommended that two people take part in the base installation. 1 To install the base: 1. Place the TV screen-down on the bottom of the Base. 4 Align the Neck piece with the Base. 3. Remove any plastic wrapping from the TV and the stand.
Download
Page 11
...a wall mount. To prevent injury or damage to the TV, ask someone to the wall. 5 Use a Phillips screwdriver to use cables with your TV, you choose is clear of debris that came with right-angle connectors. M321i-A2 M471i-A2 Screw Size: M4 M6 Screw Pitch: 0.70mm 1.00mm ...Screw Length: 12mm 12mm Hole Pattern: 100mm (V) x 100mm (H) 400mm (V) x 400mm (H) Be sure the mount you can scratch or damage the TV. 3. Disconnect any cables connected to find...
...a wall mount. To prevent injury or damage to the TV, ask someone to the wall. 5 Use a Phillips screwdriver to use cables with your TV, you choose is clear of debris that came with right-angle connectors. M321i-A2 M471i-A2 Screw Size: M4 M6 Screw Pitch: 0.70mm 1.00mm ...Screw Length: 12mm 12mm Hole Pattern: 100mm (V) x 100mm (H) 400mm (V) x 400mm (H) Be sure the mount you can scratch or damage the TV. 3. Disconnect any cables connected to find...
Download
Page 13
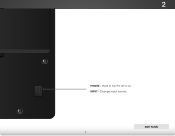
2 Side Panel POWER - INPUT - Hold to turn TV off or on. Side Panel 7 Change input source.
2 Side Panel POWER - INPUT - Hold to turn TV off or on. Side Panel 7 Change input source.
Download
Page 15
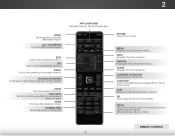
... app. Mute Turn the audio off . INPUT LIST EXIT MENU INFO BACK VOL GUIDE CH 3D 1 2 3 4 5 6 7 8 9 ENTER 0 2 Power Turn TV on or off or on -screen menu. Hot Keys Perform functions within an on -screen menu. Number Pad Manually enter a channel. Menu Display the on...Info Display the info window. Volume Up/Down Increase or decrease loudness of the audio. Guide Display the info window. V Button Open the VIZIO Internet Apps Plus™ (V.I.A. Ok Select the highlighted option. App launcher Quickly launch the pictured app. Remote Control Input Change the currently ...
... app. Mute Turn the audio off . INPUT LIST EXIT MENU INFO BACK VOL GUIDE CH 3D 1 2 3 4 5 6 7 8 9 ENTER 0 2 Power Turn TV on or off or on -screen menu. Hot Keys Perform functions within an on -screen menu. Number Pad Manually enter a channel. Menu Display the on...Info Display the info window. Volume Up/Down Increase or decrease loudness of the audio. Guide Display the info window. V Button Open the VIZIO Internet Apps Plus™ (V.I.A. Ok Select the highlighted option. App launcher Quickly launch the pictured app. Remote Control Input Change the currently ...
Download
Page 17
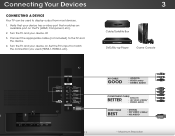
...; ANALOG • HD VIDEO (1080i)* • STEREO AUDIO HDMI CABLE BEST • DIGITAL • HD VIDEO (1080p)* • HD AUDIO 11 * Maximum Resolution Turn the TV and your device on the TV (HDMI, Component, etc). 2. Verify that your device has a video port that matches an available port on . Turn the...
...; ANALOG • HD VIDEO (1080i)* • STEREO AUDIO HDMI CABLE BEST • DIGITAL • HD VIDEO (1080p)* • HD AUDIO 11 * Maximum Resolution Turn the TV and your device on the TV (HDMI, Component, etc). 2. Verify that your device has a video port that matches an available port on . Turn the...
Download
Page 18
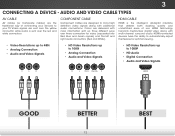
... themselves for optimal viewing. • Video Resolutions up to 480i • Analog Connection • Audio and Video Signals • HD Video Resolutions up to your TV.
... themselves for optimal viewing. • Video Resolutions up to 480i • Analog Connection • Audio and Video Signals • HD Video Resolutions up to your TV.
Download
Page 19
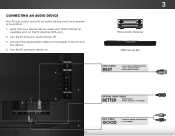
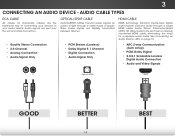
Turn the TV and your device has an audio port that matches an available port on . 3 Home Audio Receiver VIZIO Sound Bar HDMI CABLE BEST • ARC 2-WAY COMMUNICATION • 2.0-5.1 DIGITAL AUDIO • PCM, DOLBY DIGITAL OPTICAL/SPDIF CABLE BETTER... • PCM STREAM • DOLBY DIGITAL 5.1 CHANNEL RCA CABLE GOOD • ANALOG STEREO CONNECTION • 2.0 CHANNEL 13 Turn the TV and your device on the TV (Optical...
Turn the TV and your device has an audio port that matches an available port on . 3 Home Audio Receiver VIZIO Sound Bar HDMI CABLE BEST • ARC 2-WAY COMMUNICATION • 2.0-5.1 DIGITAL AUDIO • PCM, DOLBY DIGITAL OPTICAL/SPDIF CABLE BETTER... • PCM STREAM • DOLBY DIGITAL 5.1 CHANNEL RCA CABLE GOOD • ANALOG STEREO CONNECTION • 2.0 CHANNEL 13 Turn the TV and your device on the TV (Optical...
Download
Page 20
... multi-channel surround audio through a cable made of connecting your devices to be sent over the red and white connectors. Audio Return Channel-enabled (ARC) TVs allow audio to your audio device. ARC on page 15. COMPONENT VIDEO • Quality Stereo Connection • 2.0 Channel • Analog Connection • Audio Signal Only...
... multi-channel surround audio through a cable made of connecting your devices to be sent over the red and white connectors. Audio Return Channel-enabled (ARC) TVs allow audio to your audio device. ARC on page 15. COMPONENT VIDEO • Quality Stereo Connection • 2.0 Channel • Analog Connection • Audio Signal Only...

Download
Page 21
The HDMI cable will transmit audio signal from your TV with an all-digital audio/video connection. RCA (Audio) Your TV HDMI Your TV HDMI VIZIO Internet Apps With an HDMI ARC setup, the audio connection between your home audio receiver through a separate audio connection. Your Home Audio Receiver HDMI Your ... Blu-Ray Player 15 Your Blu-Ray Player 3 Connecting an Audio Device - ARC Without HDMI ARC With HDMI ARC Built-in Tuner Built-in Tuner VIZIO Internet Apps Without an HDMI ARC setup, your TV will transmit audio signal to and from the built-in tuner and VIA apps to your...
The HDMI cable will transmit audio signal from your TV with an all-digital audio/video connection. RCA (Audio) Your TV HDMI Your TV HDMI VIZIO Internet Apps With an HDMI ARC setup, the audio connection between your home audio receiver through a separate audio connection. Your Home Audio Receiver HDMI Your ... Blu-Ray Player 15 Your Blu-Ray Player 3 Connecting an Audio Device - ARC Without HDMI ARC With HDMI ARC Built-in Tuner Built-in Tuner VIZIO Internet Apps Without an HDMI ARC setup, your TV will transmit audio signal to and from the built-in tuner and VIA apps to your...
Download
Page 22
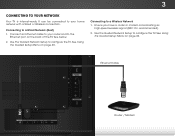
... the Guided Network Setup to your Network Your TV is internet-ready. See below. 2. Connecting to configure the TV. See Using the Guided Setup Menu on page 40. Ethernet Cable Router / Modem 16 See Using the Guided Setup Menu on page 40. Use the ...Guided Network Setup to a Wireless Network 1. Connecting to the Ethernet port on the back of the TV. Connect an Ethernet cable to your home network with a Wired or Wireless connection. It can be connected to your router and to a Wired Network (Best...
... the Guided Network Setup to your Network Your TV is internet-ready. See below. 2. Connecting to configure the TV. See Using the Guided Setup Menu on page 40. Ethernet Cable Router / Modem 16 See Using the Guided Setup Menu on page 40. Use the ...Guided Network Setup to a Wireless Network 1. Connecting to the Ethernet port on the back of the TV. Connect an Ethernet cable to your home network with a Wired or Wireless connection. It can be connected to your router and to a Wired Network (Best...

Download
Page 23
... network key ready. • If you are finished, highlight Next and press OK. 5. Completing the First-Time Setup 4 The first time you turn on the TV, the Setup App will guide you through each of the steps necessary to read and accept the Terms of Service and Privacy Policy for use... an Ethernet cable, connect it to highlight Home Mode Setup and press OK. To complete the first-time setup: 1. When you are connecting to your TV ready for Yahoo! Enter your wireless network from the list of available networks and press OK. 2. Use the Left/Right Arrow buttons on the remote...
... network key ready. • If you are finished, highlight Next and press OK. 5. Completing the First-Time Setup 4 The first time you turn on the TV, the Setup App will guide you through each of the steps necessary to read and accept the Terms of Service and Privacy Policy for use... an Ethernet cable, connect it to highlight Home Mode Setup and press OK. To complete the first-time setup: 1. When you are connecting to your TV ready for Yahoo! Enter your wireless network from the list of available networks and press OK. 2. Use the Left/Right Arrow buttons on the remote...
Download
Page 24
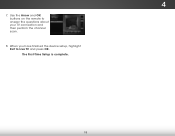
The First-Time Setup is complete. 18 4 7. Use the Arrow and OK buttons on the remote to Live TV and press OK. When you have finished the device setup, highlight Exit to answer the questions about your TV connection and then perform the channel scan. 8.
The First-Time Setup is complete. 18 4 7. Use the Arrow and OK buttons on the remote to Live TV and press OK. When you have finished the device setup, highlight Exit to answer the questions about your TV connection and then perform the channel scan. 8.


